
Battle of Villers-Bocage facts for kids
The Battle of Villers-Bocage was a fight during World War II on June 13, 1944. It happened about a week after the Normandy Landings, which was when the Allied forces started taking back German-controlled France. The battle began when British forces tried to use a gap in the German defenses west of Caen, a key city. After one day of fighting in and around the small town of Villers-Bocage, and a second day defending a spot outside the town, the British soldiers pulled back.
Quick facts for kids Battle of Villers-Bocage |
|||||||
|---|---|---|---|---|---|---|---|
| Part of Operation Perch | |||||||
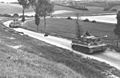
 A Cromwell observation post tank on Villers-Bocage's main street commanded by Captain Paddy Victory, 5th Royal Horse Artillery; one of more than twelve vehicles attacked by Michael Wittmann. |
|||||||
|
|||||||
| Belligerents | |||||||
| Commanders and leaders | |||||||
| George Erskine William Hinde |
Fritz Bayerlein Heinz von Westernhagen |
||||||
| Strength | |||||||
| One Brigade group c. 60 tanks |
2 ad-hoc battle groups part of a heavy tank battalion 31–41 tanks |
||||||
| Casualties and losses | |||||||
| ~217 casualties 23–27 tanks |
8–15 tanks written off, others damaged | ||||||
| Several civilians | |||||||
Both the Allies and the Germans thought controlling Caen was very important for the Normandy battle. After the D-Day landings on June 6, the Germans quickly set up strong defenses near the city. On June 9, a British plan to surround Caen failed.
On the right side of the British Second Army, the US 1st Infantry Division had pushed back a German division. This created a gap in the German front line. The British saw a chance to go around the strong German Panzer-Lehr Division. A mixed group of tanks, infantry, and artillery, led by the 22nd Armoured Brigade, moved through this gap. They tried a flanking manoeuvre (attacking from the side) towards Villers-Bocage. British leaders hoped that a strong force appearing behind the Panzer-Lehr Division would make them retreat or get trapped.
Under Brigadier William Hinde, the 22nd Armoured Brigade group reached Villers-Bocage easily on the morning of June 13. The first British units moved east from the town towards a spot called Point 213. There, they were suddenly attacked by Tiger I tanks from the 101st SS Heavy Panzer Battalion. In less than 15 minutes, many tanks, anti-tank guns, and transport vehicles were destroyed. Many of these were taken out by SS officer Michael Wittmann.
The Germans then attacked the town but were pushed back. They lost several Tiger and Panzer IV tanks. After six hours, Hinde ordered his troops to pull back to a better defensive spot west of Villers-Bocage. The next day, the Germans attacked the British "brigade box," a defensive position. The British fought back hard, causing many losses for the Germans. After this, the British left the area. The Battle for Caen continued east of Villers-Bocage. The ruined town was finally captured on August 4, after two bombing raids by the Royal Air Force.
The way the British handled the Battle of Villers-Bocage has been debated. Their retreat marked the end of the quick advances after D-Day. It started a long, tough fight for Caen. Some historians say the British attack failed because some commanders weren't fully committed. Others believe the British force wasn't big enough for the job. Wittmann's "single-handed" attack early in the battle has also been talked about a lot. Some historians think his role has been exaggerated, even though it was "remarkable."
Contents
Background to the Battle
D-Day and Early Fighting

On D-Day, June 6, 1944, the British 3rd Infantry Division landed on Sword Beach. Their main goal was to capture Caen, about 9 miles inland. Caen was important because it had airfields and open, dry land, good for fast attacks. The British had more tanks and mobile units. The plan to capture Caen on D-Day was ambitious. Traffic jams on the beaches slowed down the British 27th Armoured Brigade. The 3rd Infantry Division's advance slowed as they fought German defenses. They were stopped just outside Caen by parts of the 21st Panzer Division.
The next day, the British started Operation Perch. This was a plan to advance southeast of Caen. The British I Corps kept attacking Caen. But the Germans brought in more soldiers, making it impossible to quickly capture the city. On June 9, General Bernard Montgomery, the Allied ground forces commander, changed Operation Perch. He planned a bigger attack with a pincer movement (attacking from two sides) to surround Caen.
After delays, attacks began west and east of Caen on June 12. East of the Orne River, British attacks were stopped by the 21st Panzer Division. This attack was called off on June 13. West of Caen, the British XXX Corps could not advance south of Tilly-sur-Seulles. They were blocked by the Panzer-Lehr Division, one of Germany's strongest tank units.
The Caumont Gap

The plan to surround Caen was stopped by the Germans on the right side of the British XXX Corps. Five German battle groups, including the last reserves of the LXXXIV Corps, were destroyed. This left only parts of the 352nd Infantry Division defending the area. American attacks caused this division's left side to collapse. On the night of June 9/10, the division retreated, leaving a 7.5-mile gap. Only a small German reconnaissance unit was left in this area. The Germans planned to fill the gap with the 2nd Panzer Division. But most of this division was still far away and not expected until June 13.
The British Second Army commander, Lieutenant-General Miles Dempsey, saw an opportunity. He ordered the 7th Armoured Division to leave Tilly-sur-Seulles. They were to move through the gap, capture Villers-Bocage, and threaten the Panzer-Lehr Division's exposed left side. The British wanted to capture a ridge about 1.6 miles east of Villers-Bocage. Dempsey hoped this would force the Panzer-Lehr Division to retreat or risk being surrounded.
The 7th Armoured Division spent the morning of June 12 attacking Tilly-sur-Seulles. Around noon, they were ordered to move through the gap. The 8th King's Royal Irish Hussars, the division's reconnaissance unit, scouted a path. The main group left at 4:00 PM. They advanced 12 miles without meeting resistance, even though the last 6 miles were in German territory. The leading British tank was destroyed by a German anti-tank gun. The British stopped for the night near Livry. The 11th Hussars found no resistance on their right side. But on the left, the 8th Hussars found parts of the Panzer-Lehr Division less than 2 miles away. Two leading tanks were knocked out, and several soldiers were killed.
The British Plan
The British knew they had to quickly take the ridge to control Villers-Bocage. The 4th County of London Yeomanry (4th CLY), with a company of the 1st Battalion Rifle Brigade, was to go through Villers-Bocage. They would then take the highest point of the ridge at Point 213. The 1/7th Queen's Royal Regiment would follow and occupy the town. The 5th Royal Tank Regiment (5th RTR) and another company of the Rifle Brigade would take high ground southwest of Villers-Bocage.
Anti-tank guns would cover the gap between the 4th CLY and the 5th RTR. Artillery units would follow the rest of the brigade group. Two Hussar regiments would protect the sides against the Panzer-Lehr Division. They would also find German positions. Another infantry brigade would hold Livry as a strong base.
.jpg)
The German I SS-Panzer Corps commander, Sepp Dietrich, ordered his only reserve, the 101st SS Heavy Panzer Battalion, to move to the Villers-Bocage area. This was to stop any British advance into the Caumont Gap. The 101st SS Heavy Panzer Battalion had arrived on June 12. It had 45 Tiger I tanks, but only about 17 were working after an air attack. The 1st Company moved northeast of Villers-Bocage. The 2nd Company moved south of Point 213. The 3rd Company stayed near Falaise with only one working tank. The 2nd Company had twelve tanks, but only six Tigers were ready on June 13 due to losses and mechanical problems. The area around Villers-Bocage was heavily shelled by naval artillery during the night.
The Battle Begins
The Advance into Villers-Bocage

Early on June 13, the 1st Rifle Brigade scouted the first half-mile of the route. Livry was clear of Germans. The British advance started at 5:30 AM with the 4th CLY in the lead. French civilians cheered them on, making the soldiers feel relaxed. There were rumors that German tanks were stuck nearby, but these were wrong. A few German soldiers were still in Villers-Bocage.
As the British column neared Villers-Bocage, a German armored car spotted them and escaped. At 8:30 AM, the 22nd Armoured Brigade group entered the town. Residents celebrated, and two German soldiers were seen leaving quickly in a car. The British Hussar regiments met German forces on both sides of their route. They reported German tanks heading towards Villers-Bocage.
Morning Attack by Wittmann
With Villers-Bocage taken, A Squadron 4th CLY drove ahead to Point 213 without scouting first, as ordered. They destroyed a German car and set up their tanks in defensive positions. Along the road between the town and the ridge, the Rifle Brigade's troop carriers pulled over. The soldiers got out and set up guards, but they could only see a short distance.
Major Wright, the commander of the 1st Rifle Brigade, called a meeting at Point 213. All officers and senior non-commissioned officers of A Company attended. They realized that one shell could kill all the commanders. So, the soldiers in the half-tracks quickly spread out among other vehicles. In Villers-Bocage, Lieutenant-Colonel Arthur, Viscount Cranley, commander of the 4th CLY, worried his men were "out on a limb." But Hinde assured him everything was fine and told him to go to Point 213 to check the defenses. Hinde then left Villers-Bocage for his headquarters.
South of Point 213, Wittmann, commander of the 2nd Company, 101st SS Heavy Panzer Battalion, was surprised by the British advance. He said he had to act fast because the enemy might have already seen him. He set off with one tank and told the others to hold their ground.
Wittmann's Tiger tank was spotted around 9:00 AM by Sergeant O'Connor of the Rifle Brigade. O'Connor was in a half-track going to Point 213. He broke radio silence to give the only warning the British received. The Tiger came out onto the main road and destroyed a Cromwell tank, the last one at Point 213. Then, a Sherman Firefly tank was knocked out, caught fire, and blocked the road. The British at Point 213 were then attacked by the rest of the 2nd Company and lost three more tanks.

Wittmann continued towards Villers-Bocage. Along the road, Rifle Brigade troops tried to fight back with anti-tank weapons and a 6-pounder anti-tank gun. But as the Tiger got closer, panic spread, and the soldiers looked for cover. The British vehicles were set on fire by machine guns and explosive shells, but few soldiers were hurt. At the east end of Villers-Bocage, Wittmann attacked and destroyed three light tanks of the 4th CLY.
In the town, the 4th CLY Regimental Headquarters tanks tried to escape. But they were very slow in reverse. One tank fired two shots before being destroyed by the Tiger. Two tanks backed off the road into gardens. The 4th CLY Adjutant, Captain Pat Dyas, hid behind a barn. The Tiger drove past a wrecked tank towards the town center, destroying another tank but missing Dyas. Lieutenant Charles Pearce warned the rest of the reconnaissance troop in the town center and continued west to alert another British unit. Wittmann destroyed another Cromwell tank. On the main street, he destroyed two artillery observation post tanks, an intelligence officer's car, and a medical officer's half-track.

Wittmann was then engaged by a Sherman Firefly. He withdrew after collapsing a house that had a German sniper. Wittmann's retreat brought him close to Dyas, who had been trying to attack the Tiger's weaker rear armor. The Cromwell's shells had no effect, and Wittmann destroyed the British tank. Dyas escaped and was shot at by German infantry. Wittmann drove east to the edge of Villers-Bocage. His tank was then disabled by a 6-pounder anti-tank gun at a road junction. Wittmann later wrote that his tank was disabled in the town center. In less than 15 minutes, 13–14 tanks, two anti-tank guns, and 13–15 transport vehicles were destroyed by the 2nd Company, many by Wittmann. Wittmann and his crew then went to the Panzer-Lehr Division headquarters.
Fighting at Point 213
Later that morning, a German officer from the Panzer-Lehr Division scouted Point 213. He found a line of empty Cromwell tanks. The tank crews were looking at a map with an officer. The German officer drove one tank away before the British could react. At the east end of Villers-Bocage, he saw "burning tanks and carriers and dead Tommies." He drove back to his headquarters.
After the ambush at Point 213, A Squadron, 4th CLY, had nine working tanks. They decided to hold their position on the ridge until help arrived and set up an all round defence (defending from all sides). Around 10:00 AM, German support troops arrived and started taking prisoners between the ridge and the town. Some British soldiers escaped, and about 30 made it back to British lines.
The 1/7th Queen's took defensive positions in Villers-Bocage. They captured three German soldiers from the 2nd Panzer Division. A rescue force was planned for the troops on the ridge, but this plan was rejected. Around 10:30 AM, the British commander at Point 213 reported that their position was becoming impossible to hold, and they couldn't retreat. A breakout attempt was planned. Two hours later, a Cromwell tank crew tried to get back to Villers-Bocage but was knocked out by German tank fire. The Germans shelled the trees along the road. After five minutes, the British troops on the ridge surrendered. The British tried to burn their tanks, but German soldiers arrived quickly and took 30 prisoners. A few men escaped.

Wittmann briefed the Panzer-Lehr Division intelligence officer. He was given a car to return to Point 213. A German commander ordered 15 Panzer IV tanks to block the northern exits of the town. As these tanks moved towards Villers-Bocage, they ran into British anti-tank guns and lost a tank. Four Panzer IVs entered the town from the south. The first two were knocked out, and the others pulled back.
In Villers-Bocage, A Company of the 1/7th Queen's secured the railway station area. B and C companies occupied the east side of the town. German infantry entered the town, and house-to-house fighting began. Two German tanks were damaged and driven off. But the British infantry companies got mixed up and were ordered to fall back and reorganize. An ambush was set up in the town square by the 4th CLY. A Sherman Firefly, several Cromwells, a 6-pounder anti-tank gun, and infantry waited for German tanks to come down the main street. West of the town, the Germans attacked another British unit and lost a tank.
Afternoon Attacks

Around 1:00 PM, tanks from the Panzer-Lehr Division advanced into Villers-Bocage without infantry support. Four Panzer IVs tried to enter from the south, and two were knocked out by anti-tank fire. Some Tiger tanks were brought up and silenced the anti-tank position. The main German counter-attack went down the main highway through Villers-Bocage and through the southern part of town. The Tigers moved slowly to scare the British into retreating. But they ran into the British ambush. The Firefly tank opened fire on the lead German tank and missed, but the anti-tank gun knocked it out.
A group of three Tigers split up and drove through back streets to flank the British. One was destroyed by an anti-tank gun. The other two were attacked with anti-tank weapons. One was knocked out, and the other was stopped.

A fifth Tiger stopped on the main street, waiting for the British to come out of cover. The Firefly crew spotted it through the windows of a corner building. They backed up to shoot through the windows. The Tiger was hit and sped past the side street. A Cromwell tank moved onto the main street and fired into the Tiger's rear, destroying it. It then backed into cover. The Firefly knocked out a Panzer IV. During a quiet moment, the disabled tanks were set on fire. Outside the town, the 7th Armoured Division brigade group was attacked from the north and south. These attacks were pushed back.
Under heavy shelling, the Germans attacked A Company 1/7th Queen's in the town. A platoon (small group of soldiers) was cut off and captured. Even with the whole Queen's battalion in town, German troops found their way inside. Two German grenadier battalions attacked from the south. They were engaged by British tanks and suffered many losses. Both sides called for artillery support. By 6:00 PM, the Queen's battalion headquarters was threatened. Hinde decided to pull back before dark made holding the town impossible. Behind a smoke screen and artillery fire, the infantry retreated, covered by tanks. The Germans attacked the retreating British for two and a half hours. This continued until around 10:30 PM.
June 14: The Brigade Box

On June 14, the 22nd Armoured Brigade group formed an all round defence position, called a "brigade box." This was in the Amayé-sur-Seulles–Tracy-Bocage–St-Germain area, overlooking Villers-Bocage. The Panzer-Lehr Division, supported by the 101st SS Heavy Panzer Battalion, attacked this box. The US 1st Infantry Division, from nearby heights, used artillery fire to help defeat the first German attack. Later attacks got so close that artillery couldn't fire without hitting British positions. A British platoon was overrun, but a counter-attack with tanks and infantry pushed the Germans back.
The Germans continued to shell the box. Later in the day, they attacked from two sides with artillery and tanks. They broke into the box and got close to the brigade headquarters before being pushed back. Even though the British felt they could hold the box, another British division couldn't join them. This led to the decision to pull back the brigade group and straighten the front line.
Aftermath of the Battle
Casualties and Losses
It's hard to know the exact number of casualties because sources are different. The 22nd Armoured Brigade group lost about 217 men killed, wounded, or missing. Many of these were captured at Point 213. The British lost 23–27 tanks. More than half of these were at Point 213, where A Squadron 4th CLY lost all 15 of its tanks.
The German Panzer-Lehr Division and 2nd Panzer Division were fighting in other places on June 13. So, they didn't count their losses at Villers-Bocage separately. The 101st SS Heavy Panzer Battalion only fought at Villers-Bocage. They lost nine men killed and ten wounded in one company, and one killed and three wounded in another.
Sources also disagree on the number of German tanks lost. German tank losses are generally thought to be between 8 and 15, including six Tiger tanks. This was a serious loss for the Germans, as they only had 36 Tiger tanks in Normandy. Some British claims included tanks that were only stopped and later fixed. At least nine French civilians died on June 13. Six were killed by crossfire or shrapnel, and three by artillery fire. After the British left, the Germans reoccupied the town. Several shops, houses, and the town hall were set on fire.
Bombing and Liberation
On the night of June 14/15, to cover the British retreat, 337 Royal Air Force (RAF) bombers dropped 1,700 tons of explosives on the town of Évrecy and targets around Villers-Bocage. This destroyed one Tiger tank and damaged three others. No aircraft were lost. Just over two weeks later, on June 30, Villers-Bocage was bombed again by 266 bombers. They dropped 1,100 tons of bombs to support another operation. Only two aircraft were lost. The town was a key traffic hub for German forces. It was hoped German troops would be caught in the bombing, but only French civilians were there at the time. After being badly damaged by the fighting and bombings, the town was freed by British soldiers on August 4, 1944.
Changes in Command
In early August, about 100 men, including several senior officers, were removed from their positions. Historians mostly agree this happened because of the failure at Villers-Bocage. Some believe the battle's outcome was just an excuse. They think the changes were made to show that the army command was doing something about public opinion of the campaign.
Awards and Honors
In 1956 and 1957, the British system of battle honours recognized the Battle of Villers-Bocage. Eleven units received the honor Villers Bocage for their service from June 8–15. For his actions at Villers-Bocage, Michael Wittmann was promoted and received a special award for his bravery.
Images for kids
-
Wittmann's company on June 7, 1944, on their way to Morgny. Wittmann is standing in the turret of Tiger 205.
.jpg)
