
Capture of Hill 60 (Western Front) facts for kids
Quick facts for kids Capture of Hill 60 |
|||||||
|---|---|---|---|---|---|---|---|
| Part of the Western Front of the First World War | |||||||
 Hill 60 |
|||||||
|
|||||||
| Belligerents | |||||||
|
|||||||
| Commanders and leaders | |||||||
| Strength | |||||||
| 1 division | 1 regiment | ||||||
| Casualties and losses | |||||||
| c. 3,100 | |||||||
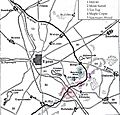
The Capture of Hill 60 was a series of battles that took place during the First World War. It happened near a small hill called Hill 60 in Belgium, close to the town of Ypres. This hill was very important because it offered a great view of the surrounding area.
German soldiers had captured Hill 60 in November 1914. Both the French and British armies wanted to take it back. The British 5th Division planned a big attack. They decided to dig tunnels under the hill and blow it up with explosives. This was a new and risky plan.
The British attacked on April 17, 1915, and quickly captured the hill. But holding onto it was very difficult. The Germans fought back hard, using gas attacks in early May. They managed to take the hill back on May 5. Hill 60 stayed in German hands until 1917, when it was finally recaptured during the Battle of Messines.
Why Was Hill 60 Important?
What is Hill 60?
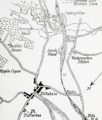
Hill 60 wasn't a natural hill. It was a large pile of earth, about 230 meters (750 feet) long and 45 meters (150 feet) high. This earth came from digging a railway cutting for the Ypres–Comines railway. It was called "Hill 60" because of its height above sea level.
The hill was located on a ridge, which is a raised strip of land. From the top of Hill 60, soldiers could see far across the flat countryside. This made it a perfect spot for observing enemy movements and directing artillery fire. Whoever controlled Hill 60 had a big advantage in the battles around Ypres.
Other Important Spots Nearby
Near Hill 60, there were other important mounds of earth. One was called the Caterpillar, a long mound on the ridge. Another was the Dump, a smaller mound closer to Zillebeke. These spots were also created from the railway digging. Controlling all these high points was crucial for both sides during the war.
The British Plan to Attack
Preparing the Mines

To capture Hill 60, the British decided to use a special tactic: mining. This meant digging tunnels under the German positions and filling them with explosives. It was the first time the British army used this method on such a large scale.
Skilled miners, many from Northumberland and Wales, were brought in. They dug deep tunnels, some over 90 meters (100 yards) long. By April 1915, they had placed six large mines under the hill. Some mines held as much as 900 kilograms (2,000 pounds) of explosives!
British planes flew over the area to take pictures. These photos helped them see where German guns and trenches were located. This information was used to plan the attack carefully.
The Battle Begins
The First Attack (April 17–18)
On April 17, 1915, at 7:05 p.m., the British set off the first two mines. Ten seconds later, the other mines exploded. Huge amounts of earth and debris were thrown high into the air. The explosions were so powerful they caused some casualties to the British soldiers waiting to attack.
The German soldiers on the hill were completely surprised. Many were killed instantly. The British soldiers quickly moved in, capturing the hill with very few losses themselves. They took about twenty German prisoners.
The Germans tried to counter-attack, but the British machine guns stopped them. The explosions had also opened up the ground, making it hard for the Germans to move without being seen. The British quickly dug new trenches to connect their new positions on the hill.
German artillery started firing heavily on the hill. Later that night, German infantry attacked from different directions. The British fought them off. The fighting continued all day on April 18. The Germans used powerful explosives and even gas shells. By the end of the day, the British were pushed back from some parts of the hill. However, a British counter-attack later that evening recaptured the hill.
Holding the Hill (April 19–22)
The fighting was intense. The Germans kept bombarding the hill with artillery. On April 20, they attacked again, mainly with small groups using grenades. The British machine guns held them back.
By April 21, the hill was completely destroyed, full of shell holes and mine craters. It looked like a "moonscape." The Germans dug new lines to launch their attacks from. On April 22, the British had to move some of their artillery north. This was because the Germans launched their first major gas attack of the Second Battle of Ypres against French troops further north.
German Counter-Attack with Gas
The Gas Attacks (May 1–7)

The Germans retook Hill 60 after a series of terrible gas attacks from May 1 to May 5. On May 1, the Germans released chlorine gas from cylinders very close to the British lines. The gas moved so fast that many British soldiers couldn't put on their gas masks in time.
As soon as the gas reached the British trenches, German soldiers attacked. They tried to get around the sides of the hill. Some British soldiers managed to fire back, which gave time for reinforcements to arrive. These brave soldiers had to rush through the gas cloud to help. The Germans were pushed back. However, the British soldiers who had been in the trenches during the gas attack suffered greatly. Many were injured or died.
On May 5, the Germans released gas again. This time, the wind blew the gas along the British trenches, making it impossible for soldiers to escape to the sides. The gas was so thick that even with improvised masks, soldiers couldn't stay in their positions. Many were overcome by the gas.
Fifteen minutes after the gas cloud, German infantry attacked. They captured almost all of the front line on the lower part of the hill. British reinforcements arrived and fought their way back into some trenches. The Germans released more gas later that morning.

The British soldiers on the right side of their defense were overwhelmed. However, enough soldiers on the left side held their ground. More British troops arrived and counter-attacked. They managed to regain some lost trenches.
The Germans still held the very top of the hill. They released more gas that evening, but it didn't have much effect. A German infantry attack that followed was stopped by British rifle fire. That night, the British launched another attack to retake the hill. But the darkness, the broken ground, and the alert German soldiers made it impossible to advance. The hill was too difficult to hold unless the British also captured the nearby Caterpillar and other areas. Both sides were exhausted.
On May 7, the British tried one last time to attack the hill. They used two companies of infantry and soldiers with hand grenades. Sadly, all of them were either killed or captured. The Germans had successfully recaptured Hill 60.
Planes in the Sky
Air Support During the Battle

During the battle, British planes from 1 Squadron of the Royal Flying Corps (RFC) played an important role. They flew patrols to keep German planes away from the area, ensuring surprise for the British attack.
When the attack began, British pilots helped by spotting flashes from hidden German guns. This allowed British artillery to target and silence those guns. Even when the British were pushed back, air observers helped by reporting directly to headquarters.
British fighter planes also chased away German aircraft trying to fly over the battlefield. On April 18, British planes helped locate 33 German guns. The next day, British artillery bombarded these areas, and the German guns became much less active.
Planes continued to help throughout the battle. On May 1, a British plane flying towards Hill 60 caused German artillery to stop firing. On May 5, after the Germans captured the crest, 1 Squadron took photos to help plan another British attack. Although that attack failed, air operations were crucial for gathering information and supporting the troops on the ground.
What Happened Next?
The Cost of the Battle
The fighting for Hill 60 was very costly. On May 1, one British battalion, the 1st Dorsets, lost over 90 men to gas poisoning. Many more were injured. Out of 2,413 British soldiers admitted to hospitals, 227 died from gas.
Overall, the British 5th Division suffered about 3,100 casualties (killed, wounded, or missing) during the battles for Hill 60 in April and May 1915.
Hill 60 in 1917

Even after the Germans recaptured Hill 60, the British didn't give up on it. They started digging new, deeper tunnels under the hill in late 1915. These tunnels went about 27 meters (90 feet) underground.
By 1916, these tunnels were filled with massive amounts of explosives. One mine under Hill 60 had 24,000 kilograms (53,300 pounds) of explosives! Another under the Caterpillar had 32,000 kilograms (70,000 pounds).
On June 7, 1917, at 3:10 a.m., these huge mines were detonated. The explosions were enormous, creating one of the largest non-nuclear explosions in history. People reportedly heard them in London and Dublin, hundreds of kilometers away! The blasts destroyed a large part of the hill and killed around 10,000 German soldiers.
This massive explosion was part of the Battle of Messines. The British successfully captured the ridge, including Hill 60, during this battle. This helped them gain control of the high ground south of Ypres, which was very important for future operations.
Brave Soldiers: Victoria Crosses
The Victoria Cross is the highest award for bravery in the British military. Several soldiers earned this medal for their actions during the fighting at Hill 60:
- Private Edward Dwyer, 1st East Surrey Regiment.
- 2nd Lieutenant Benjamin Geary, 4th East Surrey Regiment.
- Lieutenant George Roupell, 1st East Surrey Regiment.
- 2nd Lieutenant Geoffrey Woolley, 9th London Regiment.
- Private Edward Warner, 1st Bedfordshire Regiment.
See also
- Hill 60 (Ypres)
- Beneath Hill 60 - An Australian film based on the battle.
- Sanctuary Wood Museum Hill 62
Images for kids
-
Hill 60
-
Hill 60, 1915
-
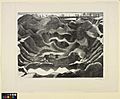
A Mine Crater, Hill 60 Art.IWMART1601
-
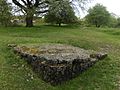
A bunker on Hill 60
-
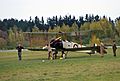
Avro 504, photograped at Hood Aerodrome, Masterton, New Zealand, 2009
-
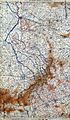
Map Showing Progress in the Ypres Area
