
Capture of Jericho facts for kids
Quick facts for kids Capture of Jericho |
|||||||
|---|---|---|---|---|---|---|---|
| Part of the Middle Eastern theatre of World War I | |||||||
 Breakfast meeting of Generals Chaytor, Chauvel and Chetwode on the morning of the capture of Jericho, 21 February 1918 |
|||||||
|
|||||||
| Belligerents | |||||||
|
|||||||
| Commanders and leaders | |||||||
| Units involved | |||||||
|
Egyptian Expeditionary Force
and Desert Mounted Corps's
|
Yildirim Army Group
|
||||||
| Strength | |||||||
| 6,800 | 3,000 | ||||||
| Casualties and losses | |||||||
| 510 | 144 prisoners, 8 machine guns | ||||||
The Capture of Jericho was an important event during World War I. It happened between February 19 and 21, 1918, near Jerusalem in the Jordan Valley. This battle was part of the larger Sinai and Palestine Campaign.
During this time, the British Empire's forces attacked positions held by the Ottoman Empire. They pushed the Ottoman troops back towards Jericho and eventually across the Jordan River. This victory helped the British secure their control over the area east of Jerusalem.
Contents
Why Jericho Was Important

After capturing Jerusalem in December 1917, heavy winter rains made it very hard to continue fighting. This break allowed the British forces, called the Egyptian Expeditionary Force, to get organized. They needed to improve their supply lines, which stretched about 150 miles (240 km) from their main bases.
General Edmund Allenby, the British commander, was worried about his right side (flank) being open to attack from the east. His left side was safe because it was near the Mediterranean Sea. To make his right side more secure, he wanted to capture the land east of Jerusalem, all the way to the Dead Sea.
This area was defended by Ottoman soldiers dug into hills. British infantry, along with Australian light horse and New Zealand Mounted Rifles Brigades, attacked these positions. The infantry captured a key spot called Talat ed Dumm on the main road to Jericho. Meanwhile, the mounted troops captured Jericho itself and the land south of it, bordered by the Jordan River and the Dead Sea.
Getting Ready for Battle

The land east of the Judean Hills drops sharply into the Jordan Valley. It's a tough area with rocky hills and deep, narrow valleys. Most paths were narrow and winding, making it hard for soldiers to move. Sometimes, attacking groups had to climb steep cliffs to reach their enemies.
Who Was Fighting
The Ottoman Empire had three armies defending their front line. Between 3,000 and 5,000 Ottoman soldiers defended the area near the Jordan Valley. They were dug into a series of hilltops along the Jericho road.
The British forces were led by Lieutenant General Philip Chetwode. His infantry troops, mainly the 60th (London) Division and the 53rd (Welsh) Division, were to attack towards Jericho. At the same time, General Chauvel's mounted troops, including the 1st Light Horse Brigade and the New Zealand Mounted Rifles Brigade, would protect the infantry's right side and advance towards the Dead Sea.
The plan was for the 60th (London) Division to move east from Jerusalem, capturing key positions. Their goal was to reach the edge of the ridge overlooking Jericho and the Jordan Valley. Each infantry group had artillery and engineers to support them.
On February 14, the British began their first moves. The mounted brigades started their march towards Bethlehem. As the infantry attacked on February 19, the mounted troops planned a flanking move. They would go down into the Jordan Valley to cut off the Ottoman retreat from Jericho and push them across the Jordan River.
Air Support
Aircraft played a role too. On January 3, Australian planes found boats carrying supplies on the Dead Sea. They bombed and shot at these boats until the service stopped.
Later, as part of the preparations for the Jericho attack, six aircraft dropped bombs on Amman and a railway station. They hit trains, buildings, and troops. Air patrols also flew over Jericho and other areas, watching and reporting on enemy positions, supplies, and movements.
The Battle Begins
.jpg)
February 19: Infantry Attack
The 60th (London) Division moved forward. In the center, their 180th Brigade advanced. On the left, the 181st Brigade faced tough fighting, with one battalion suffering 50 casualties but capturing 25 prisoners and two machine guns. On the right, the Wellington Mounted Rifle Regiment covered their flank.
General Chetwode and General Chauvel watched the start of these operations from the Mount of Olives, which is high above sea level. By the time the mounted troops reached Jericho, they would be far below sea level.
February 20: Day Two
Infantry Attack
The infantry continued their advance. The 180th Brigade captured Talat ed Dumm, a key position on the main road from Jerusalem to Jericho, after an hour of heavy shelling. On the left, the 181st Brigade moved slowly due to small enemy groups.
On the right, the 179th Brigade faced difficult terrain, including a 20-foot (6-meter) drop. They eventually captured Jebel Ekteif, a dominating position, after a strong counter-attack was pushed back with the help of heavy artillery.
Mounted Attack

Meanwhile, the New Zealand Mounted Rifles Brigade and the 1st Light Horse Brigade began their advance on El Muntar at 3:30 AM. They moved in single file down a winding path, watched by Ottoman soldiers above. The terrain was so difficult that the long column of mounted troops stretched for miles.
By 6:00 AM, the New Zealand Mounted Rifles Brigade was in the valley. They attacked Hills 306 and 288, capturing them by noon. This forced the Ottoman defenders to fall back to Nebi Musa. However, Nebi Musa was strongly defended, so the attack was put off until the next day.
Frank Hurley, the official Australian War Photographer, described the difficult journey:
Even in daylight I should not have dreamt of riding this track [down the Wadi Qumran to the valley of the Jordan], and yet the whole brigade passed along it without mishap. At 11.00pm we were at the arranged position, and after tethering out the horses rolled ourselves up in our blankets. The night was bitterly cold, and we missed our "bivvies", orders having been given to travel light, so that every man rode with an absolute minimum weight. We are to leave here at 3.30 am to attack Neby Musa.
—Frank Hurley, the Official Australian War Photographer, attached to the 1st Light Horse Brigade
At dusk, the 1st Light Horse Brigade began their own difficult descent. They followed a goat track that dropped 1,300 feet (400 meters) in just 2 miles (3.2 km) to get into position to attack Nebi Musa from behind. They completed this journey successfully by midnight.
February 21: Jericho Captured
Under the cover of darkness, the New Zealand Mounted Rifles Brigade moved north. By daylight, they were east of Nebi Musa. They launched a dismounted attack while British infantry attacked from the rear. The Canterbury Mounted Rifles Regiment occupied Nebi Musa at daylight, finding that the Ottoman soldiers had already left.
When the 1st Light Horse Brigade reached the Jordan Valley floor, 1,300 feet (400 meters) below sea level, they turned north towards Jericho. A small group from the 3rd Light Horse Regiment entered Jericho around 8:00 AM, finding that the Ottoman garrison had already pulled out. The rest of the brigade advanced up the Jordan Valley.
The 60th (London) Division moved to the top of the cliff overlooking Jericho and the Jordan Valley. The British forces suffered 510 casualties during these operations.
After the Battle

On February 22, the 60th (London) Division moved its main line back to a more secure position, leaving small groups on the cliffs above the Jordan Valley. The Anzac Mounted Division began their journey back to Richon LeZion. They left behind the Auckland Mounted Rifle Regiment to patrol the Jordan River area.
Ottoman troops on the western bank of the Jordan River held a strong position at Ghoraniyeh, protecting a bridge. They also had a smaller group covering a ford (a shallow place to cross a river) downstream.
The Auckland Mounted Rifle Regiment patrolled the Jordan River, often drawing artillery fire from Ottoman guns. They watched the Ottoman positions until February 25, when all Ottoman troops, guns, and a pontoon bridge were moved to the east side of the river.
The Ottoman Empire's War Minister, Enver Pasa, replaced the German general leading the Ottoman forces in Palestine with General Otto Liman von Sanders on March 1, 1918.
On March 6, the British War Cabinet allowed General Allenby to advance further. He decided to create a third infantry corps. On March 21, the British attempted to cut the Hedjaz Railway at Amman. This happened at the same time as a major German attack on the Western Front in Europe.
Images for kids
-
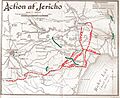
Map showing the advance of the Anzac Mounted Division with Ottoman positions indicated in green.
-
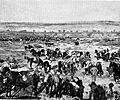
A halt in the Jordan Valley.


