Capture of Jisr ed Damieh facts for kids
Quick facts for kids Capture of Jisr ed Damieh |
|||||||
|---|---|---|---|---|---|---|---|
| Part of the Middle Eastern theatre of World War I | |||||||
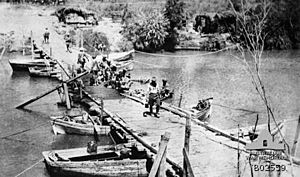 British pontoon bridge at Jisr ed Damieh |
|||||||
|
|||||||
| Belligerents | |||||||
| Commanders and leaders | |||||||
| Units involved | |||||||
| Meldrum's Force New Zealand Mounted Rifles Brigade mounted sections of the 1st and 2nd Battalions British West Indies Regiment 29th Indian Mountain Battery Inverness-shire Battery Royal Horse Artillery (all detached from Chaytor's Force) |
Seventh Army Fourth Army |
||||||
The Capture of Jisr ed Damieh was an important battle during World War I. It happened on September 22, 1918. This event was part of a larger battle called the Battle of Megiddo.
During this battle, a group of soldiers called "Meldrum's Force" attacked and captured the bridge at Jisr ed Damieh. This bridge crossed the Jordan River. Capturing it was a big deal. It blocked the main escape route for two Ottoman armies. These armies were trying to retreat from the Judean Hills.
This victory by Meldrum's Force was very important. It allowed another group, Chaytor's Force, to move forward. They went on to capture Es Salt and then won the Second Battle of Amman.
The main attack by the Egyptian Expeditionary Force (EEF) was led by General Edmund Allenby. This attack focused on the coast and western Judean Hills. At the same time, Chaytor's Force was fighting in the Jordan Valley. Their goal was to push north, cross the Jordan River, and capture Es Salt and Amman. This led to many Ottoman soldiers being captured.
Contents
What Led to the Battle?
Where Were the Armies?
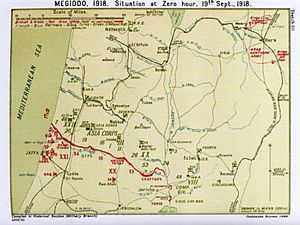
Before the Battle of Megiddo, the Egyptian Expeditionary Force (EEF) held a long front line. This line stretched from the Mediterranean coast to the Dead Sea. It went over the Judean Hills, where the land was very high. Then it dropped down to the Jordan Valley, which is below sea level.
The Ottoman army had strong defenses along their front line. They had trenches and fortified posts. These defenses were especially strong near the Jordan River. They also had observation points on Red Hill to watch the area.
Who Was Chaytor's Force?
Chaytor's Force was positioned on the right side of the EEF. They held the area from the Judean Hills across the Jordan Valley. This area was watched by Ottoman long-range guns.
Meldrum's Force was a special group created for this attack. It was led by Brigadier General William Meldrum. This force included the New Zealand Mounted Rifles Brigade. It also had soldiers from the British West Indies Regiment and artillery units. They were formed on September 21, 1918, to attack Jisr ed Damieh.
The Ottoman Retreat Begins
The Ottoman Yildirim Army Group had many soldiers and weapons. They were spread out along a long front line. The Eighth Army was near the coast. The Seventh Army was in the Judean Hills. The Fourth Army was east of the Jordan River.
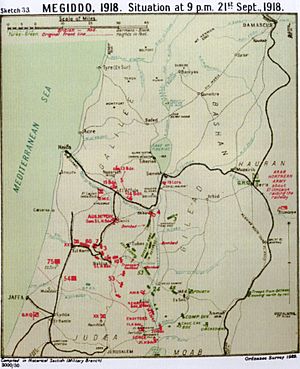
By September 21, the Ottoman resistance in the Judean Hills was breaking. Most of the Eighth Army had surrendered. The Seventh Army was trying to escape east. They hoped to cross the Jordan River at the Jisr ed Damieh bridge.
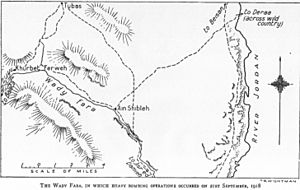
The Seventh Army was retreating down the Wadi el Fara road. They had to leave behind their guns and vehicles. British and Australian planes heavily bombed this long line of Ottoman soldiers. The road became blocked, and the Ottoman forces were attacked for hours. Many guns, trucks, and other vehicles were destroyed. The remaining soldiers tried to escape north.
Getting Ready for the Attack
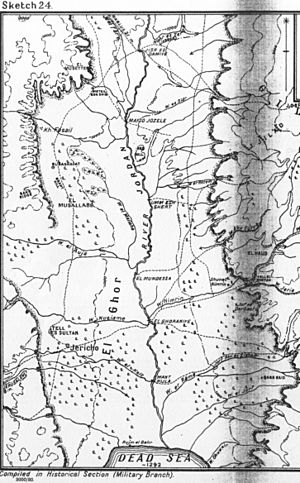
General Chaytor gave orders to Meldrum. He told Meldrum to block the Wadi el Fara road. This road was west of the Jordan River. Meldrum also had to capture the Ottoman 53rd Division's headquarters. Most importantly, he had to capture the Jisr ed Damieh bridge. This bridge was on the main road from Nablus to Es Salt.
Meldrum's Force started their march at midnight on September 22. The Auckland Mounted Rifles Regiment led the way. They were followed by the 1st Battalion British West Indies Regiment. These soldiers arrived near Ain Jozele by 5 AM.
The Auckland and Wellington Mounted Rifle Regiments advanced along an old Roman road. They were exposed to Ottoman artillery fire from across the river. The Auckland Regiment's goal was to capture the bridge from the northeast. The Wellington Regiment was to attack El Makhruk directly. They also needed to capture the Ottoman 53rd Division's headquarters and cut the Nablus road.
The Wellington Mounted Rifles Regiment reached the Nablus to Jisr ed Damieh road early on September 22. They captured Abd el Kadyr and El Makhruk after a "sharp fight." This happened by 7 AM. They also captured 600 prisoners, the Ottoman 53rd Division commander, and many supplies.
Meanwhile, the Auckland Mounted Rifles Regiment arrived near the bridge. An Ottoman column had just passed them and was crossing the Jordan River.
The Battle for the Bridge
The Auckland and Canterbury Mounted Rifles Regiments attacked the bridge. They were supported by the 1st Battalion, British West Indies Regiment. The fighting was intense, but the attackers forced the Ottoman defenders to retreat. The bridge was captured without being destroyed.
The Auckland Mounted Rifles Regiment attacked the bridge before dawn. A large group of Ottoman soldiers was nearby, trying to retreat. The mounted riflemen were pushed back by a strong counter-attack. Meldrum sent more soldiers to help, including the 1st Squadron, Canterbury Mounted Rifles Regiment. They fought their way to a position overlooking the bridge.
A large group of about 1,200 Ottoman soldiers had already crossed the bridge. They threatened to cut off Meldrum's Force. Another Ottoman force attacked Talaat Amrah. This area was defended by the 2nd Battalion, British West Indies Regiment. A second group of about 500 Ottoman soldiers was seen moving towards the bridge from Nablus. More Ottoman soldiers were also on their way.
Meldrum sent reinforcements to the Wellington Mounted Rifles Regiment. These soldiers attacked the column of 500 Ottoman troops. They forced them back into the hills.
By 8:15 AM on September 22, other British forces joined the fight. They were ordered to clear the area west of the Mafid Jozele ford. Another regiment was sent to protect Meldrum's Force.
At 10:50 AM, the Auckland Mounted Rifles Regiment and their allies launched a big attack on the bridge. They used artillery and machine guns for cover. They charged with bayonets against the Ottoman soldiers defending the bridge. After close-quarters fighting, they broke through and captured the bridge. Meldrum's machine guns caused many casualties among the escaping Ottoman soldiers. Some mounted riflemen crossed the bridge and chased the Ottomans, capturing many prisoners.
Meldrum's Force captured 786 prisoners and six guns. They also took nine machine guns and 200 tons of ammunition. During these operations, Chaytor's Force had 72 soldiers injured and 400 sick.
According to a British Air Force report, only about 600 Ottoman soldiers escaped across the Jordan River at Jisr ed Damieh. The capture of this bridge was a huge success. It helped block a main Ottoman escape route. The remaining gap to Beisan was closed on September 24.
The New Zealanders held the bridgehead on the east bank of the Jordan River overnight. Other units held protective lines to the south, north, and west.
What Happened Next?
The EEF learned about the Ottoman Fourth Army's retreat late on September 22. Orders were given to attack Shunet Nimrin. On September 23, Chaytor's Force crossed the Jordan River. They climbed onto the Plateau of Moab and Gilead. They then went on to capture Es Salt that same evening.
|


