
Battle of Sharon facts for kids
Quick facts for kids Battle of Sharon |
|||||||
|---|---|---|---|---|---|---|---|
| Part of the Middle Eastern theatre of World War I | |||||||
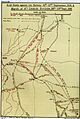
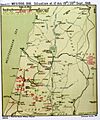
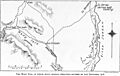
 Falls Map 20 Detail shows capture of Nahr el Faliq and clearing of the coastal plain for the cavalry advance, the attack on the Tabsor defences and the advances towards Tulkarm and Et Tire |
|||||||
|
|||||||
| Belligerents | |||||||
|
|||||||
| Commanders and leaders | |||||||
| Units involved | |||||||
|
Egyptian Expeditionary Force
|
Yildirim Army Group
|
||||||
| Strength | |||||||
| 35,000 infantry, 9,000 cavalry, 383 guns | 40,598 infantry | ||||||
| Casualties and losses | |||||||
| XXI Corps 3,378 casualties including 446 killed Desert Mounted Corps 125 killed, 408 wounded or missing |
more than 3,000 dead and wounded, unknown casualties from aerial bombing, more than 25,000 prisoners | ||||||
The Battle of Sharon was a major battle fought from September 19 to 25, 1918, during World War I. It was part of a larger plan called the Battle of Megiddo, which aimed to defeat the Ottoman (Turkish) and German armies in the Sinai and Palestine Campaign. This battle took place across a wide area, from the Mediterranean Sea to the Judean Hills.
During the Battle of Sharon, the Egyptian Expeditionary Force (EEF), which included British, Indian, Australian, New Zealand, and French soldiers, launched a surprise attack. Their goal was to break through the Ottoman front lines and allow their fast-moving cavalry to sweep behind the enemy. This plan worked, leading to a big victory for the EEF and capturing many enemy soldiers and a lot of land.
Contents
What Was the Battle of Sharon?
The Battle of Sharon was a key part of the final push by the Allied forces in the Middle East during World War I. It involved a mix of powerful infantry attacks and quick cavalry movements. The battle started with a massive artillery bombardment, similar to those seen on the Western Front in Europe.
Breaking Through the Front Line
The main attack began on September 19, 1918. British and Indian infantry divisions, supported by heavy artillery and even fire from two destroyer ships, hit the Ottoman lines hard.
- Coastal Attack: The 60th Division attacked near the Mediterranean coast. They quickly broke through the Ottoman defenses, capturing Tulkarm, where the Ottoman Eighth Army had its headquarters. This created a crucial gap in the enemy lines.
- Tabsor Defenses: Other divisions, like the 3rd (Lahore), 7th (Meerut), and 75th Divisions, attacked the strong Tabsor trench system. They fought hard and eventually captured these defenses, pushing further inland.
These infantry successes were vital. They opened the way for the cavalry to move quickly into the enemy's rear.
Cavalry's Swift Advance
Once the infantry broke through, the Desert Mounted Corps, made up of cavalry from Britain, India, and Australia, rode through the gap. Their mission was to get behind the Ottoman armies and cut off their escape routes.
- Across the Plain of Sharon: The cavalry divisions rode north across the Plain of Sharon. They then crossed the Mount Carmel Range through mountain passes.
- Capturing Key Locations: On September 20, they reached the Esdraelon Plain, far behind the Ottoman front lines. Here, they captured important towns like Afulah and Beisan, which were vital communication hubs for the Ottoman forces.
- Nazareth and Jenin: The 5th Cavalry Division attacked Nazareth, where the main Ottoman Army headquarters was located. The Ottoman commander, Otto Liman von Sanders, barely escaped. The Australian Mounted Division captured Jenin, taking thousands of prisoners and cutting off the main retreat route from the Judean Hills.
- Haifa and Samakh: The 5th Cavalry Division later captured Haifa and Acre. On the last day of the battle, the Australian Mounted Division fought a tough battle at Samakh, securing another important area.
The speed of the cavalry's advance was a huge surprise to the Ottomans. It helped trap many of their soldiers.
Why Was This Battle Important?
The Battle of Sharon was a major victory for the Allied forces. It led to the capture of a vast amount of territory and over 25,000 Ottoman and German prisoners. This battle, along with the Battle of Nablus, formed the larger Battle of Megiddo.
- Ending the Campaign: The success of the Battle of Megiddo effectively ended the Sinai and Palestine Campaign. The remaining Ottoman forces were chased towards Damascus, which was captured on October 1, 1918.
- New Tactics: The battle showed how effective a combination of strong infantry attacks and fast cavalry movements could be. It was a bit like a very early version of "blitzkrieg" tactics, which would be used in later wars.
How Did the Battle Start?
Before the Battle of Sharon, the Ottoman and German forces in Palestine had suffered several defeats in late 1917. They had lost important cities like Jerusalem. This led to changes in their leadership.
Ottoman Army Changes
- New commanders were put in charge, including Otto Liman von Sanders for the main Ottoman army group.
- The Ottoman Empire's focus shifted. They were more interested in regaining lands they had lost in the Caucasus region, partly because Imperial Russia had left the war. This meant fewer resources were sent to Palestine.
British Preparations
Meanwhile, the British were planning a new offensive. General Edmund Allenby, the commander of the EEF, wanted to make a big move in September 1918.
- Troop Changes: British units in the EEF were replaced with British Indian Army units. This allowed the British units to be sent to the Western Front in France, where they were urgently needed.
- Allenby's Goal: Allenby aimed to break the Ottoman front line, capture their headquarters, and control key roads. He also wanted to boost the morale of his new Indian troops and his Arab allies.
The Battlefield
The front line stretched from the Mediterranean coast, across the Plain of Sharon, and up into the Judean Hills.
- Supply Lines: The Ottoman defenders relied on two main railway lines for supplies. One ran from Haifa to Deraa, and another connected to Nablus and Tulkarm.
- Mount Carmel Range: For the cavalry to get behind the enemy, they had to cross the rugged Mount Carmel Range. There were two passes through these mountains. If the Ottomans defended these passes strongly, it could slow down the attack.
- Controlling the Plains: Allenby's plan was to quickly capture the Esdraelon Plain, which was about 40 miles behind the Ottoman front line. This would cut off the Ottoman armies in the Judean Hills from their supplies and escape routes.
Planning the Attack
General Allenby's plan for the Battle of Sharon was very clever and relied on three main ideas:
- Concentration: Putting a huge amount of force (soldiers and artillery) in one small part of the enemy's front line.
- Surprise: Keeping the attack a secret so the enemy wouldn't know where or when it was coming.
- Speed: Moving very quickly once the attack started, especially with the cavalry, to prevent the enemy from reacting.
Deception and Air Superiority
To achieve surprise, Allenby used a clever trick. He made the Ottomans believe the main attack would happen in the Jordan Valley, far to the east. This involved:
- Leaving a small force in the valley to make noise and appear busy.
- Moving the main cavalry force secretly to the coastal plain at night.
- Spreading rumors, like a horse race meeting, to distract the enemy.
The Royal Air Force (RAF) played a huge role. They kept Ottoman planes from flying reconnaissance missions, so the Ottomans couldn't see the British troop movements. The RAF also bombed enemy headquarters and communication lines, making it hard for the Ottomans to respond.
Similarities to Other Battles
Allenby's plan had similarities to the Battle of Amiens on the Western Front, which happened just weeks before. Both battles used:
- Secret troop movements and air superiority.
- Infantry attacks with two brigades side-by-side, and one in reserve.
- Carefully timed artillery barrages that moved forward with the infantry.
- Infantry bypassing strong enemy points to isolate them.
The main difference was that Allenby used cavalry instead of tanks to exploit the breakthrough. The cavalry advanced 65 miles, capturing many prisoners and guns, showing how effective this strategy was.
The Battle Begins
Air Attacks Before the Ground Assault
Even before the main ground attack, RAF aircraft began bombing key Ottoman communication centers and railway lines on September 19. They hit headquarters at Nablus and Tulkarm, cutting off contact with the main Ottoman command in Nazareth. They also bombed the main German air base at Jenin.
- Handley-Page Bomber: A large Handley-Page bomber, flown by Australian Ross Smith, attacked the Afulah railway junction and telephone exchange.
- Harassing Retreats: As Ottoman troops began to retreat, aircraft bombed and machine-gunned them on the roads, causing chaos and heavy casualties. One narrow gorge on the road from Tulkarm to Nablus became blocked with destroyed vehicles and dead animals.
The Artillery Barrage
The ground attack started at 4:30 AM on September 19 with a massive artillery bombardment.
- No Warning: There was no long preliminary bombardment, which usually warned the enemy. Instead, the guns fired suddenly and intensely.
- Creeping Barrage: Field artillery created a "creeping barrage" that moved forward just in front of the advancing infantry, protecting them and hitting enemy trenches.
- Naval Support: Two British destroyers, HMS Druid and HMS Forester, even fired their guns from the sea onto Ottoman trenches along the coast.
Infantry Attacks and Breakthrough
- Tulkarm Captured: The 60th Division quickly broke through the Ottoman front lines near the coast. By 7:20 AM, they had captured the first defenses and about 600 prisoners. They then advanced rapidly, capturing Tulkarm by 5:00 PM. This was a huge blow to the Ottoman Eighth Army.
- Tabsor Defenses Fall: The 75th, 7th (Meerut), and 3rd (Lahore) Divisions attacked the strong Tabsor trench system. They fought through multiple lines of trenches, capturing Et Tire and other key positions. By September 20, the Ottoman 7th and 20th Divisions were mostly destroyed.
- Protecting the Flank: The 54th (East Anglian) Division and a French detachment protected the right side of the attacking force in the Judean Hills. They held their ground against strong German and Ottoman resistance, allowing the main attack to continue.
By the end of September 20, the Ottoman Eighth Army had almost completely collapsed. The XXI Corps had advanced far, capturing many prisoners and guns.
Cavalry Exploits the Gap
The cavalry's advance was crucial to the plan.
- Through the Passes: The 4th and 5th Cavalry Divisions, followed by the Australian Mounted Division, rode through the gap created by the infantry. They crossed the Mount Carmel Range through two passes.
- Afulah and Beisan: On the morning of September 20, the 4th Cavalry Division captured Afulah, a central point on the plain. They then pushed on to capture Beisan, cutting off the main escape routes for the Ottoman armies.
- Nazareth Attack: The 5th Cavalry Division attacked Nazareth, the Ottoman headquarters. Though they didn't capture Liman von Sanders, they forced him to flee.
- Jenin Captured: The Australian Mounted Division captured Jenin, a major Ottoman supply depot and air base. They took thousands of prisoners, including many who were retreating from Nablus.
- Samakh and Tiberias: On September 25, the Australian Mounted Division attacked a strong German force at Samakh. After a tough fight, they captured the town. Units then advanced to capture Tiberias. These victories marked the end of the Battle of Sharon.
Ottoman Reactions and Retreat
The Ottoman and German forces were caught by surprise and struggled to respond.
- Communications Cut: Early in the battle, Allied air attacks cut off telephone and wireless communications for the Ottoman Eighth Army. This made it very difficult for them to coordinate their defenses.
- Failed Reinforcements: Liman von Sanders ordered reserves forward, but they were often too late or too weak to stop the Allied advance.
- Mass Retreat: Many Ottoman units were forced to retreat in disorder. The roads became jammed with soldiers, vehicles, and animals, making them easy targets for Allied aircraft.
- Trapped Armies: The swift advance of the Desert Mounted Corps meant that the Ottoman Seventh and Eighth Armies, still fighting in the Judean Hills, were largely cut off from their escape routes to the north and east.
Aftermath of the Battle
The Battle of Sharon was a decisive victory.
- Huge Captures: Between September 19 and 21, over 15,000 Ottoman and German soldiers were captured. Many more were taken in the following days.
- Spanish Flu: The rapid advance and the large number of prisoners created challenges for medical services. Many prisoners and some Allied soldiers became ill with the Spanish flu, which was spreading globally at the time. Hospitals were overwhelmed, and conditions were difficult.
- Pursuit to Damascus: The success of the Battle of Sharon allowed the Allied forces to begin their final push towards Damascus, which was captured on October 1, 1918. This marked the end of the Sinai and Palestine Campaign.
The Battle of Sharon showed how a well-planned and executed attack, using both infantry and cavalry, could lead to a quick and overwhelming victory. It was a crucial moment in the final stages of World War I in the Middle East.
Images for kids
-
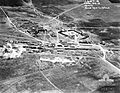
Aerial photograph of air raid on Afulah railway on 19 September 1918. Road to Nazareth in top left corner
-
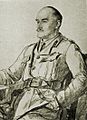
Commander of the Egyptian Expeditionary Force, General Allenby c1917
-
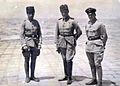
General Otto Liman von Sanders later to command Yildirim Army Group, with Hans-Joachim Buddecke, and Oswald Boelcke in Turkey, 1916
-
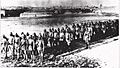
Ottoman infantry column c1917 many wearing Keffiyehs
-
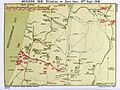
Map 38 shows attacks on the Hejaz railway between 16 and 23 September. South of Jabir a bridge was destroyed, another bridge north of Deraa at Tell' Arar was destroyed, 4 miles (6.4 km) of rail line was cut. The Muzeirib Station north east of Deraa (apparently on a redundant French railway) was burnt. A bridge at Nasib was destroyed and another bridge south of Jabir was burnt
-
Falls Sketch Map 30 Situation at Zero hour 19 September
-
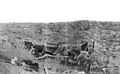
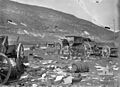
Wrecked transport 1.5 miles (2.4 km) from Tulkarm on the Nablus road
-
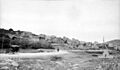
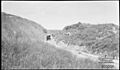
Anebta on the Tulkarm to Nablus road
-
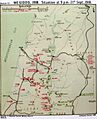
Falls Sketch Map 31 Megiddo Situation at 24:00 19/20 September 1918
-
Model T Ford travelling through Musmus Pass
-
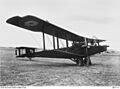
A side view of the Handley–Page 0/400 of No. 1 Squadron, Australian Flying Corps
-
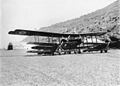
Handley–Page 0/400 aircraft and Bristol Fighter aircraft at Australian Flying Corps aerodrome was frequently piloted by Captain Ross Macpherson Smith
-
Cutlack Map 8 shows the section of the Wady Fara bombed during 21 September 1918
-
Transport destroyed by aerial bombing on the Nablus to Jenin road
-
Falls Map 21 shows the three main lines of retreat, the aerial bombings and the retreat of the Asia Corps and the Seventh Army over the Jordan River
-
Falls Map 33 Megiddo Situation at 21:00 21 September 1918


