
First Battle of Eora Creek–Templeton's Crossing facts for kids
Quick facts for kids First Battle of Eora Creek–Templeton's Crossing |
|||||||
|---|---|---|---|---|---|---|---|
| Part of the Second World War, Pacific War | |||||||
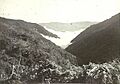
.jpg) Eora Creek valley |
|||||||
|
|||||||
| Belligerents | |||||||
| Commanders and leaders | |||||||
| Units involved | |||||||
|
Maroubra Force
|
South Seas Detachment
|
||||||
| Strength | |||||||
| 710 | 1,300 | ||||||
| Casualties and losses | |||||||
| 21 killed 54 wounded |
43 killed 58 wounded |
||||||
The First Battle of Eora Creek–Templeton's Crossing was a major fight during the Kokoda Track campaign in World War II. It took place from August 31 to September 5, 1942. Australian soldiers, with help from the United States, fought against Japanese troops. The Japanese aimed to capture Port Moresby in Papua.
This battle was one of three times the Australians tried to stop the Japanese on the Kokoda Track. The fighting helped slow down the Japanese advance. This allowed the Australian forces to safely pull back to another location called Efogi. Later, in October 1942, a second battle happened here. This was when Australian forces chased the Japanese back towards the north coast of Papua.
Why the Battle Happened
On July 21, 1942, Japanese forces landed on the northern coast of Papua. They landed near Buna and Gona. Their goal was to capture Port Moresby by marching along the Kokoda Track. An earlier attempt to reach Port Moresby by sea had failed at the Battle of the Coral Sea.
At first, Australian and Papuan forces offered little resistance. But as the Japanese moved south, Australian resistance grew stronger. Several battles were fought along the Kokoda Track in July and August. The Japanese advanced steadily towards their goal.
.jpg)
After some confusing fights, Kokoda village fell to the Japanese in early August. Then, there was heavy fighting near Deniki. Soon, the main Japanese army, led by Major General Tomitaro Horii, arrived. The first big battle of the campaign happened at Isurava. Here, experienced Australian soldiers from the 21st Brigade joined the Militia troops. These troops, called Maroubra Force, had been holding the line.
By the end of August, the Australians set up a new defense. They wanted to slow the Japanese down even more. This new position was around Eora Creek, south of Eora village. It was on high ground overlooking Templeton's Crossing. After the fight at Isurava, the Japanese 144th Infantry Regiment rested. The 41st Infantry Regiment was then ordered to chase the Australians. Their mission was to destroy the Australian forces as they pulled back.
The Battle at Eora Creek

The battle at Eora Creek happened right after the fighting at Isurava. It lasted from August 31 to September 5. The Australian Maroubra Force tried to break away from the Japanese chase. The Australian 2/14th, 2/16th, and 39th Infantry Battalions were very tired and had lost many soldiers. Despite this, they successfully delayed two Japanese battalions. These Japanese units were from Colonel Kiyomi Yazawa's 41st Infantry Regiment. This delay allowed the Australians to retreat further towards Efogi.
During the battle, the 2/16th and 2/14th Infantry Battalions acted as the rearguard. This meant they stayed behind to protect the main force as it withdrew. The 2/14th was initially kept in reserve. The battle involved a series of planned withdrawals. Each battalion would pull back through a reserve position. Then, they would hold a new blocking position until a set time. After that, they would move further back.
On the evening of August 31, General Horii put the 41st Infantry Regiment in the lead. This unit replaced the 144th Regiment, which had led the advance towards Isurava. The battle unfolded in several stages. Each stage was defined by the delaying positions held by the 2/16th Infantry Battalion.
The 2/16th Infantry Battalion covered the retreat of Maroubra Force from Isurava. They also protected the wounded soldiers. They held a series of positions between Alola and Eora Village. Their last position was left at 2 AM on September 1. The Japanese closely followed the rearguard as it moved towards Eora Village.
Around midday on September 1, the 2/16th Infantry Battalion reached Eora Village. They took up a defensive spot on a hill overlooking the creek and village. The 2/14th Infantry Battalion was about 1 kilometer (0.6 miles) south. The 39th Infantry Battalion had been holding the position at Eora Village. Once the 2/16th Battalion arrived, the 39th was ordered to go to Kagi and hold that area.
The Japanese artillery fired on the 2/16th Infantry Battalion's position. Two Japanese companies tried to go around the Australian flank from the east. These attackers had not fought much before. So, they were careful when approaching the Australians. Still, they kept testing the Australian defenses all night. The Australian battalion held its position until 6:00 AM on September 2. This was their planned time to pull back.
The battalion withdrew through the reserve. They moved to a high point on the track about 1 kilometer (0.6 miles) north of Templeton's Crossing. The 2/14th Infantry Battalion was fighting as it retreated to this position. The Japanese advance, led by the 2/41st Battalion, tried to get around the Australian flanks. They threatened to surround the 2/16th Battalion. The Australians found a rough path that circled east and led back to Dump 1. Dump 1 is where the track first crosses Eora Creek, about 2 kilometers (1.2 miles) south of Templeton's Crossing.
Potts ordered the 2/16th Infantry Battalion to hold until dusk. The 2/14th needed time to get ready for a withdrawal along this new route. They also needed to cover Templeton's Crossing. As the 2/16th began to pull back, they were spotted and attacked.
The 2/14th Infantry Battalion had taken a position on high ground south of Dump 1. The 2/16th Infantry Battalion arrived there at 4:00 PM on September 3. They took over the position, and the 2/14th then retreated to Myola. Almost immediately after the 2/14th left, the 2/16th was attacked. With its sides threatened, it managed to pull back and escape towards Myola. Commander Potts decided to abandon Myola. He ordered all supplies to be destroyed. The Australians then withdrew towards Efogi. The 2/27th Infantry Battalion was coming to join the other battalions of the 21st Brigade.
What Happened Next

During these battles, the Japanese lost 43 soldiers killed and 58 wounded. They had about 1,300 soldiers. The Australians lost 21 killed and 54 wounded from about 710 soldiers. One author, Peter Williams, later said this battle was "the least-examined engagement of the campaign." It happened so soon after the fighting at Isurava that it was "obscured by it." Japanese records even called it the "Second Battle of Isurava." Australian newspapers at the time did not report much about it.
Still, it was one of the main clashes during the Australian retreat. It was also the last time in the campaign that the Japanese had more soldiers than the Australians. The Japanese had four artillery guns and an engineer team. The Australians only had one 3-inch mortar for support.
Even though the Australians lost their supply dump at Myola, their actions were a success. They managed to delay the Japanese. The Japanese pursuit was slow, which helped the Australians. The food supplies the Japanese captured at Myola were later found to be spoiled by the Australians. This made them useless.
After the fighting at Eora Creek, the Japanese 41st Regiment was criticized. Other Japanese soldiers and General Horii thought they were too slow. They failed to destroy the Australian force, allowing it to regroup. The 144th Regiment then took over the chase. They caught up with the Australians near Efogi.
At Mission Ridge and Brigade Hill, the Australians tried to stop the Japanese again. But they were defeated and forced to retreat through the jungle. This happened when the 144th Infantry Regiment held the Australian front line. They almost surrounded the second line of defense at Brigade Hill. Commander Potts was then replaced by Brigadier Selwyn Porter. The Australian retreat south along the track continued.
More fighting happened at Ioribaiwa. Here, the Australians finally managed to stop the Japanese. Then, they pulled back to Imita Ridge. They set up a final defense line there for a last stand. But this big battle never happened. The Japanese reached the end of their supply line. Also, other events in the Pacific War changed things. The Japanese lost battles at Milne Bay and Guadalcanal. Because of this, the Japanese commander, Horii, was ordered to stop attacking. He was told to take a defensive position instead of trying to capture Port Moresby.
After the Japanese retreated from Ioribaiwa in late September, Australian troops began to advance. Soldiers from the 25th Brigade, led by Brigadier Kenneth Eather, moved north. Later, Brigadier John Lloyd's 16th Brigade joined them. Both were part of the Australian 7th Division, commanded by Major General Arthur Allen.
On September 28, the Australians retook the abandoned trenches at Ioribaiwa. For the next two weeks, the Japanese avoided contact as they fell back. They were heading north to a new defense line. Allied leaders wanted the Australians to speed up their chase. In mid-October, the Australians reached Eora Creek and Templeton's Crossing again. This area was held by a Japanese group called the "Stanley Detachment." A second battle was fought there between October 11 and 28.
After the war, the location of the battle was kept secret by local villagers. This was done "out of respect for the dead." In 2010, Brian Freeman, a former Australian commando and tour guide, announced the battlefield's location.
Australian units received a special honor after the war for fighting here. It was called "Eora Creek–Templeton's Crossing I." The second battle in this area received the honor "Eora Creek–Templeton's Crossing II." The 39th, 2/14th, and 2/16th Infantry Battalions received the first honor. The 3rd, 2/1st, 2/2nd, 2/3rd, 2/25th, 2/31st, and 2/33rd Battalions received the second.
Images for kids
-
Eora Creek valley
