
Battle for Baby 700 facts for kids
Quick facts for kids Battle for Baby 700 |
|||||||
|---|---|---|---|---|---|---|---|
| Part of the Gallipoli Campaign | |||||||
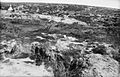
 Baby 700 as viewed from The Nek |
|||||||
|
|||||||
| Belligerents | |||||||
| Commanders and leaders | |||||||
| Units involved | |||||||
|
|
||||||
| Strength | |||||||
| 3,000 men | 1,500 men | ||||||
| Casualties and losses | |||||||
| ~ 1,000 | |||||||
The Battle for Baby 700 happened on May 2-3, 1915. It was a fight during the Gallipoli Campaign of the First World War. This battle was between soldiers from the British Empire and the Ottoman Turkish Empire.
On April 25, 1915, the Australian and New Zealand Army Corps (ANZAC) landed on the Gallipoli Peninsula. Their plan was to capture a hill called Baby 700 on the first day. This hill was important because it overlooked the area. However, the Turkish forces were stronger than expected. The ANZACs had to stop and set up their defenses on a different ridge.
After successfully defending against a Turkish attack on April 27, the ANZACs wanted to capture Baby 700. They knew it would make their position much safer. The New Zealand and Australian Division, which was their strongest group, was given this important task. They were supported by the 1st Royal Naval Brigade.
The attack did not go well for the British Empire forces. New Zealand troops on one side were delayed. This meant the main attack by the Australians got stuck. British soldiers came to help, but they were also pushed back. Only one Australian battalion was left alone in a dangerous spot. This battalion was pulled back safely when it got dark on May 3. The Turks then took back their position on Baby 700. For many months after, neither side could make much progress. This changed in August 1915 when another attack happened.
Contents
What Was Baby 700?
The Hill's Location and Importance

Baby 700 was a hill in the Sari Bair mountain range. It was located between two other important spots, Russell's Top and Battleship Hill. People thought it was 700 feet (about 213 meters) above sea level, but it was actually about 590 feet (180 meters) high. The Turkish name for the hill was Kilic Bayir.
The easiest way to reach Baby 700 from the ANZAC lines was through a narrow strip of high ground called The Nek. This path was only about 20 yards (18 meters) wide. It was a very direct route, about 350 yards (320 meters) from Russell's Top.
Why Baby 700 Was So Important
During the Landing at Anzac Cove, the plan was for the 3rd Australian Brigade to capture Baby 700. But the Turkish soldiers fought very hard. The Australian commander, Colonel Ewen Sinclair-Maclagan, had to stop. He decided to set up a defense line on a different ridge instead.
This meant Baby 700 stayed in Turkish hands. This gave them a huge advantage. From Baby 700, they could see everything happening at the ANZAC beachhead. They also held other key spots like Russell's Top and The Nek. These positions allowed Turkish soldiers to look down on the ANZACs. Some ANZAC trenches even had Turkish trenches in front and behind them.
When the 4th Australian Brigade landed, they took positions along Monash Valley. Soldiers at Quinn's Post were watched from Turkish positions on both sides. The Turkish lines were sometimes only 50 yards (46 meters) away. At Pope's Hill, Turkish positions were only 100 yards (91 meters) behind the ANZACs. At first, the ANZAC lines had many gaps. Turkish snipers could easily sneak behind them.
On April 27, Turkish troops launched a strong counter-attack. After this, the ANZACs decided they had to capture Baby 700. Taking this hill and other spots overlooking Monash Valley was crucial for their safety.
Planning the Attack
The First Plan and Why It Changed
The first plan was a huge attack set for April 30. It aimed to capture a large area, including Baby 700. Three brigades were supposed to lead this assault. However, Brigadier-General Harold Bridgwood Walker, who knew the area well, doubted the plan would work. He asked his commander, Major-General William Bridges, to see the situation for himself. Bridges agreed that the plan was too risky, and it was cancelled.

The New Plan for Baby 700
The attack plan was then changed. The new main goal was just to capture Baby 700. The New Zealand and Australian Division, led by Major-General Alexander Godley, was chosen for this task. They were the strongest group. The attack was set for 7:30 PM on May 2.
The 4th Australian Brigade was to capture the area from Quinn's Post to the top of Baby 700. At the same time, the 1st New Zealand Brigade would capture the area between the summit and the sea. Before the attack, naval gunnery (big guns from ships) and field artillery (land-based cannons) would bomb Baby 700. This bombing would start 30 minutes before the attack. Ten minutes later, machine guns would join in. At 7:15 PM, the bombing would shift to other hills. The attacking troops would move up Monash Valley. The 1st Royal Naval Brigade would help them. The first groups to attack were the New Zealand Otago, the 13th Australian, and the 16th Australian Battalions.
Who Were the Turkish Defenders?
The Turkish soldiers defending Baby 700 were mainly from the 19th Division. Their commander was Mustafa Kemal, whose headquarters was on a hill the ANZACs called "Scrubby Knoll." The Turks called it "Kemalyeri" (Kemal's Place). Several Turkish regiments, including the 57th, 72nd, and 77th, were involved in defending Baby 700.
The Battle Begins
First Attacks on the Hill

At 7:15 PM, the bombing stopped. The 16th Battalion climbed out of Monash Valley. As they moved, they faced heavy fire from Turkish small arms (rifles and machine guns). They advanced a short distance and started digging trenches. They tried to extend the trench from Quinn's Post. Another part of the battalion took over an abandoned Turkish trench. The rest of the soldiers fought and dug trenches through the night.
However, getting supplies to the front was hard at night and impossible during the day. Turkish machine guns fired from behind them. In daylight, the Australians tried to charge another Turkish trench, but machine guns on Baby 700 forced them back. When the Turks started moving forward around 5:00 AM, an ANZAC shell landed behind them. Part of the 16th Battalion had to pull back.
The 13th Battalion, in the middle, could only move in a single line because of the difficult land. The front of the battalion, led by Captain James Durrant, reached a slope without being seen. He gathered 250 men and ordered them to attack a Turkish trench, which they captured. Meanwhile, some of the battalion continued towards another area. A guide who was supposed to direct them was killed. One platoon (a small group of soldiers) went to help the 16th Battalion, who needed help. Another platoon got lost and was never seen again. Durrant went back to the valley to guide the rest of the battalion. The 13th Battalion was ready to continue, but there was no sign of the New Zealanders. While they waited, they dug trenches. Their efforts that night cost them 200 men.

The Otago Battalion from New Zealand had a long way to go to get into position. They had to move about 1.5 miles (2.4 km). They didn't reach their starting point until 8:45 PM. When they climbed out of the valley, the Turks were ready and opened fire. The New Zealanders tried several times to move forward. They finally set up a rough defense line. But there was a gap between them and the 13th Battalion. A company (a group of soldiers) from the 15th Australian Battalion filled this gap at midnight. Still, none of the attacking groups reached their goals. The Nek, Baby 700, and the head of Monash Valley were still held by the Turks.
More Attacks and Retreats
Major-General Godley thought the attacks had some success. He believed a little more effort could win the objective. So, he told his commanders to send more troops. At 11:00 PM, a company from the Canterbury Battalion tried to reach The Nek. They faced heavy fire and had to return. Their commander, Colonel Francis Earl Johnston, ordered the whole Canterbury Battalion to try again, but they also failed. At 3:00 AM, the battalion was ordered to help the Otago Battalion dig trenches. They reached them an hour later. They were told to extend the Otago Battalion's trench. At daylight, Turks were seen along the Otago trench and opened fire, forcing the New Zealanders and the 15th Battalion company back.

At 1:35 AM, Godley sent two Royal Marine Light Infantry battalions to help the 4th Australian Brigade. But the valley was crowded with wounded soldiers, and they didn't arrive until dawn. Soon after, part of the 16th Battalion ran back from the front line, and some Marines went with them. When order was restored, it was daylight. The Marines went forward to support the rest of the 16th Battalion. But they were caught in the open by Turkish machine guns from both front and rear. They were forced back. Left alone and exposed, small groups of the 16th Battalion started to retreat. Eventually, the Turks took over their trench.
The Royal Naval Nelson Battalion was sent to support the 13th Battalion. As they got close, they mistook the digging Australians for Turks and started firing. Captain Durrant managed to stop them. They then moved into position next to the 13th Battalion. When artillery shells started falling on the Nelson Battalion, they were ordered to pull back. Some of the 13th Battalion heard this order and also started to move, but they were called back. Royal Marines from the Portsmouth Battalion then advanced to Dead Man's Ridge. They had faced heavy fighting earlier. Once they reached the position, they came under heavy machine gun fire from a ridge to their right and behind them. After many casualties, the Marines had to withdraw, leaving their dead behind.
What Happened Next?
The 13th Battalion was left alone and exposed at the front. They couldn't reach their headquarters by phone or by messenger. The battalion commander, Lieutenant Colonel Granville Burnage, left Captain Durrant in charge. He went alone to reach headquarters after 3:00 PM on May 3. There, he was told to pull his battalion back. He went back to direct the withdrawal after nightfall. The 13th Battalion brought their wounded with them and pulled back in an orderly way. After they left, the Turks took over the trenches the 13th Battalion had dug.
The British, Australian, and New Zealand troops failed to capture Baby 700. This resulted in many casualties. The exact number isn't known, but one historian estimates about 1,000 soldiers were lost. Baby 700 stayed in Turkish hands for the rest of the campaign. From this high ground, they could watch and control the Monash Valley and the Allied positions.
In the weeks after this failed attack, the Turks launched several of their own attacks. They especially targeted Quinn's Post, but these attacks were pushed back with heavy losses. A period of stalemate followed, where both sides dug in and strengthened their positions. Later in the campaign, the Allies planned another effort to capture the high ground during the August Offensive. This included another attempt to take Baby 700. During this effort, along with the Landing at Suvla, the Allies attacked again. They had some limited success at first, but a strong Turkish counter-attack regained a key hill. Meanwhile, other attacks, like those at The Nek and Lone Pine, resulted in many casualties.
Images for kids
-
Baby 700 as viewed from The Nek
-
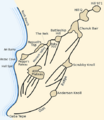
Map showing the Anzac beachhead, plateaus, and ridges
-
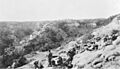
Quinn's Post looking across Monash Valley to Russell's Top
-
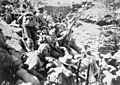
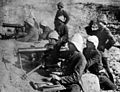
Soldiers from the 4th Australian Infantry Brigade behind Quinn's Post
-
Turkish machine guns at Gallipoli
-
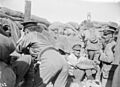
Soldiers of the Royal Naval Division and ANZACs in the Quinn's and Courtney's Post area
