Landing at Anzac Cove facts for kids
Quick facts for kids Landing at Anzac Cove |
|||||||
|---|---|---|---|---|---|---|---|
| Part of the Gallipoli campaign | |||||||
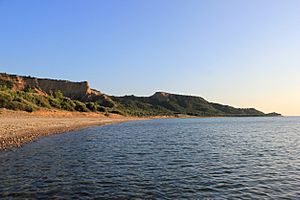 North Beach (north of Anzac Cove) looking south, Gallipoli, in 2014 |
|||||||
|
|||||||
| Belligerents | |||||||
|
|||||||
| Commanders and leaders | |||||||
| Units involved | |||||||
|
Elements of the:
|
||||||
| Strength | |||||||
| 20,000 men | 10,000 men | ||||||
| Casualties and losses | |||||||
| ~2,000 dead and wounded 4 taken prisoner |
unknown | ||||||
The landing at Anzac Cove happened on Sunday, 25 April 1915. It was also called the landing at Gaba Tepe. To the Turks, it was known as the Arıburnu Battle. This event was a major part of the Gallipoli Campaign during World War I.
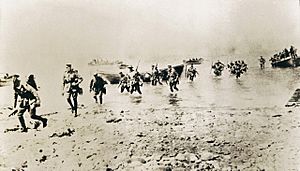
Soldiers from the Australian and New Zealand Army Corps (ANZAC) landed at night. They came ashore on the western side of the Gallipoli Peninsula. The troops landed about 1 mile (1.6 km) north of where they planned to go. In the dark, the groups got mixed up. Still, the soldiers slowly moved inland. They faced more and more resistance from the Ottoman Turkish defenders.
The ANZACs had to change their plans quickly. Groups of soldiers were sent into battle without clear orders. Some reached their goals, while others were sent to different areas. They were told to dig in along defensive hills.
Even though they didn't reach all their goals, the ANZACs formed a beachhead by nightfall. This was a small area on the coast they could hold. In some places, they were holding onto steep cliffs. Their position was very risky. Both army commanders wanted to leave, but the navy said it was too hard. So, the army decided to stay. Many soldiers were killed or hurt that day. Over two thousand ANZACs were killed or wounded. A similar number of Turkish soldiers were also hurt.
Since 1916, the anniversary of the landing on 25 April has been a special day. It is called Anzac Day. It is one of the most important days for Australia and New Zealand. This day is also remembered in Turkey and the United Kingdom.
Contents
Why the Landing Happened
The Ottoman Turkish Empire joined the First World War on 31 October 1914. They fought with the Central Powers. On the Western Front, soldiers were stuck in trench warfare. This meant they fought from long, narrow ditches. The British leaders thought attacking Turkey might be a good way to win the war.
From February 1915, the British navy tried to get through the Dardanelles. This was a narrow waterway. But they faced many problems. So, it was decided that soldiers needed to land on the ground too. The Mediterranean Expeditionary Force was created for this. General Ian Hamilton was in charge.
Three landings were planned to take control of the Gallipoli Peninsula. This would let the navy attack Constantinople, Turkey's capital. The hope was that this would make Turkey stop fighting.
The ANZAC Plan
Lieutenant-General William Birdwood led the Australian and New Zealand Army Corps (ANZAC). This group was new to fighting. It included the Australian Division and parts of the New Zealand and Australian Division. Birdwood was told to lead a landing on the western side of the Gallipoli Peninsula.
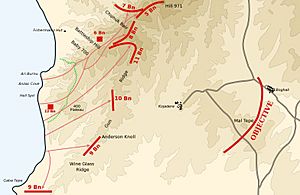
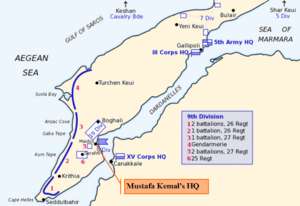
The ANZACs had about 30,638 men. They planned to land between Gaba Tepe and Fisherman's Hut. This was about 3 miles (4.8 km) north of Gaba Tepe. The first troops were to land at dawn after a navy bombardment. They would capture the lower hills of Hill 971. The next groups would then take the higher parts of Hill 971, especially Mal Tepe.
From Mal Tepe, they could cut off Turkish supplies. This would stop the Turks from sending more soldiers to the Kilid Bahr Plateau. This was important because the British 29th Division was attacking further south. Taking Mal Tepe was seen as very important.
Birdwood wanted the first troops to land at 3:30 AM, before dawn. Soldiers would travel in ships. Then they would get into small rowing boats. These boats would be pulled by small steamboats to the shore.
The Australian Division would land first. The 3rd Australian Brigade would capture the third ridge. The 2nd Australian Brigade would take the Sari Bair range up to Hill 971. The 26th Jacob's Mountain Battery (from India) and the 1st Australian Brigade would follow. All were supposed to be ashore by 8:30 AM.
Then, the New Zealand and Australian Division would land. After both divisions were ashore, they would advance to Mal Tepe. The planners thought the area was not well defended. They believed they would reach their goals easily. They didn't expect much Turkish resistance.
Turkish Defenders
The Ottoman Turkish Army was like the German army. Most soldiers were conscripted. This meant they had to join the army. They served for two or three years. The army had 208,000 men in 36 divisions. Each division had about ten thousand men. This was about half the size of a British division.
Unlike the new ANZACs, Turkish commanders were very experienced. They had fought in earlier wars.
The British could not keep their plans a secret. By March 1915, the Turks knew many British and French troops were gathering. They thought the landings would happen at four main places.
On 24 March, the Turks formed the Fifth Army. It had over 100,000 men. German general Otto Liman von Sanders was in command. The Fifth Army placed its troops at Gallipoli and on the Asian coast. The 9th Division guarded the coast. The 19th Division was kept as a reserve. The area where the ANZACs would land was defended by the 2nd battalion of the 27th Infantry Regiment.
The Landing at Anzac Cove
On 19 April, the ANZACs were told to get ready. Ships were loaded with coal and supplies. The landing was first set for 23 April. But bad weather delayed them until 24 April. British warships and transport ships led the way. They carried the 3rd Brigade.
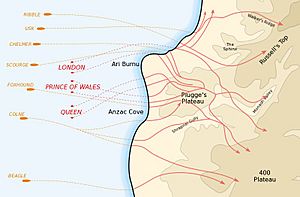
At 1:00 AM on 25 April, the British ships stopped. Thirty-six rowing boats, pulled by steamers, took the first soldiers. These were from the 9th, 10th, and 11th Battalions. At 2:00 AM, a Turkish guard saw ships moving. At 2:53 AM, the ships headed towards the peninsula.
Around 4:30 AM, Turkish guards started shooting at the boats. But the first ANZAC troops were already ashore at Beach Z. This place was later called Anzac Cove. They had landed about 1 mile (1.6 km) further north than planned. Instead of an open beach, they faced steep cliffs and ridges up to 300 feet (91 m) high.
However, this mistake put them in a less defended area. Where they had planned to land, at Gaba Tepe, there was a strong Turkish position with artillery. The hills around Anzac Cove protected the beach from direct Turkish artillery fire. Fifteen minutes after the landing, the Royal Navy started firing at targets in the hills.
The rowing boats got mixed up on the way in. Soldiers from the 9th and 10th Battalions started climbing the Ari Burnu slope. They grabbed bushes or dug their bayonets into the soil to help them climb. At the top, they found an empty trench. The Turks had moved inland. Soon, the Australians reached Plugge's Plateau. The Turks fired at them from a nearby summit.
As more troops landed, they spread out. Some went north, others south. They faced Turkish fire as they came ashore. Some soldiers were killed in their boats or on the beach. Turkish artillery also started shelling the beach, destroying boats.
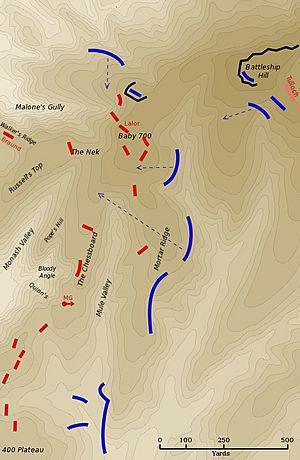
The Australians fought their way forward. They reached Russell's Top. The Turks pulled back to Baby 700, about 350 yards (320 m) away. The Australians advanced about 1,000 yards (910 m) inland. They then dug in.
Turkish Response
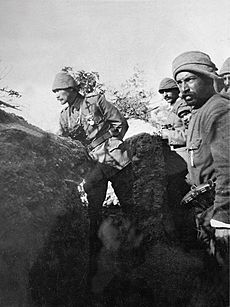
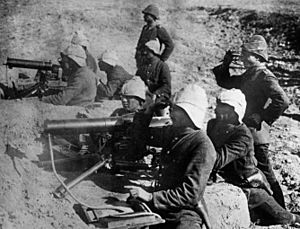
At 5:45 AM, Lieutenant-Colonel Mehmet Sefik of the Turkish 27th Infantry Regiment got orders. He was to move his battalions to support the 2nd Battalion near Gaba Tepe. These battalions were already ready from a night exercise. Colonel Halil Sami, commanding the 9th Division, also sent machine guns and artillery to help.
At 8:00 AM, Lieutenant-Colonel Mustafa Kemal, leading the 19th Division, was told to send a battalion. Kemal decided to go himself with the 57th Infantry Regiment. He moved towards Chunuk Bair. He knew this was a key point for defense. Whoever held these heights would control the battle. By chance, the 57th Infantry was already prepared for an exercise that morning.
By 9:00 AM, Sefik and his battalions were near Kavak Tepe. They met their 2nd Battalion, which had been fighting and retreating. An hour and a half later, the regiment was in place to stop the ANZACs. Around 10:00 AM, Kemal arrived at Scrubby Knoll. He rallied some retreating troops and pushed them back into defensive positions. The 57th Infantry Regiment prepared to counter-attack. Scrubby Knoll became the Turkish headquarters for the rest of the campaign.
Fighting for the Hills
The ANZACs faced tough fighting on the hills. They tried to advance but met strong Turkish resistance.
Baby 700 and MacLaurin's Hill
Baby 700 was a hill in the Sari Bair range. It was named for its height, though it was actually 590 feet (180 m) high. Australian troops tried to reach it. They faced Turkish artillery and scattered fire. Many officers were diverting men to other areas. This meant only small groups reached Baby 700.
Some Australians reached the top of Baby 700. They found an empty Turkish position. But then, Turkish defenders opened fire from further away. The Australians held out for a while but had to pull back. No other ANZAC unit advanced as far inland that day.
Later, more Australians tried to take Baby 700. They fought Turkish troops moving down Battleship Hill. A Turkish machine gun forced them back. The Turks secured Battleship Hill and pushed the Australians off Baby 700.
MacLaurin's Hill was a long section of the Second Ridge. It connected Baby 700 to 400 Plateau. The first ANZACs found the Turks had already left. But as they reached the top, they came under fire. Turkish troops advanced and fired at them from 300 yards (270 m) away.
400 Plateau
The 400 Plateau was a wide, flat area on the second ridge. It was about 600 by 600 yards (550 by 550 m) wide. The northern part was called Johnston's Jolly. The southern part was Lone Pine.
Some ANZACs reached 400 Plateau. They found a Turkish artillery battery getting ready to move. The Australians opened fire, and the battery pulled back. The Australians damaged the guns to make them useless. The ANZAC commander ordered his men to dig in on the plateau. But some units kept trying to advance, following their original orders.
These groups crossed a valley and climbed a hill. They saw Gun Ridge, defended by many Turkish troops. They came under heavy machine-gun and rifle fire. Outflanked by the Turks, they had to pull back.
As more Australian brigades landed, they were sent to reinforce the lines. They were pushed forward into the front line. But they had no clear orders other than to support the 3rd Brigade. Turkish artillery started firing heavily. This forced the Indian artillerymen to move their guns off the plateau.
Most of the Australian Division was now fighting on 400 Plateau. Many officers misunderstood their orders. They still tried to advance to Gun Ridge. But the Turks were ready for them. Turkish machine guns and rifles caused many casualties. A Turkish counter-attack from Gun Ridge followed. By 3:30 PM, the Australian commander ordered his brigade to dig in.
Pine Ridge
Pine Ridge was part of the 400 Plateau. It stretched for about 1 mile (1.6 km) towards the sea. It was covered in thick gorse bushes and small pine trees.
Several groups of men reached Pine Ridge. They faced heavy Turkish fire, causing many casualties. The Australians tried to hold their positions. By noon, the 8th Battalion was dug in on the ridge. In front of them were scattered groups from other battalions. These groups were hidden in the bushes.
Later, large numbers of Turkish troops appeared. They came over the southern section of Gun Ridge.
Turkish Counter-Attack
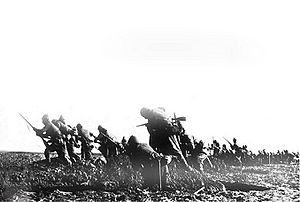
Around 10:00 AM, Kemal and his 57th Infantry Regiment arrived. From Scrubby Knoll, Kemal saw the landings. He ordered his artillery to set up. He told his battalions to attack Baby 700 and Mortar Ridge.
At 11:30 AM, Sefik told Kemal that the ANZACs had a beachhead of about 2,200 yards (2,000 m). He said he would attack towards Ari Burnu with the 19th Division. Around midday, Kemal learned that the 9th Division was busy fighting the British at Cape Helles. They could not help him. So, Kemal ordered more regiments to move forward.
By 12:30 PM, Kemal had four regiments ready. They attacked from north to south. In total, between ten thousand and twelve thousand Turkish soldiers fought against the landing.
Fighting in the North
At 3:15 PM, a company moved to Baby 700. The left side of Baby 700 was held by only sixty men. These were the remains of several units. They had survived five Turkish attacks. After the last attack, the Australians were told to pull back.
By 4:00 PM, New Zealand companies formed a defense line on Russell's Top. Turkish artillery started shelling. This was the start of a new Turkish counter-attack. Columns of troops appeared over Battleship Hill and attacked the ANZAC lines.
At 4:30 PM, three battalions from the 72nd Infantry Regiment attacked from the north. At the same time, the Australians and New Zealanders on Baby 700 broke and ran. They ran back to a new line. The defense line at The Nek was now held by only nine New Zealanders. They had three machine guns, but the crews were all killed or wounded. As survivors arrived, their numbers rose to about sixty.
As it got dark, the Turkish attack reached Malone's Gulley and The Nek. The New Zealanders waited until the Turks came close. Then they opened fire in the darkness. This stopped the Turkish advance. The New Zealanders were greatly outnumbered. They asked for help. But the supporting troops behind them were pulled back. The Turks managed to get behind them. So, the New Zealanders withdrew, taking their machine guns. This left the defenders at Walker's Ridge cut off.
Fighting in the South
The Australians on 400 Plateau had been under constant fire. They saw Turkish troops digging in on Gun Ridge. Around 1:00 PM, a large group of Turkish reinforcements was seen moving along the ridge from the south. The Turks then turned towards 400 Plateau and advanced.
The Turkish counter-attack forced the Australian troops to pull back. Their machine-gun fire caused many casualties. Soon, the attack created a gap between the Australians on Baby 700 and those on 400 Plateau. Heavy Turkish fire forced the survivors to retreat to the western slope of 400 Plateau. By 2:25 PM, Turkish fire was so heavy that the Indian artillerymen had to push their guns off the plateau by hand.
The Australian units were mixed up. They had taken heavy casualties. Their commanders did not know exactly where their men were.
At 3:30 PM, two Turkish battalions attacked again. At 3:30 PM and 4:45 PM, the Australian commander asked for more soldiers. He was told there was only one battalion left in reserve. He spoke directly to General Bridges. He said the situation was desperate. If they didn't get help, the Turks would get behind them. At 5:00 PM, Bridges sent the last battalion to help. They arrived just in time to stop Turkish attacks from the south.
At 5:20 PM, the Australian commander reported that many unwounded men were leaving the battlefield. As it got dark, the Turkish artillery stopped firing. Small arms fire continued, but it was less effective in the dark. Darkness also allowed soldiers to dig better trenches and get more water and ammunition.
The last major action of the day was at 10:00 PM, south of Lone Pine. The Turks charged towards Bolton's Ridge. The 8th Battalion had two machine guns covering their front. These guns caused many casualties among the attackers. When the Turks got within 50 yards (46 m), the 8th Battalion charged with bayonets. The Turks pulled back. Royal Navy searchlights helped the ANZAC defense. Both sides were exhausted. They were not ready for more attacks.
Aftermath
By nightfall, about sixteen thousand men had landed. The ANZACs had formed a beachhead. But it had several undefended parts. It stretched along Bolton's Ridge in the south, across 400 Plateau, to Monash Valley. After a short gap, it continued at Pope's Hill, then at the top of Walker's Ridge. It was not a large beachhead. It was less than 2 miles (3.2 km) long. In some places, only a few yards separated the two sides.
That evening, General Birdwood checked the situation. His senior officers asked him to arrange an evacuation. Birdwood asked General Hamilton for permission to leave.
Both my divisional generals and brigadiers have represented to me that they fear their men are thoroughly demoralised by shrapnel fire to which they have been subjected all day after exhaustion and gallant work in morning. Numbers have dribbled back from the firing line and cannot be collected in this difficult country. Even New Zealand Brigade which has only recently been engaged lost heavily and is to some extent demoralised. If troops are subjected to shellfire again tomorrow morning there is likely to be a fiasco, as I have no fresh troops with which to replace those in firing line. I know my representation is most serious, but if we are to re-embark it must be at once.
Hamilton talked with his naval commanders. They said an evacuation would be almost impossible. Hamilton replied, "dig yourselves right in and stick it out... dig, dig, dig until you are safe". The survivors had to keep fighting alone. On 28 April, four battalions from the Royal Naval Division joined them.
On the Turkish side, their regiments were also exhausted. Many had suffered heavy casualties. Some soldiers had deserted. The Turkish commander, Liman von Saunders, said the situation was saved by the quick actions of the 19th Division. Its commander, Kemal, became known as a very successful officer. He was able to get the most from his troops. He famously told his 57th Infantry Regiment: "Men, I am not ordering you to attack. I am ordering you to die. In the time that it takes us to die, other forces and commanders can come and take our place."
In the following days, both sides tried to attack but failed. The Turks tried on 27 April. The ANZACs tried on 1/2 May. The Turkish attack on 19 May was their worst defeat. They had about ten thousand casualties. The next four months had only small attacks. On 6 August, the ANZACs attacked Chunuk Bair but had limited success.
The Turks never managed to push the Australians and New Zealanders back into the sea. And the ANZACs never broke out of their beachhead. In December 1915, after eight months of fighting, they left the peninsula.
Casualties
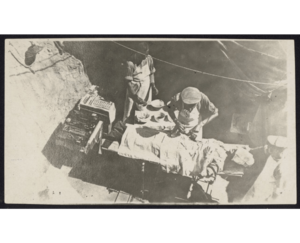
The exact number of casualties on the first day is not fully known. Birdwood thought between three and four hundred men died on the beaches. The New Zealand Ministry for Culture and Heritage says one in five of the three thousand New Zealanders involved became a casualty. The Australian War Memorial records 860 Australian deaths between 25–30 April. The Australian Government estimates 2,000 wounded left Anzac Cove on 25 April. More wounded were still waiting on the battlefields. The Commonwealth War Graves Commission says 754 Australian and 147 New Zealand soldiers died on 25 April 1915. A higher number of officers were killed or wounded. This might be because they kept exposing themselves to fire. Four men were taken prisoner by the Turks.
Private Victor Laidlaw, a medical worker, wrote in his diary about the dangers:
28 April I have to report that one of our chaps was killed this day, he was attending the wounded in the trenches and was killed instantly, every day one sees the burials of fallen soldiers, they are all put in one large hole, then the service is held by the chaplain. I was struck this night by a piece of shell, but it only grazed my thigh and didn't hurt at all. I have got the bullets of several kinds of shells, they will be very interesting relics if I get home safely.
He also described treating the many wounded:
2 May In the evening, we had a very hard nights work, our troops had captured a ridge and of course there were plenty of casualties, we were working right through the night, the most cases I noticed were body injuries, though there was a good many fractures. We had a very anxious time with regard to snipers, several times they fired point blank at our squad which were bringing wounded men back to the base, happily they didn't hit any of our corps. This night though, snipers killed one of the 4th Fld. Amb. men. The Medical service has suffered very severely so far, we don't wear our Red Crosses now as they only make a target for the enemy. At 6 a.m. we were allowed a little time to get something to eat.
It is thought that the Turkish 27th and 57th Infantry Regiments lost about 2,000 men. This was half of their total strength. The full number of Turkish casualties for the day is not known. During the whole campaign, 8,708 Australians and 2,721 New Zealanders were killed. The exact number of Turkish dead is not known but is estimated around 87,000.
Anzac Day
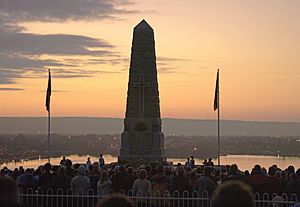
The anniversary of the landings, 25 April, has been called Anzac Day since 1916. It is now one of the most important national days in Australia and New Zealand. It does not celebrate a military victory. Instead, it remembers all Australians and New Zealanders "who served and died in all wars, conflicts, and peacekeeping operations." It also honors "the contribution and suffering of all those who have served."
Around Australia, dawn services are held at war memorials. These services remember those involved. In Australia, another service is held at the Australian War Memorial at 10:15 AM. The prime minister and governor general usually attend. The first official dawn services were held in Australia in 1927 and in New Zealand in 1939. Smaller services are also held in the United Kingdom.
In Turkey, many Australians and New Zealanders gather at Anzac Cove. In 2005, about 20,000 people attended the service there. Attendance grew to 38,000 in 2012 and 50,000 in 2013.
See also
- List of Australian military personnel killed at Anzac Cove on 25 April 1915
- Landing at Cape Helles


