Battle of Bazentin Ridge facts for kids
Quick facts for kids Battle of Bazentin Ridge |
|||||||
|---|---|---|---|---|---|---|---|
| Part of the Battle of the Somme of the First World War | |||||||
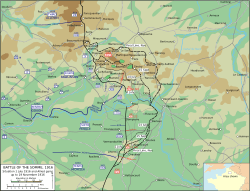 Map of the Battle of the Somme, 1916 |
|||||||
|
|||||||
| Belligerents | |||||||
| Commanders and leaders | |||||||
| Henry Rawlinson | Fritz von Below | ||||||
| Strength | |||||||
| 5 divisions | 3 divisions | ||||||
| Casualties and losses | |||||||
| 9,194 | 2,300 and 1,400 prisoners (see Casualties section) |
||||||
The Battle of Bazentin Ridge was a major fight during the Battle of the Somme in World War I. It took place in France from July 14 to 17, 1916. British soldiers, led by General Henry Rawlinson, launched a surprise attack at dawn against German forces.
Even though some thought the British were not ready, they managed to succeed. They tried to capture a key area called High Wood, but they couldn't quite get it. This was because German soldiers held onto nearby areas. British cavalry, who were supposed to move quickly, got stuck in the muddy, shell-filled ground.
Later that day, British infantry attacked High Wood. They found German troops already there. British cavalry then attacked east of the wood. They surprised German soldiers hiding in tall crops. About 100 Germans were hurt, while only eight British cavalrymen were lost. An airplane helped the cavalry by spotting the Germans and even shooting at them. The British found it hard to keep their advantage. The German army recovered, leading to more small attacks and counter-attacks. The main battles would not start again until mid-September.
Why the Battle Happened
The Big Picture
By June 1916, Germany knew the British and French would attack on the Somme. General Erich von Falkenhayn, the head of the German army, sent more troops and cannons to the area. The German army had built strong defenses. They were ready for a big attack.
However, the British and French attack on July 1st surprised the Germans. Even though the British had many losses, their artillery fire caused many German casualties. The Germans also lost many of their cannons. They tried to counter-attack right away, but this also cost them many soldiers. In the first ten days, Germany lost over 40,000 men. This was more than they lost at Verdun in the same amount of time.
Germany also had problems on the Eastern Front. Russia started a new attack in June. This forced Germany to send more soldiers to help their allies. By July, Germany had to send even more troops to the Somme. This showed that the British and French were now in control of the fighting on the Western Front.
Moving Forward
On July 1st, the French and part of the British army had a big win against the Germans. But north of the Albert–Bapaume road, the British attack was a disaster. Many British soldiers were lost. General Sir Douglas Haig decided to focus on the southern area where they had succeeded.
From July 1st to 13th, the British pushed forward. They captured several German defense lines. But it was hard to bring supplies because of the rain and muddy roads. The British attacks were not always well-planned. They lost many men. Still, they got close to the German second line of defense.
After July 1st, German General Below ordered his soldiers not to give up any ground. He said the war depended on winning on the Somme. He even fired some commanders who allowed their troops to retreat. German reinforcements were sent to the front, but they were often sent in small groups. This led to even more losses for them. German counter-attacks were also poorly planned and often failed.
Getting Ready for Battle
German Defenses
The German second line of defense, called the Braune Stellung, was hit hard by British artillery. Many German soldiers were killed. British planes helped guide the artillery fire. German communication lines were cut. Commanders didn't know what was happening at the front.
More German heavy cannons and airplanes arrived. General Below asked for more machine guns, which were key to their defense. On July 12th, Falkenhayn ordered a "strict defensive" at Verdun. He sent even more troops and cannons to the Somme. This showed how serious the situation was for Germany.
The German army also changed how they organized their troops. They divided the battlefield into permanent areas. This helped them manage their forces better.
British Attack Plan
Before the British captured some key woods, General Rawlinson planned an attack on the German second line. Engineers started clearing roads and filling trenches. Cannons and ammunition were moved closer to the front. Airplanes took photos of German positions.
Rawlinson decided the attack would start at dawn. This would make it hard for German machine gunners to see. Some British troops had to cross a long distance of open ground in the dark. They would get very close to the German lines before the attack. This was risky, but Rawlinson thought it was worth it.
Haig, the overall British commander, was worried. He thought British soldiers were not trained enough for such a complex night move. But Rawlinson and his commanders convinced him. They believed a surprise dawn attack would work.
The plan involved several British divisions. They would attack along a wide front. The goal was to break through the German second line. Three cavalry divisions were also ready to move forward quickly if the attack succeeded. They were supposed to capture key areas like High Wood.
Preparing the Attack
The British started shelling German positions on July 11th. They focused on German cannons and the front lines. They also shelled villages and roads behind the German lines. There wasn't enough heavy artillery ammunition. So, they had to limit how many shells they fired each day.
British field cannons were moved closer. The British had control of the sky. German planes couldn't see what the British were doing. This made it safe for the British to bring up supplies. The British infantry practiced their night approach. They would attack after a very short, intense shelling, only five minutes long. This was to surprise the Germans, who were used to longer bombardments.
Capturing Trônes Wood
British attacks on Trônes Wood had been going on for days. Just after midnight on July 13th/14th, British soldiers attacked again. They moved from south to north. They captured a strong German position. Then they reached the eastern edge of the wood. German troops tried to retreat but were caught by British fire. The British then dug in to hold their new positions.
Night Assembly
Six British brigades, with about 22,000 soldiers, had to get very close to the German lines in the dark. They had to do this without being seen. On July 13th, the British found out the Germans were listening to their phones. So, they made a fake call saying the attack was delayed.
British soldiers used tapes and markers to guide themselves in the dark. They moved forward in lines, very quietly. They brought machine guns and mortars with them. There was very little German shelling. The soldiers got into position with very few losses. Three German deserters even told the British that no attack was expected. This helped the British achieve a big surprise.
The Battle Begins
Reserve Army Attacks Ovillers
While the main attack was happening, other British forces, called the Reserve Army, attacked Ovillers. They tried to push forward from different directions. They captured some ground but faced heavy machine-gun fire. They attacked again and again over the next few days. Finally, on July 16th, the last German soldiers in Ovillers surrendered.
Fourth Army Attacks
July 14th: The Surprise Attack
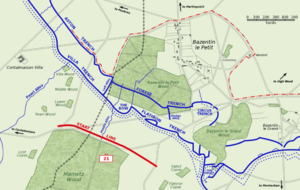
At 3:20 a.m., the sky lit up. British cannons and machine guns fired a short, intense barrage. At 3:25 a.m., the British infantry stood up and moved forward through the mist. The German soldiers were completely surprised. The British reached the German wire without a single shot being fired. They quickly moved past the first German trenches. Some Germans came out of their shelters, but the British were too fast.
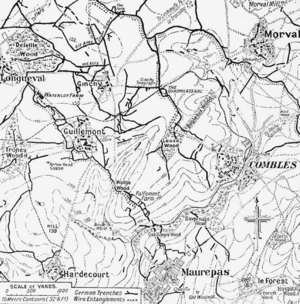
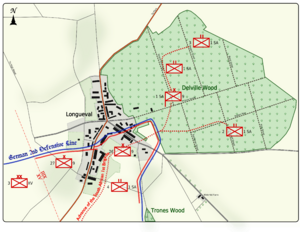
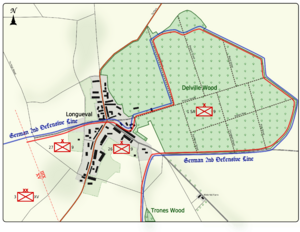
On the right, two British brigades crossed two lines of barbed wire. They cut the wire by hand in some places. They captured two trench lines. The Germans in Longueval fought hard, but the British took most of the village. They couldn't capture Waterlot Farm, a strong German position.
On other parts of the front, the British also broke through. They found the German wire and trenches destroyed. They quickly captured Bazentin le Grand Wood. Then they moved on to Bazentin le Petit village. They captured the village, taking many German prisoners. An hour later, a German counter-attack briefly took back part of the village. But the British quickly recaptured it.
The British had advanced onto the Ginchy–Pozières Ridge. They captured 1,442 German prisoners. Many German bodies were seen. But many Germans also escaped because British soldiers were not trained to hit targets far away.
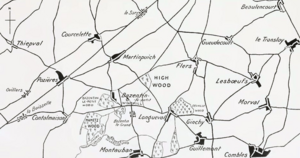
Fighting continued in Longueval and Delville Wood. The British had many casualties. The Germans defended these areas strongly. This stopped the British from pushing further west. Some British officers walked up to High Wood and found no Germans. They suggested sending troops to occupy it. But they were told to wait for the cavalry.
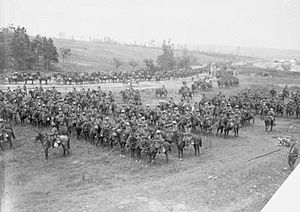
The cavalry was ordered forward but found the ground very difficult. It was wet and full of trenches and shell-holes. They moved very slowly. Rawlinson then ordered the 7th Division to capture High Wood. But the order was changed because of the fighting in Longueval. Other British attacks also failed because of German resistance and heavy shelling.
High Wood
Later in the day, observers saw many German troops retreating from Pozières. The British artillery stopped firing. The 7th Division was ordered to attack High Wood. The cavalry was finally ready on the right side.
An airplane crew saw British soldiers and cavalry advancing. The pilot flew low over German troops hiding in crops. He shot at them with his machine gun. He even dropped a sketch to the cavalry, showing where the Germans were. About 100 Germans were killed or captured in the fields. Eight cavalrymen were killed, and about 100 were wounded.
The British infantry entered High Wood. They found few Germans at first. But the thick undergrowth slowed them down. They couldn't capture the entire wood. They dug in across the middle and eastern edge. The rest of the cavalry was sent back. The 33rd Division, which was supposed to help, didn't get the orders. As night fell, the fighting quieted down, except in Longueval.
July 15th: German Counter-attacks
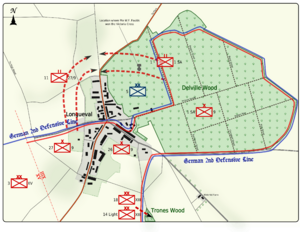
On the right side of the British advance, Delville Wood and northern Longueval were still held by Germans. This made British positions vulnerable. At dawn, the British attacked Waterlot Farm and eventually captured it. But German shelling prevented them from digging in properly until July 17th.
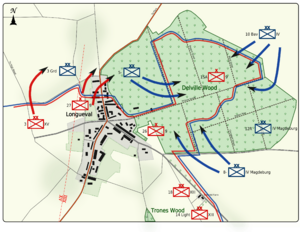
The British tried to attack Longueval again, but German reinforcements pushed them back. The South African Brigade was ordered to capture Delville Wood. They attacked at 6:15 a.m. and quickly took most of the wood. They started digging in, but the ground was hard. German counter-attacks began. Several German battalions attacked the wood but were pushed back with heavy losses.
At High Wood, the British 91st Brigade attacked again but was stopped by machine-gun fire. German counter-attacks recaptured part of the wood. High Wood was hard for British observers to see from the ground. An airplane reported that the wood was full of Germans. The 91st Brigade was pulled back from High Wood that night. German troops quickly re-occupied it.
Other British attacks on the Switch Line and Pozières also failed. German machine guns caused many casualties.
July 16th: More Fighting
The British tried to attack Delville Wood and Longueval again. But German machine guns stopped them. The fighting continued with no clear winner. The British decided to shell the village heavily before another attack.
At High Wood, the British 91st Brigade was confused by the thick trees. They were ordered to retreat that night. They managed to remove most of their wounded. German troops then re-occupied the wood.
On the left, British soldiers tried to advance along the German second line. But they found deep mud. Their mortars ran out of ammunition. The British artillery then shelled the German lines all day. That night, two British battalions attacked and pushed the Germans back. They advanced beyond their goal.
July 17th: Final Push
The British shelled Delville Wood for an hour. Then the infantry attacked again. But the German machine guns were still there. The attack was stopped around noon. Both sides had many losses. German artillery shelled the village and wood all night. The British decided to make another attack on Delville Wood from the west. The Germans were also preparing to attack the wood.
After the Battle
Casualties
The British Fourth Army had 9,194 casualties in this battle. The 3rd Division, 7th Division, and 21st Division had the most losses. One German regiment, BIR 16, lost about 2,300 men.
In July, the British had over 158,000 casualties on the Somme. The French had almost 50,000. The German 2nd Army lost about 103,000 men.
What Happened Next
After the Battle of Bazentin Ridge, the British tried to improve their positions. They wanted to capture High Wood and Pozières. These areas would give them better starting points for future attacks. The Germans tried to take back Delville Wood. This wood helped them hide their positions and see British movements.
For the rest of July and August, both sides fought hard for these areas. But they struggled because they ran out of ammunition. They also had many casualties. The wet weather made it hard to see and move. Both sides ended up fighting in small, separate attacks. Most of these attacks failed because of strong defenses and bad weather. The battlefield often turned into a muddy mess.


