
Battle of Wau facts for kids
Quick facts for kids Battle of Wau |
|||||||
|---|---|---|---|---|---|---|---|
| Part of the New Guinea Campaign of the Pacific Theater (World War II) | |||||||
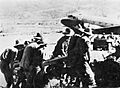
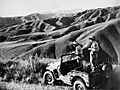
 A 25-pounder of the 2/1st Field Regiment is unloaded from a Dakota on the airfield at Wau. The gun was assembled and fired at Japanese positions around Wau later that day. |
|||||||
|
|||||||
| Belligerents | |||||||
| Commanders and leaders | |||||||
| Strength | |||||||
| 3,000 | 4,000 | ||||||
| Casualties and losses | |||||||
| 349 killed, wounded or missing | 1,200 killed (estimate) | ||||||
The Battle of Wau was an important fight during World War II in New Guinea. It happened from January 29 to February 4, 1943.
Japanese forces sailed from Rabaul across the Solomon Sea. Even with Allied air attacks, they reached Lae safely. From Lae, Japanese soldiers marched overland towards Wau. Wau was an Australian base that could threaten Japanese positions at Salamaua and Lae.
It became a race: the Japanese moved slowly overland due to tough terrain. The Australians moved by air, but bad weather made it hard. By the time the Japanese reached Wau, many more Australian defenders had arrived by plane. The Japanese tried a surprise attack from an unexpected direction. But they could not capture Wau.
Contents
Background of the Battle of Wau
Wau's Geography and Importance
Wau is a town in New Guinea, located in the Morobe province. It sits in the Wau-Bulolo Valley. In the 1920s and 1930s, Wau was a busy place because of a gold rush. Gold miners came from the coast at Salamaua and walked inland on the Black Cat Track.
The miners built houses, workshops, and set up water and electricity. They also built aerodromes (airports) at Wau and Bulolo. These airfields were the main way to reach the Wau-Bulolo Valley.
Wau Airport Challenges
The Wau aerodrome was a grass airstrip about 945 meters (3,100 feet) long. It had a 10% slope going straight towards Mount Kaindi. Planes could only approach from the northeast, landing uphill and taking off downhill. A mountain at the end of the runway meant pilots could not try landing again if they missed. It also stopped them from making the runway longer.
Pilots had to fly Dakotas under clouds and through dangerous mountain passes. They had to "dodge a peak here and cloud there," landing at high speeds. This needed clear weather, but the Owen Stanley Range often had storms, strong winds, and mist from the jungle.
The first plane landed at Wau on April 19, 1927. It showed how important air travel was for the area. Everything, from building materials to furniture, was flown in. This was amazing for a time when most people thought a short plane ride was an adventure.
Kanga Force: Defending Wau
When the war with Japan started, Wau became a safe place for people leaving Lae and Salamaua. Women and children who were not native to the area were flown out. Men of military age joined the New Guinea Volunteer Rifles, a local army group.
At first, civilians left on regular planes. But as the Japanese got closer, bombing Wau on January 23, 1942, it became too risky to fly without fighter planes. These fighters were not available. This left about 250 European and Asian men stuck. They made a dangerous trip over the Owen Stanley Range on foot. They walked to Bulldog, an old mining town with an airfield. From there, they went down the Lakekamu River to the sea.
Establishing Supply Routes
This journey showed that the route was possible. So, the New Guinea Force decided to set up a supply line to Wau through the Bulldog Track. A group from the 1st Independent Company left Port Moresby by boat. They traveled the route and joined the New Guinea Volunteer Rifles defending Wau. This group became known as Kanga Force on April 23, 1942.
More Australian commandos joined Kanga Force by air. The 2/5th Independent Company arrived in May 1942. The 2/7th Independent Company followed in October 1942.
Supplies could be flown into Wau if fighter planes were available to protect them. To save transport planes, supplies also came by land and river. They were shipped to the mouth of the Lakekamu River. Then they went up the river to Bulldog in boats. Finally, native carriers carried them over the Bulldog Track to Wau.
War Strategy for Wau

Kanga Force had one big success: a raid on Salamaua in June 1942. But mostly, they kept the Japanese busy without making them attack Wau. This was important because the Allies did not have enough resources to send more troops to Kanga Force at that time. Kanga Force also gathered valuable information.
Wau was very important to the overall plan of General Sir Thomas Blamey. He was the commander of Allied land forces in the South West Pacific Area. At that time, Japan controlled the skies over the Solomon Sea. This meant the Allies could not attack the Japanese base at Lae by air or sea.
General Blamey decided he would have to capture Lae by land. The plan was to improve the Bulldog Track into a highway. This road would carry trucks and tanks to support a large force marching overland to Lae.
Japanese Counter-Strategy
Lieutenant General Hitoshi Imamura, the Japanese commander in Rabaul, understood Blamey's plans. He knew Kanga Force was a threat. So, he ordered Lieutenant General Hatazō Adachi to secure "important areas west of Lae and Salamaua."
On December 29, 1942, Adachi ordered the 102nd Infantry Regiment to move from Rabaul to Lae. Their mission was to immediately march inland and capture Wau. This force was led by Major General Toru Okabe and was called the Okabe Detachment.
The Allies, however, had good intelligence. Codebreakers were reading Japanese shipping codes. By January 3, 1943, Allied commanders knew about the Japanese force heading to Lae. They did not know Wau was the target yet. But General Blamey did not wait. On January 4, 1943, he ordered the 17th Infantry Brigade to move from Milne Bay to Wau. Its commander, Brigadier Murray Moten, was told to take charge of Kanga Force and defend Wau.
Preparing for Battle
The Commander of Allied Air Forces, Lieutenant General George Kenney, wanted to bomb Japanese ships in Rabaul Harbour before they could leave. His bomber commander, Brigadier General Kenneth Walker, suggested a noon attack. Kenney insisted on a dawn attack, even if it meant bombers flew out of formation. He wanted to avoid Japanese fighter planes.
Bad weather stopped bombers from Australia from joining. Only six B-17s and six B-24s from Papua were available. Walker attacked Rabaul Harbour at noon on January 5, ignoring Kenney's order. They faced heavy anti-aircraft fire and constant fighter attacks. Two B-17s were shot down, including Walker's plane. He was given the Medal of Honor after his death. Later, it was confirmed that only one Japanese ship was sunk.
Japanese Convoy Attacked

On January 6, the Japanese convoy carrying Okabe's force left Rabaul for Lae. Allied planes, warned by intelligence, found and attacked the convoy. The Japanese ships were hidden by low clouds and protected by their fighters. The Allies claimed to have shot down many Japanese planes. A P-38 pilot, First Lieutenant Richard Bong, shot down three, becoming an ace.
An Australian Catalina plane attacked the convoy at night. It sank the transport ship Nichiryu Maru. Destroyers rescued 739 of the 1,100 soldiers on board. But the ship carried all of Okabe's medical supplies, which were lost. Another transport, Myoko Maru, was badly damaged at Lae by American planes. It had to be beached. Still, the convoy reached Lae on January 7 and landed about 4,000 soldiers.
Japanese Advance on Wau

Between January 10 and 16, the Okabe Detachment moved along the coast in barges to Salamaua. There, they got ready for the attack on Wau. On January 16, the Japanese met an Australian patrol. A short fight happened, and the Australians pulled back.
Instead of chasing them, Okabe chose a different path to Wau. He used an old, rarely used track through difficult country. This track ran next to the Black Cat Track. This surprised the Australians. The Japanese avoided being seen by Allied planes as they cut their way through the jungle. The mountains east of Wau were about 450 meters (1,500 feet) high. There were no clear tracks in some parts. Soldiers had to carry their food, ammunition, and equipment on their backs. This made the advance very hard and slow.
Finally, they reached a peak where they could see the Wau-Bulolo Valley. They were running low on food. Okabe ordered the attack, saying, "We are short of food—let us quickly capture Wau and get food from the enemy!" But moving through the thick jungle caused his units to get separated. The attack was not well-coordinated.
Australian Reinforcements Arrive

Meanwhile, the first group of the 17th Infantry Brigade, the 2/6th Infantry Battalion, left for Port Moresby on January 9, 1943. The rest of the battalion followed over the next two nights. The 2/7th Infantry Battalion and the 2/5th Infantry Battalion also departed Milne Bay by ship.
It looked like it would be hard to beat the Japanese to Wau. At this time, there were only 28 Dakota transport planes in New Guinea. These planes had to be shared with another battlefront. So, each area had about 14 planes, meaning 10 were available daily. A Dakota could carry 27 passengers or about 4,500 kg (10,000 lb) of cargo. Moving one infantry battalion needed 60 plane loads. Moving a whole brigade needed 361 plane loads.
Between January 10 and 19, the 2/6th Infantry Battalion was flown from Port Moresby to reinforce Kanga Force. There were three plane crashes during this time. Bad weather often forced many planes to turn back without landing. Brigadier Moten himself had to return to Port Moresby twice before finally reaching Wau on his third try. Bad weather continued, limiting air operations. Part of the 2/5th Infantry Battalion arrived on January 27.
The Battle of Wau
A Company of the 2/6th Infantry Battalion, led by Captain W. H. Sherlock, stood in the way of Okabe's advance. Okabe ordered a full attack on Sherlock's position on January 28. Sherlock's men were forced back to a nearby hill. For most of the afternoon, Japanese attacks were stopped by Australian mortar and machine gun fire. Sherlock himself led a bayonet charge to stop Japanese soldiers from sneaking in.
By 6:00 PM, Sherlock's mortar ammunition was gone, and his small arms ammunition was low. His position was being hit by mortar rounds and machine gun fire. Sherlock held on through the night. He was killed the next day trying to break through the Japanese lines. He was honored for his bravery.
Air Support and Reinforcements

The fighting at Buna ended on January 23. This freed up planes to support Wau. Also, 52 new Dakotas arrived in Australia from the United States. These planes were quickly sent to Port Moresby to help fly the 17th Infantry Brigade into Wau. This meant up to 40 planes were now available daily.
On January 29, 57 plane loads of troops arrived. They brought most of the 2/7th Infantry Battalion and the rest of the 2/5th. Even though they were shot at while landing and unloading, 40 planes made 66 trips the next day. Their cargo included two dismantled 25-pounder guns with ammunition. These guns were landed in the morning and were firing by noon. They shelled a group of 300 enemy soldiers. Australian Beaufighters also attacked the Japanese from the air.
Three Dakotas were damaged when one overshot the runway and crashed into two others. One was repaired, but two were completely destroyed. A pilot was injured, losing a leg. Japanese attacks that day reached the edge of the airstrip but were forced back.
On January 31, 35 planes made 71 trips. On February 1, 40 planes made 53 trips. They brought more troops, including the 2/3rd Independent Company. This brought Kanga Force's strength to over 3,000 men. It also included a company of machine guns to defend the airfield. By February 4, Okabe's forces were in danger of being surrounded. He was forced to order a retreat. With no hope of capturing Wau, Okabe was told to give up the attack. Brigadier Moten was honored for his excellent leadership at Wau.
Japanese Air Attacks and Allied Air Defense

The Japanese tried to stop Allied transport planes by bombing the Wau airstrip. But it was the rainy season, and they faced the same bad weather that bothered the Allies. Japanese planes that left Rabaul could not see the Wau airstrip and returned without doing anything.
It was not until February 6 that there was a big air battle. Eight P-39s were patrolling over Wau. They had just escorted five Dakotas. They saw 24 Japanese planes. Captain Thomas H. Winburn led his P-39s in an attack, claiming 11 Japanese planes shot down.
Meanwhile, eight P-40s also on an escort mission saw 12 planes bombing the Wau airstrip. The transport planes they were escorting turned back. The fighters attacked the Japanese, claiming seven planes shot down. At this time, four Dakotas were on the ground at Wau, and five more were circling, waiting to land. One Dakota was shot down, and all five crewmen died. A Dakota on the ground was damaged, and an Australian CAC Wirraway plane was destroyed by a bomb. Its two crewmen had just left the plane seconds before. The pilot was unharmed, but the observer was hit by shrapnel. A signals hut was directly hit, and three men were killed.
More Allied fighter squadrons joined the battle. P-38s shot down Japanese fighters over Wau. P-40s surprised six Japanese fighters, shooting down three. Allied airmen claimed to have shot down many Japanese planes. Australian gunners also claimed more planes. The 374th Troop Carrier Group was given a special award for its part in the battle.
Aftermath of the Battle
From May 1942 until February 15, 1943, Kanga Force lost 30 officers and 319 men. This included 4 officers and 48 men from the 2/6th Infantry Battalion. The Australians counted 753 Japanese dead. Adding those lost on the Nichiryu Maru and many airmen, the total Japanese deaths were around 1,200.
The Allies wanted to chase the Japanese, but it was too hard to get supplies there. The Japanese planned another attempt to capture Wau. This time, they planned to approach from the north. They would build a road from Markham Point to the Snake River Valley. From there, they would go down the valley to Wau.
The 51st Division was chosen for this mission. But it lost many soldiers on its way to New Guinea in the Battle of the Bismarck Sea. This showed the Japanese how dangerous Allied air power was. So, a new plan was made to build a land supply route through the Ramu and Markham Valleys. In June, the Japanese commander was ordered to prepare to capture Wau. Road building was very difficult for the soldiers. But the road was still not finished when the Allies landed at Nadzab and Lae. This caused the work to stop. For the Allies, Wau became an important starting point for the Salamaua–Lae campaign.
Images for kids
-
A 25-pounder of the 2/1st Field Regiment is unloaded from a Dakota on the airfield at Wau. The gun was assembled and fired at Japanese positions around Wau later that day.
-
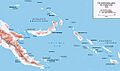
Papua, the eastern part of New Guinea, and the Solomon Islands
-
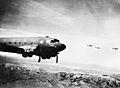
Dakotas fly across the mountains towards Wau. Blamey's ability to reinforce his position at Wau depended on these aircraft, but they were limited in numbers and hampered by the weather.
-
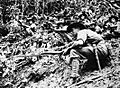
Australian patrol moves out along the Mubo
-
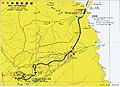
The Wau-Mubo area, which the Japanese Army traversed to reach Wau.
-

A Wirraway of No. 4 Squadron RAAF burns after being set on fire during the Japanese air raid on Wau.
-
Battle of Wau

