Battle of the Heligoland Bight (1939) facts for kids
Quick facts for kids Defence of the Reich |
|||||||
|---|---|---|---|---|---|---|---|
| Part of the Western Front of World War II | |||||||
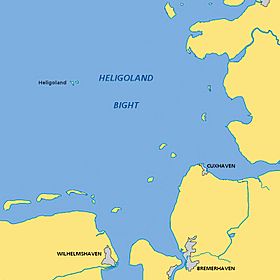 The Heligoland Bight |
|||||||
|
|||||||
| Belligerents | |||||||
| Commanders and leaders | |||||||
| Units involved | |||||||
| No. 9 Squadron RAF No. 37 Squadron RAF No. 149 Squadron RAF |
Stab./Jagdgeschwader 1 II./Jagdgeschwader 77 II./Trägergruppe 186 (N)./Jagdgeschwader 26 I./Zerstörergeschwader 76 I./Jagdgeschwader 26 |
||||||
| Strength | |||||||
| 22 Vickers Wellington bombers | 44 fighter aircraft | ||||||
| Casualties and losses | |||||||
| 12 bombers destroyed 3 bombers damaged 57 killed |
2 Bf 109s destroyed 30 sailors injured |
||||||
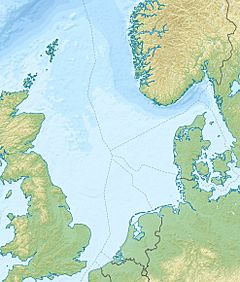
The Battle of the Heligoland Bight was the first major air battle of World War II. It happened on December 18, 1939, over the North Sea near Germany. This battle was part of a larger air campaign called the Defence of the Reich.
At the start of the war, the British Royal Air Force (RAF) wanted to attack German warships. They hoped to stop these ships from being used in the Battle of the Atlantic. The RAF believed their bombers were strong enough to defend themselves against enemy fighter planes.
However, earlier missions had some problems. There was bad weather and communication issues. The RAF decided to send more planes at once to make their attacks stronger.
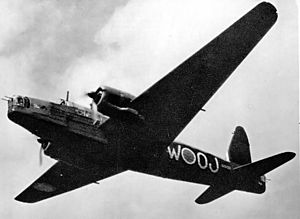
On December 18, 1939, 22 British Vickers Wellington bombers flew towards Wilhelmshaven. This German port was home to important warships. The German air force, called the Luftwaffe, sent out many fighter planes. They intercepted the British bombers.
The battle had a big impact on both sides. The RAF realized that flying bombers in daylight was too risky. They decided to switch to night bombing missions instead. The Luftwaffe, on the other hand, felt very confident. They believed Germany was safe from enemy air attacks. This belief later caused problems for them in the war.
Contents
What Led to the Battle?
RAF's Early War Strategy
Before World War II began, the RAF Bomber Command thought that air power alone could win wars. They believed that groups of bombers flying close together could defend themselves. They thought these bombers could fight off enemy fighters even without their own fighter escorts.
However, the RAF did not have large, powerful bombers yet. These bombers would need to carry heavy bombs deep into Germany. Also, countries like the Netherlands and Belgium wanted to stay neutral. They did not allow British planes to fly over their land. France also refused to let the RAF bomb German cities from French airfields. This was because France feared Germany would attack them back.
So, the only option for the RAF was to fly missions directly from Britain. This meant they could only reach ports and coastal cities in northern Germany easily. This situation suited the British Navy, known as the Admiralty.
Protecting Ships from U-boats
During the early part of the war, German submarines, called U-boats, were a big threat. These U-boats were sinking British ships that brought supplies from other countries. For example, in October 1939, a U-boat sank the battleship HMS Royal Oak. This caused the loss of 786 sailors.
Because of this, the Admiralty wanted the RAF to focus on protecting ships. They wanted the RAF to use its RAF Coastal Command more. The British decided to attack German warships to stop them from helping the U-boats. These attacks were planned to avoid civilian areas.
Early RAF Missions (September – December 1939)
The RAF began sending bombers over the North Sea to find and attack German warships. On September 3, 1939, a British plane spotted German ships near Wilhelmshaven. However, the radio failed, and the attack was delayed. When bombers finally arrived, the weather was bad, and they found no targets.
On September 4, another attempt was made. British bombers found German warships like Gneisenau and Scharnhorst. Some bombs hit the Admiral Scheer, but they did not explode. Another bomber crashed into the cruiser Emden, killing 11 sailors.
During these early raids, German fighter planes and anti-aircraft guns shot down several British bombers. The Germans used early Freya radar systems. These radars gave them about eight minutes warning when British planes were coming. This helped the German defenses.
The RAF realized that the delay between spotting ships and attacking them was too long. They decided to send groups of bombers on patrol to find and attack German ships directly. On December 3, 1939, 24 Wellington bombers attacked. They claimed to sink a German minesweeper. The German pilot Günther Specht was shot down in this attack.
On December 14, twelve Wellingtons flew at a very low height due to clouds. Five of them were lost to fighters and anti-aircraft guns. The RAF still believed their bombers were safe in tight formations. They thought fighters were not the main threat.
German Air Defenses
The German air force, the Luftwaffe, was in charge of defending German ports. The main defense unit was the Air Defence Command Hamburg. However, this system had problems. The fighter planes and anti-aircraft guns were too far apart to work together well.
Also, the leaders of the Luftwaffe and the German Navy did not get along. This made it hard for them to cooperate. To fix this, fighter units defending the North Sea coast were put under a new command. This command was led by Oberstleutnant Carl-August Schumacher. He had a naval background, which they hoped would help with cooperation. But Schumacher and his navy counterpart were the same rank, so neither could give orders to the other. This still caused problems.
Who Fought in the Battle?
German Luftwaffe Forces
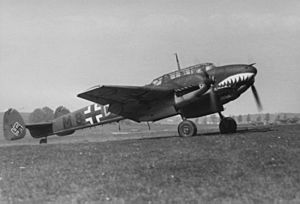
Carl-August Schumacher led a new unit called Stab./Jagdgeschwader 1 (Fighter Group 1). This group had about 80 to 100 aircraft. They used Messerschmitt Bf 109 and Messerschmitt Bf 110 planes. The Bf 110 was a strong plane designed to destroy bombers.
Several smaller groups of fighters were part of Schumacher's command. These included:
- II./Jagdgeschwader 77
- II./Trägergruppe 186
- 10. (Nacht)./Jagdgeschwader 26 led by Johannes Steinhoff
- I./Zerstörergeschwader 76 led by Wolfgang Falck
British RAF Forces
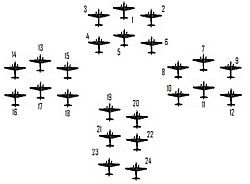
Section 1: 1 Richard Kellett 2 Turner 3 Speirs
Section 2: 4 Kelly 5 Duguid 6 Riddlesworth
Formation 2
Section 1: 7 Harris 8 Briden 9 Bolloch
Section 2: 10 Ramshaw 11 Grant 12 Purdy
Formation 3
Section 1: 13 Guthrie 14 Petts 15 McRae
Section 2: 16 Challes 17 Allison 18 Lines
Formation 4
19 Hue-Williams 20 Lemon 21 Wimberley 22 Lewis 23 Thompson 24 Ruse
The RAF sent planes from No. 3 Group RAF. This group included 9 Squadron, 37 Squadron, and 149 Squadron. These squadrons were quickly put together for daylight missions. Many of the crews were not well-trained in flying in tight formations.
RAF Fighter Command pilots had warned that the bomber formations were easy targets. They said they could "decimate" (destroy a large part of) a squadron quickly. But these warnings were ignored.
Wing Commander Richard Kellett was given command of the mission. He was an experienced leader, but he had not practiced with all the squadrons. He had not been able to plan how to attack naval targets or how to deal with fighter attacks. For the December 18 mission, 24 Wellington Bombers were given to Kellett. The British bombers flew in a diamond-shaped formation.
The Battle Begins
Flying Towards the Target
On the morning of December 18, 1939, the first Wellington bomber took off from RAF Mildenhall. Wing Commander Richard Kellett was flying it. The planes from 9 Squadron took off from RAF Honington and met up over King's Lynn. No. 37 Squadron missed the meeting but caught up later over the North Sea.
As they left England, the clouds disappeared. The bombers were flying in a clear, bright sky. This made it easy for German aircraft to spot them. Two bombers had to turn back due to engine trouble. This left 22 Wellingtons to continue the mission.
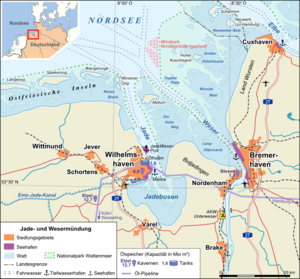
The bombers flew north past the Frisian Islands and then turned south. They planned to approach Wilhelmshaven from the east, hoping to surprise the Germans. This plan worked, and they arrived without being stopped at first. However, the southward journey gave the Germans about an hour's warning. German radar had picked up the bombers 30 kilometers off the coast.
As the bombers flew along the coast, they faced heavy anti-aircraft fire from ships and harbor defenses. The bombers fired back with their machine guns. They were flying at about 3,000 meters high. The RAF believed that anti-aircraft fire was the biggest danger, not German fighters.
Poor communication in the Luftwaffe meant the German defenses were slow to react. Naval radar systems first spotted the British bombers. But German fighter commanders did not believe the British would attack in such clear weather. Fighters were only sent up when ground observers confirmed the bombers were real. The observers even thought there were 44 British planes, twice the actual number.
Air Combat Over the Bight
At 1:10 PM, the RAF formation flew over the mud flats west of Cuxhaven. They came under fire from German anti-aircraft guns. As Kellett turned towards the Jade Estuary and Wilhelmshaven, more anti-aircraft units opened fire. The warships Scharnhorst and Gneisenau also fired their guns.
In the distance, the bombers saw German fighters taking off. German pilots had been told to attack the Wellingtons from the side. This was a weak spot for the bombers. Attacking from behind was dangerous because the bomber's tail gunners could easily hit them. Early Wellingtons also had fuel tanks that could catch fire easily if hit.
Only 149 Squadron managed to drop bombs on the ships in Wilhelmshaven harbor. Six 227-kilogram bombs were dropped, but the results are unknown. This was the only success for the RAF's first major raid. After the anti-aircraft fire, the RAF formation became disorganized. Kellett's and Harris's formations stayed together, but others, like Squadron Leader Guthrie's and Squadron Leader Hue-Williams's, fell behind.
At 1:30 PM, German Bf 109 fighters, led by Johannes Steinhoff, attacked. They claimed to shoot down seven bombers. Soon after, Bf 110 fighters, led by Wolfgang Falck, also attacked. Falck's plane was badly damaged, but he managed to land safely.
One German pilot, Johann Fuhrmann, was shot down by a British gunner. He tried to swim to shore but drowned. Another German pilot, Roman Stiegler, crashed into the sea while chasing a bomber and was killed. Among the German pilots who claimed victories was Helmut Lent, who was credited with two bombers. Wing Commander Schumacher, the German commander, also shot down a bomber. By 1:45 PM, the German fighters, running low on fuel, returned to base. By 2:05 PM, the remaining British bombers were out of range.
What Happened After the Battle?
Claims and Reality
The German fighter pilots claimed to have shot down 38 bombers. However, the RAF actually lost 12 aircraft. The British bomber gunners claimed to have shot down 12 German fighters. In reality, the Germans lost three Bf 109s destroyed and two severely damaged. Two Bf 110s were also severely damaged. This shows that both sides claimed more victories than they actually achieved.
The Germans initially claimed that 44 or even 52 British bombers were in the air. Later, they reduced this to 27 "confirmed" victories. This was still more than double the actual number of planes shot down. British records show no deception and confirm the losses of only 12 planes from the three squadrons involved.
British Lessons Learned
The RAF saw the attack as a failure. They believed it was due to poor formation flying and leadership. They thought they needed better defensive guns on the sides of their bombers. They also needed fuel tanks that would not catch fire easily. They still hoped to make daylight bombing work.
On December 22, an RAF report said that tight formations of six Wellington aircraft could survive heavy fighter attacks. But loose formations would suffer many losses. The report also blamed Squadron Leaders Guthrie and Hue-Williams for breaking formation. However, others argued that these leaders were untrained and had never faced the enemy before. They also blamed the RAF headquarters for not planning or training the squadrons properly.
The RAF's rules for formation flying said that each group of six aircraft should be a self-contained unit. If a leader tried to follow the main commander too closely, their own section would break apart. Bomber formations relied on planes protecting each other. If the formation broke, each bomber would be on its own, making it an easy target. Kellett and Harris kept their formations together and lost fewer planes. Within weeks, the RAF began discussing switching to night bombing.
Another problem was the old bomb sights they were using. These sights required the aircraft to fly straight for a long time before dropping bombs. This made them easy targets for anti-aircraft guns. The RAF asked for a new bomb sight that allowed planes to maneuver more. This led to the development of the Mark XIV bomb sight, which became standard later in the war.
German Lessons Learned
The Germans also learned lessons. They noticed that the Wellington bombers' nose and tail guns did not protect well against attacks from the side. They also saw that the bombers' rigid formations made it easy for fighters to choose their attack angle. Schumacher, the German commander, said that anti-aircraft fire helped break up formations, making it easier for fighters.
After their success, the Luftwaffe did not analyze the battle as thoroughly as the German Army did after the Polish Campaign. The Luftwaffe mostly used the victory for propaganda. They did not fix the problems and warnings that the battle showed.
For a while, the Luftwaffe focused on attacking enemy forces on the front lines. They believed that by defeating enemies in their own skies, Germany would be safe. They thought that occupying enemy territory would prevent attacks on Germany. This meant that German daylight defenses were rarely tested. This made the Luftwaffe believe Germany was safe from attack. They focused on building bombers instead of fighters.
However, this belief proved wrong later in the war. When the United States entered the war, the United States Army Air Forces (USAAF) began strategic bombing raids in daylight. The Luftwaffe was not prepared for this. Even by the end of 1942, Germany's air defenses were still not strong enough. Hans Jeschonnek, a Luftwaffe leader, wrongly believed that "one" fighter wing could handle the Allied daylight raids. Adolf Galland, a top German fighter pilot, said that the lack of planning for air defense was one of the Luftwaffe's biggest mistakes in the war.


