Bougainville campaign facts for kids
Quick facts for kids Bougainville campaign (1943–45) |
|||||||
|---|---|---|---|---|---|---|---|
| Part of the Solomon Islands campaign of the Pacific Theater (World War II) | |||||||
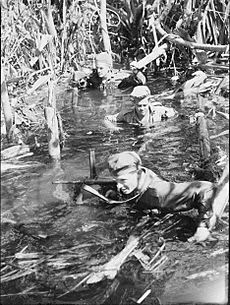
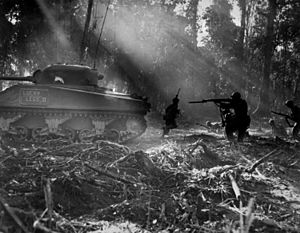 United States Army soldiers hunt Japanese infiltrators on Bougainville in March 1944. |
|||||||
|
|||||||
| Belligerents | |||||||
| Commanders and leaders | |||||||
| Strength | |||||||
| 144,000 American troops 30,000 Australian troops 728 aircraft |
45,000–65,000 troops 154 aircraft |
||||||
| Casualties and losses | |||||||
| USA: 727 dead Australia: 516 dead |
18,500–21,500 dead | ||||||
The Bougainville campaign was a series of land and sea battles during World War II. It took place on and around Bougainville, an island in the Solomon Islands. This campaign was a key part of the Pacific campaign, where the Allied forces fought against the Empire of Japan.
The fighting on Bougainville happened in two main parts. The first part, from November 1943 to November 1944, involved American troops. They landed on the island and set up a strong defense area around a beach. The second part, from November 1944 to August 1945, mainly involved Australian troops. They went on the attack against Japanese soldiers who were isolated and struggling for supplies. The war ended before all Japanese forces were defeated.
Contents
- Japanese Control of Bougainville
- Allied Plans for Bougainville
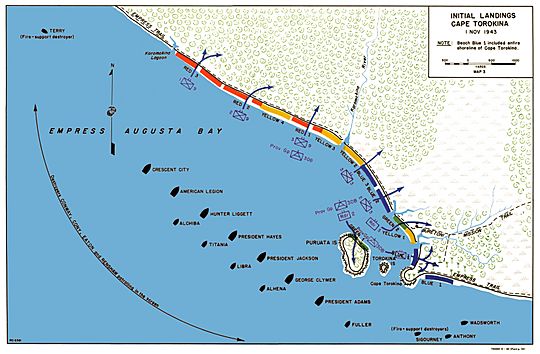
- Landing at Cape Torokina
- Expanding the Beachhead in November 1943
- Securing the Perimeter in December 1943
- January–February 1944: Surrounding Rabaul
- March 1944: Japanese Counterattack
- Australian Phase: November 1944 – August 1945
- Namesake
Japanese Control of Bougainville
Before World War II, Bougainville was managed by Australia as part of the Territory of New Guinea. However, the island is geographically part of the Solomon Islands. Because of this, the campaign is sometimes seen as part of both the New Guinea and Solomon Islands campaigns.
Why Japan Wanted Bougainville
In March and April 1942, Japan took control of Bougainville. They built important naval and air bases there. These bases helped protect Rabaul, a major Japanese military hub in Papua New Guinea. They also allowed Japan to expand further into the Solomon Islands. For the Allies, taking Bougainville was crucial to weaken the Japanese base at Rabaul.
When the Japanese first arrived, there was only a small Australian force on the island. Most of these Australians were evacuated, but some stayed behind to gather information. The Japanese then built airfields in several locations, including Buka Island, the Bonis Peninsula, and near Buin. These airfields allowed them to launch attacks and control sea routes in the southern Solomon Islands.
At the start of the Allied attacks, estimates suggested there were between 45,000 and 65,000 Japanese soldiers and workers on Bougainville. These forces were led by General Harukichi Hyakutake.
Allied Plans for Bougainville
The main goal for the Allies in the Solomon Islands was to weaken the large Japanese base at Rabaul. To do this, they needed an airfield closer to Rabaul for their smaller bombers and fighter planes. This meant they didn't need to capture the entire island of Bougainville, just a flat area big enough for an airbase.
Choosing a Landing Spot
The area around Cape Torokina was chosen as the landing site. The Japanese didn't have many troops there, and there was no airfield. Empress Augusta Bay offered a somewhat safe place for ships. Also, the mountains and thick jungle to the east of the cape would make it hard for the Japanese to launch a quick counterattack. This would give the US forces time to set up their defenses after landing. The plan for landing at Cape Torokina was called Operation Cherry Blossom.
Getting Ready for the Invasion
Bougainville was under the command of General Douglas MacArthur, whose headquarters were in Australia. However, Admiral William F. Halsey was in charge of the actual planning and operations. Halsey set November 1, 1943, as the invasion date.
The Japanese knew the Allies were planning another attack, but they weren't sure where. The commander of the Japanese fleet sent many aircraft to Rabaul to bomb Allied bases. However, these Japanese planes suffered heavy losses, which later prevented them from stopping US landings elsewhere.
To confuse the Japanese, the Allies carried out two other invasions. New Zealand troops landed on the Treasury Islands on October 27. A temporary landing also happened on Choiseul Island. Unlike earlier campaigns, the Allies couldn't get much information from local observers on Bougainville because the Japanese had already driven them away.
Allied Forces for the Attack
Rear Admiral Theodore Stark Wilkinson led the landing forces at Cape Torokina. His ships carried the III Marine Expeditionary Force, commanded by Major General Alexander Vandegrift. This force included about 14,321 men, mostly from the 3rd Marine Division and the US Army's 37th Infantry Division.
Landing at Cape Torokina
First Day: November 1–2, 1943
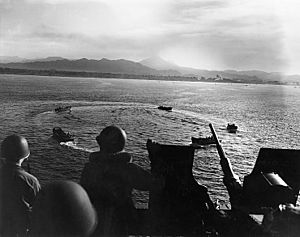
On the morning of November 1, 1943, three groups of transport ships arrived in Empress Augusta Bay. The maps the Allies had of Bougainville were old and not very accurate. Admiral Wilkinson had learned from past landings that it was important to unload troops and supplies quickly. So, he made sure his ships were only partly full and that many troops helped with unloading.
The Japanese were surprised and couldn't launch an air attack on the invasion fleet. This allowed the Allied ships to land almost all the troops and supplies safely. Wilkinson ordered the transport ships to leave the area by sundown.
Air Attacks on Rabaul
The Japanese commander, Admiral Koga, sent seven heavy warships to Rabaul. This worried Admiral Halsey because the Bougainville beachhead was still vulnerable to attack from these ships. Halsey took a big risk and ordered his aircraft carriers to attack the Japanese ships at Rabaul.
On November 5, planes from the carriers Saratoga and Princeton attacked Rabaul. They didn't sink any ships, but they damaged enough to make Koga withdraw his heavy warships. This meant the Japanese ships couldn't attack the new beachhead on Bougainville. A second air raid on November 11 further damaged Japanese ships.
Expanding the Beachhead in November 1943
Defending and expanding the US landing area at Cape Torokina was tough. There was a lot of jungle warfare, and many soldiers got sick from malaria and other tropical diseases. Most of the major fighting to expand the beachhead happened in the Marines' area.
From November 6 to 19, more US troops landed, and the beachhead slowly grew. On November 7, the Japanese managed to land some troops by destroyer just outside the American beachhead. However, the Marines wiped out this force the next day. Japanese infantry also attacked US forces but were pushed back.
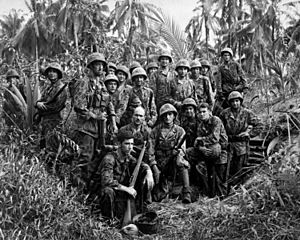
American Marine Raiders fought the Japanese in the Battle for Piva Trail on November 8–9. The Marines then chose spots for two new airstrips. On November 9, Major General Roy Geiger took command of the Marine forces. Four days later, he took command of the entire Torokina beachhead. By this time, the "Perimeter" (the defended area) was quite large.
The Japanese launched air raids against the US forces around Torokina throughout early November. But by November 17, they had lost so many planes that their main carrier division had to pull back. This allowed US forces to gradually expand their perimeter, eventually capturing two airfields. These airfields were then used to launch attacks against Rabaul. After this, the Japanese troops on Bougainville became largely cut off from outside help.
Late November Battles
At Rabaul, the Japanese commander, Imamura, still believed the Allies wouldn't stay long at Torokina. He thought it was just a temporary stop. So, instead of launching a big counterattack on Bougainville, he sent more troops to Buka Island, north of Bougainville, thinking that was the Allies' real target. This was a mistake, similar to what happened on Guadalcanal.
The Battle of Piva Forks from November 18–25 almost completely destroyed a Japanese infantry regiment. Even so, the beachhead wasn't entirely safe. Japanese artillery still fired on landing ships, causing casualties. The Marines silenced these guns the next day.
On November 25, a naval battle called the Battle of Cape St. George took place. US destroyers intercepted Japanese destroyers carrying troops to reinforce Buka. The US forces sank three Japanese destroyers without taking any hits.
However, the battle wasn't completely one-sided. On November 28–29, the 1st Marine Parachute Battalion launched a raid to stop Japanese reinforcements. They landed without resistance, but the Japanese counterattacked strongly. The Marines had to be rescued by landing craft.
Securing the Perimeter in December 1943
American Naval Construction Battalions (CBs) and New Zealand engineers worked hard to build three airstrips. The first fighter strip near the beach began operating on December 10. The Japanese Army command at Rabaul was sure the Allies would move on from Torokina. So, Imamura ordered stronger defenses to be built at Buin, on the southern tip of Bougainville.
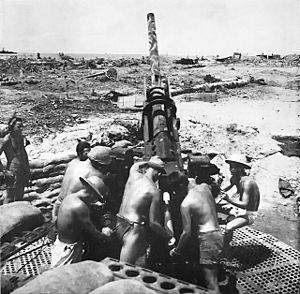
In November and December, the Japanese placed field artillery on high ground around the beachhead. They shelled the airstrips and supply areas. The 3rd Marine Division extended its lines to include these hills in a series of operations from December 9–27. One hill, called "Hellzapoppin Ridge," was a very strong natural fortress. The Japanese had built hidden positions there. The 21st Marines attacked Hellzapoppin Ridge but were pushed back on December 12. After coordinated air, artillery, and infantry attacks, the ridge was finally captured on December 18. The Marines also fought around Hill 600A, capturing it by December 24, 1943.
On December 15, the US Army's XIV Corps, led by Major General Oscar Griswold, took over command from the Marines. On December 28, the tired 3rd Marine Division was replaced by the Army's Americal Division.
January–February 1944: Surrounding Rabaul
Air Attacks on Rabaul
Rabaul had already been bombed many times. To cause more damage, the Allies needed to use smaller, more agile aircraft that could fly low and hit specific targets. To do this, they built several airstrips on Bougainville. The fighter strip at Torokina began operating on December 10. An inland bomber strip, "Piva Uncle," opened on Christmas Day, and another inland fighter strip, "Piva Yoke," opened on January 22.
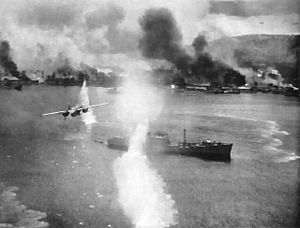
Once the three airstrips were fully working, the Allied air command moved its headquarters to Bougainville. At first, their raids had limited success because Japanese anti-aircraft fire was very strong. But the Americans developed new tactics, and the Japanese air force suffered heavy losses. By late January, the Japanese navy could no longer risk its ships in Rabaul harbor due to the constant air attacks.
Capturing the Green Islands
The Allies decided to surround Rabaul. To help with this, and to get another airfield close to Rabaul, Admiral Halsey ordered an invasion of the Green Islands. These were small coral islands about 115 miles east of Rabaul. Scouts found that the local people there were friendly to Europeans and disliked the Japanese. So, the Allies decided not to bomb or shell the islands before the landing.
On February 15, New Zealand troops landed on the Green Islands. The landing went smoothly, and there was very little interference from Japanese planes. This showed how much damage the Allies had already done to the Japanese air force.
With the Green Islands captured, the Japanese base at Rabaul could no longer launch air attacks to stop Allied operations. The Green Islands also provided a base for patrol boats, which could now enter Rabaul harbor undetected. In addition, an airfield was built there, putting the Japanese base at Kavieng within range of Allied planes. By March 8, Allied bombers were flying to Rabaul without escorts. Rabaul, once a major Japanese naval base, was reduced to a small supply point.
March 1944: Japanese Counterattack
Japanese Preparations
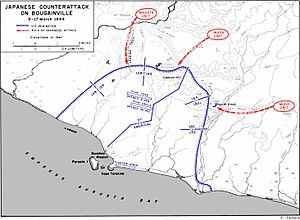
General Hyakutake had about 40,000 men on Bougainville. One of his units, the 6th Infantry Division, was known as one of the toughest in the Japanese Army. At first, Hyakutake thought the Allies would stay at Torokina only temporarily, so he kept his forces on defense. This delay gave the American commander, General Griswold, plenty of time to set up strong defensive positions.
In December 1943, Hyakutake decided to launch a major attack on the US forces around the perimeter. He spent the early months of 1944 preparing his plans. Hyakutake's attack would involve 12,000 infantrymen and 3,000 reserves. He was so confident that he planned to accept Griswold's surrender at the Torokina airstrip on March 17. The Japanese brought their largest collection of artillery to the ridges overlooking the American defenses. Griswold decided it was better to let the Japanese hold these ridges than to spread his own troops too thin trying to capture them.
On the American side, the Americal Division and the 37th Infantry Division defended the perimeter. Griswold had learned from fighting on New Georgia that waiting for the Japanese to attack was a better strategy than launching his own attacks in the jungle.
The Battle of the Perimeter
The Japanese launched their full-scale attack, known as "The Counterattack," on March 9. They managed to capture Hill 700 and Cannon Hill, but the 37th Division recaptured these positions on March 12. Griswold praised the destroyers that helped by shelling Japanese positions.
Hyakutake's second push was on March 12. The Japanese advanced through a deep valley and managed to break through the perimeter in one spot. American tanks and infantry were sent to push them back. Japanese artillery that had been shelling the American airstrips was silenced by Allied bombers. This part of the battle ended on March 13. Hyakutake tried two more times to break through, on March 15 and 17, but was pushed back each time. A final Japanese attack on March 23–24 made some progress but was also stopped. On March 27, the Americal Division drove the Japanese off Hill 260, and the battle ended.
During the Battle of the Perimeter, Allied aircraft continued to bomb Rabaul, completely destroying its ability to launch attacks.
Aftermath of the Counterattack
The Japanese army, having suffered heavy losses, pulled most of its forces back into the island's interior and to the northern and southern ends of Bougainville. On April 5, American troops captured the Japanese-held village of Mavavia. Two days later, they destroyed about 20 Japanese bunkers. Later, American troops, along with soldiers from Fiji, captured Hills 155, 165, 500, and 501 in fierce fighting that lasted until April 18.
The Americans were reinforced by the 93rd Infantry Division, the first African American infantry unit to see combat in World War II. The Japanese, now isolated and without outside help, focused mainly on survival. They started farms across the island to grow food. Morale among Japanese troops dropped, and there were reports of desertions. The food situation became so bad that their rice rations were severely cut, and many soldiers had to work growing food. Allied pilots sometimes dropped napalm on these farm plots.
Australian intelligence estimated that 8,200 Japanese troops were killed in combat during the American phase of operations. Another 16,600 died from disease or starvation. Most of the combat deaths happened during the attack on the US perimeter, with 5,400 Japanese killed and 7,100 wounded before the attack was called off.
Australian Phase: November 1944 – August 1945
Why Australia Took Over
The invasion of the Philippines was moved up to October 1944. General MacArthur needed all his ground troops for the Leyte landings. So, in mid-July, he decided to pull the American XIV Corps out of Bougainville. They were replaced by the Australian II Corps.
The Australian government and military decided to continue aggressive operations on Bougainville. They wanted to finish the campaign, free up troops for other areas, liberate Australian territory and the local people from Japanese rule, and show that Australian forces were actively fighting in the war.
Changing of Command
Lieutenant General Sir Stanley Savige led the Australian II Corps, which had just over 30,000 men. This included the Australian 3rd Division and other brigades.
On October 6, the first Australian troops landed. By mid-November, they had replaced the American regiments. On November 22, Savige officially took command of Allied operations on Bougainville from General Griswold. By December 12, all American frontline troops had been replaced by Australians.
Australian Attacks
The Australians estimated that about 40,000 Japanese soldiers were still on Bougainville. Although weakened, they were still organized and capable of fighting. Savige gave his orders on December 23. The Australian attacks would happen in three areas:
- North: The 11th Brigade would push the Japanese into the narrow Bonis Peninsula and defeat them.
- Center: The enemy would be driven off Pearl Ridge, a high point from which both sides of the island could be seen. From there, patrols would disrupt Japanese communications.
- South: The main Australian attack would be in the south, where most of the Japanese forces were located. This task was given to the 3rd Division.
Fighting in the Center
The Battle of Pearl Ridge (December 30–31) showed how much Japanese morale had dropped. A single Australian battalion captured the ridge with few losses. It was later found that 500 Japanese defenders had been there, not the estimated 80–90. After this, activity in the central area was limited to patrols.
Fighting in the North
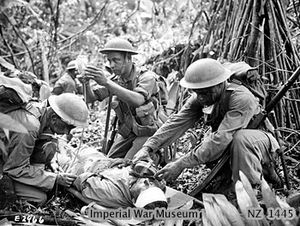
The 11th Brigade advanced along the coast, reaching Rukussia village by mid-January 1945. However, they couldn't cross the Genga River until the Japanese were removed from Tsimba Ridge. In the Battle of Tsimba Ridge, the Australians faced strong resistance in heavily fortified positions. It wasn't until February 9 that the last Japanese were dug out.
During February and March, the Australians pushed the Japanese north past Soraken Plantation. About 1,800 Japanese soldiers fell back to a strong defensive line across the Bonis Peninsula. Because the 11th Brigade was tired from weeks of fighting, a direct attack was ruled out. An attempt was made to go around the Japanese defenses with a landing by sea on June 8. However, the landing force got stuck and was almost wiped out. Although the Japanese likely suffered more losses in the Battle of Porton Plantation, their morale improved. The Australians stopped offensive operations in this area and decided to contain the Japanese while focusing resources on the southern sector.
Fighting in the South
On December 28, the 29th Brigade began its push toward the main Japanese forces around Buin. After a month of fighting, the Australians controlled an area extending twelve miles south of the Perimeter. Using barges to go around Japanese positions, they entered Mosigetta village by February 11, 1945, and Barara by February 20. The Australians then cleared an area near Mawaraka for an airstrip.
By March 5, the Japanese had been driven off a small hill overlooking the Buin Road. During the Battle of Slater's Knoll (March 28 – April 6), the Japanese launched a strong counterattack. Several determined Japanese attacks against this position were pushed back with heavy losses. General Kanda's attack was a disaster. He then pulled his men back to a defensive area around Buin and reinforced them with garrisons from nearby islands.
Savige allowed his forces two weeks to rest and resupply before restarting the push on Buin. After pushing back more Japanese attacks in the Battle of the Hongorai River (April 17 – May 22), his men crossed the Hari and Mobai Rivers. However, their advance stopped at the Mivo River because heavy rain and flooding washed away many bridges and roads. This made large-scale infantry operations impossible for almost a month. It wasn't until late July and early August that the Australians could resume patrolling across the Mivo River. Before Savige could launch a major assault, news arrived of the dropping of the atomic bombs. After this, the Australian forces mainly conducted limited patrols.
End of the Campaign
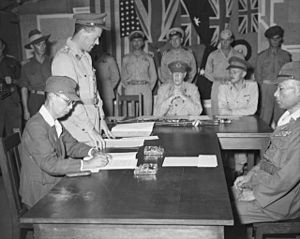
Combat operations on Bougainville officially ended with the surrender of Japanese forces on August 21, 1945. The Empire of Japan surrendered in Tokyo Bay on September 2, 1945.
In the final phase of the campaign, 516 Australians were killed and 1,572 were wounded. About 8,500 Japanese were killed in combat, while another 9,800 died from disease or starvation. Around 23,500 Japanese troops and laborers surrendered at the end of the war. Some historians have noted that the Australian soldiers fought bravely even though the island's capture was no longer critical to ending the war after March 1944.
However, other historians argue that the 1944–45 Bougainville campaign was necessary. They point out that it wasn't known at the time when Japan would surrender. There was a need to free up Australian forces for other operations and to liberate the island's civilian population. The local population on Bougainville decreased significantly after 1943, from over 52,000 to under 40,000 by 1946.
Three Victoria Crosses, a very high award for bravery, were given during the campaign. Corporal Sefanaia Sukanaivalu of Fiji received the award after his death for his bravery on June 23, 1944. Corporal Reginald Roy Rattey received the award for his actions during the fighting around Slater's Knoll on March 22, 1945. Private Frank John Partridge earned his in one of the last actions of the campaign on July 24, 1945. Partridge was the only member of the militia (part-time soldiers) to receive the Victoria Cross, and it was the last one awarded to an Australian in the war.
Namesake
The U.S. Navy escort carrier USS Bougainville (CVE-100), which was in service from 1944 to 1946, was named after the Bougainville campaign.


