
Charge at Khan Ayash facts for kids
The Charge at Khan Ayash was an important event that happened on 2 October 1918, during World War I. It took place about 17 miles (27 km) north of Damascus, a city that had just been captured. This charge was part of a bigger chase after a major victory by the Egyptian Expeditionary Force at the Battle of Megiddo on 25 September.
After Damascus was surrounded by the Desert Mounted Corps on 30 September, the 3rd Light Horse Brigade rode through the city on 1 October. Their mission was to attack and capture the remaining soldiers of the Ottoman Yildirim Army Group who were trying to escape north towards Rayak and Homs.
Following the big wins at the Battle of Sharon and Battle of Nablus (which were part of the Battle of Megiddo), and then the capture of Damascus, many Ottoman soldiers from the Seventh and Eighth Armies were trying to get away towards Damascus. Australian soldiers captured their rearguards (groups protecting the retreat) at places like Samakh and Tiberias. Other Ottoman forces, the Fourth Army, also retreated towards Damascus.
The last Ottoman group to leave Damascus, the 146th Regiment, left on the night of 30 September. Early the next morning, 1 October, the 10th Light Horse Regiment (part of the 3rd Light Horse Brigade) entered Damascus and accepted the city's surrender. The Australian light horsemen then followed the retreating Ottoman soldiers north towards Homs. They fought many small battles, capturing soldiers and weapons. They were finally stopped by strong defenses protecting about 2,000 Ottoman soldiers near Khan Ayash.
Early on 2 October, a large group of German and Ottoman soldiers was seen moving towards a narrow pass just north of Khan Ayash. Two squadrons (smaller groups) of the 9th Light Horse Regiment rode ahead to block the road. A third squadron charged right into the middle of the enemy group, splitting them up and forcing them to surrender.
Quick facts for kids Charge at Khan Ayash |
|||||||
|---|---|---|---|---|---|---|---|
| Part of the Middle Eastern theatre of World War I | |||||||
 Australian Light Horsemen at Khan Ayash |
|||||||
|
|||||||
| Belligerents | |||||||
| Commanders and leaders | |||||||
| Units involved | |||||||
| 3rd Light Horse Brigade Australian Mounted Division Desert Mounted Corps |
146th Regiment Army Troops, Fourth Army and unidentified cavalry | ||||||
| Casualties and losses | |||||||
| 2,000 prisoners | |||||||
Contents
Background to the Charge
The day after the big win at the Battle of Megiddo, the chase towards Damascus began on 26 September. The 4th Cavalry Division moved east across the Jordan River. They went to Irbid and then to Deraa, which was captured by Arab forces. The chase to Damascus, about 140 miles (225 km) away, continued with Arab forces protecting the cavalry division's right side.
Meanwhile, the Australian Mounted Division started their 90-mile (145 km) chase to Damascus on 27 September. They went around the northern end of the Sea of Galilee (also called Lake Tiberias), passing through Jisr Benat Yakub and Kuneitra.
Ottoman Retreat

By 26 September, the Ottoman Fourth Army's soldiers in Amman were still able to fight, even though they were quickly retreating north. They moved along the Hejaz railway and Pilgrims Road, east of the Jordan River.
Between 6,000 and 7,000 German and Ottoman soldiers from the Ottoman Fourth, Seventh, and Eighth Armies had managed to escape through Tiberias or Deraa before these places were captured. These retreating groups were heading towards Damascus.
Two days later, on 29 September, Mustafa Kemal Pasha, who led the Seventh Army, arrived at Kiswe. This was about 50 miles (80 km) north of Deraa and 9 miles (14 km) south of Damascus. Here, Otto Liman von Sanders, who commanded the Yildirim Army Group, told him to retreat further north of Damascus, to Rayak.
By the next morning, the main group of the Fourth Army, which included Ottoman cavalry and some infantry, was getting close to Kiswe. The 4th Cavalry Division was following them about 30 miles (48 km) behind.
Australian Mounted Division's Role
During the cavalry part of the Battle of Sharon, the Australian Mounted Division's 3rd Light Horse Brigade captured Jenin on the evening of 20 September 1918. By the next morning, they had captured 8,000 soldiers from two Ottoman armies who had been fighting in the Judean Hills.
Preparing for the Battle
Ottoman Forces
Liman von Sanders had ordered several Ottoman infantry and cavalry divisions to defend Damascus. However, he soon realized he couldn't hold the city. So, he moved his Yildirim Army Group headquarters north to Aleppo. Only a few groups of Ottoman soldiers remained organized.
The 146th Regiment was the last group to leave Damascus, doing so on the night of 30 September. After hearing that the Barada Gorge was captured, the commander of the 146th Regiment retreated along the Homs road. They followed other Ottoman units to gather at Rayak.
Desert Mounted Corps on 30 September

By midnight on 30 September, the Australian Mounted Division was near El Mezze, about 2 miles (3 km) west of Damascus. They were ordered to block the roads leading to Beirut and north to Homs. Other cavalry divisions were positioned around Damascus to surround it.
3rd Light Horse Brigade's Actions
On the night of 29/30 September, the brigade attacked a strong Ottoman position at Sa'sa on the road to Damascus. They captured 20 prisoners, two field guns, and two machine guns.
The 3rd Light Horse Brigade then camped outside Damascus on the night of 30 September/1 October. They set up guards to stop anyone except Arab forces from entering the city. With orders to cut the Homs road, the brigade entered Damascus at 5:00 AM on 1 October 1918.
At the Town Hall, Major A.C.N. Olden, who commanded the 10th Light Horse Regiment, accepted the surrender of the city from Emir Said Abd el Kader.
Damascus was in chaos, with no proper government or military control. Major Olden asked for a guide to lead the Australian light horsemen through the city to the Homs road.
The Battle at Khan Ayash
After taking Damascus, the 3rd Light Horse Brigade spent the whole day fighting small but intense battles. They moved north along the Homs road, chasing the retreating Ottoman soldiers. During these attacks, they captured many prisoners and machine guns.
As they left Damascus through the Bab Tuma gate, the 10th Light Horse Regiment learned that Ottoman rearguards were holding the Nahr Ma'raba, about 5 miles (8 km) northeast of Damascus. The leading squadron attacked the German machine gunners. The Germans were forced to leave their position when they saw the Australians were about to charge. The rearguard at Wadi Ma'raba was captured by 9:00 AM, along with 600 prisoners and about 40 machine guns.
.jpg)
The 10th Light Horse Regiment continued their advance about 4 miles (6 km) north to Duma, where they captured about 500 prisoners and 37 machine guns. They then moved on to Khan Kusseir, about 2 miles (3 km) further. Here, in the evening, they faced a German rearguard with several machine guns. The Australians charged from behind some vineyards and olive groves, breaking the German defense. All the defenders were either killed or captured. Street fighting with bayonets helped capture Khan Kusseir, 160 prisoners, and more machine guns.
Another 50 prisoners were captured after another attack. Then, a large group of between 1,500 and 2,000 Ottoman soldiers was seen about 7 miles (11 km) away. They were moving towards a pass in the hills near Khan Ayash, which is 17 miles (27 km) north of Damascus on the Homs road. This group was protected by a strong fort defended by about 20 machine guns, set up by the German 146th Regiment. Without the help of field guns, the Australian light horsemen tried several times to attack the fort but were unsuccessful. They also attacked the back of the retreating column, causing some losses and capturing more prisoners and machine guns. At 7:00 PM, the 10th Light Horse Regiment went back to Khan Kusseir to camp.
At 6:15 AM on 2 October 1918, a long column of Ottoman soldiers was reported retreating north. The 9th Light Horse Regiment rode out at 6:45 AM. After several small groups of machine gunners failed to stop them, the light horsemen caught up with the main enemy column. Two squadrons were ordered to ride ahead to Khan Ayash to block the road before the enemy entered a narrow pass. Meanwhile, a third squadron charged the left side of the column, forcing them to surrender. The Australian brigade galloped through heavy fire, charging right through the enemy force and killing many. An advanced group of enemy cavalry also surrendered to the leading squadrons.
.jpg)
The 10th Light Horse Regiment arrived to support them at 7:45 AM. They found that 91 officers (including a divisional commander), 318 cavalry, 1,072 infantry, three guns, and 26 machine guns had surrendered. In total, over 2,000 prisoners were captured, along with the flag of the 146th Regiment. This was the only enemy flag captured by Australians during the First World War.
Aftermath of the Charge
After their last battle of the war, the 10th Light Horse Regiment held the pass and the hills covering the road to Homs. A squadron explored to the east until they were replaced by the 8th Light Horse Regiment. The brigade returned to camp southwest of Damascus on 4 October 1918.
Since 19 September, the Desert Mounted Corps had lost only about 500 soldiers who were killed, wounded, or missing in action.
Images for kids
-
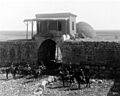
Australian Light Horse at Khan Ayash
-

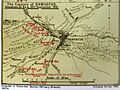
Gullett's Map 43 Detail shows positions of the retreating remnants of the Yildirim Army Group, Beisan, Irbid and Deraa with the Jordan River on the left and the Pilgrims' Road on right
-
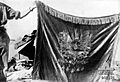
The colour of the 146th Regiment captured at Khan Ayash by the Australian Light Horse
-
Falls Sketch Map 39 detail Capture of Damascus
-
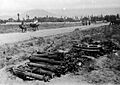
Captured machine guns by the roadside near Khan Ayash. Maxim MG08s and Bergman LMG15s on left, artillery trails on right
