
First Battle of Amman facts for kids
Quick facts for kids First Battle of Amman |
|||||||
|---|---|---|---|---|---|---|---|
| Part of the Middle Eastern theatre of World War I | |||||||
.jpg) View across Amman to the Citadel |
|||||||
|
|||||||
| Belligerents | |||||||
|
|||||||
| Commanders and leaders | |||||||
| Units involved | |||||||
| 60th (London) Division Anzac Mounted Division Imperial Camel Corps Brigade |
Fourth Army 3rd and 46th Assault Companies 48th Infantry Division 145th and part 150th Regiments German 703rd Infantry Battalion with a cavalry troop, artillery section and Asia Corps machine gun company |
||||||
| Strength | |||||||
| 6,000 troops with 15 guns | |||||||
| Casualties and losses | |||||||
| 1,348 | |||||||
The First Battle of Amman took place from March 27 to 31, 1918, during the First World War. It was part of the Sinai and Palestine Campaign, where the British Empire fought against the Ottoman Empire. In this battle, British and Australian-New Zealand (Anzac) forces tried to capture the city of Amman, which was deep inside enemy territory.
The attacking forces, including the 60th (London) Division and the Anzac Mounted Division, first captured nearby towns like Es Salt and Shunet Nimrin. However, the Ottoman forces fought back strongly. The British-led Egyptian Expeditionary Force (EEF) was eventually forced to retreat back to the Jordan River.
Before this battle, the EEF had won important victories at Gaza and Beersheba in 1917. They had also captured Jerusalem. In early 1918, the EEF pushed their front line further east, capturing Jericho and extending their control into the Jordan Valley. These moves were important steps before the attack on Amman.
Crossing the Jordan River was very difficult. British and Australian soldiers had to swim across the fast-flowing river while under enemy fire. They quickly built temporary bridges for the troops to cross. The goal was to destroy parts of the Hejaz Railway near Amman, including bridges and a large viaduct. Amman was well-defended by the Ottoman Fourth Army, which also received many reinforcements. Despite strong attacks for several days, the British-led forces had to pull back. They only managed to keep small areas on the eastern side of the Jordan River.
Contents
Why the Battle Happened
After capturing Aqaba, Prince Feisal's Arab forces moved north. They attacked the Hejaz Railway and threatened the town of Ma'an. The Ottoman Empire tried to stop these raids but was not fully successful. In early 1918, Ottoman forces temporarily pushed the Arab forces back from Tafilah.
This created an opportunity for the British-led EEF. While the Ottoman forces were busy fighting Prince Feisal's troops, the EEF could attack Amman. This attack would force the Ottoman army to move their troops back towards Amman. It would also help Prince Feisal attack Ma'an and possibly allow the EEF and Arab forces to meet up.
Before the attack on Amman, the EEF needed to strengthen its position. In March 1918, they pushed their front line further north in the Judean Hills during the Battle of Tell 'Asur. This gave them a better starting point for attacks across the Jordan River.
About Amman
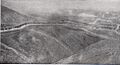
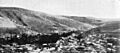
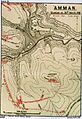
Amman is an ancient city, once called Rabbath Ammon by the Ammonites and later Philadelphia by the Romans. It is surrounded by hills. A strong fort, called a citadel, sat on a hill, protecting the city from the north and west. To the east was the Hejaz Railway, with a station about 2 miles (3 km) from the city. South of the station was a 10-arched viaduct (a long bridge) and a 462-foot (141 m) railway tunnel.
Getting Ready for Battle
Before the main attack on Amman, the British planned smaller attacks along the front line. These were meant to distract the enemy. They also coordinated with an Arab raid led by T. E. Lawrence on the Hejaz Railway station at Deraa. This railway was very important, running from Constantinople all the way south to Medina.
Ottoman Defenders
The Ottoman Fourth, Seventh, and Eighth Armies had their headquarters in the region. The main Ottoman commander, Otto Liman von Sanders, was based in Nazareth.
Around 4,000 to 5,000 German and Ottoman soldiers defended Amman. They had rifles, many machine guns, and 15 artillery guns. Another 2,000 Ottoman soldiers defended the area towards Es Salt. These forces were well-equipped and trained, often using special "stormtrooper" tactics for counterattacks.
By March 27, the Amman garrison had about 2,150 soldiers, 70 machine guns, and 10 guns. Reinforcements arrived, bringing the total to about 4,000 soldiers by March 30. German and Ottoman aircraft were also in the area, flying planes similar to the British ones.
British-led Forces
The British attacking force was led by Major General John Shea. His force included the 60th (London) Division, the Anzac Mounted Division, and the Imperial Camel Corps Brigade. They also had mountain guns and armored cars. German and Ottoman planes bombed their camps several times before the attack.
Edward Chaytor commanded the New Zealand Mounted Rifles Brigade, the 2nd Light Horse Brigade, and the Imperial Camel Corps Brigade. These units were to attack Amman from Es Salt. Other British Empire units protected the northern side of the attacking forces.
Goals of the Attack
The main goal was to destroy the Amman viaduct and other parts of the Hejaz Railway. This would make it harder for the Ottoman army to move troops and supplies. It would also help the Arab forces fighting near Ma'an. The British commander, Allenby, hoped the attack would force the Ottomans to pull back a large force that had occupied Tafila.
After destroying the railway, the British-led forces were supposed to retreat back to the Jordan River.
Tough Journey to Amman
On March 25, the 3rd Light Horse Regiment and parts of the 60th (London) Division occupied Es Salt. The Anzac Mounted Division and Imperial Camel Corps Brigade began a difficult climb from the Jordan Valley towards Amman. The weather was terrible, with sleet and heavy rain making roads muddy.
The journey was continuous for three days and nights. The roads were so bad that most wheeled vehicles, including ammunition carts, had to be left behind. Only small pack guns, some ammunition, and explosives were carried by camels and pack-horses. The troops were exhausted, so the attack on Amman was delayed until March 27.
During the delay, patrols captured German soldiers and destroyed some enemy vehicles. A special patrol blew up a 7-mile (11 km) section of railway line south of Amman. Another group tried to wreck the line north of Amman but faced strong enemy cavalry.
The Battle Begins
The bad weather and delay gave the Ottoman forces time to strengthen their defenses. Still, the Anzac Mounted Division and Imperial Camel Corps Brigade made some progress against the well-defended German and Ottoman positions.
March 27: First Attacks
By daylight, Chaytor's Force advanced across the plateau. The ground was wet and muddy, making movement difficult. The landscape had many stone piles and wadis (valleys), which provided good cover for enemy machine guns.
At 10:30 AM, the attack began. New Zealand mounted riflemen aimed to capture Hill 3039, which overlooked Amman. Light horsemen attacked from the northwest, while the Imperial Camel Corps Brigade attacked from the west. The only artillery support came from the Hong Kong Mountain Battery.
By midday, all brigades were fighting. A squadron of Wellington Mounted Rifles tried to attack a train but got stuck in the mud. The 4th Battalion Imperial Camel Corps Brigade destroyed 3 miles (5 km) of railway culverts near Quseir Station. The train, carrying 300 reinforcements, managed to escape.
The New Zealanders got within 600 yards (550 m) of Hill 3039 but were stopped by heavy machine gun fire from the hill and the Citadel. The 5th Light Horse Regiment blew up a bridge 5 miles (8 km) northeast of Amman, temporarily cutting off the town from the north.
In the evening, German and Ottoman units counterattacked but were pushed back. During the night, the 2nd Light Horse Brigade blew up another bridge north of Amman, further isolating the city. Casualties for the day were 26 killed and 183 wounded.
British infantry reinforcements from Es Salt were delayed by local fighting and bad weather.
March 28: Heavy Fighting
Chaytor's Force held a line west and northwest of Amman. At daybreak, German and Ottoman guns opened fire. British reinforcements, including mountain guns, began to arrive. An Ottoman attack on the right side was stopped.
A general attack was ordered for 1:00 PM. The mounted troops and new infantry reinforcements faced very heavy machine gun fire. They advanced but were eventually held up about 700 yards (640 m) from Amman. The ground offered no cover, and enemy machine guns swept the area.
The New Zealand Mounted Rifles Brigade was held back by Ottoman defenders on Hill 3039. Rain continued to fall, and it was very cold. Supply of food and animal feed became a concern.
More British infantry battalions were ordered to reinforce the attack. A new attack was planned for March 30.
March 29: Continued Struggle
German and Ottoman artillery shelled the British-led positions. Several counterattacks were launched but were all pushed back. The weather remained harsh, with cold rain and strong winds.
More Ottoman reinforcements were seen arriving in Amman from the north. The British also brought in more infantry battalions. However, no more troops could be spared because a large Ottoman force was threatening the British communication lines in the Jordan Valley.
That night, a British infantry unit faced a strong enemy attack, firing intensely to hold their line. Allenby reported that 5 miles (8 km) of railway track south of Amman had been destroyed.
During March 28-29, German aircraft bombed British camps, causing many casualties and killing camels.
March 30: Night Attack on Hill 3039
Heavy rain fell as troops prepared for an attack at 2:00 AM on March 30. Chaytor ordered the New Zealand Mounted Rifles Brigade and the 4th Battalion, Imperial Camel Corps Brigade, to take Hill 3039. The rest of the Imperial Camel Corps Brigade attacked towards Amman. The 181st Brigade of the 60th (London) Division made the main attack on Amman.
The attack on Hill 3039 was a silent night assault. The first Ottoman trenches were captured quickly, and 23 soldiers surrendered. Five machine guns were taken. The attackers then moved on to capture a second position and finally "Position A," which overlooked Amman. This forced the defenders to withdraw.
Attack on Amman and the Citadel
The Citadel was a key part of Amman's defenses. The 2/18th Battalion London Regiment attacked it, but heavy machine gun fire stopped them. The Imperial Camel Corps Brigade also attacked but faced strong machine gun fire from the Citadel, stopping their progress.
Allenby reported that the attack had captured Hill 3039 and two lines of trenches. However, strong defenses around Amman railway station made further progress impossible.
As dawn broke, the British-led troops faced intense rifle and machine gun fire. They managed to overrun the first line of enemy trenches.
Daylight Defense of Hill 3039
The troops worked to strengthen their positions on Hill 3039. They built stone walls (sangars) because the ground was too rocky to dig trenches. At 5:00 AM, Ottoman artillery began shelling the hill, causing many casualties.
German and Ottoman forces launched heavy counterattacks throughout the day. At one point, an unauthorized order caused some British-led troops to withdraw, allowing the enemy to reach the crest. However, officers quickly rallied their men, charging back and forcing the Ottomans to retreat.
The British Somerset Battery arrived and began firing, but it was too late to change the battle's outcome. German and Ottoman batteries continued to shell Hill 3039, causing more casualties. At 4:00 PM and 5:00 PM, two more heavy counterattacks were launched but were again pushed back.
Chaytor told Shea that capturing the Citadel was not possible. Shea then ordered a withdrawal across the Jordan River. The main goal of destroying the large viaduct at Amman had not been achieved.
When darkness fell on March 30, the troops received the order to retreat. Allenby reported that 5 miles (8 km) of railway track and culverts south of Amman had been destroyed, achieving the goal of cutting the Hejaz Railway.
After the Battle
The total casualties for the British-led forces were between 1,200 and 1,348.
Moving the Wounded
The retreat from Amman began with sending the wounded back to the Jordan Valley. This was difficult because Es Salt was under attack, and a flood had left only one usable bridge across the Jordan River. Many wounded had to be carried by camels or walk. Some camels carrying wounded got stuck and exhausted, and some seriously wounded men had to be left behind when Ottoman cavalry attacked.
The Retreat
The withdrawal began while the front lines were still fighting. The New Zealand Mounted Rifles Brigade skillfully pulled back across the Wadi Amman in the dark, carrying their wounded. All wounded were taken back, and as many dead as possible were buried.
The Imperial Camel Corps Brigade and infantry also began their march back. The journey down the mountains was long and difficult, with weary camels, horses, and men stumbling in the mud and rain. The New Zealand Mounted Rifles Brigade acted as the rearguard, holding off advancing German and Ottoman troops.
Ain es Sir Incident
On April 1, as the last squadron of the Wellington Mounted Rifles Regiment was leaving the village of Ain es Sir, they were attacked by Circassian fighters. The Circassians fired from houses and caves at very close range, wounding men and horses. The New Zealanders counterattacked, rushing the mill where some attackers were hiding. No prisoners were taken.
Back to the Jordan
By April 2, the withdrawal across the Jordan River was complete. The British-led forces left small bridgeheads (defended areas) at Ghoraniye and Makhadet Hajlah on the eastern side of the river.
Images for kids
-

The Hedjaz Railway and country east of the Dead Sea
-
Infantry in the 60th (London) Division marching from Jerusalem to the Jordan Valley March 1918
-
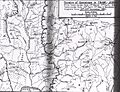
Transjordan theatre of operations 21 March to 2 April; 30 April to 4 May and 20 to 29 September 1918
-
Powles sketch map of attack on Hill 3039 shows positions "A" to "E"
-
Amman. Hill 3039 in the background
-
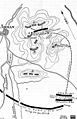
Falls Map 25 showing the situation on 30 March at Amman
-

2nd Light Horse Field Ambulance crossing the Jordan River at Ghoraniyeh on their return
-
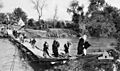
Bedouin refugees from Es Salt crossing a pontoon bridge over the Jordan River

_Infantry_Division_Jerusalem.jpeg)


