Moro River campaign facts for kids
Quick facts for kids Moro River campaign |
|||||||
|---|---|---|---|---|---|---|---|
| Part of the Winter Line and the battle for Rome of the Italian campaign, World War II | |||||||
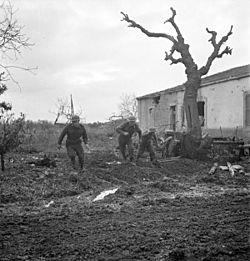 Riflemen of the 48th Highlanders of Canada take cover during German counterattack north of San Leonardo, 10 December 1943. |
|||||||
|
|||||||
| Belligerents | |||||||
|
|
|||||||
| Commanders and leaders | |||||||
| Strength | |||||||
| 4 Infantry Divisions 2 Armoured Brigades |
1 Panzer Division 1 Parachute Division 2 Panzergrenadier Divisions |
||||||
| Casualties and losses | |||||||
| Unknown | |||||||
The Moro River campaign was a tough and important battle during World War II. It was part of the Italian campaign, where Allied forces fought to push back German troops in Italy. This battle took place near the Moro River in eastern Italy from December 4, 1943, to January 4, 1944.
The Allies, led by General Sir Harold Alexander, wanted to break through the strong German defenses called the Winter Line. Their goal was to reach Pescara and eventually Rome.
During the campaign, four Allied infantry divisions (British, Canadian, Indian, and New Zealand) and two armored brigades attacked German positions. They managed to create several small areas where they could cross the river by December 8. For the next week, there was constant fighting. The Canadians eventually outsmarted the Germans, forcing them to retreat.
By December 26, strong German defenses had stopped the Canadian forces in the Battle of Ortona. British and New Zealand forces were also held back in Orsogna. Even though Ortona and Villa Grande were captured, the Allied soldiers were very tired. They couldn't capture Orsogna or advance further. When bad winter weather hit, the Allied commanders realized they couldn't make more progress. General Alexander then called off the attack.
Contents
- Why the Battle Happened
- The Battle Begins
- Canadians Cross the Moro River
- Fighting at Villa Rogatti
- Struggles at San Leonardo
- Attack on San Donato
- Securing the Moro River Crossings
- Attacks on Orsogna
- The "Impossible" Bridge
- Fighting at The Gully
- Capturing Casa Berardi
- Eighth Army Strengthens the Attack
- Taking The Gully for Good
- Capturing Villa Grande
- XIII Corps Attacks Orsogna
- The Battle of Ortona
- End of the Attack
- What Happened Next
- More to Explore
Why the Battle Happened
In late 1943, the Allied forces were moving north through Italy. They faced strong German resistance. The German commander, Generalfeldmarschall Albert Kesselring, had set up many defensive lines. The British Eighth Army, led by General Sir Bernard Montgomery, was fighting on the eastern side of Italy.
The Eighth Army had already crossed other rivers and pushed back German defenders. By November 9, they reached the main German Winter Line defenses. These were on high ground north of the Sangro River.
The main attack across the Sangro River was delayed by bad weather. After several days of hard fighting, the Germans pulled back. They moved to new defenses they had prepared on high ground north of the Moro River.
Allied Plan and Forces
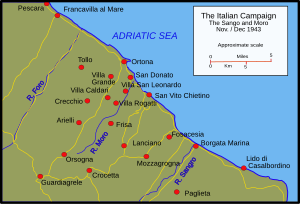
The Moro River flows from the mountains in central Italy to the Adriatic Sea near Ortona. The German defenses on the Moro were a key part of their Winter Line. This line protected the eastern side of the mountains.
General Montgomery wanted to break through this line. He hoped to capture Ortona and Pescara, then move on to Rome. The British 78th Infantry Division, which had fought hard and suffered many losses, was replaced by the fresh 1st Canadian Infantry Division.
Montgomery's plan was for the 1st Canadian Division to attack across the Moro River. They would aim for the coast to take Ortona first, then Pescara. Further inland, the 2nd New Zealand Division would attack toward Orsogna. The 8th Indian Infantry Division would hold the middle of the front.
The German forces facing the Allies were also very strong. They included the 1st Parachute Division and other tough units. These German divisions formed the LXXVI Panzer Corps. They were responsible for defending the front line east of the mountains.
The Battle Begins
Canadians Cross the Moro River
On December 6, 1943, Canadian forces began major attacks. They aimed to cross the Moro River at several points. Their goal was to secure a large area on the other side of the German defensive line.
Three main attack points were chosen: Villa Rogatti, San Leonardo, and San Donato. Five Canadian infantry battalions were picked for these attacks. They were scheduled to start on the morning of December 6.
Fighting at Villa Rogatti
The Princess Patricia's Canadian Light Infantry (PPCLI) was tasked with taking Villa Rogatti. This was the westernmost crossing point. They planned their attack carefully during the night of December 5.
Early on December 6, two PPCLI companies crossed the Moro River. They moved towards Villa Rogatti. Soon, fierce fighting broke out in the town. Canadian soldiers fought hard against strong German defenses.
Even after Canadian companies occupied Villa Rogatti, German forces still held strong positions nearby. The PPCLI faced several German counterattacks throughout the afternoon. They fought them off, pushing the Germans back. The PPCLI had 68 casualties, while German casualties were estimated at 120.
Because the Canadians were surrounded, they decided to focus their efforts elsewhere. On the night of December 7-8, the Indian 21st Infantry Brigade took over the western flank. Canadian efforts would now focus on San Leonardo.
Struggles at San Leonardo
The Canadian attack on San Leonardo began late on December 5. The Seaforth Highlanders of Canada tried to establish a crossing point. They suffered heavy losses.
On the morning of December 6, two more Seaforth companies continued the attack. They struggled to enter San Leonardo. German fire pinned down Canadian units. Small arms fire also stopped one company from moving up the road.
In the afternoon, the Hastings and Prince Edward Regiment sent help. They attacked German positions west of San Leonardo. Still, the attack on San Leonardo stalled. German armored units reinforced the area. The Canadians were ordered to prepare to pull back from San Leonardo.
Attack on San Donato
While other units tried to cross the Moro, the Hastings and Prince Edward Regiment attacked San Donato. This was a small town on the coast. The attack began at 1:40 PM on December 6.
However, the single company making the attack gained little ground. The commander ordered a withdrawal at 3:40 PM. Strong German coastal defenses prevented further progress. Even with tanks and artillery, the Germans held San Donato by nightfall. The Canadians pulled back to the south bank of the Moro River.
Securing the Moro River Crossings
On December 8, Major General Vokes made a new plan. The 48th Highlanders of Canada and Princess Patricia's Canadian Light Infantry would attack San Leonardo again. Meanwhile, the Royal Canadian Regiment (RCR) would break out from their crossing point near San Donato. They would then move southwest to meet the other units. The attack was set for the afternoon of December 8.
The attack started with a huge artillery barrage. It pounded German positions for two hours. Then, the Saskatoon Light Infantry joined in with machine gun fire. As the bombardment stopped, the 48th Highlanders and the RCR attacked.
The 48th Highlanders quickly crossed the Moro with few losses. They established strong positions overlooking San Leonardo. During the night, Canadian engineers built a bridge over the Moro. This allowed tanks and equipment to move into San Leonardo the next day.
The RCR faced intense fighting southwest of San Donato. They advanced against strong German defenses. By nightfall, they held shaky positions among the German lines. German counterattacks were fought off with continuous Canadian artillery fire.
By the morning of December 9, the bridge was ready. Tanks from the 14th Armoured Regiment moved into San Leonardo. By mid-morning, San Leonardo was cleared of German defenders. The tanks then broke through German positions near Sterlen Castle. They linked up with the 48th Highlanders and PPCLI. This finally created strong Canadian positions across the Moro River. German forces then fell back to their next defensive line, known as "The Gully."
Attacks on Orsogna
While the Canadians crossed the Moro, the New Zealand Division launched an attack on Orsogna. This was called Operation Torso. It began at 2:30 PM on December 7. They had British paratroopers helping them and strong artillery and air support. The Germans were surprised by the attack.
Initially, the New Zealand attack went well. But the German defenders quickly recovered. The attack lost momentum against heavily fortified positions. By 9:00 PM, the New Zealand 24th Infantry Battalion had fought their way into the town center. However, they were stuck without armored support.
Concealed minefields and well-hidden German tanks made it impossible for Allied tanks to advance. In the early hours of December 8, the New Zealand commander ordered a withdrawal. He planned to renew the attack after more artillery and bomber strikes.
The "Impossible" Bridge
Both the Canadian and New Zealand Divisions found it hard to advance. So, the Indian 21st Infantry Brigade was brought into the attack. They were ordered to capture Caldari.
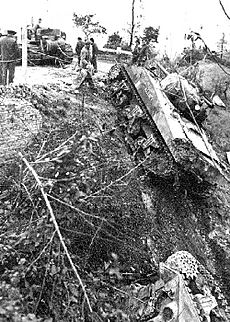
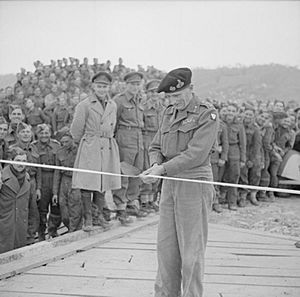
There was no easy way to cross the river. So, Indian engineers quickly built a bridge across the Moro. It was finished on December 9. This allowed infantry and tanks to cross and expand the area they held. The bridge was called the "Impossible Bridge." This was because it had to be built backwards from the enemy side of the river.
Fighting at The Gully
After losing San Leonardo and the Moro River, the German 90th Panzergrenadier Division pulled back. Their main defensive line was about 5 kilometers (3 miles) north of San Leonardo. This line was centered around a deep natural ravine called "The Gully." It was about 60 meters (200 feet) deep.
General Vokes planned a direct attack on The Gully. He wanted to capture Vino Ridge and positions on the road to Ortona. However, German defenses were very well prepared. They had gun-pits, bunkers, and shelters.
On December 10, three Canadian battalions tried to cross The Gully. They captured Vino Ridge, but couldn't clear the German positions in the ravine. On December 11, they tried again. The Loyal Edmonton Regiment suffered heavy losses. They gained a small foothold but were forced to withdraw by new German units.
On December 12, General Vokes sent three battalions of the 3rd Canadian Infantry Brigade against The Gully. The attack started badly. German soldiers captured Canadian artillery plans. When The West Nova Scotia Regiment attacked, they faced strong German counterattacks. They had to call off their attacks and suffered many casualties.
Attempts were made again on December 13. Two battalions of the 3rd Canadian Infantry Brigade were driven back by strong German resistance. On the evening of December 13, the German 90th Panzergrenadier Division was replaced by units of the 1st Parachute Division.
Capturing Casa Berardi
By December 14, Vokes had a new plan for The Gully. A small force from the Royal 22e Régiment would move to Casa Berardi. This was a group of farmhouses west of The Gully. They would then go around the German positions with infantry and tanks. This would force the 1st Parachute Division to retreat.
The attack began at dawn. Two companies of the Royal 22e Régiment attacked Casa Berardi with artillery support. By 7:50 AM, they controlled the highway leading to Casa Berardi. Captain Paul Triquet's company pushed towards the main house at Casa Berardi. They had support from the Ontario Regiment.
Strong German defenses caused heavy losses. Only 21 men and five tanks made it close to the objective. Despite German tanks arriving, Triquet's remaining forces captured the main house by 2:30 PM. Only 14 men of his company were still able to fight. For his bravery, Triquet was awarded the Victoria Cross.
Eighth Army Strengthens the Attack
With the Indian Division now involved, Montgomery decided to increase the attack. He brought the British 5th Infantry Division from another quiet area. They were placed between the New Zealand and Indian Divisions. This allowed the Indian division to focus their attack. It gave Montgomery four divisions to continue the attack between Orsogna and the sea.
By December 12, the first British brigade was in place. It was under the New Zealand division's command. Once the 5th Division headquarters arrived, these two divisions would be led by XIII Corps.
To the left of the Canadian division, the Indian 21st Brigade had a strong foothold by December 13. That night, another Indian brigade attacked towards Caldari. British and Gurkha soldiers stormed the village in fierce night fighting. They held their positions against strong German counterattacks, including tanks.
By the end of December 16, more attacks secured positions on the road between Ortona and Orsogna. This meant the 8th Indian Division was firmly inside the main German defenses.
Meanwhile, on December 15, the New Zealand Division launched a new flanking attack on Orsogna. This was called Operation Florence. By that afternoon, they had pushed a shallow area into the German line. They had used almost all their reserves, but were hopeful for the next day.
However, the Germans counterattacked at 3:15 AM on December 16. They used fresh paratroopers. These troops attacked the New Zealand positions. The New Zealanders held them off. The New Zealanders also attacked Orsogna with tanks. But under heavy fire, the tanks and infantry became separated.
Operation Florence ended. The German line had been pushed back, and they suffered losses. But they still held Orsogna firmly. The New Zealand Division was exhausted and needed to rest and reorganize.
By December 16, the British 5th Division was in place. There was a period of patrols and small fights. The main fighting then shifted to the V Corps. The Canadians pushed for Ortona, with the Indian Division attacking Villa Grande and Tollo on their left.
Taking The Gully for Good
To prepare for the final attack on The Gully, General Vokes moved the 2nd Canadian Infantry Brigade. He planned for the Carleton and York Regiment to make the last direct assault. If this failed, the Seaforth Highlanders and Royal Canadian Regiment would go through Casa Berardi. They would then go around the German defenses, forcing them to leave The Gully.
At 7:30 AM on December 15, two companies of the Carleton and York Regiment attacked. After just over an hour, the Canadians had to stop the attack. In the afternoon, the Royal 22e Régiment fought off a large German counterattack on Casa Berardi. Canadian artillery fired thousands of rounds to support them.
On December 18, Vokes planned the biggest attack on The Gully yet. It began at 8:00 AM. Canadian artillery bombarded a wide area. The barrage moved forward every five minutes. Less than 100 meters behind it, the 48th Highlanders advanced. At the same time, the 8th Indian Division attacked northward. This stopped German reinforcements from reaching The Gully.
The attack started very well. But when the artillery barrage moved, the German defenses quickly recovered. Their machine gun fire caused heavy losses. The attack was quickly stopped.
On December 20, Canadian forces tried again. The Royal Canadian Regiment attacked Cider Crossroads at noon. This time, Vokes was determined to succeed. Armored forces moved into position early. Due to fuel shortages and bad weather, the attack was delayed until 2:15 PM.
When the attack began, a powerful artillery barrage supported two companies of the Royal Canadian Regiment. By evening, they controlled the Cider Crossroads. They met almost no resistance. German forces had already left The Gully. They had fallen back to prepare a strong defense of Ortona. The powerful 1st Parachute Division was firmly dug in there.
Capturing Villa Grande
On December 23, Montgomery was promoted to command a larger army group. Command of the Eighth Army went to Lieutenant General Sir Oliver Leese. He kept up the pressure on the entire front.
The 19th Indian Infantry Brigade was ordered to attack Villa Grande. They were to push any gains as far as the Arielli river. The attack began at 5:30 AM on December 22 but failed after desperate fighting. The 1/5th Battalion, Essex Regiment renewed their attack the next morning with more success.
After a German paratrooper counterattack was pushed back, the Essex advanced to clear the rest of the village. However, deadly house-to-house battles continued for the next two days. The determined German paratroopers held on. To the south of Villa Grande, the 3rd/15th Punjabis had taken Vezzano on December 23. A continuous brigade line was established.
On December 25, more troops were brought in. After an artillery barrage, they attacked the east side of Villa Grande. With four battalions now involved, supported by tanks, Villa Grande was finally cleared by the end of December 26. The village was in ruins.
XIII Corps Attacks Orsogna
On December 23, Lieutenant-General Dempsey's XIII Corps launched a new attack. They wanted to push back the German line from Orsogna. In the afternoon, the British 5th Infantry Division attacked towards the Arielli stream. Their goal was to protect the side of the 2nd New Zealand Division. The New Zealanders were to attack northwest and west to break the Orsogna defenses.
After the British 5th Infantry Division pushed from Poggiofiorito, they took the town of Arielli. The 5th New Zealand Infantry Brigade attacked at 4:00 AM on December 24. Despite heavy artillery support, the tired New Zealand battalions struggled.
By the afternoon, it was clear to the New Zealand commander, Bernard Freyberg, that the strong German defenses could not be broken. He reportedly said, "It is not a question of further advance, it is a question of holding on to what we have got." The XIII Corps front was stuck. They settled into defending their positions and patrolling.
The Battle of Ortona
From December 11 to 18, the German 1st Parachute Division prepared strong defenses in Ortona. Paratrooper engineers and infantry destroyed much of the town. They turned the streets into a maze of rubble. Major streets were mined, and there were many booby traps. German forces also buried tanks in the rubble, leaving only their turrets showing.
On December 20, 1943, the Loyal Edmonton Regiment moved toward Ortona. The Seaforth Highlanders covered their eastern side. They faced heavy machine gun fire as they tried to enter Ortona. By nightfall, both battalions had a small foothold on the western edge of Ortona.
The next day, the Loyal Edmonton Regiment attacked towards the city center. But accurate German sniper fire quickly stopped their advance.
For the rest of the week, the Battle of Ortona became a fierce house-to-house fight. Canadian forces used "mouse-holing" tactics. This meant moving between houses by blasting holes through walls. This helped them avoid German sniper fire in the open streets. German counterattacks on December 24 and 26 caused many casualties for the Canadians.
The 1st Parachute Regiment left the town the next day. They were in danger of being surrounded by Allied advances west of Ortona. Canadian forces then took Ortona. The Canadians had about 650 soldiers killed or wounded in the fighting for the town.
End of the Attack
The battle continued for a few days after Ortona fell. With Ortona and Villa Grande captured, it seemed the Eighth Army only needed to regroup. Then they could make one more big push at Orsogna. This would complete breaking through the Gustav Line.
However, on December 31, a blizzard covered the battlefield. Snow, sleet, and biting winds stopped movement and communication. Cloud cover grounded the air force. The Canadians managed to advance north along a ridge. They reached the coast on January 4. But inland, Orsogna remained in German hands.
General Leese realized the Eighth Army no longer had the strength or good conditions to reach Pescara. He recommended to General Alexander that the offensive should stop. Alexander agreed.
What Happened Next
The Allies had made progress and broken into the Gustav Line. But failing to capture Orsogna ended their plans for a strong push up the eastern coast. Rain, flooded rivers, and many casualties stopped Allied plans until the spring of 1944.
After the offensive ended, Alexander ordered aggressive patrols. This was to keep the German LXXVI Panzer Corps busy in the Adriatic sector. It would stop Kesselring from moving them to reinforce another front.
Despite this, three attempts by the U.S. Fifth Army to break through at Cassino failed during the winter. The offensive continued until January 15. Some ground was gained, but the weather and strong German resistance meant a breakthrough was impossible.
As spring approached in 1944, Alexander secretly moved his forces. He thinned out the Adriatic front. He brought most of the Eighth Army's power to the Cassino front. The combined attack of his two armies in early May surprised Kesselring. This led to the Allied capture of Rome in early June.
More to Explore


