Operation Excess facts for kids
Quick facts for kids Operation Excess |
|||||||
|---|---|---|---|---|---|---|---|
| Part of the Battle of the Mediterranean of the Second World War | |||||||
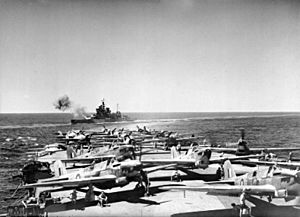
 A later image taken from Illustrious showing Valiant in the background. Both ships were part of Force A and the closest aircraft are Fulmar fighters of the type defending operation Excess. |
|||||||
|
|||||||
| Belligerents | |||||||
| Strength | |||||||
| 1 aircraft carrier 2 battleships 3 cruisers 7 destroyers |
2 destroyers unknown number of Stuka dive-bombers and fighters |
||||||
| Casualties and losses | |||||||
| 1 aircraft carrier damaged 1 cruiser sunk 1 cruiser damaged 1 destroyer damaged beyond repair |
1 torpedo boat sunk 8 aircraft shot down (British claim) |
||||||
Operation Excess was a series of important supply missions by the British Navy in January 1941. These missions aimed to deliver vital supplies to Malta, Alexandria (in Egypt), and Greece during the Second World War.
This operation was special because it was the first time British ships in the Mediterranean Sea faced attacks from German Luftwaffe (air force) planes. Even with these new threats, all the supply ships reached their destinations safely. However, some British warships were badly damaged. The destroyer Gallant hit an Italian mine, and German bombers severely damaged the cruiser Southampton and the aircraft carrier Illustrious.
Contents
Why Operation Excess Was Needed
War in the Mediterranean
When Italy joined the Second World War in June 1940, the war spread to the Mediterranean Sea. This made it harder for Britain to use its traditional sea routes to places like India. Italy's navy and air force became a big challenge to British control of the seas.
At first, the British Navy controlled the eastern Mediterranean, and the French Navy controlled the western part. But after France surrendered in June 1940, the French Navy was no longer an ally. This left the British Navy, based in Gibraltar and Alexandria, to protect supply routes alone.
Supplying Malta and Greece
The British needed to keep Malta supplied. Malta was a crucial island base right in the middle of the Mediterranean. It was like a strong fortress that helped the British control the sea.
In late 1940, Italy attacked Egypt and Greece. This made it even more important for the British to send supplies to their forces and allies in these areas. British victories in November 1940, like stopping the Italian attack in Greece and damaging Italian battleships at the Battle of Taranto, created a good chance to send these much-needed supplies.
Getting Ready for the Mission
Allied Forces Prepare
For Operation Excess, the British organized several groups of ships, called "convoys" and "forces." Each had a specific job:
- Convoy MC 4: Four supply ships left Gibraltar carrying materials for Greece and Malta. One ship, Essex, had 3,000 long tons (3,048 t) of potatoes, 4,000 long tons (4,064 t) of ammunition, and twelve Hawker Hurricane fighter planes for Malta.
- Convoy MW 5: Two supply ships from Alexandria carried cargo for Malta.
- Convoy ME 6: Nine supply ships waited at Malta to travel to Alexandria.
Many warships were assigned to protect these convoys:
- Force A: Included battleships like HMS Warspite and Valiant, and the aircraft carrier Illustrious. They sailed from Alexandria to protect the convoys.
- Force B: Cruisers HMS Gloucester and Southampton carried soldiers and airmen to Malta, then joined Convoy MC 4.
- Force C: Protected Convoy MW 5.
- Force D: Included cruisers HMS York and Orion, along with smaller ships.
- Force F: Protected Convoy MC 4 and carried more soldiers and airmen to Malta.
- Force H: A powerful group from Gibraltar, including the battleship HMS Malaya, battlecruiser Renown, and aircraft carrier Ark Royal. They protected Convoy MC 4 for the first part of its journey and delivered six Fairey Swordfish planes to Malta.
Axis Forces Get Ready
The Axis powers (Germany and Italy) were also preparing. Germany moved about 500 anti-shipping aircraft from Norway to Sicily, an island south of Italy. These planes, from a unit called Fliegerkorps X, were there to protect Axis supply ships and stop British convoys from reaching Malta.
The Battle Unfolds
January 6, 1941
Convoy MC 4 left Gibraltar. To trick enemy spies, it first pretended to head towards the Atlantic Ocean before turning towards Malta after dark.
January 7
Force H sailed from Gibraltar to protect Convoy MC 4. Forces A and D, along with Convoy MW 5 and Force C, left Alexandria. Force B sailed from the Aegean Sea towards Malta. Italian planes spotted Force A that afternoon.
January 8
Force B dropped off its passengers in Malta and headed west to meet Convoy MC 4. British bombers attacked Naples, Italy. They damaged the Italian battleship Giulio Cesare, causing the only other active Italian battleship, Vittorio Veneto, to move away from the approaching British convoys.
January 9
Force A met up with Force D and HMAS Sydney southeast of Malta. Force B joined Convoy MC 4. Italian planes discovered Convoy MC 4 and Force H. Ten Italian SM.79 bombers attacked, but two were shot down by Fairey Fulmar fighters from Ark Royal. A later attack by 15 Italian Fiat CR.42 Falco fighters also failed. Force H left Convoy MC 4 that afternoon after launching six Swordfish planes for Malta's defense. Force A joined Convoy MC 4 at dusk.
January 10: Heavy Attacks Begin
Italian ships tried to find Force H but failed. An Italian submarine and two torpedo boats, Circe and Vega, launched torpedoes at Convoy MC 4 but missed.
- Vega Sunk: The British ships Bonaventure and Hereward sank Vega south of Pantellaria at 8:30 AM. Circe escaped. Bonaventure was slightly damaged, and two of its crew were killed. Only two of Vega's crew survived.
- Gallant Hits a Mine: Right after this fight, which pushed the British convoy off its planned route, the destroyer Gallant hit a naval mine at 8:35 AM. Its front part was destroyed, and 65 men were killed. The destroyer Mohawk began towing Gallant towards Malta, while other cruisers protected them from air attacks.
- Convoys Reach Malta: Convoys MC 4 and MW 5 arrived safely in Malta. Convoy ME 6 left Malta for Alexandria.
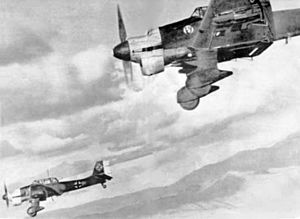
- Illustrious Attacked: At 12:35 PM, Force A was attacked by a large group of German planes: 18 He 111 bombers and 43 Ju 87 Stuka dive-bombers, escorted by 10 Bf 110 fighters. The aircraft carrier Illustrious was the main target. Bombs exploded all around it, creating huge waterspouts. Some bombers dove very low before releasing their bombs. The few British fighter planes available couldn't stop the attack effectively.
- Damage to Illustrious: Illustrious was hit by five bombs. One bomb didn't explode, and a near miss damaged its steering. Another bomb hit an elevator, causing huge damage to the hangar and destroying many planes (nine Swordfish and five Fulmars). Many crew members were killed or wounded.
- Escape to Malta: At 3:30 PM, Illustrious headed for Malta, steering with its engines. The bombing attacks continued, but the ship reached Malta at 9:30 PM. By then, 126 crew members had died, and 91 were wounded. The battleship Warspite was also lightly damaged.
January 11
- Gallant Beached: Gallant was pulled ashore in Malta's Grand Harbor at dawn. It was too badly damaged to be repaired.
- Southampton Sunk: As Mohawk and the Force B cruisers sailed from Malta to rejoin Force A, they were attacked by 12 German Ju 87R dive bombers at 3:20 PM. The bombers attacked from the direction of the sun, making them hard to see. The cruiser Gloucester was hit by a bomb that didn't explode. However, Southampton was hit by two bombs, which killed 80 men and started fires. The ship was so badly damaged that it had to be sunk by its own crew about 180 nmi (210 mi; 330 km) east of Malta. Force H returned to Gibraltar.
January 12-13
Force A was joined by more ships west of Crete. Convoy ME 6 arrived safely in Alexandria.
The Illustrious Blitz
After Illustrious reached Malta, the Germans and Italians made a huge effort to destroy it before it could be repaired. The Maltese people called these intense air raids the Illustrious Blitz.
- Continued Attacks: On January 16, Illustrious and the supply ship Essex were hit during an air raid. German and Italian fighters escorted 44 Ju 87s. A bomb exploded in Essex's engine room, killing 15 men and wounding 23.
- Illustrious Survives: Illustrious was not seriously damaged in this attack, but it was hit again on January 18. The last major attack on January 19 also failed to damage it.
- Departure and Repairs: Illustrious left Malta on January 23, but its Fulmar fighter planes stayed behind to help defend the island. The carrier reached Alexandria on January 25 for more repairs. To be fully ready for combat again, it had to travel all the way to shipyards in the United States.
What Was Lost
During Operation Excess, no merchant (supply) ships were lost, which was a big success for the British. However, the Royal Navy lost one cruiser, Southampton, which was sunk, and one destroyer, Gallant, which was damaged beyond repair.
British Fairey Fulmar fighters and anti-aircraft gunners shot down at least seven enemy aircraft on January 10 while defending Illustrious. Only one British Fulmar was lost.
See also
Sources
- Brown, David Warship Losses of World War II Naval Institute Press (1995) ISBN: 978-1-55750-914-7
- Pack, S.W.C. The Battle for Crete Naval Institute Press (1973) ISBN: 978-0-87021-810-1
- Pegg, Martin Luftwaffe Ground Attack Units 1939–45 Sky Books Press, NY 1977. ISBN: 978-0-89402-013-1
- Smith, Peter C. Junkers Ju 87 Stuka Crowood Press, Ramsbury, 1998. ISBN: 978-1-86126-177-9
Images for kids


