
Screen printing facts for kids

Screen printing is a cool way to print designs onto many different materials. Imagine a mesh screen, like a fine net. You push ink through this net, but only where you want the design to appear. Other parts of the screen are blocked off by a special stencil.
A tool called a squeegee helps push the ink through the open parts of the mesh. As the squeegee moves, the screen briefly touches the material below, letting the ink transfer. Then, the screen springs back up. You print one color at a time. If you want a design with many colors, you use a different screen for each color.
This printing method has a few names. It used to be called screen printing or silkscreen printing because silk was often used. Today, people mostly use strong synthetic materials like polyester for the mesh. Sometimes, nylon or stainless steel mesh is used for special projects. The size of the mesh holes can change how the final design looks.
Contents
History of Screen Printing
Screen printing first started in China a long, long time ago, during the Song Dynasty (960–1279 AD). Other Asian countries, like Japan, then learned and improved the method.
This technique slowly made its way to Europe in the late 1700s. But it didn't become very popular until silk mesh was easier to get from Asia. People also needed to find good ways to use it for business.
In the early 1900s, some printers started trying out special chemicals that reacted to light. These chemicals could harden certain parts of a stencil. Roy Beck, Charles Peter, and Edward Owens were important in this. They found a way to create stencils using light, which changed the screen printing industry forever. Today, the chemicals used are much safer.
A group of artists in the 1930s, including Max Arthur Cohn, came up with the word "serigraphy." They wanted a special name for screen printing when it was used for art, to tell it apart from industrial uses. "Serigraphy" comes from Latin and Greek words meaning "silk" and "to write or draw."
Screen printing is super flexible. Since the basic tools are cheap and easy to find, it's often used in underground art and DIY culture. This "do-it-yourself" style is now seen everywhere. You can find it on movie posters, album covers, T-shirts, and even in advertising.
Screen Printing from the 1960s to Today
The famous artist Andy Warhol helped make screen printing popular in the art world. His screen prints include the 1962 Marilyn Diptych, a colorful picture of actress Marilyn Monroe.
Corita Kent, an artist and nun, also became famous in the 1960s and 1970s for her bright screen prints. Her art often used rainbow colors and shared messages of peace and love.
In 1960, an American inventor named Michael Vasilantone started making and selling a special machine. This machine could print many colors on clothes. He first made it for printing logos on bowling shirts. But soon, it became very popular for printing designs on T-shirts. Today, printing on clothes makes up more than half of all screen printing in the United States.
Screen printing is still widely used today to make lots of graphics, like posters or signs. You can even create full-color pictures by using just four ink colors: cyan, magenta, yellow, and black (CMYK).
Many artists, including Andy Warhol and Roy Lichtenstein, have used screen printing to create amazing art.
There's also a newer method called digital hybrid screen printing. This combines traditional screen printing with digital printing. It lets you create unique designs with special screen printing effects.
How Screen Printing Works


A screen is a piece of mesh stretched tightly over a frame. The mesh can be made from materials like nylon. If you need a very detailed design, you use a mesh with smaller, finer holes. The frame can be made of wood or aluminum. The mesh needs to be tight, and its tension can be measured in Newtons per centimeter.
A stencil is made by blocking off parts of the screen. The areas that are blocked will not let ink through. The open areas are where the ink will print on your material.
Before printing, the screen goes through a "pre-press" process. First, a liquid called emulsion is spread across the mesh. Once it dries, you place a film with your design on top of the screen. Then, you shine ultraviolet light on it. The light hardens the emulsion where the design is clear. The parts of the emulsion that were blocked by the design film stay soft.
Next, you wash the screen with water. The soft, unexposed emulsion washes away. This leaves open areas in the mesh that match your design. These open areas are where the ink will pass through.
When printing on fabric, a special tape is put on the surface that holds the fabric. This protects the surface from any ink that might leak through the screen.
Then, tape is put around the edges of the screen and frame. This stops ink from getting onto the frame. The type of tape depends on the ink you are using.
Finally, you check for any tiny unwanted holes in the stencil. If you leave them, ink will go through and make unwanted marks. You can block these tiny holes with tape or special pens.
To print, you place the screen on top of your material. You put ink on the screen. A tool called a floodbar pushes the ink to fill the mesh openings. Then, you use a squeegee (a rubber blade) to push the screen down onto the material. As you push the squeegee, the ink is squeezed through the open mesh areas onto the material. As the squeegee moves, the screen lifts away from the material, leaving the ink behind.
There are three main types of screen printing machines: flat-bed, cylinder, and rotary.
For colorful designs on fabric, people often print one color right after another while the ink is still wet. For other items, each color is allowed to dry before the next color is printed.
After printing, most screens can be cleaned and reused. Sometimes, screens need an extra cleaning step called "dehazing." This removes faint "ghost images" left by old stencils. These are usually ink bits stuck in the mesh.
Even though many people think of T-shirts, screen printing is used for thousands of items. This includes stickers, clock faces, balloons, and many other products. It's even used for advanced things like making parts for electronic circuits.
Stencilling Techniques

One popular way to make stencils is called the photo emulsion technique:

- You start by creating your design on a clear sheet, like a transparency. You can draw or print your design on it. The parts you want to print should be dark or opaque, so they block ultraviolet light.
- Next, you pick a screen. Different mesh sizes are used for different levels of detail in your design. Once you have your screen, you coat it with emulsion and let it dry.
- You place your design transparency over the screen. Then, you expose it to a light source that has ultraviolet light.
- Finally, you wash the screen thoroughly. The parts of the emulsion that were not exposed to light will dissolve and wash away. This leaves a stencil on the mesh that is the exact opposite of your design. The open areas will let ink through.
Garment Printing Inks
Here are some types of inks used for printing on clothes:
- Caviar beads: This is a glue printed in the shape of the design. Small plastic beads are then added, creating a cool bumpy surface.
- Cracking ink: This ink creates a cracked surface after it dries.
- Discharge inks: These inks remove the dye from dark fabrics, making the design appear lighter. They work best on 100% cotton. They can have strong fumes, so good air flow is important. They give a soft feel to the print.
- Expanding ink (puff): This ink makes the print rise off the fabric, giving it a 3D look and feel.
- Flocking: A glue is printed on the fabric, then soft, fuzzy material is applied, making it feel like velvet.
- Foil: An adhesive glue or special ink is printed first. Then, a thin shiny sheet is placed on top and heated. The foil sticks only to the printed areas, creating a metallic look.
- Four-color process (CMYK): This uses only four ink colors (cyan, magenta, yellow, black) to create a wide range of colors for photo-like prints. It saves money and time but the colors might be less bright.
- Glitter/Shimmer: Tiny metallic flakes are added to the ink, making the design sparkle.
- Gloss: A clear ink is printed over other inks to give them a shiny finish.
- Metallic: Similar to glitter, but with smaller particles in the ink, giving a metallic sheen.
- Plastisol: This is the most common ink for clothes. It gives bright colors on dark fabrics and a clear design. It feels a bit like plastic. Plastisol inks need heat (around 150 °C or 300 °F) to dry completely.
- PVC and Phthalate Free: A newer type of ink that works like plastisol but doesn't have certain toxic chemicals. It also has a soft feel.
- Suede Ink: An additive mixed with plastisol ink to give the print a soft, suede-like texture.
- Water-Based inks: These inks soak into the fabric more, creating a much softer feel. They are great for printing darker colors on lighter clothes. Some need heat to become permanent.
- High Density: This process creates a raised, embossed print that feels like Braille.
Versatility of Screen Printing

Screen printing is super flexible compared to older printing methods. You don't need to press hard, and you can print on surfaces that aren't flat. You can use different inks for many materials, like:
- Balloons
- Clothing
- Decals (stickers)
- Medical devices
- Printed electronics, like circuit boards
- Product labels
- Signs and displays
- Snowboard graphics
- Textile fabric
- Pinball machines
Screen Printing Press
To print many copies of a design on clothes quickly, printers often use a screen printing press. These machines can be simple or very complex. There are three main types: Manual (you do the work by hand), Semi-Automatic, and Fully Automatic. Most printing companies use semi-automatic or fully automatic machines.
Rotary Screen Printing
A newer way of screen printing, developed in 1963, uses a screen shaped like a tube. The ink and squeegee are inside this tube. The tube spins at the same speed as the material being printed. This method allows for very fast printing and long rolls of product. It's great for making textured wallpapers and other continuous designs.
Images for kids
-
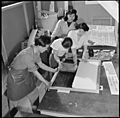
The poster shop at Heart Mountain War Relocation Center was run by Japanese-American internees. They used silkscreen to make information for the whole center (January 1943).

See also
 In Spanish: Serigrafía para niños
