kids encyclopedia robot

Actions of 30 September – 4 October 1917 facts for kids

Kids Encyclopedia Facts
Quick facts for kids
Actions of 30 September – 4 October 1917
Part of the Third Battle of Ypres in the First World War
Ypres area north, 1914-1915.jpg
Map of the Ypres–Menin Road–Polygon Wood area, 1917
Date 30 September – 4 October 1917
Location 50°51′7″N 2°59′7″E / 50.85194°N 2.98528°E / 50.85194; 2.98528
Result British victory
Belligerents
 German Empire

 United Kingdom

Commanders and leaders
Crown Prince Rupprecht Douglas Haig
Strength
1 division, 1 attached regiment 2 divisions
Casualties and losses
30 September: 80+
1 October: 356
4 October: 5,669 (partial)

The Actions of 30 September – 4 October 1917 were German methodical counter-attacks (Gegenangriffe) during the Third Battle of Ypres, in Flanders, during the First World War. Hasty counter-attacks (Gegenstöße) by the German 4th Army during the Battle of the Menin Road Ridge on 20 September and the Battle of Polygon Wood on 26 September, had been costly failures. On 29 September, a review was held at Roulers by Erich Ludendorff, the Generalquartiermeister (Quartermaster-General of the German Army, equivalent to the British Chief of the General Staff) with the commanders of Heeresgruppe Kronprinz Rupprecht von Bayern (Army Group Rupprecht of Bavaria) and the 4th Army staffs.

Gegenangriffe (Methodical counter-attacks) 24–48 hours after a British attack were to be substituted for Gegenstöße (immediate counter-attacks) during British attacks, to benefit from greater knowledge of the situation in the front line, air reconnaissance and artillery support. The change to Gegenangriffe was expected to thwart the British tactic of short advances and rapid consolidation. From 30 September to 4 October, the 4th Army conducted several Gegenangriffe but these re-captured little ground. After a costly failure on 1 October, another Gegenangriff intended for 3 October was put back to 4 October and failed, after coinciding with a big British attack on Broodseinde Ridge by the Second Army. Local attempts to counter-attack during the afternoon met a similar fate.

On 7 October, the 4th Army changed its defensive policy again; more emphasis was placed on reducing British barrage fire by counter-battery bombardments. Front line garrisons were to man an outpost zone dispersed in sentry posts and machine-gun nests. As soon as the British attacked, the outpost troops were to rush back to the main defensive line, which would then be protected by a standing barrage. The attackers were to be delayed by artillery-fire rather than German infantry action, while Eingreif divisions (specialist counter-attack divisions) advanced through the British barrages and conducted Gegenstöße as soon as possible. If the British had already dug in, the Gegenstoß was to be cancelled and a Gegenangriff conducted later.

Background

Strategic developments

The failure of the Kerensky Offensive in Russia in July had hastened the disintegration of the Russian army, made likely a Russian armistice and a huge reinforcement of the German Western Front. On the Western Front, the Battle of Hill 70 was fought by the Canadian Corps against the 6th Army, from 15 to 25 August, forestalling the transfer of fresh divisions to Flanders. On 20 August, the French attacked the German 5th Army at Verdun and in four days, re-took much of the ground lost to the Germans in 1916. The French took 9,500 prisoners, thirty guns, 100 trench mortars and 242 machine-guns. The French victory was similar in extent to the defeat of the 4th Army in the Battle of Messines in June and the Germans were unable to mount big counter-attacks because their Eingreif divisions had been transferred to Flanders. French preparations continued for an offensive on the Chemin des Dames (the Battle of La Malmaison) and the British Third Army worked on a plan for a surprise artillery–tank attack on the Flesquières Salient near Cambrai.

Tactical developments

The period of dry weather and clear skies in Flanders, in early September, greatly increased the effectiveness of British air observation and artillery-fire. German Gegenstoße (immediate counter-attacks) had failed and when Eingreif divisions arrived from the rear, they found that the British had established a defence in depth on reverse slopes, protected by standing barrages. The Royal Flying Corps (RFC) flew new specialist counter-attack reconnaissance sorties to observe German troop movements and improved its contact patrol and ground-attack methods. German artillery-fire was haphazard, due to uncertainty over the position of German infantry, just when the British could rely on massed artillery, accurately directed by observers in the air and on the ground. German counter-attacks had become assaults on reinforced field positions, due to the short British infantry advances, greater artillery firepower and tactical emphasis on defeating Gegenstoße. Following the costly defeats at the Battle of the Menin Road Ridge on 20 September and the Battle of Polygon Wood on 26 September, the 4th Army changed its defensive organisation again by altering their counter-attack tactics.

Prelude

German defensive preparations

German defences east of Ypres mid-1917
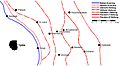
German defensive lines east of Ypres in mid-1917

On 28 September, two days after the defeat of the Battle of Polygon Wood, Oberstleutnant (Lieutenant-Colonel) Albrecht von Thaer, the chief of staff of Gruppe Wijtschate, made a diary note that it had been an awful experience; he did not know what to do against the British. Erich Ludendorff the Generalquartiermeister (Quartermaster-General of the German Army, equivalent to the British Chief of the General Staff) conferred on 29 September with Generalfeldmarschall (Field Marshal) Crown Prince Rupprecht the commander and Generalleutnant (Lieutenant-General) Hermann von Kuhl the chief of staff, of Heeresgruppe Kronprinz Rupprecht von Bayern (Army Group Rupprecht of Bavaria), the 4th Army commander, General Sixt von Armin and the 4th Army chief of staff, Generalmajor (Major-General) Fritz von Loßberg.

The fighting of the Third Battle of Flanders exhibited the same characteristics as the second battle and the fighting before Verdun....Our defensive tactics had to be modified in some way... but it was incredibly difficult to find the correct solution.

—Ludendorff (Memoirs)

In many cases, the counter-attacks hardly reached the front line then held. Heavy casualties were suffered and the whole thing was a failure, as our enemy contented himself with an objective already gained.

—Summary, Guard Infantry Brigade 5

The staff officers of the 4th Army Gruppen (corps headquarters) agreed that defensive manoeuvre was to be replaced by a policy of fighting for every piece of ground. Armin thought that even if counter-attacks failed to recapture ground, the British would keep more troops in the front line and that German infantry casualties were no worse in counter-attacks than under British barrages. On 30 September, the 4th Army issued an operation order for more field artillery bombardments between British attacks and that at least half of the heavy artillery ammunition was to be used for observed fire on captured pill-boxes, command posts and machine-gun nests, duckboard tracks and field railways. Gas bombardments were to be increased on the British front line and artillery emplacements, wind permitting. Pillboxes were to be recaptured, defensive positions improved and the British infantry were to be harassed by patrols and diversionary bombardments. The British were to be compelled by spoiling attacks to reinforce their forward positions and to counter-attack, during which they could be engaged by the German artillery.

Forward garrisons of the ground holding divisions were to be reinforced and all machine-guns, including those of the support and reserve battalions of the front line regiments, were sent into the forward zone, to make a cordon of four to eight guns every 250 yd (230 m). The Stoß (storm) regiments of the Eingreif divisions were moved up to the Artillerieschutzstellung (artillery protection line) behind the forward battle zone, to counter-attack while the British were consolidating. The rest of the Eingreif division was to be held back for a Gegenangriff (methodical counter-attack) 24–48 hours later. Between British attacks, the Eingreif divisions were to make more spoiling attacks. On 27 September, south-east of Polygon Wood, three German attacks against the 39th Division in the X Corps area, were repulsed by artillery fire. On the 3rd Division front astride the Ypres–Roulers railway, the Germans made a determined attack on Bostin Farm, eventually to be forced back; there were no Gegenangriffe until 30 September.

British preparations

Battle of Broodseinde - rough attack planning map
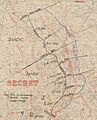
Battle of Broodseinde - rough attack planning map for 4 October
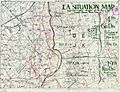
; 23rd Division relieved by the 5th Division, night of 1/2 October

British tactical refinements had sought to undermine the German defence-in-depth, by attacking objectives close behind the German front line and then fighting the principal battle against Eingreif divisions, as they counter-attacked. By further reorganising infantry reserves, Plumer had ensured that the depth of the attacking divisions corresponded closer to the depth of the local German counter-attack reserves and their Eingreif divisions, providing more support for the advance and consolidation against German counter-attacks. Divisions had attacked on narrower fronts and advanced no more than 1,500 yd (1,400 m) into the German defence zone, before digging in. German counter-attackers found a reciprocal defence-in-depth, protected by a mass of artillery. The tempo of attacks achieved by the British also added to the German difficulty in replacing tired divisions through the transport bottlenecks behind the 4th Army front.

No formal artillery preparation was to be conducted before 4 October, except for the normal heavy artillery counter-battery fire and destructive fire on German strong points. To mislead the Germans as to the date and time of the infantry attack, when a hurricane bombardment was to be fired at zero hour, practice barrages began on 27 September and increased to two barrages a day from 1 October. In a summary of 1 October, British military intelligence predicted the German defensive changes made after the defeat of 26 September, forecasting a big German counter-attack to recapture the area around Zonnebeke. The British considered cancelling their attack when heavy rain fell on 2 October, turning parts of the ground into a morass but decided to go ahead. X Corps took over from the I Anzac Corps in the area north of the Menin road and the 23rd Division (Major-General J. M. Babington) relieved the 33rd Division from the Menin road, north to Cameron Covert, on the night of 27/28 September. German artillery began to fire on the divisional area at dusk and a German party of infantry, seen on the right flank, was dispersed by British artillery.

A spur into Cameron Covert was taken over from Australian troops and patrols during the night found little sign of Germans. Advanced posts were dug and work continued on field defences, using the thick white mist that rose before dawn for concealment. The German artillery continued to bombard the area during 29 September and that day, German aircraft flew over the divisional artillery and the rear areas. In the evening, German shelling increased around Black Watch Corner on the south side of Polygon Wood. German troops were seen assembling and were engaged by artillery but still managed to attack. The British infantry waited, opened rapid fire with their small arms and repulsed the attackers. During the night, rear areas were bombed by German aircraft and the divisional artillery was severely bombarded with mustard gas. During the night of 30 September/1 October, the 23rd Division reorganised, the left flank of the 69th Brigade around Cameron Covert, being in touch with the 110th Brigade on the right of the 21st Division to the north.

German plans

1 October

Weather
(27 September – 4 October 1917)
Date Rain
mm
°F
September
27 0.0 67 dull
28 0.0 67 dull
29 0.0 65 fine
30 0.0 67 fine
October
1 0.0 69 fine
2 2.7 76 rain
3 1.2 64 dull
4 4.6 60 dull

The ground between Polygon Wood and the Menin road contained the streams of the Polygonbeek, between Reutel and Cameron Covert and the Reutelbeek, which drained the south-eastern corner of the Gheluvelt Plateau. The beds of the streams had been smashed by artillery bombardments, their courses had become swampy and in wet weather formed a mud slough about .5 mi (0.80 km) wide, between Reutel to the north and Cameron Covert and the Polderhoek Spur to the south. A ravine between the Polygonbeek and Jetty Warren was muddy but passable in most places. The fresh 45th Reserve Division, the Eingreif division of Gruppe Ypern contributed Reserve Infantry Regiment 210 (RIR 210) and the 8th Division of Gruppe Wijtshate supplied Infantry Regiment 93 (IR 93). The 4th Army Sturmbataillon provided twelve sections to attack the pillboxes and several minenwerfer companies were attached, to form a special force under General Arthur von Gabain [de], commander of the 17th Division.

4 October

After the disaster of 26 September, the 4th Guard Division (General Finck von Finckenstein) had been rushed up to relieve the 3rd Reserve Division at Zonnebeke. To hold the ridge, the Guards needed to assemble further west on Tokio Spur, because infantry counter-attacking over the ridge would be sky-lined and destroyed by British small arms and artillery fire. Unternehmen Hohensturm (Operation Height Storm) was planned for 3 October by Gruppe Ypern, to recapture Tokio Spur from Zonnebeke south to Molenaarelsthoek, at the eastern edge of Polygon Wood. The Gegenangriff was to be conducted by RIR 212 of the 45th Reserve Division, reinforced by eight sections of the 4th Army Sturmbataillon and 16 heavy and 16 light minenwerfer. RIR 212 was to attack through the three regimental sectors of the 4th Guard Division, held by Guard Grenadier Regiment 5 (GGR 5), Foot Guard Regiment 5 (FGR 5) and Reserve Infantry Regiment 93 (RIR 93) which would stand by, in case of a British attack. Both divisional infantries were put under the command of Lieutenant-Colonel Ernst von Radowitz [de] (FGR 5) in two parts. In the GGR 5 sector at Zonnebeke, I Battalion, RIR 212 came under the GGR 5 commander, Major Freiherr von Schleinitz and to the south, II and III battalions RIR 212, FGR 5 and the two northernmost companies of RIR 93 were subordinated to Lieutenant-Colonel Rave, the commander of RIR 212.

The Gegenangriff on 3 October was to be made on a front of 2,000 yd (1.1 mi; 1.8 km) through the lines of the 4th Guard Division, to recapture Tokio Spur and the vicinity. After the costly failure of the Gegenangriff at Polygon Wood on 1 October, the attack was put back 24 hours to dawn (6:10 a.m.) on 4 October; from 2 to 3 October, rehearsals were watched by the divisional and corps commanders. On the southern flank, the width of the attack was reduced and half of III Battalion, RIR 212 became a second wave behind the II Battalion in the centre; a contact patrol aircraft was arranged to fly over the area at 7:30 a.m. In the 4th Guard Division, the troops were assembled on or in front of Broodseinde Ridge, the rest of the support battalions on the rear slope and reserve battalions in the Artillerieschutzstellung (artillery protection line) at the bottom. Since 1 October, the 45th Reserve Division had been alarmed almost nightly and hurried forward to an assembly position in front of Moorslede, only to be sent back to its billets during the morning. The 20th Division was opposite the II Anzac Corps to the north of Polygon Wood and on 2 and 3 October, the 4th Bavarian Division (another Eingreif division) had been brought up to Passchendaele. On the night of 3/4 October, the German commanders had second thoughts but decided to proceed, warning the artillery to be ready to commence defensive bombardments.

Battle

30 September

At 4:00 a.m. on 30 September, a thick mist covered the ground and at 4:30 a.m., German artillery began a bombardment on the front of the 70th Brigade (Brigadier-General H. Gordon) between the Menin road and the Reutelbeek, on the right flank of the 23rd Division. German mortars fired on the brigade support lines and a cloud of smoke mixed with the morning mist, obscuring the view until about 5:00 a.m. At 5:15 a.m., German troops of the 8th Division and the 45th Reserve Division emerged from the mist on an 800 yd (730 m) front. The attack was supported by flame-throwers and German infantry threw smoke- and hand-grenades into the trenches held by the 8th Battalion King's Own Yorkshire Light Infantry (8th KOYLI) and the 11th Battalion, Sherwood Foresters. The British replied with small-arms fire and bombs, forcing the Germans to retreat in confusion but a post was lost south of the Menin road and then retaken by an immediate counter-attack. SOS rockets had been shrouded by the mist and the British artillery remained silent; a runner took two hours to get back to the brigade HQ in Sanctuary Wood. Another German attack was repulsed at 6:00 a.m. but German artillery-fire continued during the day. The 70th Brigade took two prisoners from RIR 78 and counted about 80 German corpses, for few British losses.

1 October

At 5:00 a.m. a German hurricane bombardment began on a 1,500 yd (1,400 m) front, from the Reutelbeek north to Polygon Wood, to a depth of 1,000 yd (910 m). Barrages were also fired on the north bank of the Reutelbeek and on a line south of Black Watch Corner; by coincidence a Second Army practice barrage began at 5:15 a.m. Communication with the British front line was cut and RIR 210 attacked in three waves at 5:30 a.m. On the 23rd Division front, south of Cameron Covert, two determined German attacks were repulsed but the bombardment continued and spread to the 70th Brigade on the right, much of it from the south-east, falling in enfilade along the British defences. The spur into Cameron Covert blocked the view from the south but small arms fire beyond could be heard all day. At 7:00 p.m. the German artillery began to concentrate on the 70th Brigade front and German troops were seen massing opposite, to the north and on the Menin road. The German attack was defeated by small-arms fire and the rapid response of the British artillery to SOS rockets. The battalion on the left of the 69th Brigade retreated from Cameron Covert, when the right hand battalion of the 110th Brigade, 21st Division to the north, was forced back and later retreated another 50 yd (46 m). A counter-attack coincided with another German attack and was repulsed, the British retiring for another 150 yd (140 m), before contact was regained with the 110th Brigade. Another attack failed and the German infantry dug in behind some old German barbed wire.

As night fell, the Germans attacked again at Cameron Covert but made no progress; by the end of the German attacks, the line of the 69th Brigade had been pushed back west of Cameron Covert to a line north from Cameron House to the 110th Brigade. On the 21st Division front, the right flank battalion of the 110th Brigade, north of Cameron Covert, was pushed back about 150 yd (140 m). On the 7th Division front on the left flank of X Corps, along the east side of Polygon Wood, the 22nd Brigade had a battalion in Jetty Trench and one to the north in Jubilee Trench. Neither battalion had been able to improve the defences by 1 October; mud limited the effect of German shell explosions but they still caused many casualties. German infantry attacked in waves against the right of the brigade and despite intense small-arms fire, the first wave reached Jetty Trench before being shot down. The following waves were forced back and were counter-attacked on the British right-flank, which took several prisoners. The Germans attacked all day and communication with the rear was lost but British SOS rockets were visible and after dark another three German attacks were repulsed by SOS barrages. The troops of RIR 210 had managed to advance 140 yd (130 m) on the right but fewer than 80 yd (73 m) in the centre.

4 October

Unternehmen Hohensturm

Battle of Broodseinde - situation map
Situation map showing German dispositions from Cameron Covert to Broodseinde, 4 October

The three battalions of RIR 212 had assembled at midnight, on the eastern slope of Broodseinde Ridge. The troops had been guided to the front line, ready to move forward and hug the barrage. At 5:25 a.m., the German preliminary bombardment for Unternehmen Hohensturm (Operation Height Storm) began and ten minutes later, the trench mortars and artillery of the 4th Guard Division concentrated on the attack front, as the divisions on the flanks opened fire. Some of the first German shells fell on I Battalion, RIR 212 in the I Battalion, GGR 5 sector at Zonnebeke, causing many casualties and the troops fired yellow cluster flares to warn the artillery. At 6:00 a.m., the German bombardment lifted, the last shells being fuzed to explode underground to smother shell splinters, making it safer for the infantry to close up. The barrage was to creep forward 200 yd (180 m) beyond the British front line, then to move further to the rear.

When the British artillery opened fire ten minutes later, the German gunners were uncertain if it was for an attack or retaliation. Soon after the first waves of RIR 212 had leap-frogged through the troops of the 4th Guard Division, they reappeared shouting "The English are coming!". At about 5:20 a.m. a yellow flare rather than the usual white one rose over Broodseinde Ridge, followed by a few more and then many flare illuminations spread gradually along the flanks. After a few minutes, a German barrage began and increased in extent and depth, back to Glencorse Wood. The German barrage fell on the troops of the I Anzac Corps, hitting the 1st Australian Division and the 2nd Australian Division at Zonnebeke and Molenaarelsthoek. The most advanced troops escaped the worst and troops further back edged forward. As dawn broke about 14 per cent of the attacking infantry of the I Anzac Corps had become casualties. The 3rd Australian Division and the 7th Division on the flanks were not bombarded as extensively. It was too late for the Australians to fire an SOS rocket, because the guns were not allowed to respond in the last ten minutes before an attack.

Opposite the X Corps front were the German 19th Reserve Division and the 17th Division, its Eingreif division. The 5th Division attacked Polderhoek Spur on its right flank and took some ground towards Gheluvelt. The British captured Polderhoek Château and several pillboxes but was forced from the château as dark fell. The 21st Division and four tanks crossed the swamp of the Polygonebeek and routed the German defenders, the division gaining observation to the south-east over the Reutelbeek valley, which protected the main attack on Broodseinde Ridge; the right hand brigade retreated slightly, to dead ground, to avoid massed machine-gun fire. The 7th Division, on the left of X Corps, reached its objectives at the eastern edge of the Gheluvelt Plateau against the left of RIR 93 and reserve troops of IR 93 and IR 94. The British found many dead German infantry in camouflaged shell-holes and the survivors retreating rapidly down the eastern slope, except for 600 men who were taken prisoner. The advance fell short of the final objective but gave a view across the Heulebeek depression to the Keiberg Spur and towards Dadizeele.

As the I Anzac Corps divisions began their 800 yd (730 m) advance towards Flandern I Stellung on Broodseinde Ridge, men were seen rising from shell-holes and more shell-craters were found, where German troops were concealed. Most of the Germans were overrun or retreated through the British barrage, then the Australians attacked pillboxes one-by-one and captured the village of Zonnebeke north of the ridge. When the British barrage began on Broodseinde Ridge, the Keiberg Spur and Waterdamhoek, some of the German forward headquarters only realised that they were under attack when British and Australian troops appeared among them.

German counter-attacks

As the Australians began the second phase of the British attack, RIR 93 was conducting a Gegenstoß to regain the In de Ster plateau on the southern flank, only to be driven further back. Against the 1st Australian Division to the north, II Battalion, FGR 5 and III Battalion, RIR 211 advanced, under machine-gun fire from In de Ster, through retreating German troops and could only close up to hedges and woods near the new Australian positions. In the sector of GGR 5 to the north, II Battalion, GGR 5 had some scattered companies in front of Daisy Wood but German infantry retreating down the slopes to the south led to a fear that the battalion might be cut off. Part of the reserve battalion of FGR 5 and part of II Battalion, RIR 211 were sent out as a flank guard. Australians advancing to the north started another panic and the II Battalion, GGR 5 was ordered to fall back to Daisy Wood, the rest of the II Battalion, RIR 211 was brought up and a call for reinforcements was sent to the Kapellenhof (Eddy Farm to the British) on the Keiberg Spur.

RIR 210 of the 45th Reserve Division was still recovering from the 1 October Gegenangriff but its battalions were sent to reinforce the 4th Guard Reserve Division. Part of a battalion got through to GGR 5 in the afternoon but it was so exhausted that it was sent back to the artillery protection line to join the rest of the regiment. Bavarian Infantry Regiment 5 (BIR 5), part of the 4th Bavarian Division, was ordered up between Passchendaele and Moorslede, as Eingreif troops for the 20th Division north of Broodseinde. At 11:25, BIR 5 was sent to the Kapellenhof, the only easy passage through the wire of Flandern II Stellung, then the I and III battalions were sent to Broodseinde instead. Both battalions were caught by machine-gun fire and took cover in Daisy Wood with the rest of GGR 5.

The rest of the 4th Bavarian Division was to counter-attack astride and north of the railway. At noon, BIR 9 attacked from the north-east against Broodseinde at 12:30 p.m. The II Battalion, BIR 9 advanced south of the railway and was bombarded by artillery and machine-guns as it crossed the Keiberg Spur; only scattered parties managed to reach Daisy Wood and the area to the south. North of the railway, the I Battalion advance began later at 1:45 p.m. and was delayed by the wire at Flandern II Stellung, engaged with small-arms fire at the Ypres–Roulers railway cutting and then from the right flank, which drove the survivors south to Daisy Wood. The III Battalion advanced from Passchendaele Ridge on the right flank but Australian machine-gun fire from the crest, forced it to swerve right into a dip east of Gravenstafel Spur. At 3:00 p.m. the II Battalion, BRIR 5 was ordered to attack from the Kapellenhof towards the Broodseinde cross-roads and also ended up in Daisy Wood, still under severe bombardment by British artillery. When the advance resumed, a German barrage fell short on the battalion, ending the counter-attack.

Aftermath

Casualties

On 1 October, the 7th Division had 235 casualties. On 4 October, German losses in the area of Unternehmen Hohensturm west of Broodseinde Ridge, were 2,883 men of the 45th Reserve Division and 2,786 casualties in the 4th Guard Reserve Division. In RIR 212, Oberstleutnant Rave, 13 officers and 328 men were killed and 1,050 officers and men were reported wounded, missing or ill, some companies having suffered 95 per cent casualties.

kids search engine
Actions of 30 September – 4 October 1917 Facts for Kids. Kiddle Encyclopedia.