Battle of Dupplin Moor facts for kids
Quick facts for kids Battle of Dupplin Moor |
|||||||
|---|---|---|---|---|---|---|---|
| Part of Second War of Scottish Independence | |||||||
|
|||||||
| Belligerents | |||||||
| Bruce loyalists | Balliol supporters English allies |
||||||
| Commanders and leaders | |||||||
| Donald, Earl of Mar † Robert Bruce † Duncan, Earl of Fife |
Edward Balliol Henry Beaumont |
||||||
| Strength | |||||||
| 15,000 to 40,000 | 1,500 | ||||||
| Casualties and losses | |||||||
| High | 35 killed | ||||||
| Designated | 21 March 2011 | ||||||
| Reference no. | BTL8 | ||||||
The Battle of Dupplin Moor was a major battle fought on 11 August 1332. It was the first big fight in the Second War of Scottish Independence. The battle took place near Perth, Scotland. It was between supporters of King David II of Scotland, who was the son of Robert Bruce, and invaders who supported Edward Balliol. Edward Balliol was the son of a former Scottish king, John I of Scotland. He had help from England.
A Scottish army, led by Donald, Earl of Mar, had between 15,000 and 40,000 soldiers. They attacked a smaller force of about 1,500 men. This smaller army was mostly English and led by Balliol and Henry Beaumont. Even though the Scots had many more soldiers, Balliol's side won a big victory.
Contents
Why the Battle Happened
The First War of Scottish Independence between England and Scotland ended in 1328. A peace treaty, called the Treaty of Northampton, said that Robert Bruce was the rightful king of Scotland. However, many people in England did not like this treaty. They called it "the cowards' peace."
Some Scottish nobles had lost their lands because they didn't support Robert Bruce. They were called "disinherited nobles." These nobles joined forces with Edward Balliol. Edward Balliol wanted to be king of Scotland, just like his father, John I of Scotland, had been.
King Edward III of England was young, but he wanted to cause trouble for Scotland. He secretly supported Balliol's plan to invade Scotland. Edward III told his officials to arrest anyone planning an invasion. But he let Balliol's forces sail from English ports in July 1332.
Robert Bruce died in 1329, and his son, David II, became king. David was only five years old. Thomas Randolph, an experienced soldier, was chosen to rule Scotland as David's guardian. He knew Balliol was coming, but he died just ten days before Balliol's ships sailed.
Getting Ready for Battle
Edward Balliol's army was small, with only 1,500 men. This included 500 men-at-arms (knights and heavily armed soldiers) and 1,000 infantry (foot soldiers), many of whom were longbowmen. Balliol hoped that many Scots would join him once he landed.
The Scots chose Donald, Earl of Mar, as their new guardian. Mar was a skilled fighter and a relative of King David II. He split the large Scottish army. Mar led the part north of the Firth of Forth, and Patrick, Earl of March, led the part to the south.
Balliol landed at Wester Kinghorn (now Burntisland) on 6 August 1332. This was on the northern shore of the Firth of Forth. As Balliol's men were getting off their ships, a Scottish force attacked them. This Scottish force was led by Duncan, Earl of Fife, and Robert Bruce (who was an illegitimate son of King Robert the Bruce).
The Scots attacked the English on the beach. But the English longbowmen fired arrows at them, driving them back. Many Scots were killed. After this, Balliol's army marched to Dunfermline. They took supplies and then headed for Perth, which was the capital of Scotland.
The Battle Begins
English Plan
The Scottish army, led by Mar, took a strong position south of Perth, on the north bank of the River Earn. They broke down the bridge over the river. The Scots had many more soldiers than the English. Some reports say they had 20,000, 30,000, or even 40,000 men. The English had only about 1,500.
The English arrived on the south bank of the Earn on 10 August. They were in a tough spot. They were deep in enemy land, facing a much larger army across a river. Another Scottish army was also moving towards them. The Scots felt very confident. They even started celebrating that evening, "playing, drinking and making merry" late into the night. They set a guard by the broken bridge but didn't take other safety steps.
The English knew they had no hope if they stayed or retreated. So, around midnight, their whole army crossed the river at a spot that wasn't guarded. In the dark, they found a Scottish camp and attacked it. Many Scots were killed or captured, and the rest ran away. The English thought they had defeated the main Scottish army. But at dawn, they saw two huge groups of Scots marching towards them. This made the English feel scared, but their leaders gave them inspiring speeches.
The English got ready for battle. Most of their soldiers fought on foot. They formed three tight rows of men-at-arms, with a fourth row of ordinary foot soldiers. The longbowmen were split into two groups, one on each side of the main group of soldiers. They stood in a narrow valley, which was a good defensive spot. The archers were on higher ground on the sides of the valley.
Scottish Attack
The Scots were still very confident. They formed into two large groups, called schiltrons. These were tightly packed formations of soldiers armed with long pikes. Mar suggested that the English should be allowed to surrender so they could be captured and held for ransom.
But Robert Bruce, who led the first Scottish group, accused Mar of being a traitor. Bruce thought Mar had let the English cross the river easily. Mar denied this and said he would be the first to attack the English to prove his loyalty. Bruce then said he would be first. So, the two Scottish groups raced each other to attack the English.
Bruce's group was in the lead and won the race. But their fast charge made them disorganized. Only about 800 men were still with Bruce when they hit the English line. They pushed the English back a little, but the English did not break. The English soldiers stood firm.
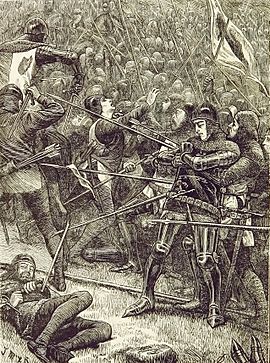
The Scots, in their rush, were forced into the narrow valley. All of them attacked the English men-at-arms in the middle, ignoring the longbowmen on the sides. As the Scots pushed forward, their sides became open to the English archers. The rest of Bruce's group rushed into the valley, pushing their comrades even harder against the English. This made it so crowded that the soldiers in the front couldn't even use their weapons.
The English archers fired arrows into the faces of the Scottish soldiers. The Scots on the sides tried to get closer to the main group to avoid the arrows. This made the Scottish formation even more crowded. Mar's group also rushed forward and crashed into the back of Bruce's group, causing even more confusion.
The fighting lasted from dawn until after noon. In the middle of the Scottish army, many men died from suffocation because they were pressed too tightly together to breathe. If someone fell, they were trampled to death. Reports say that over a thousand Scots died this way without even fighting the English.
The English, in their looser formation, could use their weapons. The Scottish soldiers who survived tried to escape, adding to the chaos. The English soldiers had to climb over piles of dead Scots to reach those still alive. All this time, the English archers kept firing arrows into the Scottish sides.
Finally, the Scottish army broke and ran away. Some Scottish nobles escaped on horseback, but most Scots fled on foot. The English soldiers got on their horses and chased the Scots, killing them until sunset. After the battle, the English took over Perth and made its defenses stronger.
Who Was Lost
The English lost 35 men: 2 knights and 33 squires (young men training to be knights). No English archers were killed. The Scots lost many more soldiers.
Donald, Earl of Mar, and Robert Bruce both died in the battle. Two other earls, 14 barons, and 160 knights also died. Many other Scottish soldiers were killed. Some reports say over 15,000 Scots died. Others say 2,000 or 3,000. The Earl of Fife was the only high-ranking Scottish leader who survived. He was captured and then joined Balliol's side.
What Happened Next
A week after the battle, the other Scottish army, led by March, arrived outside Perth. But there was little he could do. Balliol had won a big victory and was now in a strong, fortified town. Balliol had also captured lots of food in Perth. His ships had defeated the Scottish navy, so more food and soldiers could be brought in by sea. Soon, March's army ran out of supplies and had to leave.
Edward Balliol was crowned king of Scotland at Scone on 24 September 1332. This was the traditional place where Scottish kings were crowned. Balliol quickly gave King Edward III of England Scottish lands.
But Balliol did not have much support in Scotland. Within six months, his power fell apart. He was attacked by supporters of David II at the Battle of Annan a few months after his coronation. Balliol had to flee to England, barely dressed and riding without a saddle. He asked Edward III for help.
Edward III then openly supported Balliol and got ready for war. After the Scots were defeated at the Battle of Halidon Hill in July 1333, Balliol became king of Scotland again. But he was removed from power again in 1334, put back in 1335, and finally removed for good in 1336 by those loyal to David II. The Second War of Scottish Independence finally ended in 1357.
The Battle of Dupplin Moor was very important. Historian Sir Charles Oman said that after this battle, the English always used the battle plan that Balliol and Beaumont had used.
Where the Battle Was Fought
Historic Environment Scotland has found a possible location for the battle on Gaskmoor. This area is on the Dupplin plateau, about 5 miles (8 km) southwest of Perth.
Experts believe this spot matches the old stories of the battle. The narrow valley would have forced the Scottish soldiers into the center, causing the deadly crush that killed so many. The steep sides of the valley would have protected the English from attacks on their sides. This choice of land shows how smart and experienced the English leaders were. The battlefield was added to the Inventory of Historic Battlefields in Scotland in 2011.
Images for kids
-
A modern replica of a bodkin point arrowhead used by English longbows to penetrate armour
See also
 In Spanish: Batalla de Dupplin Moor para niños


