kids encyclopedia robot

Battle of Lundy's Lane facts for kids

Kids Encyclopedia Facts
Quick facts for kids
Battle of Lundy's Lane
Part of the War of 1812
Battle of Lundys Lane.jpg
Battle of Lundy's Lane, Alonzo Chappel
Date 25 July 1814 (1814-07-25)
Location
Niagara Falls, Upper Canada
43°05′21″N 79°05′44″W / 43.0891°N 79.0955°W / 43.0891; -79.0955
Result Inconclusive (see aftermath of the battle)
Belligerents
 United Kingdom
 Upper Canada
 United States
Commanders and leaders
Gordon Drummond
Phineas Riall  Surrendered
Jacob Brown
Winfield Scott
Eleazer Ripley
Strength
3,500 2,500
Casualties and losses
84 killed
559 wounded
169 captured
55 missing

174 killed
572 wounded
79 captured
28 missing

Official name: Battle of Lundy's Lane National Historic Site of Canada
Designated: 1937

The Battle of Lundy's Lane, also known as the Battle of Niagara Falls, was a battle fought on 25 July 1814, during the War of 1812, between an invading American army and a British and Canadian army in present-day Niagara Falls, Ontario. It was one of the bloodiest battles of the war, and one of the deadliest battles ever fought in Canada, with over 1,731 casualties including 258 killed.

The two armies fought each other to a stalemate; neither side held firm control of the field following the engagement. However, the casualties suffered by the Americans precipitated their withdrawal, and the British held the strategic initiative.

Background

On 3 July 1814 an American army under Major General Jacob Brown launched an attack across the Niagara River near its source on Lake Erie. His force quickly captured the British position at Fort Erie and then advanced north. Two days later one of his two brigades of regular U.S. Infantry under Brigadier General Winfield Scott defeated a British force commanded by Major General Phineas Riall at the Battle of Chippawa.

A few days after the battle, Brown outflanked the British defences along the Chippawa River and the British fell back to Fort George near the mouth of the Niagara on Lake Ontario. Brown lacked the necessary troops and heavy artillery to attack this position and a British naval squadron controlled the lake. Commodore Isaac Chauncey, commander of the American ships based at Sackett's Harbor, New York, was waiting for new frigates and armed brigs to be completed before he challenged the British squadron. The American squadron was further delayed in port when Chauncey fell ill. As a result, no reinforcements or heavy guns were sent to Brown, and the British were able to move several units across the lake from York to reinforce Fort George.

For most of July, Brown's army occupied Queenston, a few miles south of Fort George. In this forward position they were harassed by Canadian militia and First Nation warriors. On 24 July Brown fell back to the Chippawa River, intending to secure his supplies before advancing west to Burlington. As soon as Brown retired, British light infantry and militia under Major General Riall advanced to Lundy's Lane 4 miles (6.4 km) north of the Chippawa to allow light troops to maintain contact with the American main force.

Battle

Preliminary movements

Early on 25 July, the British Lieutenant Governor of Upper Canada, Lieutenant General Gordon Drummond, arrived in Fort George to take personal command on the Niagara peninsula. He immediately ordered a force under Lieutenant Colonel John Tucker to advance south from Fort Niagara (which the British had captured in December 1813) along the east side of the Niagara River, hoping this would force Brown to evacuate the west bank. Instead, Brown ordered an advance north, intending in turn to force the British to recall Tucker's column to protect Fort George. The Americans apparently did not know that the British held Lundy's Lane in strength.

Gordon Drummond
The order to retreat to Fort George was countermanded by Lieutenant General Gordon Drummond, who instead ordered for reinforcements to support his position at Lundy's Lane.

As soon as Riall knew the Americans were advancing, he ordered his troops to fall back to Fort George and ordered another column under Colonel Hercules Scott to move from St. Davids to Queenston to cover his withdrawal, rather than advance to his support. These orders were countermanded by Drummond, who had force-marched a detachment of reinforcements to Lundy's Lane from Fort George. The British were still reoccupying their positions when the first American units came into view, at about 6:00 pm.

Scott's attack

Lundy's Lane was a spur from the main Portage Road alongside the Niagara River. It ran along the summit of some rising ground (about 25 feet higher than the surrounding area) and therefore commanded good views of the area. The British artillery (two 24-pounder and two 6-pounder guns, one 5.5-inch howitzer and a Congreve rocket detachment) were massed in a cemetery at the highest point of the battlefield.

The American 1st Brigade of regulars under Winfield Scott emerged in the late afternoon from a forest into an open field and was badly mauled by the British artillery. Scott sent the 25th U.S. Infantry, commanded by Major Thomas Jesup, to outflank the British left. The 25th found a disused track leading to a landing stage on the river and used it to pass round the British flank. They caught the British and Canadian units there (the light company of the 1st Battalion of the 8th (King's) Regiment and the Upper Canada Incorporated Militia Battalion) while they were redeploying and unaware of the American presence, and drove them back in confusion. The British and Canadians rallied, but had been driven off the Portage Road. Jesup sent Captain Ketchum's light infantry company to secure the junction of Lundy's Lane and the Portage Road. Ketchum's company captured large numbers of wounded and messengers, including Major General Riall, who had been wounded in one arm and was riding to the rear. Most of the prisoners escaped when Ketchum, having briefly rejoined Jesup, ran into an enemy unit while trying to return to the main body of the American army, although Riall and militia cavalry leader Captain William Hamilton Merritt remained prisoners.

Jesup's action and the steadiness of Scott's brigade persuaded Drummond to withdraw his centre to maintain alignment with his left flank, and also pull back the Glengarry Light Infantry, who had been harassing Scott's own left flank. The withdrawal of Drummond's center left the artillery exposed in front of the infantry.

Brown's attack

AR Miller James
After he was instructed to take British guns, Lt Col James Miller, commander of the 21st U.S. Infantry, responded "I'll try, Sir."

By nightfall, Scott's brigade had suffered heavy casualties. Brown had arrived late in the day with the American main body (the 2nd Brigade of regulars under Brigadier General Eleazer Wheelock Ripley and a brigade of volunteers from the militia under Brigadier General Peter B. Porter). As Ripley and Porter relieved Scott's brigade, Brown ordered the 21st U.S. Infantry under Lieutenant Colonel James Miller to capture the British guns. Miller famously responded, "I'll try, Sir".

While the British were distracted by another attack by the 1st U.S. Infantry on their right, Miller's troops deployed within a few yards of the British artillery. They fired a volley of musketry that killed most of the gunners and followed up with a bayonet charge; this captured the guns and drove the British centre from the hill. The British infantry immediately behind the guns (the 2nd Battalion of the 89th Foot) tried to counter-attack, but were driven back by Miller and Ripley.

Meanwhile, the British column under Colonel Hercules Scott was arriving on the field, already tired from its unnecessary diversion via Queenston. Unaware of the changed situation, they blundered into Ripley's brigade and were also driven back in disorder, losing their own three 6-pounder guns. These were recovered by a charge by the light company of the 41st Foot, but were either abandoned again or remained in British hands but could not be brought into action as the drivers and gunners had been scattered.

Drummond's counter-attack

While the Americans tried to deploy their own artillery among the captured British guns, Drummond (who had been wounded in the neck) reorganized his troops and mounted a determined attempt to retake his own cannon. There was no subtlety; Drummond launched an attack in line, without attempting to use his many light infantry to harass or disorder the American line, or to locate any weak points in it. The Americans beat back the attack after a short-range musketry duel over the abandoned British guns, in which both sides suffered heavy casualties. The Glengarry Light Infantry, who had once again begun to harass the American left flank, were mistaken for Americans by other British units and forced to withdraw after suffering casualties from British fire.

Battle of Niagara Falls map
A map from 1869 that shows the positions of the American and British forces during the battle.

Undeterred by his first failure, Drummond launched a second attack, using the same methods and formation as in the first. Although some American units wavered, they were rallied by Ripley and stood their ground. While the combat was taking place, Winfield Scott led his depleted brigade (which had been reorganized into a single ad hoc battalion under Major Henry Leavenworth) in an unauthorized attack against Drummond's centre. Scott's brigade was engaged both by the British and by units of Ripley's brigade, who were not aware of the identity of the troops at which they were shooting. Drummond's line was driven back but Scott's men broke in disorder and retreated, before rallying on the American left. Scott rode to join Jesup's regiment, still out on the right flank, but was severely wounded shortly afterwards.

Shortly before midnight, Drummond launched a third counter-attack, using every man he could find, although by this time the British line consisted of mixed-up detachments and companies, rather than organised regiments and battalions. The fighting over the artillery was closer than before, with bayonets being used at one point, but again the exhausted British fell back.

End of the battle

By midnight both sides were spent. On the American side only 700 men were still standing in the line. Winfield Scott and Jacob Brown were both severely wounded. Brown would soon recover but Scott's injury removed him from the campaign. With supplies and water short, Brown ordered a retreat. Porter and Lieutenant Colonel Jacob Hindman (Brown's artillery commander) protested but complied. Ripley apparently did not learn of Brown's order until he realised that Hindman's artillery had been withdrawn. Although urged by Porter to maintain his position, he also withdrew. The British still had 1,400 men on the field but they were in no condition to interfere with the American withdrawal. Drummond had ordered some units to hold the Portage Road and left some light infantry outposts near the Americans, but had withdrawn the remainder a short distance west along Lundy's Lane.

The American artillerymen had suffered severely during the fighting, and Hindman had difficulty finding sufficient draught horses to get all his guns away. One American 6-pounder gun had been lost earlier during the close-range fighting, when its drivers had been hit by musket fire and the horses drawing it had bolted into the British lines. Hindman also had to abandon a howitzer with a broken carriage. The Americans were able to drag away one captured 6-pounder gun that had earlier been pushed to the bottom of the high ground in the centre of the former British position. Hindman later found more horses and sent a team back to recover one of the prized British 24-pounder guns. The team was captured by British parties who were wandering around the battlefield.

Aftermath

Map of the Niagara Frontier, 1869
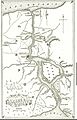
Map of the Niagara Frontier in 1814. Following Lundy's Lane, American forces fell back to Fort Erie, losing the initiative on the Niagara Peninsula.

In the early hours of the morning of 26 July, Brown ordered Ripley to recover the abandoned British guns the next day. Reinforcing his exhausted men with detachments that had been left at Chippawa, Ripley moved out at daybreak with 1,200 soldiers but found that Drummond had reoccupied the battlefield with 2,200 men. Ripley withdrew, unmolested.

The American army fell back to Fort Erie, first deliberately destroying the old British fortifications along the Chippawa River and burning the bridges behind them. Because they were short of transport, they had to abandon or destroy much equipment and supplies to make room for the wounded on the available wagons. Drummond was later to claim that the Americans had retreated in disorder. After burying some of the British and Canadian dead on the battlefield and burning many American corpses in large funeral pyres, the British withdrew to Queenston until Drummond received reinforcements.

In respect to the effect of the battle on the War, the British won a strategic victory, as the Americans on the Niagara had suffered so many casualties that they were now badly outnumbered, and were forced to retire to Fort Erie. Richard V. Barbuto says, "On 26 July, Brown's plan to advance on Burlington Heights was irretrievably shattered... Drummond had secured the forts at the northern end of the Niagara, and he had blunted an American advance. Although there was still a lot of fight in both forces, the balance of combat power on the Niagara Peninsula had swung from the invaders to the defenders".

Casualties

The British official casualty return had 84 killed, 559 wounded, 42 captured, and 193 missing. The Americans captured 19 British officers and 150 other ranks, giving a revised British casualty total of 84 killed, 559 wounded, 169 captured, and 55 missing.

The original American official casualty return, dated 30 July 1814, gave 171 dead, 572 wounded, and 117 missing. A slightly later version gave the same number of killed and wounded but 110 missing. Donald Graves says, "British records state that four officers and 75 Americans of other ranks captured at Lundy's Lane were imprisoned at Quebec in the autumn of 1814. The remainder of the missing were probably the wounded or dead left on the field after Ripley withdrew". Three officers of the 22nd U.S. Regiment of Infantry; Lieutenants William Sturgis, John D. Kehr and Robert M. Davidson, who appear on the casualty list as "missing" and "supposed to be killed" were later confirmed as having been killed on 25 July. This gives a revised American loss of 174 killed, 572 wounded, 79 captured, and 28 missing. Graves speculates that the discrepancies in the proportions of killed and wounded men between British and American casualties may be accounted for by the Americans not collating their casualty returns until five days after the battle, when some of those originally listed as missing were confirmed to have been killed, and some severely wounded men had died of their wounds.

Battlefield and memorials

Lundy's Lane Historical Museum
Lundy's Lane Historical Museum (now the Niagara Falls History Museum) in Niagara Falls, Ontario, Canada, on Lundy's Lane near the battle site.

The site was designated as a National Historic Site of Canada in 1937.

The site of the battle is now a residential and commercial area of Niagara Falls, Ontario. Part of the battlefield site was preserved next to the Drummond Hill Cemetery on Lundy's Lane east of Drummond Road. Other memorials added to the site include:

  • Soldier's Monument – created by the Canadian Parliament and unveiled by Lundy's Lane Historical Society in 1895
  • Commemorative Wall – added 2004
  • Laura Secord Monument – Laura Secord is buried at the Drummond Hill Cemetery

Legacy

  • James Miller's response, "I'll try, Sir", to Brown's order to capture the British guns is now the motto of the 5th U.S. Infantry. The 21st were merged into this regiment in 1815 when Congress reduced the United States Army to a smaller peacetime establishment.
  • Ten active regular infantry battalions of the United States Army (1–2 Inf, 2-2 Inf, 1–3 Inf, 2–3 Inf, 4-3 Inf, 1–5 Inf, 2–5 Inf, 1–6 Inf, 2–6 Inf and 4–6 Inf) perpetuate the lineages of a number of American infantry units (the old 1st, 9th, 19th, 21st, 22nd, 23rd and 25th Infantry Regiments) that took part in the battle.
  • Four Regiments of the British Army, the 1st (Royal Scots), 8th (Kings), 41st and the 89th Regiments of Foot were awarded the "Niagara" Battle Honour for their service during the battle of Lundy's Lane. Their respective modern successor units are: The Royal Regiment of Scotland, the Duke of Lancaster's Regiment, the Royal Welsh Regiment and the Royal Irish Regiment.
  • As the result of a decision taken in 2012, four Ontario-based regiments of the Canadian Army perpetuate the history and heritage of the Battalion of Incorporated Militia and thus carry the NIAGARA battle honour earned by that battalion. These regiments are: The Lincoln and Welland Regiment, the Queen's York Rangers, the Brockville Rifles and the Princess of Wales' Own Regiment.
  • Seven other Canadian Army regiments carry the same Battle Honour in commemoration of other Canadian Fencible and Militia units that took part in the battle. They are: the Stormont, Dundas and Glengarry Highlanders, the North Shore (New Brunswick) Regiment, the 56th Field Artillery Regiment, RCA, the Essex and Kent Scottish Regiment, the Royal Canadian Regiment, the Royal Hamilton Light Infantry, and The Lorne Scots.
  • In 1818, American poet John Neal published the poem "Battle of Niagara," which is considered the best poetic description of Niagara Falls up to that time.
  • In 1908, Canadian poet Duncan Campbell Scott wrote a poem, "The Battle of Lundy's Lane," which won a contest sponsored by the Toronto Globe. The poem was reprinted in his 1916 collection, Lundy's Lane and Other Poems.
  • Lundy's Lane is mentioned in the unofficial Canadian patriotic anthem, "The Maple Leaf Forever" :
At Queenston Heights and Lundy's Lane our brave fathers, side by side
for freedom, homes, and loved ones dear, firmly stood and nobly died.
And those dear rights which they maintained, we swear to yield them never.
Our watchword evermore shall be, the Maple Leaf forever!
  • In Martin Scorsese's blockbuster film Gangs of New York, lead character William "Bill the Butcher" Cutting states that his late father was "[m]urdered by the British with all of his men on the twenty-fifth of July, anno domini, 1814", a presumed reference to the Battle of Lundy's Lane.

Orders of battle

British order of battle American order of battle

Lieutenant General Sir Gordon Drummond

  • Right Division (Major General Phineas Riall)
    • 2nd (Light) Brigade (Lieutenant Colonel Thomas Pearson)
      • Glengarry Light Infantry (Lieutenant Colonel Francis Battersby)
      • Upper Canada Incorporated Militia Battalion (Lieutenant Colonel William Robinson)
    • 1st Militia Brigade (Lieutenant Colonel Love Parry)
      • Detachments from 1st, 2nd, 4th, 5th Lincoln and 2nd York Militia Regiments
    • One troop, 19th Light Dragoons (Major Robert Lisle)
    • Provincial Dragoons (Merritt's Troop) (Captain William Hamilton Merritt)
    • Royal Artillery (Two 6-pounder guns, One 5.5-inch howitzer)
  • Drummond's column
    • 2nd Battalion, 89th Foot (Lieutenant Colonel Joseph Wanton Morrison)
    • Three companies, 1st Battalion, 1st Foot (Royal Scots) (Captain William Brereton)
    • Light company, 1st Battalion, 8th (King's) Foot (Captain Francis Campbell)
    • Light company 41st Foot (Captain Joseph B. Glew)
    • Artillery (Captain James MachLachlane)
      • Royal Artillery (Two light 24-pounder guns)
      • Royal Marine Artillery (Two Congreve rocket launchers)
  • Colonel Hercules Scott's Column
    • 1st Brigade (Colonel Scott)
      • 103rd Foot (Major William Smelt)
      • Five companies, 1st Battalion, 8th (King's) Foot (Major Thomas Evans)
      • Flank companies, 104th (New Brunswick) Foot (Captain Richard Leonard)
    • 2nd Militia Brigade (Lieutenant Colonel Christopher Hamilton)
      • Caldwell's Western Rangers
      • Detachments from 1st, 2nd Norfolk, 1st Essex, 1st Middlesex,
        4th, 5th Lincoln and 2nd York Regiments
    • Royal Artillery (Three 6-pounder guns) (Captain James Mackonochie)
  • Reserve (Lieutenant Colonel John Gordon)

Note: the companies of the Royal Scots and 8th King's were very understrength, after the Battle of Chippawa earlier in the month.

Left Division (Major General Jacob Brown)

  • 1st Brigade (Brigadier General Winfield Scott)
    • 9th U.S. Infantry (Major Henry Leavenworth)
    • 11th U.S. Infantry (Major John McNeil)
    • 22nd U.S. Infantry (Colonel Hugh Brady)
    • 25th U.S. Infantry (Major Thomas Jesup)
    • Towson's Company U.S. Artillery (Two 6-pounder guns, One 5.5-inch howitzer)
  • 2nd Brigade (Brigadier General Eleazer Wheelock Ripley)
    • 21st U.S. Infantry (Lieutenant Colonel James Miller)
      • 17th U.S.Infantry (one company)
      • 19th U.S. Infantry (one company)
    • 23rd U.S.Infantry (Major Daniel McFarland)
    • 1st U.S. Infantry (four companies) (Lieutenant Colonel Robert Nicholas)
  • 3rd (Militia) Brigade (Brigadier General Peter B. Porter)
    • 5th Pennsylvania Militia (Major James Wood)
    • New York Militia Volunteers (Lieutenant Colonel Hugh Dobbin)
    • Canadian Volunteers (approx. 1 company) (Lieutenant Colonel Joseph Willcocks)
  • U.S. Artillery (Lieutenant Colonel Jacob Hindman)
    • Ritchie's Company (Two 6-pounder guns, One 5.5-inch howitzer)
    • Biddle's Company (Three 12-pounder guns)
  • Cavalry (Captain Samuel D. Harris)
    • Detachment, U.S. Dragoons
    • Troop, New York Volunteer Dragoons

Note: A company of three 18-pounder guns under Captain Alexander Williams and another of two 18-pounder guns under Lieutenant David Douglass could not be brought into action

Images for kids

kids search engine
Battle of Lundy's Lane Facts for Kids. Kiddle Encyclopedia.