
Battle of Stirling Bridge facts for kids
Quick facts for kids Battle of Stirling Bridge |
|||||||
|---|---|---|---|---|---|---|---|
| Part of the First War of Scottish Independence | |||||||
 Modern day Stirling Bridge and Wallace Monument. |
|||||||
|
|||||||
| Belligerents | |||||||
| Commanders and leaders | |||||||
| Strength | |||||||
|
5,300 to 6,300 men
|
9,000 men
|
||||||
| Casualties and losses | |||||||
| Unknown |
100 cavalry killed |
||||||
| Designated | 30 November 2011 | ||||||
| Reference no. | BTL28 | ||||||
The Battle of Stirling Bridge (Scottish Gaelic: Blàr Drochaid Shruighlea) was a major battle during the First War of Scottish Independence. On September 11, 1297, Scottish forces led by Andrew Moray and William Wallace fought against the English army. The English forces were commanded by John de Warenne, 6th Earl of Surrey, and Hugh de Cressingham. The battle took place near Stirling, by the River Forth, and ended in a big victory for the Scots.
Contents
Why the Battle Happened: Background
In 1296, England's King Edward I had taken control of Scotland. Many Scottish nobles had to promise loyalty to him. But in 1297, a Scottish leader named Andrew Moray started a rebellion in northern Scotland. By late summer, he controlled several important castles and towns.
Another Scottish hero, William Wallace, joined Moray in September. Together, they marched towards Stirling. Stirling was a very important place. People called it "the key to Scotland" because of its location. Meanwhile, the English commanders, Surrey and Cressingham, arrived in Stirling by September 9, 1297. Moray and Wallace had already taken a strong position on a hill called Abbey Craig.
The Main Battle: How the Scots Won
The English army was much larger than the Scottish forces. They were separated from the Scots by the River Forth and a narrow wooden bridge. Surrey, the English commander, knew it would be risky to cross the bridge. It was so narrow that only two horsemen could cross at a time. He waited for several days, trying to talk to the Scots.
On September 11, Surrey sent messengers to the Scots. According to stories, Wallace famously replied, "We are not here to make peace but to fight. We will defend ourselves and free our kingdom."
The Scots were camped on Abbey Craig, which gave them a good view of the flat ground near the river. The English army, with knights, archers, and foot soldiers, was on the south side of the river. A Scottish knight, Sir Richard Lundie, who was fighting for the English, suggested a different plan. He said they could cross the river at a wider, shallower spot (a ford) a few miles upstream. This would let many more soldiers cross at once.
However, Hugh de Cressingham, King Edward's treasurer, convinced Surrey to ignore this advice. He insisted on a direct attack across the narrow bridge.
The English began their slow march across the bridge. It would take hours for their whole army to cross. Wallace and Moray waited patiently. They watched until a large number of English soldiers, possibly around 2,000, had crossed to their side of the river.
Then, the Scots attacked! Their spearmen rushed down from the high ground. They fought off the English cavalry and then attacked the English foot soldiers. The Scots quickly took control of the east side of the bridge. This stopped any more English soldiers from crossing. The English who had crossed were trapped in a loop of the river. They had no way to get help or escape. Most of them were killed. A few managed to swim to safety. Sir Marmaduke Thweng, an English knight, bravely fought his way back across the bridge with some of his men.

Surrey, who was still on the south side of the river with most of his army, could have tried to hold his position. But he had lost his confidence. After Thweng escaped, Surrey ordered the bridge to be destroyed. He then retreated all the way to Berwick, leaving Stirling Castle without support. This meant the Scottish Lowlands were now free from English control.
Scottish lords, James Stewart and Malcolm, Earl of Lennox, who had been with Surrey's army, saw the terrible defeat. They pulled their forces back. Then, they attacked the English supply wagons in a marshy area called The Pows. Many fleeing English soldiers were killed there.
The original Stirling Bridge from the battle is thought to have been about 180 yards upstream from the stone bridge you can see today. Parts of the old bridge have been found underwater. The area where the battle happened is now a protected historic site.
What Happened After: Aftermath
After the battle, Surrey left William de Warine and Sir Marmaduke de Thweng in charge of Stirling Castle. Then he fled to Berwick.
English records say that about 100 English cavalry and 5,000 English foot soldiers were killed in the battle. We don't know how many Scots died, but Andrew Moray was badly wounded and died by November.
A historical record, the Lanercost Chronicle, says that Wallace had a long strip of Cressingham's skin taken from his body. He supposedly used it to make a belt for his sword.
The Scots then raided south into England, reaching as far as Durham. William Wallace was given the important title of "Guardian of the kingdom of Scotland and commander of its army." However, King Edward I was already planning another invasion of Scotland. This would lead to the Battle of Falkirk the next year.
Images for kids
-
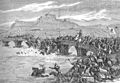
A Victorian depiction of the battle. The bridge collapse suggests that the artist has been influenced by Blind Harry's account.


See also
 In Spanish: Batalla del Puente de Stirling para niños
