
Battle of Falkirk facts for kids
Quick facts for kids Battle of Falkirk |
|||||||
|---|---|---|---|---|---|---|---|
| Part of the First War of Scottish Independence | |||||||
|
|||||||
| Belligerents | |||||||
| Kingdom of Scotland | |||||||
| Commanders and leaders | |||||||
| Sir William Wallace Sir John Stewart † Macduff of Fife † |
King Edward I Antony Bek |
||||||
| Strength | |||||||
|
c. 6,000 men |
c. 15,000 men |
||||||
| Casualties and losses | |||||||
| c. 2,000 killed | c. 2,000 killed | ||||||
The Battle of Falkirk (Scottish Gaelic: Blàr na h-Eaglaise Brice; Scots: Battle o Fawkirk) was a very important battle fought on 22 July 1298. It was a major event in the First War of Scottish Independence. In this battle, the English army, led by King Edward I of England, defeated the Scots. The Scottish forces were led by William Wallace. After this defeat, Wallace stepped down from his role as Guardian of Scotland.
Contents
Why the Battle Happened: The Background
After a big Scottish victory at the Battle of Stirling Bridge in 1297, William Wallace led the Scottish army south. From November 1297 to January 1298, the Scots raided areas in England, taking supplies and goods.
King Edward I was very upset about his army's defeat at Stirling Bridge. He quickly made a peace agreement with the French king, Philip the Fair, in October 1297. This allowed King Edward to return to England in March 1298. He immediately began preparing a large army for a second invasion of Scotland.
To help with this, King Edward moved his government to York. He held a meeting there in April to plan the invasion. He called all the important Scottish leaders to attend, but none came. Because of this, King Edward declared them all traitors. He then ordered his army to gather at Roxburgh by June 25. His army included about 2,000 armoured horsemen and 12,000 foot soldiers. Many more people joined without pay, hoping for adventure or to clear debts.
King Edward left Roxburgh on July 3. He reached Kirkliston two weeks later. He was waiting for supplies that were delayed by bad weather. While waiting, he also had to deal with a small rebellion from his Welsh soldiers. Finally, on July 20, King Edward's army moved forward. They reached Linlithgow on July 21.
King Edward was thinking about retreating to Edinburgh. But then he learned that the Scots were nearby at Torwood, near Falkirk. They were ready to attack his army if he tried to retreat. King Edward reportedly said he would "not trouble them to seek me," meaning he would go to them. On the morning of July 22, he positioned his army south of Falkirk. His cavalry commanders wanted to attack right away, even though King Edward wanted to rest his men and wait for his foot soldiers.
The Scottish army was smaller, with about 6,000 men. They had around 1,000 horsemen and 5,000 foot soldiers. These soldiers came from different areas of Scotland. William Wallace was in charge. Some important Scottish leaders, like the Comyns and Robert Bruce, were not there. Also, Andrew Moray, who had helped Wallace win at Stirling Bridge, was not there because he was badly wounded in that battle.
The Battle of Falkirk
.JPG)
.JPG)
.jpg)

.jpg)
The Scottish army was mostly made up of spearmen, just like at Stirling Bridge. They formed four large "hedgehog" groups called schiltrons. These groups had long spears (pikes) pointing outwards in every direction. This made them look very strong and hard to break through. The spaces between these schiltrons were filled with Scottish archers. About 500 mounted knights were positioned behind the schiltrons.
On Tuesday, July 22, the English cavalry (horsemen) began to attack. They were divided into four groups. The first group, led by the Earl of Lincoln, moved to the left to avoid a marshy area. Another group, led by John de Warenne, 6th Earl of Surrey, followed them. The third group, led by Bishop Anthony Bek, and the King's own group, moved around the marshy area to the right. They headed towards the left side of the Scottish army.
The English cavalry charged the Scots. The Earl of Lincoln's group quickly defeated the Scottish horsemen. The Scottish archers, led by Sir John Stewart, tried to stand their ground. But they were quickly overwhelmed by the English cavalry.
However, the Scottish schiltrons held firm. The English knights found it very difficult to break through the dense wall of long spears. Many English horses were killed in their attempts to attack the schiltrons. The English cavalry had to pull back as their foot soldiers and archers arrived.

.jpg)
Then, King Edward's archers, crossbowmen, and slingers began to fire arrows and stones at the Scottish spearmen. The Scottish soldiers were not well-armoured and had little experience against such attacks. The schiltrons were easy targets because they had no cover and nowhere to hide. The English cavalry and foot soldiers kept the Scots trapped in place. They could not retreat or attack. The battle was lost for the Scots almost as soon as the arrows started to fall.
The English waited until the Scottish lines became thinner and more disorganized. Then, the English cavalry and foot soldiers attacked the weakened Scottish spearmen. The schiltrons finally broke apart, and the Scottish army scattered.
What Happened After the Battle
After the victory, King Edward took control of Stirling. He also raided other Scottish towns like Perth, St. Andrews, and Ayrshire. However, he returned to Carlisle by September 9. King Edward invaded Scotland again in the summer of 1300.
Not many of the main Scottish leaders were killed in the battle. But some important ones did die. These included Sir John de Graham, who was William Wallace's second-in-command. Also killed were Sir John Stewart and Macduff of Fife.
Some historians believe that while William Wallace was a great leader for small attacks, his skills were not as strong for leading a large, organized army. At Falkirk, he simply arranged his army in an open field and waited. Others suggest that Andrew Moray, who was not at Falkirk, had more military genius. They think the plan for the Battle of Falkirk was not as good as the plan for Stirling Bridge. Even though Wallace resigned his leadership, he was still very important to the Scottish people. This is why King Edward wanted to capture him so badly.
Falkirk Roll of Arms
The Falkirk Roll is a special list of the coats of arms of the English noblemen and knights who fought at the Battle of Falkirk. It is the oldest known English list of its kind. It includes 111 names and descriptions of their shields.
Below are some modern pictures of the Falkirk Roll. They are based on descriptions found in a book about King Edward I's campaign in Scotland in 1298.
-
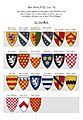
Panel 1 – La Vaunt Garde ("The Vanguard")
-
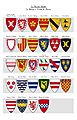
Panel 2 – La Batayle le Eveske de Dureme ("The Bishop of Durham's Battle")
-
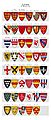
Panel 3 – La Bataille le Roy ("The King's Battle")
-
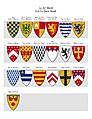
Panel 4 – La Quarte Bataille ("The Fourth Battle")


Where the Battle Might Have Been Fought
.jpg)
The exact place where the Battle of Falkirk happened is not completely certain. People have suggested three possible locations:
- At Campfield, which is now near a modern shopping area.
- South of Callendar Woods, which is shown in the diagrams above.
- At Mumrills, where an old Roman fort called Antonine Fort used to be.
One old record says the Scots were on "hard ground... on one side of a hillock." Another record says the battle site was "on this side of Falkirk." Some historians think it was on the open land near Falkirk, while others agree that the Scots were likely positioned below Callendar Wood, with a stream called Glen Burn in front of them.
See also
 In Spanish: Batalla de Falkirk para niños
