
Dowding system facts for kids
The Dowding system was a super important network built by the Royal Air Force (RAF) just before World War II. It was the first system in the world that could control planes across a huge area, covering all of the United Kingdom. Imagine a giant air traffic control system for wartime!
This system used a special telephone network to quickly gather information from Chain Home (CH) radar stations and the Royal Observer Corps (ROC). This helped them create a clear picture of all the planes in the sky over the UK. Then, they could guide their own fighter aircraft and anti-aircraft artillery (big guns that shoot down planes) to stop enemy planes. The Dowding system was a key reason the RAF won the Battle of Britain.
The system was created because early tests showed it was hard to tell fighter pilots where enemy planes were before the information was too old. Air Chief Marshal Hugh Dowding, who led RAF Fighter Command, solved this by creating a special chain of reporting. Information went to a main "filter room" at Fighter Command Headquarters (FCHQ) in Bentley Priory. Here, they made a big map of the battle.
Details from this main map were then sent to smaller Group and Sector headquarters. These places made their own maps, but only for their specific areas. This helped commanders quickly decide how to use their planes without getting confused by too much information. Pilots only received instructions from their squadron's sector control rooms, which were usually at their airfields.
The Dowding system is seen as vital to the RAF's success against the German air force (the Luftwaffe) during the Battle of Britain. Being able to detect enemy planes early and share that information quickly made the fighter force much more effective. Before the war, if fighters were sent out, only about 30% to 50% would find the enemy. During the Battle of Britain, this success rate jumped to around 90%! Sometimes, it was even 100%. The Luftwaffe didn't have a similar system, so their fighters often flew around without finding the RAF planes. When they did meet, the RAF fighters were almost always in a better position.
Many stories about the Battle of Britain talk about radar, but it was the Dowding system that made radar truly powerful. Even Winston Churchill, the British Prime Minister, understood this. He said that the success of the Hurricanes and Spitfires wouldn't have happened without this system. He called it a "most elaborate instrument of war" that was unique in the world.
Contents
How the System Developed
Early Warning Systems
To protect London from air raids during World War I, a system called the London Air Defence Area (LADA) was set up. It had defensive weapons in three rings around the city. Edward Ashmore created a large map room in London. People called "spotters" would report where planes were, and wooden blocks were placed on the map to show them. Observers around the map would then tell 25 smaller control rooms, which would guide their weapons.
After the war, LADA became part of the Air Defence of Great Britain (ADGB). ADGB expanded Ashmore's system to deal with faster planes. They used colored markers and a special "sector clock" to show how old the information was on the map. This helped them see "tracks" of planes moving.
However, this system needed to detect planes much earlier, especially as aircraft got faster. They tried using "acoustic mirrors" (big listening devices), but these only worked for about 5 miles (8 km) in good weather. So, in 1934, the Air Ministry planned to use sound detectors around London.
The Birth of Radar
A month after the sound detector plan, the Tizard Committee was formed. They were looking into newspaper stories about "electronic rays" that could stop planes. They asked a radio expert named Robert Watt for his opinion. Watt's assistant, Arnold Wilkins, figured out that such rays were impossible.
But Wilkins remembered a report about planes causing radio signals to fade. He suggested this effect could be used to detect planes from far away. Watt and Wilkins wrote a memo about this idea. The committee loved the idea, seeing it as a way to solve the problem of bombers always getting through.
On February 26, 1935, they did a test called the Daventry Experiment. They used existing radio equipment and it clearly showed a nearby aircraft. Dowding was impressed and quickly gave money for development. By summer 1935, the system, secretly called "RDF" (Radio Direction Finding), could detect bombers 60 miles (97 km) away. Plans were made to build a chain of these RDF stations every 25 miles (40 km) along the English coast. This became known as Chain Home (CH).
In 1936, tests began to see how well fighters could intercept planes using this new radar. At first, they used math and calculators. But soon, they found a simpler way called the "equal angles" method, or "Tizzy Angle." This helped pilots intercept targets much faster. By the end of 1936, interception rates were over 90% if the altitude was known.
Early Challenges

In 1936, Dowding became the leader of Fighter Command. The first working CH radar station was set up at Bawdsey Manor. Even with fast progress, radar had problems. Once, Dowding watched the test system and didn't see the planes on the screen, but then heard them fly right over! These issues were fixed, and by April 1937, the radar could also measure a plane's height within 2,000 feet (610 m).
CH stations were built near the coast, facing the sea, to give the earliest warning. But this meant they couldn't track friendly fighters or enemy planes once they flew over land. For tracking over land, Dowding planned to use the existing Royal Observer Corps (OC) system.
However, reports from CH and the OC sometimes didn't match. Also, there was too much information, and it was hard to tell friendly planes from enemy ones. To solve this, Dowding pushed for "pip-squeak" systems and identification friend or foe (IFF) devices. Pip-squeak helped locate friendly fighters using their radio signals, and IFF transponders automatically identified friendly planes. By late 1940, these helped with identification, but now there were three sources of information: radar, observers, and pip-squeak. None of them had a complete picture.
Building the System

Dowding realized the main problem wasn't the technology itself, but having too many information sources that couldn't talk to each other well. Dowding, Tizard, and mathematician Patrick Blackett started building a new system.
To manage all the data, Dowding decided that all radar reports would go to a new fighter direction center at Fighter Command Headquarters. This was like the OC's system, but on a much bigger scale, covering the whole UK. Telephone operators in contact with CH and OC centers would relay reports to workers around a large map. These workers would place small colored markers on the map to show where planes were. As the markers formed lines, they showed the planes' location and direction. Once identified, each group of planes was given a "track number."
As the paths of targets became clear, operators would send this information to the various Group headquarters. Each Group HQ had its own map, showing only the planes relevant to their area. Commanders there could easily see the battle and assign fighters. Targets assigned to squadrons within a sector were then sent to the Sector headquarters, which had an even larger map for their specific area.
By early 1939, the basic system was ready. Tests showed that "daylight raids were normally tracked and intercepted with ease and regularity."
How the System Worked
The Filter Room
.jpg)
Dowding's first big idea was the "filter room" at FCHQ. All reports from the CH radar stations went there. CH stations would turn their radar measurements into a location on a grid map. Telephone operators, called "tellers," in the filter room would connect to workers around the map, called "plotters." The tellers would relay the radar information. The plotters would then look at the "sector clock" (a clock with colored sections) and place a colored marker at the reported location. The color showed how recent the report was.
Because each CH station had slight differences, two stations reporting the same target might show it in slightly different spots. The filter room's job was to combine these scattered plots into a single, clear picture. When they were sure a group of markers was one formation of planes, they placed a wooden block on the map. This block had numbers and letters showing the type of aircraft, how many, and their height. The block was moved as new reports came in. This process of turning many radar plots into one block was the filter room's main purpose. Once a group was identified, it got a "track number." This made it much easier to share information about targets throughout the network.
Sometimes, information came from other sources, like a fighter pilot calling for help on an emergency radio. This information also went to the filter room. Operators above the map could use spotlights to mark important locations.
Reporting Levels


Dowding's second improvement was to reduce the amount of information sent to pilots and speed up delivery. He created a hierarchy of control. At the top was the FCHQ filter room at Bentley Priory, which had a view of the entire battle. This track information was then sent down to the Groups.
During the Battle of Britain, the RAF fighters were divided into four main Groups: 10, 11, 12, and 13.
- 11 Group, which did most of the fighting, had its plotting room at RAF Uxbridge.
- 12 Group, covering the Midlands, was at RAF Hucknall.
- 13 Group was in a quarry near Newcastle.
- 10 Group was at RAF Box near Bath.
At the Group HQs, another plotting board, covering only that Group's area, recreated the maps from FCHQ. This allowed Groups to see the battle in their area more clearly. Small wooden blocks with tags were placed on the map to show plane formations. These tags showed the track number, if it was friendly or hostile ("H" for hostile, "F" for friendly), the estimated number of planes, and their height. The color of the height tags showed when the report was updated, matching the sector clock. If a target was assigned to squadrons for interception, this was shown with small tags listing the squadron numbers.
Each Group was split into several Sectors, which managed operations for one or more airfields. This was the lowest level, based at the Sector Controls, usually at one of the airfields. For example, 11 Group had sectors like Sector C, controlled from Biggin Hill. Telephone links from Sector to Group allowed the Group's map to be recreated at the Sector, again filtering out unneeded information.
Sector Controls were responsible for talking to the pilots, as well as barrage balloons and anti-aircraft guns. They gave early warnings of enemy planes or told guns not to fire on friendly planes. To make sure pilots listened, Sector Commanders were usually former pilots themselves. Dowding made it clear that pilots had to follow instructions from these operations centers.
This system meant information flowed mainly in one direction, getting more specific as it went down. For example, the filter room might get 15 reports per minute from various radar sites, covering the whole coast. Only the reports over Kent would go to 11 Group, while reports about an attack on RAF Driffield would only go to 13 Group. Then, 11 Group would only send tracks of interest to its sectors, filtering out others. Finally, sector operators only told pilots what they needed to know for their flight, saving radio time.
Information Sources


Chain Home radar provided much earlier detection than old visual or sound systems. CH stations on the southeast coast could often detect enemy raids forming up over their airfields in France. This information was available day or night, in any weather. However, CH stations were on the coast and couldn't see over land.
Tracking enemy aircraft over land was the job of the Royal Observer Corps. Because there were many ROC stations, their reports were sent to special Observer Centres first. These centers filtered the information before sending it to the Dowding reporting chain.
A separate system tracked friendly aircraft using radio direction finding (RDF) on their radio signals, called Huff-Duff and pip-squeak. This involved three stations working together to pinpoint a plane's location. This information went to a selected Sector Control, which plotted the friendly planes' locations and passed them to the main operations map. Controllers could then guide the squadrons.
Finally, information about the status of fighter squadrons was known to the Sectors but needed by the Groups to decide which squadrons to send out. For this, operations rooms had "tote boards" – blackboards and lights showing the strength and current status of fighter squadrons. Commanders could see at a glance which units were ready. Statuses included: Released (not available); Available (ready in 20 minutes); Readiness (ready in 5 minutes); Standby (pilots in cockpit, ready in 2 minutes); Airborne and moving into position; Enemy sighted; Ordered to land; Landed and refuelling/rearming. The Women's Auxiliary Air Force (WAAF) plotters kept these boards updated and relayed the information up the chain.
Commanding the Battle


The most important parts of the Dowding System were the "operations rooms." These were usually at FCHQ and Group HQs. They had three levels: a large map table on the bottom, communication operators around and above the map, and a second floor where commanders could watch and talk.
Command of the battle was given to the Group commanders. From their view above the map, they could track enemy planes, check the tote board, choose a squadron, and tell their sector to send them up. Orders could be simple, like "Squadron ninety-two, intercept hostile two-one."
The sector would then call the squadron's office and order the planes to "scramble" (take off quickly). After the planes were in the air, the sector controller asked them to turn on their pip-squeak system so they could be tracked. Once their location was on the sector map, the controller would give instructions to the squadron leader. They used the "Tizzy Angle" method to guide the fighters to their targets.
Squadrons, bases, and enemy formations had special code words to make communication faster and more accurate. For example, Biggin Hill's sector control was "Sapper," and 72 Squadron was "Tennis." So, an update might be "Tennis leader this is Sapper control, your customers are now over Maidstone, vector zero-nine-zero, angels two-zero." This meant the Biggin Hill controller (Sapper) was telling 72 Squadron (Tennis) to fly due east (vector zero-nine-zero) at 20,000 feet (6,100 m) (angels two-zero) to intercept their target over Maidstone. The sector also managed local guns and balloons and helped fighters land safely.
Building the Control Centers

FCHQ and Group Control centers were very important, so they were built in bomb-proof bunkers away from airfields. Most were built just before the war. Hundreds of miles of dedicated phone lines, buried deep underground, ensured communication.
Sector Control centers were smaller and usually in brick buildings above ground, making them vulnerable. By 1940, most had earth banks or "blast walls" around them for protection. Luckily, the Luftwaffe didn't realize how important these rooms were, so most were left alone.
Even if a control room was hit, like Biggin Hill's on August 31, 1940, backup rooms were set up. For example, Kenley used an alternative room in a butcher's shop! Newer airfields built in the 1930s had bomb-proof control rooms from the start.
Impact on the Battle

The Dowding system had a huge impact. It's a great example of "force multiplication" – making a small force much more effective.
Before radar, intercepting bombers seemed almost impossible. As bombers got faster and flew higher, there was less time to react. Even with faster fighters, fixed delays like getting pilots into planes and taking off remained. With only observers and sound detectors, which had very short ranges, bombers would be over their targets before fighters could even get into the air.
Because of this, fighter operations before radar usually involved "standing patrols" or "sweeps." Fighters would fly along a set path hoping to find the enemy. In World War I, most patrols returned without seeing the enemy. The same was true in the Battle of France, where finding the enemy on 30% of missions was typical, and 50% was excellent.
If an enemy attacked, they could choose the time and place. They would only meet planes already in the air, so they could outnumber the defenders. To have enough fighters covering all possible routes, a huge number of planes and pilots would be needed, which was impossible. This is why many believed "the bomber will always get through."
In 1934, the RAF did large exercises. Even when fighter controllers knew exactly where the bombers were going, 70% of the bombers reached London without seeing a fighter. This made people feel very unsafe.
The Dowding system changed everything. By quickly sending accurate, timely information to the fighters, their ability to find and attack the enemy dramatically increased. Fighters took off, flew directly to their targets, fought, and returned to base. Early on, interception rates of 75% were common, and by the end of the Battle of Britain, over 90% was normal. Some raids even had 100% interception rates. This meant Fighter Command was effectively twice as strong, matching the Luftwaffe.
While Britain was installing CH radar, Germany was also developing radar like the excellent Freya. But they hadn't figured out how to get the radar information to their fighters quickly. During the Battle of the Heligoland Bight in 1939, over 100 German planes were sent to meet a small RAF bomber force, but less than half found them. This happened even though a German Freya radar detected the raid an hour away.
A similar thing happened at Pearl Harbor. The Opana Radar Site detected Japanese planes an hour before they arrived. They called the communications office, but the officer thought it was friendly B-17 bombers and didn't pass on the warning. The Japanese attack went unopposed.
It was the combination of all parts of the Dowding system that created an effective defense. Peter Townsend later said, "The Germans knew about British radar but never dreamed that what the radar 'saw' was being passed on to the fighter pilot in the air through such a highly elaborate communications system."
During the early war, the Luftwaffe didn't realize how important the system was. A German intelligence report from July 1940 didn't even mention it. A later report in August did, but only suggested it would limit British fighters.
After the war, German commanders Erhard Milch and Adolf Galland admitted they didn't understand the importance of the radar stations to the British interception technique. Galland later said, "From the first the British had an extraordinary advantage, never to be balanced out at any time during the whole war, which was their radar and fighter control network and organization. It was for us a very bitter surprise. We had nothing like it."
Challenges Faced
Even though the Dowding system worked well, it had some problems. A huge amount of information flowed into the FCHQ filter room. Sometimes, it was overwhelmed, and the filter room had to ask certain CH stations to stop reporting.
Radio communication was another issue. The TR.9D radio in fighters during the Battle of Britain had only two channels, and their frequencies had to be set before takeoff. One channel was for talking to other planes, the other for talking to sector control and the "pip-squeak" system. This limited how well squadrons could work together. The radio was also low power, with a short range, causing reception problems.
Chain Home radar could only see planes offshore. Once planes flew over land, the system relied on the Royal Observer Corps. The OC used sight, so they couldn't provide much information at night, in bad weather, or when it was cloudy. During the Battle of Britain, the weather was unusually good, which helped the OC. But the system struggled against high-altitude raids later in the battle.
Personal rivalries within the RAF command also affected the system, especially between 11 Group and 12 Group commanders, Keith Park and Trafford Leigh-Mallory. Leigh-Mallory felt slighted by Dowding and often didn't send his fighters to cover 11 Group airfields. Instead, he preferred to build his "Big Wing" formations to attack the Luftwaffe. These "Big Wings" took a long time to assemble and often missed the Germans, so they didn't help much in the early stages of the battle.
Dowding didn't want to move the filter room to the Group level, even though many suggested it to reduce the load on FCHQ. This caused tension with other commanders. He was eventually forced to make this change in October 1940.
On November 24, 1940, Dowding was removed from command. This was partly because he didn't resolve the feud between Leigh-Mallory and Park, partly because he refused to decentralize command, and partly because the system wasn't as successful against the increasing night bombing raids, which became known as The Blitz.
What Happened Next
_radar_installation_at_RAF_Sopley,_Hampshire,_1945._CH15188.jpg)
The Groups soon got their own filter rooms. In the winter of 1940–41, ground-controlled interception (GCI) radars were introduced. These radars allowed sector controllers to directly detect and control aircraft in their area. Working with IFF, the GCI display removed the need for separate detection and plotting, as well as many communication links and staff. The Dowding system continued to be used for daytime missions for the rest of the war, both for defense and to support offensive raids.
After the war, the fighter control system was mostly scaled back. But when the Soviet Union exploded its atomic bomb in 1949, and they had planes that could deliver it to the UK, the ROTOR system was quickly built. ROTOR reused many existing GCI and CH systems with more advanced control rooms in strong underground bunkers. ROTOR was later replaced by other systems in the 1960s.
Images for kids
-
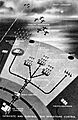
This illustration shows how reports flowed in the Dowding system. Information went from radar and observers to Sector controls, then to FCHQ, and then back down to Groups and Sectors to guide defenses.
-
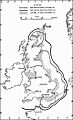
Chain Home radar coverage in 1939–1940 extended over all of Britain and the English Channel, reaching into France.


