
Operation Martlet facts for kids
Quick facts for kids Operation Martlet |
|||||||
|---|---|---|---|---|---|---|---|
| Part of the Battle for Caen of the Second World War | |||||||
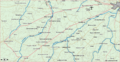
 Battle for Caen: Operation Martlet (left edge of map) |
|||||||
|
|||||||
| Belligerents | |||||||
| Commanders and leaders | |||||||
| Strength | |||||||
| 49th (West Riding) Infantry Division 8th Armoured Brigade |
12th SS Panzer Division Hitlerjugend Kampfgruppe Weidinger of 2nd SS Panzer Division Das Reich 9th SS-Panzer Division Hohenstaufen |
||||||
| Casualties and losses | |||||||
| c. 772 (incomplete) |
includes German losses during Operation Epsom: 12th SS Panzer Division Hitlerjugend1,240 9th SS-Panzer Division Hohenstaufen 1,145 Kampfgruppe Weidinger 642 c. 48 tanks |
||||||
Operation Martlet was a British military attack during World War II. It was also known as Operation Dauntless. This operation was part of the larger Battle for Caen in Normandy, France. The goal was to capture the town of Caen and the areas around it from German forces.
Operation Martlet began on June 25, 1944. It was carried out by the British XXX Corps. Their main task was to capture Rauray and the nearby area around Noyers. This was important because it would protect the right side of another British attack, Operation Epsom, which started on June 26. The British 49th (West Riding) Infantry Division played a big role in this operation.
The German forces defending the area included parts of the Panzer Lehr Division and the 12th SS Panzer Division Hitlerjugend. They also had many powerful 88 mm anti-tank guns. The first day of Operation Martlet did not fully achieve its goals. So, the 49th Division continued fighting until July 1. On that day, they successfully defeated a strong German counter-attack. This battle weakened the German forces, making it harder for them to launch their own planned attacks.
Contents
Why This Battle Happened
The Normandy Invasion
The town of Caen was a very important target for the British during D-Day on June 6, 1944. The British Second Army wanted to capture Caen. This would help protect the American army's side and create a good starting point to move further south.
However, the British 3rd Infantry Division landed on Sword Beach but could not reach Caen. German forces, especially the 21st Panzer Division, stopped them. Another attempt to surround Caen, called Operation Perch, also failed. German divisions like the Panzer Lehr Division put up strong resistance. There was also a tough battle at Villers-Bocage, which was very costly for both sides.
The Fight for Caen Continues

Bad weather hit the English Channel on June 19, 1944. This storm caused a three-day delay in bringing more Allied troops and supplies to Normandy. This gave the Germans time to bring in more soldiers, artillery, and mortar units. They also made their defenses stronger with minefields and hidden 88 mm anti-tank guns.
On June 23, the British 51st (Highland) Infantry Division attacked and destroyed thirteen German tanks. Meanwhile, the British VIII Corps arrived from England. They took up positions west of Caen. Plans were made for VIII Corps to attack on June 26 (Operation Epsom). To help protect this attack, XXX Corps was ordered to launch a preliminary attack on June 25. This was Operation Martlet.
Planning the Attack
The British Plan

Operation Epsom, the main attack by VIII Corps, was planned for June 26. But it was at risk from German counter-attacks from the Rauray Spur. This was a high area of land to the west that overlooked the path of the British 15th (Scottish) Infantry Division.
So, on June 25, XXX Corps launched Operation Martlet. Their goal was to capture the Noyers area. This would stop the Germans from seeing and attacking VIII Corps from the high ground. Once VIII Corps was safe, XXX Corps would then push south towards Noyers and Aunay-sur-Odon.
The 49th Division was to advance in stages:
- First, reach "Barracuda" on the road between Juvigny and Fontenay.
- Then, move south to "Walrus" at Tessel Wood and St. Nicholas farm.
- Finally, reach "Albacore" at Rauray village and the Rauray Spur. This would create a strong defensive line to protect the side of the 15th (Scottish) Infantry Division.
The 49th Division used two brigades for the attack. They also had support from the 8th Armoured Brigade, extra artillery, and tank destroyers.
German Defenses
The Germans facing XXX Corps were the Panzer Lehr Division and the 12th SS Panzer Division Hitlerjugend. These divisions had been fighting since the D-Day invasion and were tired. They had also lost many soldiers and tanks. For example, the 12th SS Panzer Division had lost about half of its infantry. They were dug in behind many minefields and had good camouflage. They were also supported by 60 to 80 powerful 88 mm anti-tank guns.
The Battle Unfolds
June 25: The Start of Martlet
At 4:15 a.m. on June 25, Operation Martlet began with a huge artillery bombardment. At 5:00 a.m., the British infantry advanced through cornfields. A thick mist made it very hard to see, sometimes only 5 yards (4.6 m).
On the right side, the British soldiers struggled to keep direction in the mist and smoke. They destroyed some German vehicles and reached their first objective, "Barracuda." As the sun rose, visibility improved. The Hallamshire Battalion also reached "Barracuda" but came under heavy fire from German tanks and infantry. They managed to knock out two German tanks.
Later, other British battalions advanced towards "Walrus" at Tessel Wood. They faced intense German rocket fire, which caused many casualties. On the left side, the 11th Royal Scots Fusiliers also struggled in the mist and faced heavy fire. They fought hand-to-hand in Fontenay village all night.
By nightfall, the 49th Division had advanced about 1 mile (1.6 km) south-west of Fontenay. However, they were still short of Rauray and the high ground. The Germans had moved their reserves to fight XXX Corps, thinking it was the main British attack.
June 26: Pushing Forward

On June 26, the British continued their attack. The 7th Dukes and the Sherwood Rangers Yeomanry attacked St. Nicholas farm. After a long fight and a twenty-minute artillery barrage, they captured the farm. They then advanced towards Rauray. A patrol found that Rauray village was full of German infantry and tanks.
In the center, the 1st Tyneside Scottish and the 4/7th Royal Dragoon Guards attacked another German position. They faced strong German tank and machine-gun fire. Many British tanks were knocked out. The infantry had to pull back.
The 12th KRRC also attacked towards Tessel-Bretteville. They met German tanks, and both sides lost vehicles. The British eventually pulled back to Tessel Wood. German reinforcements arrived to strengthen their defenses near Vendes, which remained in German hands.
June 27: Capturing Rauray
At 7:00 a.m., British tanks and patrols tried to enter Rauray. German tanks and 88 mm guns knocked out several British tanks. A small group of British soldiers fought their way into the village center. After an artillery bombardment, the British advanced again. By 4:00 p.m., the village of Rauray was captured. They found German snipers camouflaged and tied to trees. To the west, British attempts to advance towards Vendes made little progress.
June 28: Fierce Counter-attacks

On June 28, a new artillery barrage began. The British 10th DLI and 4/7th Dragoon Guards attacked the high ground south of Rauray. The 1st Tyneside Scottish advanced towards Brettevillette, south-west of Rauray. They faced intense German machine-gun fire but managed to enter the village by 2:30 p.m.
Thirty minutes later, German forces launched a strong counter-attack. This was by Kampfgruppe Weidinger from the 2nd SS Panzer Division Das Reich. They had just arrived and were reinforced by tanks from the 2nd Panzer Division. For several hours, both sides fought fiercely, with heavy losses. The Tyneside Scottish had to pull back from Brettevillette by 9:00 p.m. The Germans recaptured the village, keeping open a route for a planned counter-offensive.
June 29–30: Holding the Line

On June 29, the weather was clear, and Allied aircraft saw many German reinforcements moving towards the Odon area. The main German counter-offensive against VIII Corps began south of the 49th Division. XXX Corps provided artillery support to VIII Corps and prepared to defend the Rauray area.
The 1st Tyneside Scottish faced constant mortar fire from Kampfgruppe Weidinger. They had to pull back from their advanced positions. On June 30, the 4th Lincolns relieved the tired battalions. German artillery and rocket fire continued to fall on the British positions. British patrols found little due to the difficult terrain.
The British prepared their defenses, setting up anti-tank guns and machine guns. Allied bombers also dropped over 1,300 tons (1,321 t) of bombs on German tank positions.
July 1: German Counter-attack

During the night of June 30/July 1, British patrols heard a lot of German activity. The Germans had planned a big attack for 3:00 a.m. on July 1, but it was delayed until 6:00 a.m.
At midnight, German mortars and artillery began bombarding British positions. At 6:00 a.m., Kampfgruppe Weidinger and the 9th SS Panzer Division attacked. They advanced through a smoke screen with tanks and infantry. They fired on British positions as they moved forward. Other German groups attacked the British 6th KOSB and 4th Lincolns.
The British 24th Lancers and artillery opened fire on the German tanks and infantry as they appeared from the smoke. The Germans used clever tactics, moving in small groups and using smoke to hide their movements. The British responded with anti-tank guns from hidden positions. However, German fire became very accurate, destroying many British guns.
By 11:00 a.m., the German attack had pushed back the British outpost line. A line of powerful 17-pounder anti-tank guns became the new front line. When one British company was forced back, German tanks and infantry moved behind another company. British tanks engaged them, knocking out six German tanks and stopping the advance.
Later in the day, British troops, supported by flamethrower tanks, recaptured their outpost line. The flamethrowers forced German infantry into the open, where many were shot. On other parts of the front, German infantry tried to get into British positions but were pushed out in costly counter-attacks. The British 55th Anti-Tank Regiment knocked out six German Panther tanks.
What Happened Next
Battle Losses
Operation Martlet caused significant losses for the German forces.
- Kampfgruppe Weidinger lost about 642 men (killed, wounded, or missing) by July 1.
- The 9th SS Panzer Division had 1,145 casualties by July 1. Their number of operational tanks dropped sharply.
- The 12th SS Panzer Division Hitlerjugend lost about 1,240 men in the three days up to July 1. Their operational tanks also decreased significantly.
- The Panzer Lehr Division and 21st Panzer Division also suffered many casualties.
The British 49th (West Riding) Division also had losses, including about 400 from the Tyneside Scottish, 200 from the 11th DLI, 150 from the 10th DLI, and 22 killed in the 4th Lincolns.
Later Events
The 49th Division held the area around Rauray for almost a month after Operation Martlet. They then moved to another area east of the Orne River and advanced towards the Seine River.
The German 12th SS-Panzer Division Hitler Jugend, heavily damaged by these battles, continued to fight in other British offensives around Caen. The 9th SS-Panzer Division Hohenstaufen stayed in the Odon Valley, defending Hill 112 in Operation Jupiter. Both divisions were eventually pushed back into the Falaise Pocket.
Images for kids
-
Topography of the area west of Caen

