Battle of Heligoland Bight (1914) facts for kids
Quick facts for kids Battle of Heligoland Bight (1914) |
|||||||
|---|---|---|---|---|---|---|---|
| Part of the First World War | |||||||
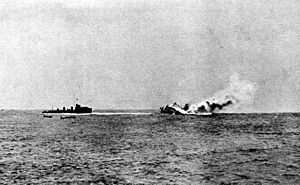
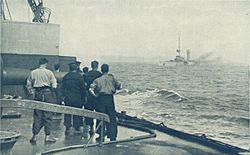 German light cruiser SMS Mainz shortly before heeling over and sinking, 28 August 1914 |
|||||||
|
|||||||
| Belligerents | |||||||
| Commanders and leaders | |||||||
| Strength | |||||||
| 5 battlecruisers 8 light cruisers 33 destroyers 8 submarines |
6 light cruisers 19 torpedo boats 12 minesweepers |
||||||
| Casualties and losses | |||||||
| 35 killed 55 wounded 1 light cruiser damaged 3 destroyers damaged |
712 killed 149 wounded 336 captured 3 light cruisers sunk 1 torpedo boat sunk 3 light cruisers damaged 3 torpedo boats damaged |
||||||
The Battle of Heligoland Bight was the very first big sea battle between Britain and Germany in World War I. It happened on August 28, 1914. The fight took place in the North Sea, near the German coast. British ships surprised German patrols there.
Germany's main navy, the High Seas Fleet, was safe in its harbors. Britain's main navy, the Grand Fleet, was further north in the North Sea. Both sides sent out cruisers and battlecruisers to patrol. They also used destroyers to scout the area near the German coast, called the Heligoland Bight.
The British came up with a clever plan. They wanted to ambush German destroyers during their daily patrols. A British group of 31 destroyers and two cruisers, led by Commodore Reginald Tyrwhitt, was sent out. Submarines, commanded by Commodore Roger Keyes, also joined them. Bigger ships supported them from further away. These included six light cruisers led by William Goodenough and five battlecruisers led by Vice Admiral David Beatty.
The German fleet was surprised and outnumbered. They lost 712 sailors, with 530 injured and 336 captured. Three German light cruisers and one torpedo boat were sunk. Three other light cruisers and three torpedo boats were damaged. The British had fewer losses: 35 killed and 55 wounded. One light cruiser and three destroyers were damaged. Even with the different numbers of ships, Britain saw this battle as a huge victory. Cheering crowds met the returning British ships.
Beatty was seen as a hero, but he didn't do much of the planning or fighting. Commodore Tyrwhitt and Commodore Keyes actually led the attack. They had convinced the British Admiralty to try their plan. The attack could have gone badly if Admiral John Jellicoe hadn't sent Beatty's extra ships at the last minute. After this battle, the German government and the Kaiser (their emperor) told their fleet to be more careful. They avoided fighting stronger enemy forces for several months.
Contents
Planning the Attack
This battle happened less than a month after Britain declared war on Germany in August 1914. On land, the Germans were winning battles in Belgium and France. Before 1913, Britain's navy usually blocked enemy ports closely. But they realized that new submarines with torpedoes and mines made this too risky for big warships. Ships would have to keep moving and refuel often.
The German navy thought Britain would stick to its old ways. So, they built many submarines and coastal defenses. Germany's main navy, the High Seas Fleet (HSF), was smaller than Britain's Grand Fleet. They knew they couldn't win a big battle against the whole British fleet. So, the HSF decided to wait in their safe ports. They would look for chances to attack smaller parts of the British force.
Britain chose a different plan: a "distant blockade." They patrolled the North Sea far from Germany's coast. German ships had two ways to get into the Atlantic Ocean. They could go through the narrow Strait of Dover, which was guarded by British submarines and mines. Or they could go north, past the Grand Fleet based at Scapa Flow in Scotland. Without access to the Atlantic, German ships couldn't attack Allied merchant ships. To keep the HSF in port, the Grand Fleet sometimes sailed out. Smaller groups of cruisers and battlecruisers also patrolled.
Most of the British army was sent to France between August 12 and 21. British destroyers and submarines protected them by patrolling the Heligoland Bight. German ships would have to cross this area to leave their bases. The Grand Fleet stayed in the central North Sea, ready to move south. But no German attack came. German naval planners thought it would take Britain longer to move its army. German submarines were out looking for the British fleet, but they were in the wrong place.
The British Plan Takes Shape
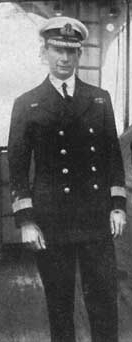
At Harwich, Commodore Roger Keyes led a group of long-range submarines. They often patrolled the Heligoland Bight. Commodore Reginald Tyrwhitt commanded a destroyer patrol. They noticed that German destroyers followed a regular pattern. Every evening, cruisers would escort destroyers out of the harbor. These destroyers would patrol all night. Then, in the morning, cruisers would meet them and escort them home.
Keyes and Tyrwhitt suggested a plan. They wanted to send a stronger force at night. This force would ambush the German destroyers as they returned. Three British submarines would surface to draw the destroyers out to sea. Then, a larger British force of 31 destroyers and nine submarines would cut them off. Other submarines would wait for any big German ships leaving the Jade estuary to help.
Keyes impressed Winston Churchill, who was in charge of the navy. Churchill liked the bold plan. The plan was changed slightly to attack at 8:00 AM during the German daytime patrol. Keyes and Tyrwhitt asked for more support. They wanted the Grand Fleet to move south and for Commodore William Goodenough's six light cruisers to help. At first, this was refused. Instead, only lighter forces were sent. These included two battlecruisers and five older armored cruisers.
The attack was set for August 28. The submarines sailed on August 26. Keyes would travel on the destroyer Lurcher. The surface ships would leave at dawn on August 27. Tyrwhitt, on the new light cruiser HMS Arethusa, would lead 16 modern destroyers. Captain William Blunt, on the light cruiser HMS Fearless, would lead 16 older destroyers. Tyrwhitt had asked for a faster cruiser because his old one was too slow. Arethusa arrived just two days before the attack. Her crew was new, and her guns jammed when fired.
Admiral John Jellicoe, who commanded the Grand Fleet, only learned of the plan on August 26. Jellicoe immediately asked to send more ships and move his fleet closer. He was only allowed to send battlecruisers. Jellicoe sent Vice Admiral David Beatty with the battlecruisers HMS Lion, Queen Mary, and Princess Royal. He also sent Goodenough with six light cruisers. Jellicoe himself sailed south with the rest of the fleet. Jellicoe sent a message to Tyrwhitt about the reinforcements, but it was delayed and never received. Tyrwhitt didn't know about the extra ships until Goodenough's ships appeared through the mist. This made him worried because he expected only German ships. British submarines were also placed to attack German ships.
The Battle Begins
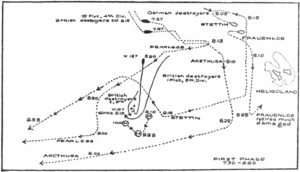
Around 7:00 AM, Arethusa was sailing south. She spotted a German torpedo boat, G194. With Arethusa were 16 destroyers. Two miles behind them was Fearless with 16 more destroyers. Eight miles behind them was Goodenough with his six cruisers. It was very foggy, with visibility only about three miles. G194 immediately turned towards Heligoland and radioed Rear Admiral Leberecht Maass, the German destroyer commander. Maass told Rear Admiral Franz von Hipper, who was in charge of German battlecruisers and local defense. Hipper didn't know how big the British attack was. He ordered the light cruisers SMS Stettin and Frauenlob to protect the destroyers. Other German light cruisers were ordered to get ready to sail.
Tyrwhitt ordered four destroyers to attack G194. The sound of gunfire warned other German destroyers, who turned back towards home. Before they could turn fully, British destroyers saw them and started firing. The German destroyer V1 was hit, then the destroyer-minesweepers D8 and T33. A German ship asked for help from shore guns, but the fog was too thick. At 7:26 AM, Tyrwhitt turned east, following the sound of gunfire. He saw ten German destroyers and chased them for 30 minutes through the fog. He had to turn away when the ships reached Heligoland.
At 7:58 AM, Stettin and Frauenlob arrived. The situation changed, and the British destroyers had to retreat towards Arethusa and Fearless. Stettin pulled back because the German destroyers had escaped. But Frauenlob fought Arethusa. Arethusa had bigger guns, but two of her guns jammed, and another was damaged. Frauenlob caused a lot of damage. Then, a shell from one of Arethusas guns hit Frauenlobs bridge. This killed 37 men, including her captain. Frauenlob had to retreat to Wilhelmshaven badly damaged.
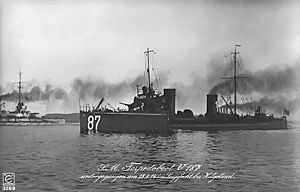
At 8:12 AM, Tyrwhitt went back to his original plan to sweep the area from east to west. Six returning German destroyers were spotted. They turned to run, but V187 turned back. The German ship had seen two British cruisers, Nottingham and Lowestoft, ahead. It tried to sneak past the British destroyers. But it was surrounded by eight destroyers and sunk. As British ships started to rescue survivors, the German light cruiser Stettin came near and opened fire. This forced the British to stop their rescue, leaving some British sailors behind. The British submarine E4 saw this and fired a torpedo at Stettin, but missed. Stettin tried to ram the submarine, which dived to escape. When E4 surfaced, the bigger ships were gone. The submarine rescued the British crewmen and some German survivors. The Germans were left with a compass and directions to the mainland, as the submarine was too small for them all.
Confusion and German Cruisers
At 8:15 AM, Keyes, with Lurcher and another destroyer, saw two cruisers with four funnels. He didn't know that more British ships were involved. He signaled that he was chasing two German cruisers. Goodenough got the message and went to help Keyes against what were actually his own ships, Lowestoft and Nottingham. Keyes was being chased by four more German cruisers. He tried to lead them towards Invincible and New Zealand, thinking they were enemy ships. Eventually, Keyes recognized Southampton. The ships then tried to rejoin Tyrwhitt.
The British submarines still didn't know about the other British ships. At 9:30 AM, a British submarine fired two torpedoes at Southampton. The submarine missed and escaped when Southampton tried to ram it. Lowestoft and Nottingham were too far away to communicate. They were separated from their group and didn't take part in the rest of the battle. Tyrwhitt turned to help Keyes when he heard he was being chased. He saw Stettin but lost her in the fog. Then he found Fearless and her destroyers. Arethusa was badly damaged. At 10:17 AM, Fearless came alongside, and both cruisers stopped for 20 minutes to fix their boilers.
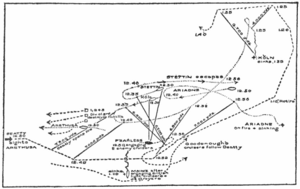
German cruisers Cöln, Strassburg, and Ariadne had sailed from Wilhelmshaven to join the German ships. Mainz was coming from a different direction. Admiral Maass still didn't know the full scale of the British attack. He spread his ships out to find the enemy. Strassburg was the first to find Arethusa. She attacked with shells and torpedoes. But British destroyers fired torpedoes back, driving her off. As Tyrwhitt turned west, Cöln, with Admiral Maass aboard, came from the southeast. She was also chased away by torpedoes. Tyrwhitt signaled Beatty for help. Goodenough, with his four remaining cruisers, came to assist. The British force then turned west.
Beatty had been following the battle by radio from 40 miles away. By 11:35 AM, the British ships still hadn't finished their mission and left. With the tide rising, larger German ships could leave their harbor and join the fight. Beatty took his five battlecruisers southeast at top speed. They were an hour away from the battle. It was clear his powerful ships could rescue the others. But he also risked torpedo attacks or meeting German dreadnoughts (even bigger warships) once the tide was up.
At 11:30 AM, Tyrwhitt's group found the German cruiser Mainz. They fought for 20 minutes. Then, Goodenough arrived, and Mainz tried to escape. Goodenough chased her. In trying to get away, Mainz crossed paths with Arethusa and her destroyers again. Her steering was damaged, making her turn back into the path of Goodenough's ships. She was hit by shells and a torpedo. At 12:20 PM, her captain ordered the ship to be sunk by its own crew, and the crew to abandon ship. Keyes had now joined the main group of ships. He brought Lurcher alongside Mainz to rescue the crew. Three British destroyers were badly damaged in this fight.
Strassburg and Cöln attacked together. But the battle was stopped by Beatty and his battlecruisers. A destroyer officer wrote about seeing Beatty's powerful ships:
There straight ahead of us in lovely procession, like elephants walking through a pack of ... dogs came Lion, Queen Mary, Princess Royal, Invincible and New Zealand ...How solid they looked, how utterly earthquaking. We pointed out our latest aggressor to them ... and we went west while they went east ... and just a little later we heard the thunder of their guns.
—Chalmers
Battlecruisers Finish the Fight
Strassburg managed to get away when the battlecruisers came near. But Cöln was cut off and quickly disabled by the much larger guns of the battlecruisers. She was saved from sinking right away because another German light cruiser, Ariadne, was spotted. Beatty chased Ariadne and quickly defeated her. Ariadne was left to sink, which she did at 3:00 PM. German ships Danzig and Stralsund rescued her survivors.
At 1:10 PM, Beatty turned northwest and ordered all British ships to leave. The tide had risen enough for larger German ships to leave the Jade estuary. Passing Cöln again, he opened fire, sinking her. Attempts to rescue her crew were stopped by a submarine. Only one survivor was rescued by a German ship two days later, out of about 250 men who had survived the sinking. Rear Admiral Maass died with his ship.
Four German cruisers survived the battle, saved by the fog. Strassburg almost ran into the battlecruisers but saw them in time and turned away. She had four funnels, like the British Town-class cruisers. This caused enough confusion for her to disappear into the fog. The German battlecruisers Moltke and Von der Tann left the Jade at 2:10 PM. They began a careful search for other ships. Rear Admiral Hipper arrived in Seydlitz at 3:10 PM, but by then the battle was over.
Aftermath and Losses
Germany lost the light cruisers Mainz, Cöln, and Ariadne. The destroyer V187 was also sunk. The light cruisers Frauenlob, Strassburg, and Stettin were damaged. They returned to base with many injured sailors. In total, German losses were 1,242 men, with 712 killed. This included Admiral Maass and the destroyer commander. The British took 336 prisoners. Commodore Keyes rescued 224 German sailors on the destroyer Lurcher and brought them to England. The son of Admiral Tirpitz, a famous German naval leader, was among the prisoners.
The British lost no ships. Their casualties were much lower, with 35 men killed and about 40 wounded.
See also
- Second Battle of Heligoland Bight (1917)
- Battle of Heligoland


