Indian Ocean raid facts for kids
Quick facts for kids Indian Ocean raid |
|||||||
|---|---|---|---|---|---|---|---|
| Part of the Pacific Theatre of World War II | |||||||
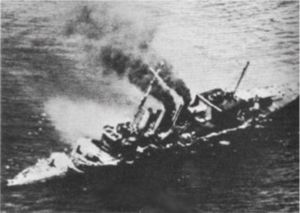
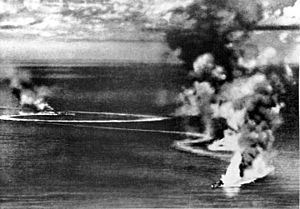 British heavy cruisers HMS Dorsetshire and Cornwall under Japanese air attack and heavily damaged on 5 April 1942. |
|||||||
|
|||||||
| Belligerents | |||||||
|
|
|||||||
| Commanders and leaders | |||||||
| Units involved | |||||||
| Strength | |||||||
| 2 carriers 1 light carrier 5 battleships 7 cruisers 15 destroyers 7 submarines 100+ aircraft 30 smaller warships 50+ merchant ships |
5 carriers 1 light carrier 4 battleships 11 cruisers 23 destroyers 5 submarines 350 aircraft |
||||||
| Casualties and losses | |||||||
| 1 light carrier sunk 2 heavy cruisers sunk 2 destroyers sunk 1 Armed Merchant Cruiser (AMC) sunk 1 corvette sunk 1 sloop sunk 23 merchant ships sunk 40+ aircraft destroyed 825 killed |
20+ aircraft destroyed | ||||||
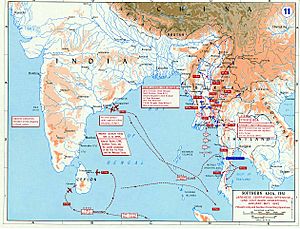
The Indian Ocean raid, also known as Operation C, was a major naval attack by the Imperial Japanese Navy (IJN) during World War II. It took place from March 31 to April 10, 1942. Japanese aircraft carriers, led by Admiral Chūichi Nagumo, attacked Allied ships and naval bases around Ceylon (now Sri Lanka).
The main goal was to destroy the British Eastern Fleet. However, the British fleet, commanded by Admiral Sir James Somerville, had been warned. They moved their ships before the Japanese arrived. The Japanese raid caused a lot of damage but did not destroy the main British fleet.
After the attack, the British moved their main naval base to Kilindini, Kenya, in East Africa. Ceylon was made stronger with more defenses. The Japanese did not plan another big attack in the Indian Ocean soon after this one.
Why the Raid Happened
Ceylon's Importance
The island of Ceylon was very important during the war. It controlled the Indian Ocean, which meant it controlled shipping routes to India and the Middle East. These routes were vital for oil and supplies. Ceylon also had most of the British Empire's rubber resources. A key naval base, Trincomalee, was on its eastern coast.
By early 1942, Japan had taken Singapore and the Andaman Islands. This gave them control over the Bay of Bengal. Both British and German leaders thought Japan might try to capture Ceylon next. This would help Japan control the Bay of Bengal and stop British supplies for India and Australia.
Japanese Plans
The Japanese Navy decided to launch a strong raid into the Indian Ocean in April 1942. This plan was called Operation C. Its main goals were to destroy the British Eastern Fleet and disrupt British supply lines in the Bay of Bengal. This would help their ongoing fight in Burma.
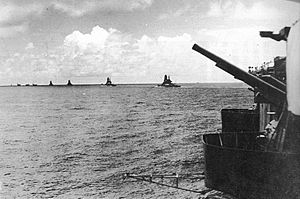
The Japanese force was very powerful. It included five aircraft carriers: Akagi, Shōkaku, Zuikaku, Sōryū, and Hiryū. They also had four battleships and many cruisers and destroyers.
British Preparations
The British Eastern Fleet was made stronger with ships from Britain and the Mediterranean. Admiral James Somerville took command in March 1942. He split his fleet into two groups based on speed.
- Force A: This was the faster group. It included the aircraft carriers HMS Formidable and HMS Indomitable, the battleship HMS Warspite, and modern cruisers and destroyers.
- Force B: This was the slower group. It had the older carrier HMS Hermes and four older battleships.
British intelligence knew how strong the Japanese force was. Somerville planned to avoid the Japanese during the day. He hoped to attack them at night using torpedo planes equipped with radar.
Ceylon's air defenses were also strengthened. By April 4, there were 67 Hawker Hurricanes and 44 Fairey Fulmar fighters. Radar stations were set up at Colombo and Trincomalee.
The Raid Begins
First Moves
The Japanese fleet left its base on March 26. Admiral Somerville sailed his fleet on March 30, expecting an attack on April 1. He positioned his ships south of Ceylon.
On April 2, the British ships went to Port T (a secret base) to refuel. Somerville sent some ships away. The heavy cruisers HMS Cornwall and HMS Dorsetshire went to Colombo. The carrier Hermes went to Trincomalee.
On April 4, a PBY Catalina flying boat from the Royal Canadian Air Force spotted Nagumo's fleet. The Catalina sent a warning before it was shot down. Somerville, who was refueling, immediately sent Force A towards the Japanese.
Admiral Geoffrey Layton in Ceylon ordered all ships in harbors to leave to avoid being attacked. Cornwall and Dorsetshire left Colombo to rejoin Force A. Hermes left Trincomalee to hide.
Attack on Colombo
On April 5, the Japanese launched 91 bombers and 36 fighters to attack Colombo. British radar failed to detect them early. British pilots had to quickly take off while under attack.
The Japanese sank the armed merchant cruiser HMS Hector, the Norwegian tanker Soli, and the old destroyer HMS Tenedos. Three other ships were damaged. The port itself was damaged but still working. The British lost 20 of their 41 fighters. The Japanese lost seven aircraft.
Loss of Dorsetshire and Cornwall
Later that day, a Japanese plane spotted Dorsetshire and Cornwall. Admiral Nagumo quickly sent dive bombers from his carriers to attack them.
Both British cruisers were sunk around 2:00 PM. A total of 424 officers and crew members were lost. The Japanese missed a chance to find the main British fleet after sinking these cruisers.
Japanese Avoid British Fleet
Admiral Somerville launched planes to search for the Japanese. However, Nagumo changed course, moving his fleet away from the British search area.
The British received some confusing reports about the Japanese position. Somerville decided not to launch a night attack based on unclear information. He chose to pursue them to the northwest.
The Japanese, unaware of how close the British fleet was, continued southeast. They were preparing to attack Trincomalee.
Attack on Trincomalee
By April 8, the British fleet had moved away. The Japanese fleet was approaching Trincomalee from the east. A British plane detected them. The harbor at Trincomalee was cleared that night. Hermes and its escort, HMAS Vampire, sailed south along the coast.
On April 9, the Japanese launched 132 aircraft to attack Trincomalee. British radar detected them early, and defending fighters took off in time. The China Bay airbase and the port were heavily bombed. The monitor HMS Erebus was damaged. A merchant ship carrying aircraft and ammunition, SS Sagaing, was set on fire. The British lost eight Hurricanes and one Fulmar. The Japanese lost four aircraft.
British Bombers Attack Japanese Carriers
Around 10:25 AM, nine British Blenheim bombers attacked Nagumo's fleet. They surprised the Japanese carriers. The bombers aimed for Akagi, but their bombs missed. Four bombers were shot down by Japanese fighters. This was the first time a Japanese carrier force had faced a coordinated air attack.
Loss of Hermes
Hermes and Vampire were about 65 miles away when Trincomalee was attacked. A Japanese plane spotted them. Eighty Japanese bombers attacked them starting at 10:35 AM.
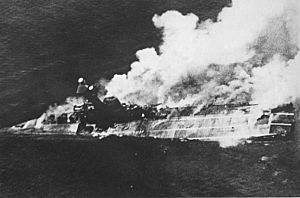
Both ships were sunk before noon. Hermes was hit by over forty bombs and lost 307 men. Vampire was lost with eight men. A nearby hospital ship rescued 600 survivors.
The Japanese attack also sank other nearby ships. The corvette HMS Hollyhock, the naval auxiliary Athelstone, the tanker British Sergeant, and the cargo ship Norviken were all sunk.
After the Raid
British Response
The Japanese caused a lot of damage. They sank one carrier, two cruisers, two destroyers, and 23 merchant ships. They also destroyed many British aircraft. In return, the Japanese lost only 18 aircraft. However, they failed to destroy the main British Eastern Fleet.
The British felt their position was risky. They believed the Japanese would keep threatening their supply lines in the Indian Ocean. The raid showed that the British air force in Ceylon was too weak. The navy was not ready to face a strong Japanese carrier force.
The Eastern Fleet moved its main base to Kilindini, Kenya, in East Africa. This meant they temporarily gave up control of the eastern Indian Ocean to the Japanese. However, the British continued to fight for control of the central Indian Ocean.
By June, Ceylon's defenses were much stronger. It had more aircraft, better radar, and improved anti-aircraft guns.
Japanese Response
The Japanese did not follow up on their victory as the British feared. Their aircraft carriers needed maintenance after months of intense fighting. Also, the Japanese were focusing on other battles in the Pacific Ocean.
In May, Japanese carriers fought in the Battle of the Coral Sea. In June, they fought in the Battle of Midway. Losses in these battles limited Japan's options for further attacks in the Indian Ocean.
After 1942, major Japanese naval activity in the Indian Ocean mostly stopped. They mainly used submarines and armed merchant ships to attack trade.
Lessons Learned
The Indian Ocean raid showed some problems with how both sides operated.
- For Japan: Their air searches were not always good enough to find the enemy fleet. It was hard to quickly change the weapons on their planes for different missions. Also, their fighter planes sometimes failed to stop enemy aircraft because they lacked radar to guide them. These problems would appear again in later battles, like the Battle of Midway.
- For Britain: Admiral Somerville was willing to take risks. His initial plan to attack at night was very risky. However, his decision to refuel at Port T likely saved the Eastern Fleet from being destroyed. He also learned that he had underestimated the strength of the Japanese air force.
The British Admiralty (the navy's leaders) agreed that Ceylon was a difficult moment for Somerville. He faced challenges that the British Navy did not usually see in the Atlantic or Mediterranean. Japanese air power made it very hard to scout and attack during the day. Night attacks using radar were the only real option, but this was a high-risk strategy.


