
Battle of Cape St. Vincent (1797) facts for kids
Quick facts for kids Battle of Cape St. Vincent |
|||||||
|---|---|---|---|---|---|---|---|
| Part of the Anglo-Spanish War (1796–1808) and the naval operations during the War of the First Coalition | |||||||
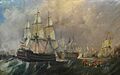
 The Battle of Cape St. Vincent, 14 February 1797 by Robert Cleveley |
|||||||
|
|||||||
| Belligerents | |||||||
| Commanders and leaders | |||||||
| Strength | |||||||
| 15 ships of the line 5 frigates 1 sloop 1 cutter |
25 ships of the line 7 frigates 1 brig 4 urcas (armed merchantmen) |
||||||
| Casualties and losses | |||||||
| 73 dead 227 wounded |
4 ships of the line captured 250 dead 550 wounded 3,000 prisoners |
||||||
The Battle of Cape St. Vincent took place on February 14, 1797. It was an important naval battle during the French Revolutionary Wars. A British fleet, led by Admiral Sir John Jervis, fought and defeated a much larger Spanish fleet. The Spanish fleet was commanded by Admiral Don José de Córdoba y Ramos. The battle happened near Cape St. Vincent in Portugal.
Contents
Why Did the Battle Happen?

In 1796, Spain and France became allies against Great Britain. This made it hard for the British navy to stay in the Mediterranean Sea. The combined French and Spanish fleets were much bigger than the British fleet. Because of this, the British had to leave their bases in Corsica and Elba.
The Spanish fleet, with 27 large warships called ships of the line, was in Cartagena, Spain. Their plan was to meet the French fleet in Brest, France. They also needed to protect a convoy of merchant ships. These ships were carrying important goods like mercury.
On February 1, the Spanish fleet left Cartagena. They were heading for Cádiz. But strong easterly winds pushed them further into the Atlantic. Meanwhile, the British fleet, led by Admiral Jervis, was trying to find them.
On February 11, a British frigate called HMS Minerve spotted the Spanish fleet. It was commanded by Commodore Horatio Nelson. Nelson quickly reported the Spanish fleet's location to Admiral Jervis. Jervis was on his flagship, Victory. Even though it was foggy, Jervis decided to intercept the Spanish ships.
How the Battle Unfolded

by Alfred Thayer Mahan
On the morning of February 14, the British ships heard Spanish signal guns in the fog. This told them the enemy was close. Admiral Jervis knew this battle was very important for England. The British fleet formed two lines, ready for action.
At first, the British didn't know how many Spanish ships there were. But as the fog cleared, they saw the Spanish fleet. It was much larger, almost twice the size of the British fleet. Despite being outnumbered, Jervis decided to fight. He knew it would be even worse if the Spanish joined the French fleet.
The Spanish ships were in two loose groups. One group had about 18 ships, and the other had about nine. Admiral Jervis ordered his fleet to form a single line. He planned to sail right through the middle of the two Spanish groups. This way, the British could fire at both sides of the Spanish fleet.
.jpg)
The battle began around 11:30 a.m. The British ships, led by Culloden, passed between the Spanish groups. This was a smart move. It allowed the British to fire on the Spanish ships while limiting the fire they received.
As the battle continued, some Spanish ships tried to break the British line. But the British ships were too fast and well-organized. For example, Victory fired powerful broadsides at the Spanish flagship, Principe de Asturias.


Nelson's Bold Move

Commodore Nelson, on his ship Captain, saw that the Spanish might escape. He made a very brave and risky decision. He ordered his ship to leave the British line and attack the larger Spanish group directly. This was against Admiral Jervis's orders, but Nelson believed it was necessary.
Nelson's ship, Captain, faced fire from many Spanish ships. These included the huge Santísima Trinidad, which had 130 guns. Other large Spanish ships like the San José and Salvador del Mundo also attacked Captain.
Around 2:50 p.m., Captain Collingwood on Excellent attacked the damaged Spanish ship San Ysidro. After a tough fight, San Ysidro surrendered. Soon after, Salvador del Mundo also surrendered.
Captain was heavily damaged and almost impossible to steer. Nelson then made another daring move. He ordered his crew to board the Spanish ship San Nicolás. With a cry of "Westminster Abbey or Glorious Victory!", Nelson led his men onto the enemy ship.
They successfully captured San Nicolás. Then, Nelson ordered his men to cross from San Nicolás to another Spanish ship, San José, and captured it too! This amazing move became known as "Nelson's patent bridge for boarding enemy vessels."
The Spanish flagship, Santísima Trinidad, tried to surrender. But other Spanish ships came to help, and it managed to escape capture. By 4:00 p.m., the main fighting was over. Admiral Jervis ordered his fleet to protect the captured ships.
Results of the Battle
The Battle of Cape St. Vincent was a huge victory for the British.
- The British lost 73 men and had 227 wounded.
- The Spanish lost about 1,000 men killed or wounded.
- Four Spanish ships of the line were captured.
- The British fleet, with 15 ships, had defeated a Spanish fleet of 27 ships. The Spanish had many more guns and men.
The Spanish navy, under Don José Córdoba, was not as well-trained as the British. Some Spanish guns were even found with plugs still in their muzzles. This shows how disorganized they were.
What Happened After?
After the battle, Admiral Jervis continued to blockade the Spanish fleet in Cádiz. This blockade lasted for about three years. It greatly limited the Spanish navy's movements. This victory also allowed Jervis to send a squadron of ships, including Nelson, back into the Mediterranean Sea. This squadron later won another important battle, the Battle of the Nile.
Admiral Jervis was given a special title, Earl St. Vincent, and a yearly pension. Nelson was knighted, becoming Sir Horatio Nelson. Both were honored by the City of London. Admiral de Córdoba, the Spanish commander, was removed from the Spanish Navy.
In 1847, a special medal called the Naval General Service Medal was given to any surviving sailors who fought in the battle.
Ships Involved in the Battle
British Fleet
| Ship | Guns | Commander | Casualties | Notes | ||
|---|---|---|---|---|---|---|
| Killed | Wounded | Total | ||||
| Culloden | 74 | Captain Thomas Troubridge |
|
|
|
|
| Blenheim | 90 | Captain Thomas L. Frederick |
|
|
|
|
| Prince George | 98 | Rear-Admiral William Parker; Captain John Irwin |
|
|
|
|
| Orion | 74 | Captain James Saumarez |
|
|
|
|
| Colossus | 74 | Captain George Murray |
|
|
|
|
| Irresistible | 74 | Captain George Martin |
|
|
|
|
| Victory | 100 | Admiral Sir John Jervis; Captain Robert Calder (captain of the fleet); Captain George Grey (flag captain) |
|
|
|
|
| Egmont | 74 | Captain John Sutton |
|
|
|
|
| Goliath | 74 | Captain Charles Henry Knowles |
|
|
|
|
| Barfleur | 98 | Vice-Admiral William Waldegrave; Captain James Richard Dacres |
|
|
|
|
| Britannia | 100 | Vice-Admiral Charles Thompson; Captain Thomas Foley |
|
|
|
|
| Namur | 90 | Captain James Hawkins Whitshed |
|
|
|
|
| Captain | 74 | Commodore Horatio Nelson; Captain Ralph Willett Miller |
|
|
|
Nelson was wounded during the action. |
| Diadem | 64 | Captain George Henry Towry |
|
|
|
|
| Excellent | 74 | Captain Cuthbert Collingwood |
|
|
|
|
| Total recorded casualties: 73 killed, 227 wounded | ||||||
Other British Vessels
| Ship | Guns | Commander | Type |
|---|---|---|---|
| Minerve | 38 | Captain George Cockburn | Frigate |
| Lively | 32 | Captain Lord Garlies | Frigate |
| Niger | 32 | Captain Edward James Foote | Frigate |
| Southampton | 32 | Captain James Macnamara | Frigate |
| Bonne-Citoyenne | 20 | Commander Charles Lindsay | Sloop-of-war |
| Raven | 18 | Commander William Prowse | Brig-sloop |
| Fox | 10 | Lieutenant John Gibson | Cutter |
Spanish Fleet
| Fleet Commander – Lieutenant-General José de Córdoba y Ramos | |||||||
|---|---|---|---|---|---|---|---|
| Ship | Guns | Commander | Casualties | Notes | |||
| Killed | Seriously Wounded | Slightly Wounded | Total | ||||
| Infante Don Pelayo | 74 | Captain Cayetano Valdés | 4 | 4 | 0 | 8 | |
| San Pablo | 74 | Captain Baltasar Hidalgo de Cisneros | - | - | - | - | |
| Purísima Concepción | 112 | Lieutenant-General Francisco Javier Morales de los Ríos; Flag Captain & Brigadier José Escaño |
8 | 21 | 0 | 29 | |
| Perla | 34 | Commander Francisco Moyúa | - | - | - | - | |
| Santo Domingo | 64 | Captain Manuel María de Torres Valdivia | 2 | 0 | 0 | 2 | |
| Conquistador | 74 | Captain José Butler | 6 | 0 | 0 | 6 | |
| San Juan Nepomuceno | 74 | Captain Antonio Boneo | - | - | - | - | |
| Nuestra Señora de las Mercedes | 34 | Commander José Varela | - | - | - | - | |
| San Genaro | 74 | Captain Agustín Villavicencio | - | - | - | - | |
| Mejicano | 112 | Brigadier Francisco de Herrera (†) | 25 | 46 | 42 | 113 | |
| Nuestra Señora de la Paz | 40 | Commander Santiago Irizarri | - | - | - | - | |
| Oriente | 74 | Captain Juan Suárez | 8 | 20 | 0 | 100 | |
| Soberano | 74 | Flag Captain & Brigadier Juan Vicente; Captain Francisco Ley (†) |
25 | 46 | 33 | 104 | |
| Santísima Trinidad | 130 | Lieutenant-General Don José de Córdoba y Ramos; Flag Captain & Brigadier Rafael Orozco; Commander & Major-General Ciriaco Ceballos |
69 | 141 | 92 | 302 | badly damaged |
| Vigilante | 12 | Lieutenant José de Córdoba y Rojas | - | - | - | - | |
| San Nicolás de Bari | 80 | Brigadier Tomás Geraldino (†) | 144 | 59 | - | 203 | captured |
| San Isidro | 74 | Captain Teodoro Argumosa | 29 | 63 | - | 92 | captured |
| Salvador del Mundo | 112 | Brigadier Antonio Yepes (†) | 42 | 124 | - | 166 | captured |
| San Ildefonso | 74 | Captain Rafael Maestre | - | - | - | - | |
| Conde de Regla | 112 | Commodore Claude Francois Renard de Fuchsemberg, Conde de Amblimont (†); Flag Captain & Brigadier Jerónimo Bravo |
9 | 17 | 27 | 53 | |
| Matilde | 34 | Captain Manuel Vitoria | - | - | - | - | |
| San Fermín | 74 | Captain José de Torres | - | - | - | - | |
| Firme | 74 | Captain Bruno Ayala | 2 | 1 | 0 | 3 | |
| Príncipe de Asturias | 112 | Lieutenant-General Juan Joaquín Moreno de Mondragón y D'Hontlier; Flag Captain & Brigadier Antonio de Escaño |
10 | 19 | 0 | 29 | |
| Diana | 34 | Commander Juan José Varela | - | - | - | - | |
| San Antonio | 74 | Captain Salvador Medina | - | - | - | - | |
| Glorioso | 74 | Captain Juan de Aguirre | - | - | - | - | |
| Nuestra Señora de Atocha | 40 | Commander Antonio Pareja | - | - | - | - | |
| Atlante | 74 | Captain Gonzálo Vallejo | 6 | 4 | 1 | 11 | |
| San Francisco de Paula | 74 | Captain José Ussel de Guimbarda | - | - | - | - | |
| San José | 112 | Commodore Francisco Javier Winthuysen (†); Flag Captain & Brigadier Pedro Pineda |
46 | 96 | - | 142 | captured |
| Ceres | 40 | Commander Ignacio Olaeta | - | - | - | - | |
| Asunción | 28 | Lieutenant Manuel Díaz Herrera | - | - | - | - | |
| Santa Justa | 18 | Lieutenant Florencio Scals | - | - | - | - | |
| Santa Balbina | 18 | Lieutenant Diego Ochandía | - | - | - | - | |
| Santa Paula | 20 | Lieutenant José Elexaga | - | - | - | - | |
| Total recorded casualties: 430 killed, 661 seriously wounded and 195 slightly wounded | |||||||
Images for kids
-
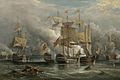
The Battle of Cape Saint Vincent, Richard Brydges Beechey, 1881
-
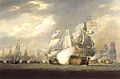
Salvador del Mundo receiving raking fire from HMS Victory by Robert Cleveley
-
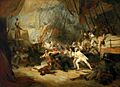
Nelson boarding the San Josef during the battle by George Jones
-
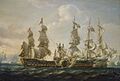
HMS Captain capturing the San Nicolas and the San Josef by Nicholas Pocock
-
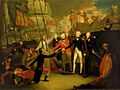
Nelson receiving the surrender of the San José by Daniel Orme, painted 1799
-
Infante Don Pelayo attempts to rescue the Santísima Trinidad by Antonio Brugada


See also
 In Spanish: Batalla del Cabo de San Vicente (1797) para niños
