
Battle of Cowpens facts for kids
Quick facts for kids Battle of Cowpens |
|||||||
|---|---|---|---|---|---|---|---|
| Part of the American Revolutionary War | |||||||
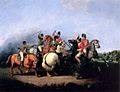
 The Battle of Cowpens, painted by William Ranney in 1845. The scene depicts an unnamed black man (left), thought to be Colonel William Washington's waiter, firing his pistol and saving the life of Colonel Washington (on white horse in center). |
|||||||
|
|||||||
| Belligerents | |||||||
| Commanders and leaders | |||||||
| Strength | |||||||
| 1,887–1,912 | 1,150 2 guns |
||||||
| Casualties and losses | |||||||
| 25 killed 124 wounded |
110 killed 229 wounded 629 captured or missing 2 guns lost |
||||||
The Battle of Cowpens was an important fight during the American Revolutionary War. It happened on January 17, 1781, near Cowpens, South Carolina. American forces, led by Brigadier General Daniel Morgan, faced British troops. Nearly half of the British soldiers were American Loyalists who supported the British King. They were led by Lieutenant Colonel Banastre Tarleton. This battle was a key moment in the American effort to take back South Carolina from the British.
General Morgan's army used a clever tactic called a double envelopment. This means they surrounded Tarleton's forces from both sides. It was the only time this tactic was successfully used in the entire war. Morgan had about 2,000 soldiers, while Tarleton had about 1,000. The Americans had very few losses, with only 25 killed and 124 wounded. Tarleton's army was almost completely destroyed. About 30% of his men were killed or wounded, and 55% were captured or went missing. Tarleton himself escaped with only about 200 British soldiers.
Before the battle, a small group of American soldiers, led by General Morgan, moved west of the Catawba River. They were looking for supplies and trying to encourage local colonists who supported the American cause. The British thought Morgan's army was going to attack Ninety Six, an important fort held by Loyalists. British General Charles Cornwallis sent Lieutenant Colonel Tarleton to stop Morgan. When Tarleton found out Morgan wasn't at Ninety Six, he got more soldiers and chased the Americans.
Morgan decided to make a stand near the Broad River. He chose a spot on two low hills in an open forest. He hoped that Tarleton, known for attacking quickly, would rush in without a detailed plan. Morgan set up his army in three main lines. Tarleton's soldiers arrived tired and hungry after a long march. Tarleton attacked right away. However, the American defense was strong and absorbed the British attack. The British lines became messy as they chased the Americans. When Morgan's army then attacked, they completely overwhelmed Tarleton's force.
Tarleton's group was no longer an effective fighting force after this defeat. Along with the British loss at the Battle of Kings Mountain, this battle forced Cornwallis to chase the main American army into North Carolina. This led to the Battle of Guilford Court House. Eventually, Cornwallis was defeated at the siege of Yorktown in October 1781, which helped end the war.
Contents
Why the Battle Happened
On October 14, 1780, General George Washington chose Nathanael Greene to lead the American forces in the South. Greene faced a tough challenge. In 1780, the Carolinas had seen many American defeats. One American army was captured at the siege of Charleston. Another was defeated at the Battle of Camden. A victory by American militia at the Battle of Kings Mountain in October helped, but most of South Carolina was still controlled by the British. When Greene took command, his army was small, with only about 949 experienced soldiers.

On December 3, General Daniel Morgan joined Greene's army. Morgan had fought in the French and Indian War and the American Revolution. He was captured by the British in 1775 during the Battle of Quebec. After being released, he led a group of 500 skilled riflemen called Morgan's Riflemen. Morgan and his men were very important in the American victory at Saratoga in 1777, a major turning point in the war. After some time away from the army, Morgan was promoted to brigadier general and returned to duty in the South.
Greene knew his small army couldn't fight the British head-on. He decided to split his army. He sent Morgan's group west of the Catawba River to boost local morale and find supplies. Morgan was told to gather more militia and protect the people in that area. Morgan headed west on December 21 with about 600 men. By Christmas Day, he reached the Pacolet River. More militia, including experienced fighters led by Andrew Pickens, joined him.
Meanwhile, Lord Cornwallis planned to invade North Carolina. Morgan's force was a threat to his side. Cornwallis also heard incorrect reports that Morgan would attack the British fort at Ninety Six. To protect the fort and defeat Morgan, Cornwallis ordered Lieutenant Colonel Banastre Tarleton to go west on January 1, 1781.

Tarleton was a young but successful British officer. He had captured American General Charles Lee in New Jersey. He also fought well at the siege of Charleston and the Battle of Camden. Tarleton led the British Legion, a strong group of American Loyalists. He had won victories at Monck's Corner and Fishing Creek. He was known for his aggressive tactics.
Tarleton and his Legion marched to Ninety Six. When he learned Morgan wasn't there, Tarleton asked Cornwallis for more British soldiers, which he received. Tarleton then set out to push Morgan's army across the Broad River. On January 12, he got accurate information about Morgan's location. Tarleton pushed his troops hard, even building boats to cross flooded rivers. Morgan, hearing that Tarleton was close behind, retreated north to avoid being trapped.
By the afternoon of January 16, Morgan was near the Broad River, which was high from floodwaters. He knew Tarleton was very close. By nightfall, he reached a place called "Hannah's Cowpens," a well-known grazing area for cattle. Pickens and his militia joined Morgan that night. Morgan decided to stand and fight instead of retreating further and risking being caught while crossing the river. Tarleton, learning Morgan's location, pushed his troops to march at 3 a.m. instead of resting.
Preparing for Battle
American Forces and Their Leaders
The exact number of American soldiers at Cowpens is debated, but it was likely between 800 and 1,900 men. General Morgan's army included:
- Experienced Continental soldiers from Maryland and Delaware.
- Virginia and North Carolina militia.
- South Carolina militia, including skilled fighters led by Colonel Andrew Pickens.
- Small groups of Georgia militia.
- Cavalry (horse soldiers) led by Lieutenant Colonel William Washington, who was a cousin of George Washington.
Morgan's army had strong, experienced soldiers and his own brilliant leadership. Many of his Continental soldiers were veterans. Some of his militia, like the "Overmountain Men," had fought in previous battles. The British, especially their young commander Tarleton, often underestimated American militia. They were used to easily defeating less experienced groups in the South.
British Forces and Their Leaders
Tarleton's force had over 1,150 soldiers. It included:
- The British Legion, with cavalry and infantry.
- A group of the 17th Light Dragoons (cavalry).
- Two small cannons called "grasshopper cannons."
- Regular British soldiers from the 7th, 16th, and 71st Regiments of Foot.
- Loyalist soldiers from the Prince of Wales's American Regiment.
- Loyalist guides.
About half of Tarleton's army were Loyalists recruited in the colonies. Tarleton's regular British troops were reliable and experienced. His own Loyalist unit, the British Legion, was known for chasing down enemies. However, they had a less certain reputation when facing strong resistance.
Morgan's Smart Battle Plan

General Morgan used the land at Cowpens to his advantage. He also knew his troops' strengths and weaknesses, and what to expect from Tarleton. He knew that many militia soldiers were not reliable in a big battle and might run away. To prevent this, he placed his army between the Broad and Pacolet rivers. This made it impossible for his army to run away if they were defeated. He chose a low hill as the center of his position and placed his best soldiers there. He purposely left his sides open, guessing that Tarleton would attack directly.
Morgan believed Tarleton would be overconfident and attack head-on without a complex plan. So, Morgan set up his forces to encourage this quick attack. He created three lines of soldiers:
- The first line had about 150 skilled riflemen from North Carolina and Georgia.
- The second line had 300 militiamen led by Colonel Andrew Pickens.
- The third line, on the hill, had Morgan's most experienced soldiers. These were about 550 Continental regulars, including famous units from Maryland and Delaware. They were supported by experienced militia from Georgia and Virginia.

Morgan wanted the first two lines to fire at the British as they advanced. He told the militia to fire two volleys (rounds of shots) and then pretend to retreat. They would move to the left and regroup behind the third line, protected by cavalry led by Colonel William Washington. This fake retreat would make Tarleton even more confident. Morgan expected the British to be disorganized and tired after fighting the first two lines. The third line would then stand strong against them. Morgan also planned for the third line to move back a short distance, adding to the illusion of a full retreat.
Historians say Morgan's tactics at Cowpens were very original for the American Revolution. He was perhaps the only general on either side to come up with such a unique battle plan.
Tarleton's Quick Approach

At 2:00 a.m. on January 17, 1781, Tarleton woke his troops and continued his march to Cowpens. His soldiers were exhausted and hungry from five days of hard marching. They had less than four hours of sleep in the 48 hours before the battle. Tarleton felt sure of victory because Morgan's soldiers, mostly militia, seemed trapped between his experienced British troops and a flooded river. As soon as he arrived, Tarleton formed his battle line. He placed his cavalry on the sides and his two cannons between his British regulars and Loyalists.
Tarleton's plan was simple: his infantry would attack Morgan directly. Cavalry units would protect the sides of his line. In reserve, he had a 250-man battalion of Scottish Highlanders. Finally, Tarleton kept 200 cavalrymen ready to chase the Americans when they broke and ran.
The Battle Begins

A few minutes before sunrise, Tarleton's lead soldiers appeared from the woods. Tarleton ordered his cavalry to attack the first line of American riflemen. The riflemen fired, hitting fifteen British cavalrymen, who then retreated. Tarleton immediately ordered his infantry to charge. He didn't stop to study the American setup or wait for all his soldiers to get out of the woods. The American riflemen kept firing as they fell back to join the second line of militia.
The British attacked again, reaching the militiamen. As ordered, the militia fired two volleys into the enemy, aiming at the officers. The British were surprised and confused, with many officers hit. They regrouped and kept advancing. Tarleton ordered some of his cavalry to charge the "defeated" Americans. His men moved forward, but the militia's musket fire briefly stopped them. Then, Pickens's militia seemed to "flee" as planned, moving around the American left to the rear after firing their second volley.

The British thought the first two American lines were running away. They charged headlong into the third and final line of disciplined American regulars waiting on the hill. The 71st Highlanders were ordered to attack the American right side. Colonel John Eager Howard saw this move and told the Virginia militiamen on the American right to turn and face the Scots. However, in the noise of battle, Howard's order was misunderstood, and the militiamen began to pull back. It was now 7:45 a.m., and the British had been fighting for almost an hour. They were tired and disorganized. But they saw the Virginia militia retreating and believed the Americans were truly running. They charged, breaking their formation and advancing in a messy crowd.
Morgan then ordered a volley of fire. Howard's "fleeing" militia suddenly stopped their retreat and turned around. The Virginians fired at the British from only thirty yards away, causing huge damage and making the confused British stop. John Eager Howard shouted, "Charge bayonets!"
The Continental soldiers in the center, as ordered, charged with their bayonets. Tarleton's force, hit by this terrible surprise, began to fall apart. Some soldiers surrendered, while others turned and ran. Howard's men charged forward and captured the two British cannons.

Colonel William Washington's cavalry came around from behind the American left side to attack the British from their right and rear. Pickens's militia, now reorganized, charged out from behind the hill. They had completed a full circle around the American position and hit the 71st Highlanders on the British left and rear. Howard ordered the Virginia militia, whose earlier retreat had caused the British to charge, to turn around and attack the Scots from the other direction.
The sudden charge, combined with the American militiamen reappearing where Tarleton's tired men expected to see their own cavalry, was too much for the British. Nearly half of the British and Loyalist infantry fell to the ground, whether wounded or not. They had lost their will to fight. Many British soldiers surrendered.
When Tarleton's right side and center collapsed, only a few of the 71st Highlanders were still fighting. Tarleton realized how bad his situation was. He rode back to his only remaining intact unit, the British Legion cavalry. He ordered them to charge, but they fled the field instead. The Highlanders, surrounded by militia and Continentals, surrendered. Tarleton, desperate to save something, found about forty cavalrymen and tried to get his two cannons back. But they had been captured, and he too retreated from the field.
Washington's cavalry chased Tarleton for sixteen miles. Washington himself was attacked by Tarleton and two of his men. Washington fought back, wounding Tarleton's right hand with his sword. Tarleton shot Washington's knee with a pistol, also wounding his horse. It was now 8:00 a.m., and the battle had lasted about one hour. Washington eventually gave up the chase.
What Happened After the Battle

Morgan's army captured 712 prisoners, including 200 wounded. Even worse for the British, the soldiers they lost, especially the British Legion and the cavalry, were among the best in Cornwallis's army. Also, 110 British soldiers were killed, and every artilleryman was either killed or badly wounded. Tarleton's force suffered an 86 percent casualty rate; his group was no longer able to fight effectively. One American prisoner later said that when Tarleton told Cornwallis about the disaster, Cornwallis was so upset that he leaned on his sword until it snapped.
Historians have found that Morgan's official report of 73 American casualties likely only included his Continental troops. Records show that at least 128 Colonial soldiers were killed or wounded at Cowpens. It seems that both the number of Morgan's casualties and the total size of his force were about double what he officially reported.
Tarleton's aggressive pursuit of Morgan might be explained by his past easy victories in the South. He seemed so focused on chasing Morgan that he forgot his men needed to be in good condition to fight.

After the American defeat at Camden, Cowpens was a surprising victory. It was a turning point that greatly boosted morale for people across all the Southern states. Americans were encouraged to keep fighting, while Loyalists and the British were discouraged. More importantly, the battle destroyed a key part of the British army in the South, which was crucial to ending the war.
Along with the British defeat at the Battle of Kings Mountain, Cowpens was a serious blow to Cornwallis. He might have defeated much of the remaining American resistance in South Carolina if Tarleton had won. Instead, the battle started a series of events that led to the end of the war. Cornwallis stopped his efforts to control South Carolina. He got rid of extra baggage and chased Greene's army into North Carolina. After a long chase, Cornwallis met Greene at the Battle of Guilford Court House. Cornwallis won, but his army was so weakened that he pulled back to Yorktown, Virginia, to rest. General Washington and his French ally, Rochambeau, used this chance to trap and defeat Cornwallis at the Battle of Yorktown. This final defeat caused the British to give up their efforts to defeat the Americans.

Many historians believe that few battles with smaller numbers of soldiers had such important results as Cowpens. It gave General Nathanael Greene the chance to lead a brilliant campaign that eventually led to Cornwallis's defeat at Yorktown, which finally separated America from British rule.
Remembering the Battle
- The battle site is now preserved as Cowpens National Battlefield.
- The Daniel Morgan Monument is in downtown Spartanburg.
- Two ships of the U.S. Navy have been named USS Cowpens to honor the battle.
- Three current Army National Guard units trace their history back to American units that fought at Cowpens.
Cowpens in Movies
- The final battle in the 2000 film The Patriot was inspired by the Battle of Cowpens and the Guilford Courthouse. The Americans used similar tactics in both battles. The name of the battle and the winning side came from Cowpens. The size of the armies and the presence of Generals Nathanael Greene and Lord Cornwallis came from the Guilford Courthouse battle.
- The movie Sweet Liberty, directed by Alan Alda, makes fun of how a film company changes the story of the Battle of Cowpens.
Images for kids
-
The Battle of Cowpens, painted by William Ranney in 1845.
-
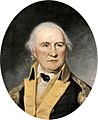
Brigadier General Daniel Morgan.
-
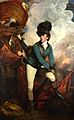
"Lieutenant-Colonel Banastre Tarleton" by Sir Joshua Reynolds.
-
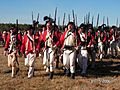
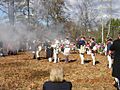
Reenactors at Cowpens.
-

Battle of Cowpens Reenactment, 225th anniversary, January 14, 2006.
-
Reenactment on the 225th anniversary of the battle, January 14, 2006.
-

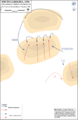
British attack at Cowpens, the first phase of the Battle of Cowpens.
-
American counterattack, the second phase of the Battle of Cowpens.
-
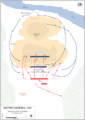
Battle of Cowpens January 17, 1781. Lieutenant Colonel William Washington's cavalry and the militia return to attack the British from the sides.
-
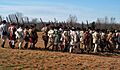
Reenactors portraying Colonial troops march into battle at Cowpens.
-
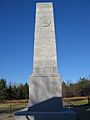
Battlefield monument.
-

The 13-striped, 13-starred American flag, with a single star in the center of a circling constellation, once believed to be flown during the battle, became known as the Cowpens flag.
See also
 In Spanish: Batalla de Cowpens para niños
