
Battle of Arnhem facts for kids
Quick facts for kids Battle of Arnhem |
|||||||
|---|---|---|---|---|---|---|---|
| Part of Operation Market Garden | |||||||
 An aerial photo of the Arnhem road bridge on September 19, showing signs of British defense and wrecked German vehicles. |
|||||||
|
|||||||
| Belligerents | |||||||
| Commanders and leaders | |||||||
| Strength | |||||||
| 1 reinforced airborne division 1 parachute infantry brigade RAF supply flights Limited support from XXX Corps in later stages |
Initially equivalent to: 1 Kampfgruppe 1 armoured division* |
||||||
| Casualties and losses | |||||||
| Approx 1,984 killed 6,854 captured** |
Approx 1,300 killed 2,000 wounded** |
||||||
| *More details of the German strengths can be found in the German forces section **More detailed information is available in the losses sections |
|||||||
The Battle of Arnhem was a major battle during World War II. It was part of a bigger plan called Operation Market Garden. This battle took place in and around the Dutch city of Arnhem, the town of Oosterbeek, and nearby villages from September 17 to 26, 1944.
Allied forces were moving quickly through France and Belgium in the summer of 1944. They wanted to enter the Netherlands. Field Marshal Sir Bernard Montgomery suggested a bold plan. He wanted to push north across the Lower Rhine River. This would let the British Second Army go around Germany's strong defenses (the Siegfried Line) and attack an important industrial area called the Ruhr.
American airborne troops were dropped in the Netherlands to capture bridges and towns. The British 1st Airborne Division landed farthest north, near Arnhem. Their goal was to capture bridges over the Nederrijn (Lower Rhine). They were supported by the Glider Pilot Regiment and the 1st Polish Parachute Brigade. The British XXX Corps (ground troops) were expected to reach them in two to three days.
However, the 1st Airborne Division landed far from their targets. They faced unexpected strong resistance, especially from parts of the 9th and 10th SS Panzer Divisions. Only a small group reached the Arnhem road bridge. The main part of the division was stopped outside the town. XXX Corps could not advance from Nijmegen as quickly as planned. This meant the British airborne troops were not rescued on time.
After four days, the small British force at the bridge was defeated. The rest of the division was trapped in a small area north of the river. The paratroopers could not get enough help from the Poles or XXX Corps. They also didn't get enough supplies from the Royal Air Force. After nine days of fighting, the remaining soldiers were pulled back in Operation Berlin. The Allies could not advance further without secure bridges over the Nederrijn. The battle line then settled south of Arnhem. The 1st Airborne Division lost almost three-quarters of its soldiers. It did not fight again after this battle.
Contents
Why the Battle Happened
By September 1944, Allied forces had broken out of their landing areas in Normandy. They were chasing the German armies across northern France and Belgium. Allied leaders usually preferred to advance on a wide front. But Field Marshal Bernard Montgomery suggested a daring plan. He wanted to go north through the Dutch region of Gelderland. This would bypass German defenses and open a path into Germany's industrial heartland.
Montgomery's plan was called Operation Market Garden. It involved dropping American airborne divisions to capture bridges around Eindhoven and Nijmegen. The British 1st Airborne Division, along with the Polish 1st Independent Parachute Brigade, would capture three bridges at Arnhem. Lieutenant-General Frederick Browning was in charge of the airborne part of the operation. The British Second Army, led by XXX Corps, would advance along a path called the "Airborne corridor." They were supposed to secure the airborne positions and cross the Rhine within two days. If successful, this plan could have ended the war in Europe by the end of the year.
British Plan for Arnhem

The British 6th Airborne Division was still recovering from earlier battles. So, the job of securing the Rhine bridgehead went to the 1st Airborne Division. This division was led by Major-General Roy Urquhart. It included three brigades of infantry (two parachute, one glider-borne). It also had artillery, anti-tank units, and engineers. Most of the division had fought in North Africa and Sicily. This was their first time fighting as a full division. Urquhart also had the Polish 1st Independent Parachute Brigade under his command. About 1,200 men from the Glider Pilot Regiment also joined. They flew the gliders and acted as infantry.
The division needed to capture the road, rail, and pontoon bridges over the Nederrijn at Arnhem. They had to hold them for two to three days until XXX Corps arrived. Urquhart's planning was difficult from the start. The US IX Troop Carrier Command could not drop all the airborne troops at once. They decided only one airlift per day was possible. This meant it would take three days to deliver the division and Polish Brigade. Also, few areas were good for glider landings. The air force didn't want to fly too close to Arnhem due to German anti-aircraft guns (flak) from Deelen airfield.
Urquhart had to choose drop zones (DZs) and landing zones (LZs) up to 8 miles (13 km) from Arnhem. These were all on the north side of the river. To secure the bridges, towns, and drop zones for future supplies, the 1st Airborne Division would have to defend a perimeter 18 miles (29 km) long.

Urquhart decided to land the 1st Parachute Brigade and the 1st Airlanding Brigade on the first day. The Airlanding Brigade would secure the drop and landing zones for the next days. The three battalions of the parachute brigade would land at DZ 'X'. They would then take different routes to the Arnhem bridges. The 2nd Battalion (led by Lieutenant Colonel John Frost) would follow the riverside roads. Their goal was to capture the main road and railway bridges. The 3rd Battalion would go through Oosterbeek to Arnhem. They would help capture the road bridge and take positions in the east of the town. The 1st Battalion would go north of the railway line. They would occupy high ground north and northwest of Arnhem.
A group of jeeps from the 1st Airborne Reconnaissance Squadron would lead the advance into Arnhem. They would try a surprise attack on the road bridge. On the second day, the 4th Parachute Brigade would arrive. They would reinforce positions north and northwest of Arnhem. On the third day, the Polish 1st Independent Parachute Brigade would be dropped south of the river. They would use the road bridge to reinforce the area east of Arnhem.
Intelligence and German Forces
The British division was told to expect only weak resistance from German reserve forces. Many soldiers believed the operation would end the war quickly. However, Major Brian Urquhart, an intelligence officer, found out that German tanks were in the Arnhem area. This was confirmed by aerial photos. But his superiors ignored this warning. SHAEF also knew about two German tank divisions near Arnhem. But they chose to ignore this information as the operation was about to start.

The Germans had regrouped after the Allies captured Antwerp. Generalfeldmarschall Walter Model, commander of Army Group B, had moved his headquarters to Arnhem. He was reorganizing defenses there. When Market Garden began, several German units were ready to fight. West of Arnhem was Kampfgruppe Von Tettau, a force of various German units. Inside Arnhem, the town garrison was led by Major-General Friedrich Kussin.
The II SS Panzer Corps (led by Obergruppenführer Wilhelm Bittrich) was also in the area. It included the remains of the 9th SS Panzer Division Hohenstaufen and the 10th SS Panzer Division Frundsberg. These divisions had been badly damaged in Normandy. But they were made up of experienced soldiers. Their presence meant the Germans had far more forces than the Allies expected. These divisions were also trained in anti-airborne operations.

Dutch units allied with the Germans were also present. These included the SS Wachbattalion 3 and parts of the 3rd Battalion of the 34th SS Volunteer Grenadier Division Landstorm Nederland.
As the battle continued, more German forces arrived. Adolf Hitler ordered that the defense of the Netherlands be a top priority. Reinforcements poured in. Each day, German military strength grew, while British supplies decreased. By September 21, German forces outnumbered the British 3 to 1.
The Battle Begins
Day 1 – Sunday, September 17

The first British airborne troops landed after intense bombing by Allied air forces. These bombings targeted German anti-aircraft guns and barracks. The first wave of aircraft and gliders suffered only light losses. The 21st Independent Parachute Company landed first to mark the landing zones. The main force arrived largely unopposed. Battalions formed up quickly and were ready by 2:45 PM.
The Airlanding Brigade moved fast to secure the landing zones. The 2nd Battalion, South Staffordshire Regiment went into Wolfheze. The 1st Battalion, Border Regiment secured DZ 'X'. The 7th Battalion, King's Own Scottish Borderers secured DZ 'Y'. Here, they ambushed the Dutch SS Wach Battalion.

The Germans were surprised and confused. General Walter Model, thinking the paratroopers wanted to capture him, fled his headquarters. He went to Bittrich's headquarters and took control of the battle. The 10th SS Panzer Division was sent south to fight the Americans at Nijmegen. The 9th SS Panzer Division would defend Arnhem. Obersturmbannführer Ludwig Spindler quickly organized a small battlegroup (Kampfgruppe Spindler). He was ordered to advance west to Oosterbeek and block the British from reaching Arnhem center.
The 9th SS division's reconnaissance battalion, led by Hauptsturmführer Viktor Gräbner, was ordered to Nijmegen. It crossed the Arnhem bridge at dusk. No units were ordered to secure the bridge at first. The Arnhem Garrison commander, Kussin, was killed by British paratroopers. This caused confusion in German command. Only later was the 10th SS Reconnaissance Battalion ordered to secure the bridge.
The Allied advance quickly ran into trouble. The reconnaissance squadron was ambushed and pulled back. The 1st and 3rd Parachute Battalions were also stopped by German defenses. They spent the rest of the day trying to get around the German lines. Only the 2nd Parachute Battalion, led by Frost, was mostly unopposed. They were slowed by cheering Dutch civilians. They did not reach the bridges until late in the day. The railway bridge was blown up by German engineers as the Allies approached. The pontoon bridge was missing its middle section.

Despite German mistakes, the British secured the undefended northern end of the road bridge. Lieutenant Jack Grayburn led an attempt to secure the southern end, but it failed. The British held their position and pushed back German units trying to take the bridge.
Poor communication severely hampered the British. The paratroopers' radios had limited range in the wooded areas. As battalions advanced, they lost contact with their headquarters. For the next nine days, radio communication was unreliable. This greatly hindered British units. Even carrier pigeons were used to send messages to Britain. Because of this, Urquhart decided to find his brigade commander, Lathbury. He ended up cut off from his own headquarters for two days.
Day 2 – Monday, September 18

On the second day, the 9th SS Panzer Division strengthened the German blocking line. Spindler's force grew larger as more units arrived. The defensive line now blocked the entire western side of Arnhem. It had also closed the gap that Frost's men used the evening before.
Overnight, the 1st and 3rd Parachute Battalions tried to reach Arnhem center. They approached the German line on the town's outskirts before dawn. For several hours, they tried to fight through. But Spindler's forces were too strong. By 10:00 AM, the British advance was stopped. A more organized attack in the afternoon also failed. Urquhart tried to return to his headquarters but was cut off. He had to hide in a Dutch family's attic. Lathbury was also injured and forced into hiding.
At the road bridge, German forces quickly surrounded Frost's battalion. This cut them off from the rest of the division. Around 9:00 AM, the 9th SS Reconnaissance Battalion tried to rush the bridge. In a two-hour battle, they were pushed back with heavy losses. Twelve of their 22 armored vehicles were destroyed, and their commander, Viktor Eberhard Gräbner, was killed. German attacks continued around the British position at the bridge all day, but the British held on.

At the landing zones, Urquhart's Chief of Staff, Lieutenant Colonel Charles Mackenzie, took temporary command. He sent the South Staffords to Arnhem to help reach the bridge. The South Staffords left in the morning and met the 1st Parachute Battalion later that day.
German forces began to test the 1st Airlanding Brigade's defenses. Units of Kampfgruppe von Tettau attacked the Border Regiment's positions. Minor fighting broke out around LZ 'X', but it didn't stop the glider landing there. At DZ 'Y', the Dutch SS Wach Battalion fought heavily with the King's Own Scottish Borderers. This threatened to disrupt the arrival of the second lift. Due to communication problems, the British couldn't warn the aircraft. Also, the second lift was delayed by fog in England.
When the 4th Parachute Brigade, led by Brigadier Hackett, finally arrived after 3:00 PM, they landed under fire. Several aircraft and paratroopers were shot down. But the arrival of a whole brigade overwhelmed the Dutch forces, who surrendered. The units assembled with few casualties. However, their roles quickly changed. The 11th Parachute Battalion and the rest of the South Staffords were immediately sent to Arnhem. They were to help break through to the bridge. The 10th and 156th Parachute Battalions moved north of the railway line. They were to take up defensive positions northwest of Arnhem. But they met the main 9th SS Panzer Division blocking line and pulled back for the night. The first supply drop was made, but only a small amount was collected as the area was not fully controlled by the British.
Day 3 – Tuesday, September 19

With more troops, the British hoped to break through to Frost's position at the bridge. Lieutenant Colonel Dobie planned an attack before dawn. But a false report said the bridge had fallen, so the attack was canceled. By the time the report was corrected, it was almost daylight. Still, the attack had to go ahead. The advance began on a narrow front between the railway line and the river. The 1st Parachute Battalion led, supported by parts of the 3rd Parachute Battalion. The 2nd South Staffordshires were on the left, and the 11th Parachute Battalion followed.
As soon as it was light, the 1st Parachute Battalion was spotted. They were stopped by heavy fire from the German defensive line. Trapped in open ground, they were under fire from three sides. The 1st Parachute Battalion broke apart. What was left of the 3rd Parachute Battalion fell back. The 2nd South Staffordshires were also cut off and mostly defeated by midday. The 11th Parachute Battalion was overwhelmed. With no hope of breaking through, the remaining 500 men retreated west towards the main British force in Oosterbeek.
This battle allowed Urquhart to escape his hiding place. He returned to his Division HQ at the Hotel Hartenstein in Oosterbeek. For the first time, he learned how strong the German forces were. In Britain, fog again delayed reinforcements. Thirty-five gliders carrying Polish troops were delayed. The parachute brigade couldn't take off at all.

North of the railway line, the 156th and 10th Parachute Battalions tried to capture high ground. Their advance was slow. Urquhart realized they needed to defend and ordered them to fall back to Wolfheze and Oosterbeek. They fought their way back, with German forces chasing them. The units gathered in the woods on the south side of the railway. Some German units followed, but stopped when attacked by German aircraft (friendly fire).
In the afternoon, the RAF flew its first big supply mission. But the Germans had moved anti-aircraft guns into the area. Ten aircraft were shot down. Despite the pilots' bravery (Flight Lieutenant David Lord received the Victoria Cross posthumously), the airborne forces only recovered a small amount of supplies. The dropzone was still in German hands.
At the bridge, Frost held on. But without supplies or reinforcements, their position became very dangerous. The Germans began to systematically destroy the houses the British were in, using tanks and artillery. German aircraft also attacked the British-held houses.
Day 4 – Wednesday, September 20

By now, the 1st Airborne Division was too weak to reach Frost at the bridge. Eight of the nine infantry battalions were badly damaged or scattered. Only one, the 1st Battalion, The Border Regiment, still existed as a unit. Urquhart made the difficult decision to leave the 2nd Parachute Battalion to fight on its own. He decided to form a defensive perimeter around Oosterbeek. He hoped to hold out until XXX Corps could reach them and create a new bridgehead over the Rhine.
The eastern side of this new perimeter was fairly stable after the previous day's retreat. Many small, mixed units defended the approaches to Oosterbeek. Major Richard Lonsdale took command of these units. Their positions withstood heavy German attacks. The Border Regiment held most of the western edge of the town. As more units fell back, they were reorganized into a thumb-shaped perimeter. The Nederrijn river formed its southern base.
The mixed units at Wolfheze began to fall back in the morning. But several were surrounded and captured. One hundred and fifty men of the 156th Parachute Battalion, led by Hackett, were pinned down. They broke out later and about 90 reached the Border Regiment's positions.

The afternoon's supply drop was no better than the previous day's. A message had reached Britain to arrange a new dropping zone near the Hotel Hartenstein. But some aircraft flew to the old LZ 'Z', where supplies fell into German hands. At Oosterbeek, the Germans used British marker panels to trick the aircraft. Ten of 164 aircraft were shot down, and only 13% of supplies reached British hands.
At the bridge, Frost finally made radio contact with Urquhart. He was told that reinforcements were unlikely. Soon after, around 1:30 PM, Frost was injured by a mortar bomb. Command passed to Major Gough. Despite their strong defense, the British position became impossible to hold. When fire spread to buildings where the wounded were being treated, a two-hour truce was arranged. The wounded, including Frost, were taken prisoner. Overnight, a few units held out longer. Some groups tried to break out towards Oosterbeek, but most were captured.
By 5:00 AM on Thursday, all resistance at the bridge had stopped.
Day 5 – Thursday, September 21

Throughout the morning, the Germans rounded up British survivors around Arnhem bridge. It took hours to clear the bridge of debris. This allowed German tanks to cross and reinforce Nijmegen. Crucially, the British had held the bridge long enough for the 82nd Airborne Division and the Guards Armoured Division to capture the Nijmegen bridge. With the resistance at Arnhem bridge crushed, the Germans had more troops for the Oosterbeek fight.
Delayed by weather, the Polish 1st Parachute Brigade, led by Stanisław Sosabowski, finally took off. They dropped under fire at 5:00 PM and suffered casualties. But they assembled in good order. Advancing to the river bank, they found the ferry was gone. Its owner had sunk it to prevent Germans from using it.
The arrival of the Poles eased pressure on the British. The Germans had to send more forces south of the Rhine. Fearing an attack on the southern end of the road bridge or the Nijmegen road, German units crossed the river overnight.

At Oosterbeek, defensive positions were strengthened. Hicks commanded the western and northern sides of the perimeter. Hackett commanded the east side. The perimeter was not a single line but a collection of defensive pockets in houses and foxholes. The divisional headquarters was at the Hotel Hartenstein. The perimeter was about 3 miles (5 km) around and defended by about 3,600 men. The biggest help to the besieged British was making contact with the 64th Medium Regiment, RA of XXX Corps. They bombarded German positions around the perimeter.
The British had seen the Polish drop but couldn't make radio contact. A soldier swam the Rhine with a message. The British planned to send rafts for a river crossing that night. The Poles were desperately needed on the northern bank. The Poles waited, but no rafts appeared by 3:00 AM. They withdrew to Driel to take up defensive positions.
Day 6 – Friday, September 22

Overnight, Germans south of the river formed a blocking line. This screened the road bridge from the Poles. The Poles were well dug in at Driel. German tanks could not easily attack them off the main roads. Hopes rose when three armored cars from XXX Corps managed to reach Sosabowski's force. These were followed by tanks and infantry. Behind them, the rest of the 43rd Wessex Division was advancing.
In Oosterbeek, heavy fighting continued. Intense shelling and snipers increased casualties at aid posts. Bittrich ordered attacks to be stepped up. Major attacks began at 9:00 AM from the east and west. They made only small gains. But these were followed by simultaneous attacks in the afternoon. The Germans made strong pushes on the northern and eastern ends. To the north, they briefly pushed back the King's Own Scottish Borderers. Urquhart realized it was pointless to hold the northern tip and ordered units to fall back to a shorter line. To the east, the remains of the 10th Parachute Battalion were almost wiped out. But the Germans failed to gain significant ground.
Two of Urquhart's staff officers swam the Rhine and contacted Sosabowski's HQ. It was arranged that six rubber boats would be sent to the northern bank. This would allow the Poles to cross into the Oosterbeek perimeter. That night, the plan started. But the cable broke, and the small oars were not enough for the fast-flowing river. Only 55 Poles made it across before dawn. Only 35 of these reached the perimeter.
Day 7 – Saturday, September 23

Spindler was ordered to shift his attacks further south. The goal was to push the British away from the river. This would cut them off from any hope of reinforcement. Despite their efforts, they were unsuccessful. But constant artillery and assaults continued to wear down the British defenses.
A break in the weather allowed the RAF to fly combat missions against the Germans. Hawker Typhoons and Republic P-47 Thunderbolts attacked German positions. The RAF attempted their final resupply flight from Britain. But they lost eight planes for little gain to the airborne troops. Some small resupply efforts were made from Allied airfields in Europe over the next two days, but with little effect.
South of the river, the Poles prepared for another crossing. That night, they waited for assault boats from XXX Corps. But these arrived late, and many were without oars. The crossings started at 3:00 AM. Only 153 men were able to cross during the remaining hours of darkness. This was less than a quarter of the hoped-for reinforcement.
Day 8 – Sunday, September 24

In the morning, Horrocks visited the Polish positions at Driel. Later, he held a meeting with Browning, Major-General Ivor Thomas, and Sosabowski. It was decided that another crossing would be attempted that night. When the Germans cut the narrow supply road near Nijmegen later that day, Horrocks realized the situation was hopeless. Plans were made to withdraw the 1st Airborne Division.
In Oosterbeek, the situation was desperate. Hackett was wounded and had to give up his command. The RAF tried to provide close air support. But shelling and sniping increased casualties every hour. Aid stations were filled with 2,000 wounded soldiers and Dutch civilians. Many aid posts were in the front line. This meant casualties were often evacuated forward, not backward. The wounded were often injured again. Some posts changed hands several times.

During the fighting, there had been short local truces around aid posts. On Sunday, Colonel Graeme Warrack, the senior medical officer, asked Urquhart for permission to arrange a truce. Warrack met with Bittrich, who agreed. Between 3:00 PM and 5:00 PM, a general ceasefire began. About 450 wounded soldiers were evacuated. The Germans used jeeps and ambulances to take serious cases to Saint Elisabeth Hospital in Arnhem. British, German, and Dutch medical staff worked together there.
That night, the Allies on the south side of the river tried another crossing. The plan was for the 4th Battalion, the Dorset Regiment and the 1st Polish Parachute Battalion to cross. Sosabowski was angry about giving up control of his battalion. He thought the plan was dangerous but was overruled. The boats arrived late. In a last-minute change, only the Dorsets would cross. The small boats, strong current, and poor landing site meant only a few of the 315 men reached British lines. Most landed too far downstream, and at least 200 men were captured.
Day 9 – Monday, September 25
_III_gemotoriseerd_geschut_aan_het_Onderlangs_2155_035321.jpg)
During the night, a copy of the withdrawal plan was sent to Urquhart. He knew there was little other choice. He agreed to the plan, provided it went ahead that night. The airborne forces would need to endure another day in their perimeter. More men were evacuated from aid posts, but there was no official truce. At 10:00 AM, the Germans began their most successful assault. They attacked the southeastern end with infantry and new Tiger tanks. This attack pushed through the outer lines. It threatened to cut off the main part of the division from the river. Strong counter-attacks and heavy shelling from south of the river eventually pushed the Germans back.
Urquhart planned his withdrawal like the evacuation of Gallipoli in World War I. The northernmost units would fall back first. They would move through the more southerly groups, who would then follow. Glider pilots would organize the routes to the river. The operation would be covered by intense artillery fire from XXX Corps. South of the river, the evacuation was organized by engineers. They used rafts and storm boats. To keep the operation secret, the plan was not announced until the afternoon. Some men (mainly wounded) would stay behind to provide covering fire. Soldiers were told to muffle their boots and weapons.
By 9:00 PM, heavy rain began to fall. This helped hide the withdrawal. The bombardment started, and units began to fall back to the river. Half of the engineers' boats were too far west. This slowed the evacuation. The Germans shelled the withdrawal, thinking it was a supply attempt. At 5:00 AM, the operation ended. A total of 2,163 airborne men, 160 Poles, 75 Dorsets, and several dozen others were evacuated. But about 300 men were left behind on the northern bank. Ninety-five men were killed overnight during the evacuation.
On the morning of September 26, the Germans pressed their attacks. They cut off the bridgehead from the river. It wasn't until noon that they realized the British had left. Later that day, they rounded up about 600 men. Most were wounded in aid stations or left behind. Some were pockets of resistance that didn't know about the withdrawal.
After the Battle

The Allies pulled back from the southern bank of the Rhine. The front line stayed on "the island" between the Rhine and Waal rivers. The Germans counter-attacked in October but were pushed back. The front line stayed stable until after winter. The bridgeheads across the Maas and Waal rivers became important bases for future operations into Germany.
The Polish Brigade moved to Nijmegen to help defend the British withdrawal. They returned to England in early October. Soon after, the British unfairly blamed Sosabowski and the Polish Brigade for the failure at Arnhem. This might have been to cover their own mistakes. Montgomery claimed the Polish forces "fought very badly." Browning wrote a critical letter about Sosabowski. He accused him of being difficult and unwilling to fully participate. Browning recommended Sosabowski be replaced. In December, the Polish government in exile dismissed him, likely due to British pressure.
Historians like Carlo D'Este believe Sosabowski was a skilled officer. He was removed because he made Browning's own mistakes look bad. Many historians agree that blaming Sosabowski was a disgrace. Brian Urquhart, who warned about the dangers of Arnhem, called the criticism "grotesque" and his dismissal "a shameful act."
Arnhem was a German victory, but they also suffered losses further south. Many military experts believe the failure was not the fault of the airborne forces. They held out much longer than planned. Instead, they blame the overall plan. John Frost noted that the biggest mistake was not prioritizing the capture of Nijmegen Bridge. He couldn't understand why Browning ordered the 82nd US Airborne Division to secure the Groesbeek Heights before the Nijmegen Bridge.
The air plan was a major weakness. Experts believe refusing night drops or a surprise attack on Arnhem bridge were "fundamental errors." The long distance from drop zones to the bridge was a "glaring snag." The air force's unwillingness to fly more than one mission a day was a key factor against success.
The Allies' failure to secure a bridge over the Lower Rhine ended Operation Market Garden. While other goals were met, the main goal of securing the Arnhem road bridge failed. Montgomery claimed the operation was 90 percent successful. The Allies had pushed a deep "bulge" into German territory. This complicated German supply problems and prevented a counter-attack on Antwerp. However, others argue that the salient led nowhere. The failure meant a pause in the Allied advance, which Montgomery had feared.
Allied Casualties
The Battle of Arnhem was a very costly defeat for the 1st Airborne Division. It never fully recovered. Three-quarters of the division were missing when it returned to England. This included many commanders. About 500 men were hiding north of the Rhine. Many escaped later, some in Operation Pegasus. New recruits and escapees joined the division. But it was still so weak that one brigade had to merge into another. The division could barely form two infantry brigades. After the war, the division was disbanded. The Glider Pilot Regiment suffered the highest proportion of deaths (17.3 percent).
| Killed in action/ died of wounds |
Captured or missing |
Withdrawn | Total |
|
|---|---|---|---|---|
| 1st Airborne | 1,174 | 5,903 | 1,892 | 8,969 |
| Glider Pilot Regiment | 219 | 511 | 532 | 1,262 |
| Polish Brigade | 92 | 111 | 1,486 | 1,689 |
| Total | 1,485 | 6,525 | 3,910 |
| Killed in action/ died of wounds |
Captured/ missing |
|
|---|---|---|
| RAF | 368 | 79 |
| Royal Army Service Corps | 79 | 44 |
| IX Troop Carrier Command | 27 | 6 |
| XXX Corps | 25 | 200 |
| Total | 499 | 329 |
German Casualties
.jpg)
German casualty figures are not as complete as Allied ones. No official numbers have been released. One signal from September 27 listed 3,300 casualties (1,300 killed and 2,000 injured) around Arnhem and Oosterbeek. Other research identified at least 1,725 German dead from the Arnhem area. These numbers are higher than Model's estimate of 3,300 casualties for the entire Market Garden area.
Arnhem City
Dutch records show that at least 453 civilians died during the battle. This was from Allied bombing or the fighting. After the battle, residents of Arnhem and nearby areas were forced to leave their homes. The Germans turned the north bank of the Rhine into a strong defensive position. People were not allowed to return without a permit. Most did not return until after the war. Dutch homes were systematically looted, and the stolen goods were sent to Germany. The Arnhem bridge was bombed and destroyed by American aircraft on October 7. The buildings of Arnhem were heavily damaged by Allied bombardments. They suffered more during the Liberation of Arnhem in April 1945.
Honors and Memorials

Even though the battle was a disaster for the British 1st Airborne Division, their fight north of the Rhine is seen as an example of courage and endurance. It's considered one of the greatest military achievements of World War II. Arnhem has become a symbol of the fighting spirit of the British people. Montgomery famously said, "in years to come it will be a great thing for a man to be able to say: 'I fought at Arnhem'."
Within days of the withdrawal, the British soldiers returned to a hero's welcome in England. Many awards were given for bravery. Five British soldiers received the Victoria Cross, Britain's highest award for gallantry. Four were from the Airborne forces, and one was from the RAF. They were:
- Lance-Sergeant John Baskeyfield, 2nd Battalion, South Staffordshire Regiment
- Major Robert Cain, 2nd Battalion, South Staffordshire Regiment
- Flight Lieutenant David Lord 271 Squadron, Royal Air Force
- Captain Lionel Queripel, 10th Battalion, Parachute Regiment
- Lieutenant John Grayburn, 2nd Battalion, Parachute Regiment
The British and Commonwealth system of battle honours recognized the fighting at Arnhem. Six units received the battle honor Arnhem 1944. After the Netherlands was freed, British Army units identified the dead. They were buried together in a field that is now the Airborne Cemetery in Oosterbeek. There are nearly 1,800 graves there, mostly for those killed in the 1944 battle. Even today, human remains and equipment are still found in the farmland around the city.
In Germany, the battle was seen as a great victory. At least eight German soldiers received the Knight's Cross of the Iron Cross. German dead were buried in a special cemetery, then later reburied in Ysselsteyn.

The damaged Arnhem road bridge was rebuilt. It was renamed John Frostbrug (John Frost Bridge) on December 17, 1977. On May 31, 2006, Queen Beatrix of the Netherlands honored the Polish forces. The Polish 1st Independent Airborne Brigade received the Dutch Military William Order for bravery. Stanisław Sosabowski was posthumously awarded the Bronze Lion. A memorial to General Sosabowski and the brigade was unveiled in September 2006. This ceremony aimed to correct the unfair blame placed on them in 1944.
The Eusebius Church, largely destroyed, also lost its 32-bell carillon. A new, 49-bell carillon was built for the reconstructed church. Since then, the carillon has been part of yearly war memorial services. In 1994, four bass bells were added. One of these bells has a quote from the book A Bridge Too Far and the film adaptation.
The Hotel Hartenstein, used by Urquhart as his headquarters, is now the Airborne Museum. Many other memorials were built in Arnhem and Oosterbeek. An annual parade is held in the area. A memorial near the museum reads:
To the People of Gelderland; 50 years ago British and Polish Airborne soldiers fought here against overwhelming odds to open the way into Germany and bring the war to an early end. Instead we brought death and destruction for which you have never blamed us. This stone marks our admiration for your great courage remembering especially the women who tended our wounded. In the long winter that followed your families risked death by hiding Allied soldiers and Airmen while members of the resistance led many to safety.
Images for kids
-
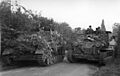
German self-propelled guns of the 9th SS Panzer Division during the battle.
-
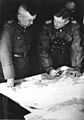
Walter Model and Heinz Harmel.
-
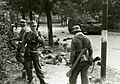
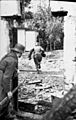
German soldiers search for equipment left behind during the fighting on September 17.
-
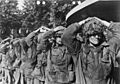
British prisoners-of-war.
-

A German 20 mm anti-aircraft gun awaits the arrival of supply aircraft during the battle.
-
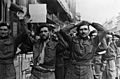
British prisoners at Arnhem Bridge.
-
German forces in Oosterbeek.
-
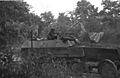
A 9th SS Sd.Kfz. 250 half-track in action at Oosterbeek.
See also
- Arnhem Oosterbeek War Cemetery
- Evacuation of Arnhem, the evacuation of civilians from Arnhem by German forces on 24 and 25 September 1944, lasting until April 1945
- Operation Fustian, 1st Parachute Brigade's previous airborne operation during the Invasion of Sicily.
- Operation Ladbroke, 1st Airlanding Brigade's operation during the Invasion of Sicily.
- Operation Pegasus, the escape of several Arnhem survivors a month after the battle.
- Second Battle of Arnhem, the April 1945 liberation of the city.
- William of Orange (pigeon)
