
Operation Market Garden facts for kids
Quick facts for kids Operation Market Garden |
|||||||||
|---|---|---|---|---|---|---|---|---|---|
| Part of the Allied advance from Paris to the Rhine on the Western Front during the Second World War | |||||||||
 Paratroopers of the First Allied Airborne Army descending over the Netherlands |
|||||||||
|
|||||||||
| Belligerents | |||||||||
| Commanders and leaders | |||||||||
|
|
||||||||
| Units involved | |||||||||
| Strength | |||||||||
|
100,000 | ||||||||
| Casualties and losses | |||||||||
| 15,326–17,200 killed, wounded, and captured 88 tanks destroyed 377 aircraft and gliders lost |
6,315–13,300 killed and wounded Unknown total captured |
||||||||

Operation Market Garden was a huge military plan by the Allied forces during World War II. It took place in the German-controlled Netherlands from September 17 to 27, 1944. The main goal was to create a path 64 mi (103 km) deep into German territory. This would allow the Allies to cross the Nederrijn (Lower Rhine River) and invade northern Germany.
The plan had two parts: "Market" and "Garden." "Market" involved airborne forces (paratroopers and glider troops) capturing nine key bridges. "Garden" was for British ground forces to quickly follow over these bridges. British General Bernard Montgomery came up with this bold plan.
The "Market" part was carried out by the First Allied Airborne Army, with over 41,000 soldiers. They were dropped from planes to seize bridges and hold the land. The "Garden" part was led by XXX Corps of the British Second Army. This force had ten armored and motorized brigades, with a similar number of soldiers. They were supposed to cover 103 km (64 mi) to the Rhine bridge in just 48 hours. About 100,000 German soldiers were in the area, ready to fight back. This was the largest airborne operation of the war at that time.
The operation successfully captured the Dutch cities of Eindhoven and Nijmegen, along with many smaller towns. They also took over some V-2 rocket launch sites. However, the most important goal was not met: securing the bridge over the Rhine at Arnhem. German forces managed to slow down and stop the Allied ground troops before they reached the Rhine. The British First Airborne Division, which was supposed to hold the Arnhem bridge, suffered heavy losses and had to retreat. Out of 12,000 men, about 8,000 were killed, went missing, or were captured. Many historians have since criticized how Operation Market Garden was planned and carried out.
After the battle, the Germans punished the people of the Netherlands by stopping food shipments. This led to a terrible famine, known as the "Hunger Winter," where over 20,000 Dutch civilians died. Arnhem was finally captured by the Allies in April 1945, near the end of the war.
Contents
- Geography of the Battle
- Background to the Operation
- The Battle Begins
- Casualties of the Battle
- Honours and Awards
- Aftermath of the Battle
- Remembering the Battle
- Images for kids
Geography of the Battle
The main road for the Allied advance, called Highway 69 (later nicknamed "Hell's Highway"), was a narrow, two-lane road. It was often raised above flat, watery land called polder or floodplain. The ground on either side was often too soft for military vehicles. There were also many dikes and drainage ditches. Trees and bushes along the dikes and roads made it hard to see far, especially in early autumn.
Six major water obstacles lay between the starting point of XXX Corps and the Rhine River. These included canals and rivers like the Wilhelmina Canal at Son en Breugel (100 feet (30 m) wide) and the Waal River at Nijmegen (850 feet (260 m) wide). The biggest challenge was the Rhine at Arnhem, which was 300 feet (90 m) wide. The plan was for airborne forces to capture bridges over all these obstacles almost at the same time. If any bridge was destroyed, XXX Corps had engineers ready to build new ones.
Even though the area was mostly flat, there were two important hill areas, about 300 feet (90 m) high. One was northwest of Arnhem, and the other was the Groesbeek ridge, in the 82nd Airborne Division's area. Capturing and defending these higher grounds was very important for controlling the highway bridges.
Background to the Operation
In August 1944, after the Allies broke out of Normandy, they chased the retreating German army across France and Belgium. On September 1, General Dwight D. Eisenhower took charge of all ground forces. British General Montgomery, who had been in command, was not happy with this change.
Supply Challenges
By late August, the Allied armies were running low on fuel and other supplies. Many divisions had to stop their advance to get more. Most supplies came from Normandy, hundreds of kilometers away, by truck. A big problem was that the Allies needed a large port closer to the front lines. On September 4, Montgomery's troops captured the huge port of Antwerp in the Netherlands almost undamaged. However, the Scheldt Estuary, which led to the port, was still controlled by the Germans. Neither Eisenhower nor Montgomery made clearing the Scheldt a top priority at first. This delay meant Antwerp could not be used until November 28, after a tough battle. Many historians call this delay "one of the greatest tactical mistakes of the war."
Allied Strategy
Eisenhower preferred a "broad front strategy," where Allied armies advanced side-by-side into Germany. Montgomery, however, wanted a "single powerful thrust" into Germany, led by his British forces. He believed this would end the war quickly. General George S. Patton, an American commander, also wanted a single thrust, but he wanted to lead it. War planners thought both ideas were too difficult to supply.
Montgomery then suggested a smaller airborne operation called Operation Comet. This plan involved British and Polish airborne forces capturing several bridges on the way to the Rhine. But bad weather and growing German resistance led him to cancel it.
Montgomery then proposed Market Garden. This more ambitious plan aimed to go around the German defenses, known as the Siegfried Line, by crossing the Rhine River in the north. This would open a path to Germany's industrial heartland, the Ruhr. Another reason for the plan was to stop German V-2 rockets, which were being launched from the Netherlands towards London.
Eisenhower eventually agreed to Market Garden, giving it "limited priority" for supplies. He also wanted to use the First Allied Airborne Army, which had been waiting in England.
The Plan: Market and Garden
The plan had two main parts:
- Market: Airborne forces, led by Lieutenant General Lewis H. Brereton, would capture bridges and key areas.
- Garden: Ground forces, mainly XXX Corps led by Lieutenant-General Brian Horrocks, would quickly advance along the captured route.
Market: Airborne Assault
The "Market" part involved four of the six divisions of the First Allied Airborne Army.
- The U.S. 101st Airborne Division would drop near Eindhoven to take bridges at Son and Veghel.
- The 82nd Airborne Division would drop northeast of them to capture bridges at Grave and Nijmegen.
- The British 1st Airborne Division, with the Polish 1st Independent Parachute Brigade, would drop furthest north to capture the road bridge at Arnhem and the rail bridge at Oosterbeek.
This would be the largest airborne operation ever, with over 34,600 soldiers dropped by parachute or glider. Gliders also brought in vehicles, artillery, and supplies. The Allies had many transport planes and gliders for this massive operation.
However, the large number of troops meant they couldn't all be dropped at once. The plan called for lifts over several days. Also, the operation had to be done in daylight because of rules about night drops. This meant more risk from German anti-aircraft guns.
Garden: Ground Advance
The "Garden" part was led by XXX Corps, with the Guards Armoured Division leading the way. They were expected to reach the 101st Airborne's area on the first day, the 82nd's by the second day, and the 1st Airborne's by the fourth day. After that, the airborne divisions would join XXX Corps to break out from the Arnhem area.
Allies believed German resistance would be weak because their army seemed to be falling apart. They thought XXX Corps would face little opposition on Highway 69.
German Preparations
The German army had suffered huge losses in July and August. However, by early September, the situation began to change. About 65,000 German soldiers were moved from other areas to the Netherlands.
Adolf Hitler became personally involved. He brought back General Gerd von Rundstedt to command the German forces in the West. General Walter Model took command of Army Group B, which included forces in the Netherlands. Model immediately started planning a defense. He requested many more divisions and tanks.

Crucially, the II SS Panzer Corps, with the 9th and 10th SS Panzer Divisions, arrived in the area. These divisions had been badly damaged in earlier fighting but were ordered to rest and refit in "safe" areas, which happened to be around Eindhoven and Arnhem. This meant that strong German armored units were accidentally placed right in the path of the Allied airborne landings.
Intelligence Information
German Intelligence
German commanders suspected a big Allied attack was coming. They believed the British Second Army would attack towards Nijmegen, Arnhem, and Wesel, aiming for Germany's industrial area. They also thought airborne troops would be used but weren't sure exactly where.
Allied Intelligence
Allied commanders received reports about German troop movements, including the presence of the 9th and 10th SS Panzer Divisions near Nijmegen and Arnhem. This worried Eisenhower, but Montgomery dismissed these concerns. Aerial photos of Arnhem also showed tanks in the area.
A British intelligence officer, Major Brian Urquhart, warned his commander, General Browning, about the tanks at Arnhem. But Browning didn't believe him and sent Urquhart away, saying he was under "nervous strain."
It turned out that the 9th and 10th SS Panzer Divisions didn't have many tanks at first. However, General Wilhelm Bittrich, their commander, quickly ordered all available armored vehicles to Arnhem once the battle started. This quick reaction by a high-ranking German officer led to many German tanks and armored vehicles appearing at Arnhem, which was a big surprise for the Allies.
The Battle Begins
Day 1: Sunday, September 17, 1944


Operation Market Garden started well for the Allies. Most airborne troops landed exactly where they were supposed to. Losses from German aircraft and anti-aircraft fire were light. By the end of the first day, all water crossings were either captured or blocked for the Germans, except for the large Nijmegen bridge.
In the south, the 101st Airborne Division faced little resistance. They captured four of their five assigned bridges. The bridge at Son was blown up by the Germans as the Allies approached. Later, the 101st met the lead units of XXX Corps, the ground forces.

To their north, the 82nd Airborne Division secured the bridge near Grave. They also captured a vital bridge over the Maas-Waal canal. However, the 82nd focused on taking the Groesbeek Heights, a high ground area, instead of immediately attacking the Nijmegen bridge. This was to prevent German attacks from a nearby forest and to stop German artillery from using the heights for observation.
The 508th Parachute Infantry Regiment was supposed to capture the Nijmegen highway bridge. But due to miscommunication and delays, they didn't attack until late in the day. By then, German SS units had arrived to defend the bridge. The attack failed, leaving the Nijmegen bridge in German hands. This was a critical failure, as the Nijmegen and Arnhem bridges were too big to be easily replaced by engineers. If either wasn't captured, the entire operation would fail.
British Landings at Arnhem

The British 1st Airborne Division landed without major issues. However, only half the division arrived in the first wave. The other half had to defend the landing zones for the next day's arrivals. This meant less than half a brigade had to attack the Arnhem bridge.
The Reconnaissance Squadron, meant to race to the bridge in jeeps, was stopped by German defenses. Five hours after the landing, a German SS Panzer Division reconnaissance battalion was able to cross the Arnhem bridge and head to Nijmegen. No British airborne unit was at the bridge to stop them.
Two of the three battalions of the 1st Parachute Brigade were slowed by small German units. Only Lieutenant-Colonel John Frost's 2nd Parachute Battalion reached the bridge that evening and set up defenses at the north end. They were joined by a small part of Brigade HQ. The other battalions were stuck in skirmishes and made little progress.
Communication Problems
Communication between the British units was very poor. Radios often didn't work, or were set to wrong frequencies. This meant units couldn't talk to each other, while German defenses were getting stronger. The only way to call for air support was through two special American units, but their radios also failed. This lack of communication severely hampered the British efforts.
XXX Corps Advances

On September 17, XXX Corps began its ground attack. Three hundred artillery guns fired a rolling barrage, supported by RAF planes. The advance was led by tanks and infantry of the Irish Guards. They faced German anti-tank guns and infantry but quickly pushed them back. By nightfall, they reached Valkenswaard.
However, the advance was slower than expected. Horrocks had hoped to reach Eindhoven in two to three hours, but they only covered about half the distance. Engineers worked through the night to build a bridge over a stream.
German Reactions

German commanders quickly understood the Allied plan. General Model, who was staying near Arnhem, immediately organized a defense. He sent a reconnaissance company of the 9th SS Panzer Division to Nijmegen to reinforce the bridge. The element of surprise for the Allies was lost at Arnhem.
Day 2: Monday, September 18
Fog delayed the second wave of Allied airborne landings. Bad weather continued to affect supply drops and air support for days.
Arnhem Area

The British 1st and 3rd Parachute Battalions tried to push towards the Arnhem bridge but were slowed by German units. The German 9th SS Reconnaissance Battalion, which had gone to Nijmegen, returned to Arnhem. It tried to cross the bridge by force but was heavily defeated by the British defenders.
By the end of the day, only about 200 men from the 1st and 3rd Battalions reached Arnhem, a fraction of their original strength. The second wave of British troops arrived, but they landed in an area already under heavy German attack.
Nijmegen Area
German forces continued to press the 82nd Airborne Division on the Groesbeek Heights. German counterattacks briefly captured one of the Allied landing zones, but the 508th Parachute Infantry Regiment quickly retook it. The second wave of airborne troops arrived, bringing in artillery and medical support.
Eindhoven-Veghel Area

The 101st Airborne Division, in the south, faced German counterattacks. British tanks helped push the Germans back. The Son bridge, which the Germans had blown up, was quickly replaced by a Bailey bridge built by XXX Corps engineers. During the night, German bombers attacked Eindhoven, causing many civilian casualties and damaging the city. Allied soldiers helped rescue civilians.
Day 3: Tuesday, September 19
Arnhem Bridge Defenders
At Arnhem, the 1st Parachute Brigade tried to attack the bridge again before dawn. But as it got light, they were spotted and stopped by strong German defenses. Trapped in open ground, the 1st Battalion was destroyed. The 2nd South Staffordshires were also cut off. The remaining 500 men from these battalions had to retreat west towards Oosterbeek.

Lieutenant-Colonel Frost's 2nd Battalion, about 600 men, still held the northern approach to the Arnhem bridge. They were constantly shelled by German tanks and artillery. The Germans systematically destroyed buildings to get closer to the British. Despite being heavily outnumbered, the British held their positions.
Oosterbeek Pocket

The remaining British 1st Airborne Division soldiers tried to pull back into a defensive area (a "pocket") at Oosterbeek. They hoped to hold a small area on the north bank of the Rhine until XXX Corps arrived. The 4th Parachute Brigade tried to break through German lines to help, but communication problems and strong German resistance caused the attack to fail with heavy losses.
Later, 35 gliders carrying part of the 1st Polish Independent Parachute Brigade arrived. They landed in an area still controlled by the Germans, suffering heavy losses. The rest of the Polish paratroopers were delayed by fog.
Nijmegen Bridge Battle

The 504th Parachute Infantry Regiment of the 82nd Airborne met the Grenadier Guards of XXX Corps near Grave. This allowed the 504th to focus on other missions. XXX Corps was now only eight miles (13 km) from Arnhem.
The attack on the Nijmegen bridge continued. A plan was made for the 3rd Battalion, 504th Parachute Infantry Regiment, to cross the Waal River in boats and attack the north end of the bridge. The boats, which were canvas folding boats from British stores, arrived late in the afternoon. A daylight river crossing was ordered.
Around 3:00 PM, the 504th PIR began the dangerous river assault. Soldiers rowed across the Waal in 26 boats, using rifle butts as paddles because of a paddle shortage. Despite heavy German fire, about half the boats made it across. This costly attack was later called "Little Omaha." The paratroopers then fought their way to the north end of the bridge. As German forces pulled back, tanks of the Irish Guards crossed the bridge from the south. The Irish Guards linked up with the 504th PIR north of the bridge.
The delay in capturing the Nijmegen bridge allowed the Germans to reinforce their defenses between Nijmegen and Arnhem.
Day 4: Wednesday, September 20
Arnhem Bridge Falls

Frost's force at the Arnhem bridge continued to hold out. They learned that the rest of their division could not relieve them and that XXX Corps was still stuck at Nijmegen. By afternoon, the British positions at the bridge were very weak. They had many wounded and were running out of ammunition. German tanks were able to destroy British positions from close range.
A two-hour truce was arranged to evacuate the wounded, including Lieutenant-Colonel Frost. The remaining British troops continued to fight, but by early Thursday morning, almost all had been captured. The last radio message from the bridge was "Out of ammo, God save the King."
The 740 British soldiers at Arnhem bridge held out for four days, twice as long as expected, against much stronger German forces. The bridge was later renamed the "John Frost Bridge" in his honor.
Oosterbeek Last Stand

Further west, the remaining 1st Airborne Division survivors gathered in Oosterbeek. Their position was heavily attacked. In the southeast, a group called Lonsdale Force fought off a big German attack. In the north, the 7th King's Own Scottish Borderers were almost overrun but fought back. The most serious attack was against "B" Company, 1st Battalion, Border Regiment, which controlled high ground overlooking the Heveadorp ferry crossing, their only way to get reinforcements. They lost this vital position. The division was left controlling only 700 metres (770 yards) of the riverbank.
A supply drop by RAF planes was attacked by German fighter planes, and 15 planes were shot down.
Polish Reinforcements Arrive
After two days of delays due to weather, the rest of the Polish 1st Independent Parachute Brigade arrived. They were dropped under heavy German fire near Driel, south of the Rhine, opposite the British 1st Airborne Division. Their commander, General Stanisław Sosabowski, was parachuted in. They found the ferry missing and the opposite bank controlled by Germans. The Polish brigade suffered 590 casualties. Several attempts to cross the Rhine to help the British failed due to heavy German fire.
Nijmegen Advance Stalls
Despite capturing the Nijmegen bridge, the five tanks of the Guards Armoured Division that crossed did not advance further that night. It was dark, one tank was hit, and they faced hidden German anti-tank guns. The overall situation was chaotic. The division resumed its advance 18 hours later, at noon the next day.
The delay allowed the Germans to reinforce their defenses between Nijmegen and Arnhem. The Guards' advance was soon stopped by a strong German line. The 43rd Division was ordered to take the lead and try to link up with the Polish troops at Driel. However, the 43rd Division was 16 km (9.9 mi) away and stuck in traffic. It took another day for them to cross the Waal River and advance.
Day 5: Thursday, September 21
Oosterbeek Under Siege

The 3,584 survivors of the 1st Airborne Division held their ground in Oosterbeek. They were constantly attacked by German artillery, mortars, and tanks. The British anti-tank guns caused the Germans to be careful. The British were outnumbered 4 to 1.
The Polish 1st Parachute Brigade at Driel, though unable to cross the Rhine, forced the Germans to move troops away from Oosterbeek to fight them. This gave the British a small break.
Link-up with Poles and XXX Corps
Leading units of the British 43rd Division tried to advance to Driel. They arrived in Driel that evening. British and Polish engineers tried to improvise a crossing of the Rhine using small boats, but it was difficult under enemy fire. Only 52 Polish soldiers made it across before dawn.
German counterattacks continued along the highway. One group managed to cut the highway between Veghel and Grave, stopping any further Allied advance to Arnhem.
Day 6: Friday, September 22 ("Black Friday")
The Germans heavily shelled the airborne positions in Oosterbeek. Attacks were limited to specific points. The British 43rd Wessex Division took over from the Guards Armoured Division. They captured Oosterhout and later Opheusden and Dodewaard.
The fog lifted, allowing the 43rd Division to advance to Driel. They faced German fire but reached Driel in the evening. An unsuccessful attempt was made that night to get more Polish troops across the river. Only 52 soldiers made it across due to heavy fire and strong currents.
The Germans cut the highway again between Veghel and Grave. XXX Corps had to send a unit back 19 km (12 mi) to retake the road.
Day 7: Saturday, September 23
The Germans tried to cut off the British in Oosterbeek from the riverside, but the British held on. The Germans also attacked the Poles on the south side of the river. More tanks from XXX Corps arrived and helped defeat the German attack. Canadian army boats and engineers arrived, and another river crossing that night landed 150 Polish troops on the north bank of the Rhine.
The highway was still cut in the south, but XXX Corps eventually cleared it.
Day 8: Sunday, September 24
Another German force cut the road south of Veghel. At this point, the main goal of Operation Market Garden – crossing the Rhine – was abandoned. The Allies decided to go on the defensive, setting up a new front line at Nijmegen.
An attempt was made to reinforce the 1st Airborne Division with the 4th Battalion, The Dorsetshire Regiment. Two companies crossed the river, but they landed among German positions. Only 75 of 315 men reached Oosterbeek; the rest were captured. Because of this failure, it was decided to withdraw the 1st Airborne Division from the north side of the Rhine.
Day 9: Monday, September 25
At dawn, the 1st Airborne Division received orders to withdraw across the Rhine in an operation called Operation Berlin. This had to be done at night. During the day, the Germans launched a strong attack in the eastern sector, almost breaking through the British lines. But a heavy bombardment from XXX Corps artillery stopped them.
The 1st Airborne Division began its withdrawal at 10:00 PM. British and Canadian engineers ferried the troops across the Rhine, covered by the Polish 3rd Parachute Battalion. By early morning, 2,398 survivors had been evacuated. About 300 men were left behind and surrendered. Out of about 10,600 men who fought north of the Rhine, 1,485 died and 6,414 were captured.
To the south, the 50th (Northumbrian) Infantry Division attacked the Germans holding the highway and secured it.
Casualties of the Battle
XXX Corps had fewer than 1,500 casualties. The 1st Airborne Division suffered much more, with 8,000 casualties. The 101st Airborne Division also had many casualties because they fought not only local German defenders but also German troops retreating from the XXX Corps advance.
| Casualties | Total | Grand Total |
|---|---|---|
| Dutch civilians | 500 | 500 |
| Second Army and I Airborne Corps |
11,784–13,226 | 15,326–17,200 |
| XVIII Airborne Corps | 3,542– 3,974 |
German casualties are harder to know exactly, but estimates range from 6,400 to 13,300 killed and wounded.
Honours and Awards
Victoria Cross
Five Victoria Crosses, Britain's highest military award for bravery, were given during Operation Market Garden.
- On September 19, Flight Lieutenant David Samuel Anthony Lord received a posthumous VC (meaning after his death). He was a pilot who flew a supply plane to Arnhem, even after it was hit by enemy fire. He made two passes to drop supplies before his plane exploded.
- From September 17 to 20, John Hollington Grayburn of the 2nd Parachute Battalion showed amazing courage and leadership while defending the Arnhem bridge. He was awarded a posthumous VC.
- Also on September 19, Captain Lionel Queripel of the 10th Parachute Battalion, though injured, stayed behind as a lone rear guard to protect his men. He received a posthumous VC.
- On September 20, Lance Sergeant John Baskeyfield of the 2nd Battalion, South Staffordshire Regiment, showed incredible bravery while fighting. He was awarded a posthumous VC.
- On September 25, Major Robert Henry Cain, also of the 2nd Battalion, South Staffordshire Regiment, showed superb courage and leadership. He was the only Victoria Cross recipient to survive the battle.
Medal of Honor
Two American soldiers received the Medal of Honor, the highest U.S. military award, both posthumously.
- On September 19, Private First Class Joe E. Mann of the 101st Airborne Division, though injured, threw himself on a German grenade to save his comrades.
- On September 21, Private John R. Towle of the 82nd Airborne Division, rushed through enemy fire to attack a German vehicle, saving many lives.
Military Order of William
The Military Order of William is the highest Dutch military award.
- On October 8, 1945, the U.S. 82nd Airborne Division received this honor from Queen Wilhelmina for their bravery at Nijmegen.
- On May 31, 2006, Queen Beatrix awarded the same honor to the Polish 1st Independent Parachute Brigade.
Aftermath of the Battle
German Counter-attack
After the Allies failed to secure the Arnhem bridge, the Germans tried to retake the Nijmegen area. The II SS Panzer Korps launched a counter-offensive. British and American forces, supported by artillery, held their ground. By October 3, the Germans were pushed back, suffering heavy losses.
The Germans made one last effort against the American 101st Airborne Division, but they were also defeated. On October 7, the Arnhem bridge was finally bombed and destroyed by Allied planes to prevent the Germans from using it.
Debate on the Outcome
Operation Market Garden remains a debated battle. Many historians and military leaders have discussed why it failed.
Optimistic Planning
One controversial point was the need for all main bridges to be captured. The terrain was also not ideal for the ground forces. The decision to drop the 82nd Airborne several kilometers from the Nijmegen Bridge, focusing on the Groesbeek Heights first, caused a delay in capturing the bridge. This gave the Germans crucial time to set up defenses.
At Arnhem, the landing zones were chosen far from the bridge due to concerns about German anti-aircraft fire. This meant British troops had a long march to their objective, giving the Germans more time to react.
Weather Problems
The plan relied heavily on good weather for air drops. But bad weather, especially fog, caused many delays. This meant airborne divisions were without their artillery or full strength for days, weakening their fighting power.
Missed Opportunities
Some argue that the Allies missed opportunities. For example, if the planners had known about a ferry at Driel, the British might have focused on securing that instead of the Arnhem bridge. Also, after the Nijmegen bridge was captured, XXX Corps did not push forward immediately, giving the Germans more time to reinforce.
The commander of the Glider Pilot Regiment had suggested a small force land very close to the Arnhem bridge to capture it quickly, but this was not allowed. The Polish commander, Sosabowski, was willing to try a dangerous drop through fog to help, but he was refused.
Intelligence Failures
British forces at Arnhem did not use local Dutch resistance members. This was because Britain's spy network in the Netherlands had been compromised earlier in the war. However, American units did use Dutch help. Knowledge of the Driel ferry or the Dutch underground's secret telephone network could have greatly helped the Allies, especially when their radios failed.
Consequences in the Netherlands

A tragic result of the operation's failure was the Dutch famine of 1944–45, also known as the 'Hunger Winter'. Dutch railway workers went on strike to help the Allies. In revenge, Germany stopped all food transportation to the Netherlands. In the following winter, over twenty thousand Dutch civilians died from starvation.
After Market Garden, Allied forces continued fighting in the Netherlands. They secured the port of Antwerp and cleared the Scheldt Estuary in the Battle of the Scheldt. In February 1945, Allied forces advanced into Germany from the Groesbeek heights, which had been captured during Market Garden. They crossed the Rhine in March. Arnhem was finally liberated by Canadian forces on April 14, 1945.
Remembering the Battle
Memorials and Remembrance


The original Arnhem bridge was destroyed during the war. A new bridge, similar in appearance, was built in 1948 and renamed the John Frost Bridge in 1977.
Many monuments exist in the Netherlands to remember Operation Market Garden. A memorial near Arnhem thanks the people of Gelderland for their courage and help. Several museums, like the Freedom Museum and the Airborne Museum Hartenstein, are dedicated to the operation. Each year, a commemorative walk takes place in Oosterbeek.
In 1994, veterans of the 101st Airborne unveiled a "Monument for the Dutch" in Sint-Oedenrode, thanking civilians for their courage and friendship. The "Airborne trail," a 225-kilometre (140 mi) hiking path, follows the route of the liberating forces from Lommel to Arnhem.
In Film
- Theirs Is the Glory (1946) mixed original battle footage with reenactments filmed in Arnhem. Many actors were soldiers who fought in the battle.
- A Bridge Too Far (1977) is an epic war film based on the book by Cornelius Ryan. It covers the entire operation from all sides.
- The HBO miniseries Band of Brothers includes dramatizations of the 101st Airborne Division's actions during the battle.
- The 2021 film The Forgotten Battle shows parts of Operation Market Garden.
Images for kids
-
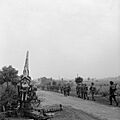
Infantry of 50th (Northumbrian) Division moving up past a knocked-out German 88mm gun near 'Joe's Bridge' over the Meuse-Escaut Canal in Belgium, 16 September 1944
-
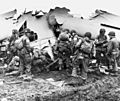
101st Airborne Paratroopers inspect a broken glider.
-
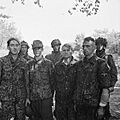
Four Waffen SS troopers taken prisoner, 18 September 1944.
-
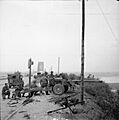
A British 17-pounder anti tank gun protects the road embankment on 'The Island', North of the Nijmegen road bridge - the allies managed to repel the German counter offensive from 30 September to 8 October
-
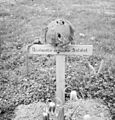
The grave of an unknown British soldier at Arnhem, photographed after its liberation 15 April 1945.
-
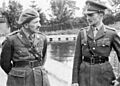
Gen. Sosabowski (left) with Gen. Browning.
-
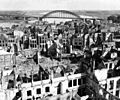
Nijmegen after the battle. 28 September 1944.
-
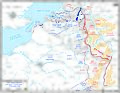
The front line in the Low Countries after Operation Market Garden


