
Battle of Broodseinde facts for kids
Quick facts for kids Battle of Broodseinde |
|||||||
|---|---|---|---|---|---|---|---|
| Part of the Third Battle of Ypres in the First World War | |||||||
 German artillery piece captured by the 45th Australian Battalion |
|||||||
|
|||||||
| Belligerents | |||||||
|
|||||||
| Commanders and leaders | |||||||
| Douglas Haig Herbert Plumer Hubert Gough |
Erich Ludendorff Crown Prince Rupprecht Sixt von Armin |
||||||
| Strength | |||||||
| 12 divisions | 10 divisions | ||||||
| Casualties and losses | |||||||
| Total: 20,000 Australian: 6,423 New Zealand: 1,853 |
35,000: 1–10 October, including 5,000 prisoners on 4 October | ||||||
The Battle of Broodseinde was a major fight during the First World War. It happened on 4 October 1917 near Ypres in Belgium. British armies, the Second and Fifth, fought against the German 4th Army. This battle was a big success for the Allies during the Third Battle of Ypres.
The British used a smart plan called bite-and-hold tactics. This meant they would capture a small area and then strongly defend it against German counter-attacks. This strategy worked very well. It caused big problems for the German commanders and made their soldiers lose hope. The Germans even started planning to pull back their troops from the Belgian coast.
Unfortunately, heavy rain started on 4 October and continued for the rest of the campaign. This made the muddy ground even worse. It helped the German defenders because they were pushed back to less damaged areas. The British had to move their big guns (artillery) through the muddy, shell-damaged land. This made it hard to move guns and ammunition, and easier for German artillery to hit them.
Contents
Why This Battle Was Important
New Ways of Fighting
The Battle of Broodseinde was the third major attack using the British bite-and-hold strategy. This strategy was developed by the Second Army, led by General Herbert Plumer. Heavy rains in August had made it hard for the British to advance. The battlefield was a plateau (a flat area of high ground) called Gheluvelt. This plateau was a big obstacle, stopping the Allies from moving forward.
The British brought more guns and soldiers to the Second Army. This forced the Germans to spread out their own artillery. Broodseinde followed two earlier successful battles: the Battle of the Menin Road Ridge (20 September) and the Battle of Polygon Wood (26 September). These battles had already captured much of the plateau. The Germans had tried to counter-attack many times, but they failed and lost many soldiers.
On 28 September, General Douglas Haig, the British commander, met with Plumer and General Hubert Gough (Fifth Army commander). Haig felt confident because of the recent victories and good weather. He believed the next attack would be the last of the small advances. After that, they could try a bigger push. He even thought the Germans might retreat from the Belgian coast.
However, Plumer and Gough thought it was too early for a big advance. They believed they needed to capture Passchendaele ridge first. This would take more attacks and time to fix the roads. Haig agreed they should prepare for a bigger advance, even if it wasn't certain yet.
Getting Ready for Battle
British Plans
The British had improved their tactics to deal with the German defenses. Instead of trying to push too far, they would capture a shallow area. Then, they would fight the main battle against German reserve troops (called Eingreif divisions) as they counter-attacked.
The British also changed how they used their infantry (foot soldiers). They made sure they had enough support to hold the captured ground against German counter-attacks. British divisions attacked on narrower fronts. Soldiers advanced about 1,500 yards (1,370 meters) into German lines. When the Germans counter-attacked, they faced strong British defenses and a lot of artillery fire. This caused them many casualties.
The Battle of the Menin Road Ridge on 20 September was the first attack using these new tactics. It had a three-week break for preparation. But the time between attacks became shorter after that. This meant less time for either side to prepare. The Germans had to take more risks to replace their tired soldiers.
To trick the Germans about the attack time, the British fired "practice" barrages (lots of artillery fire). These started on 27 September and increased daily. But the Germans still found out an attack was coming. The battle was almost called off because heavy rain started on 2 October. This turned parts of the ground into a muddy mess.
British intelligence also predicted that the Germans were planning a big counter-attack called "Operation Height Storm" for 4 October. This meant the British were ready for it.
The Attack Plan

The main goal was to capture Broodseinde Ridge and Gravenstafel Spur. This would secure the British southern flank (side) and allow future attacks on Passchendaele Ridge. The attack was originally set for 6 October. But Haig, worried about the weather, moved it up to 4 October.
Twelve divisions (large groups of soldiers) were involved in the attack. They spread out over a 14,000-yard (12,800-meter) front. The plan was for the I Anzac Corps (Australian and New Zealand soldiers) to be replaced. But they had fewer casualties than expected, so they stayed in the front line.
The attack involved several British corps (large military units). Each had specific areas to capture. For example, the I Anzac Corps aimed to advance about 1,200 to 1,900 yards (1,100 to 1,740 meters). The New Zealand Division aimed for 1,000 yards (914 meters). The first objective was just below the top of Broodseinde Ridge. The final objective was a bit further beyond.
The artillery plan was very detailed. A "creeping barrage" (a moving wall of artillery fire) would move forward just ahead of the advancing soldiers. This would keep the Germans pinned down. Machine guns would also fire to support the advance.
German Preparations

East of Ypres, the Germans had six lines of defense. These included the front line and several "Stellung" (positions) like Flandern I, II, and III. The villages of Zonnebeke and Passchendaele were between these lines. The British had already broken through some of these defenses.
On 29 September, German commander Ludendorff met with his officers. They told him their defense system was "completely broken." Ludendorff ordered more machine guns to the front lines. He also moved special "Stoß" (shock) regiments closer to the front. These were part of the Eingreif divisions, meant for quick counter-attacks.
The main Eingreif divisions were kept further back for bigger, planned counter-attacks. The Germans also planned to use more artillery fire on British positions. They wanted to trick the British into sending more soldiers to the front, where German artillery could hit them.
Between 26 September and 3 October, the Germans attacked and counter-attacked many times. On 1 October, they attacked Polygon Wood but failed. Their bigger counter-attack, "Operation High Storm," was planned for 3 October but was delayed to 4 October.
The Battle Begins
British Second Army Attacks
The British IX Corps attacked with two brigades. The right side faced heavy German fire but captured its first objective. However, German counter-attacks pushed them back. The left side was stopped by a strong German pillbox (a small concrete fort).
In X Corps, the 5th Division attacked. By chance, a German division was also about to attack and was caught by the British bombardment. The British advanced, but faced strong German resistance and counter-attacks. They captured some areas but had to give up others.
The 21st Division attacked at 6:00 a.m. The ground was very difficult, from marshy to hard. They faced heavy machine-gun fire but captured most of their objectives. This gave them a good view of the German positions.
The 7th Division advanced easily at first. They reached their objectives and formed a strong defensive line. This position helped protect the Australian and New Zealand soldiers further north.
The main attack came from the two Anzac Corps (Australian and New Zealand). At 5:30 a.m., a German artillery bombardment hit them, causing many casualties. But when the Australians advanced at 6:00 a.m., they met German soldiers in no-man's-land. These Germans were also advancing for their own attack!
The 1st Australian Division quickly defeated the Germans and pushed beyond their first line of defense. They captured German field guns and continued to their final objective. They fought off several German counter-attacks throughout the day.
The 2nd Australian Division also advanced at 6:00 a.m. They saw German troops rising from shell-holes. The Australians fired as they moved, destroying the first German wave. They overran the German soldiers, who were caught off guard. The Australians captured several field guns and reached their final objective east of Broodseinde village.
In the II Anzac Corps area, the 3rd Australian Division had trouble getting into position because of German flares. But their attack at 6:00 a.m. was successful. They quickly took German pillboxes and strongholds. By 7:20 a.m., they had reached their first objective. They continued to advance, capturing more machine-gun nests and reaching their final objective by 9:12 a.m.
The New Zealand Division attacked with two brigades. The German bombardment hit between their front and support lines. But when the New Zealand infantry advanced, they met the German soldiers who had been hit hard by the British artillery. The New Zealanders quickly defeated the remaining Germans. They found they could cross the muddy Hanebeek area more easily than expected. They captured several farms and pillboxes, reaching their final objective after advancing 1,000 yards (914 meters).
British Fifth Army Attacks
.jpg)
In the XVIII Corps area, the 48th (South Midland) Division attacked. They captured some positions but were slowed by machine-gun fire. They continued to advance but were eventually stopped by strong German fire.
The 11th (Northern) Division attacked with two brigades and ten tanks. They captured several strongpoints, including Gloster Farm, with the help of tanks. They entered Poelcappelle village and captured pillboxes beyond it. They reached their final objective and held off a German counter-attack.
The XIV Corps protected the northern side of the attack. The 4th Division attacked and captured Kangaroo Trench. They faced heavy machine-gun fire but continued to advance. A German counter-attack later in the day pushed them back, but British reinforcements drove them away.
The 29th Division attacked along the railway. They captured Chinese House and a farm. When the 4th Division was pushed back by a German counter-attack, the 29th Division helped by firing on the Germans from the side, allowing the 4th Division to regain its lost ground.
Air Support and German Response
Bad weather, including wind, rain, and low clouds, limited air operations. But British air observers still helped direct artillery fire. They spotted German positions and helped the ground troops.
The German "Operation High Storm" counter-attack was a disaster. Their troops were caught in the open by the British bombardment as they assembled. Many German soldiers were killed or captured. The German Eingreif divisions, meant for counter-attacks, suffered heavy losses. The Germans were left with only a small foothold on the Gheluvelt Plateau. Their defenses were severely weakened.
After the Battle
After the big success, some British commanders wanted to push further. But General Plumer decided against it. He knew the Germans had many fresh divisions behind the lines. He wanted to wait for the expected German counter-attacks to be defeated first. The ground was also very muddy, making it hard to move artillery forward for a new attack.
Battle Outcomes
Soldiers Lost
A German officer described the terrible conditions in the muddy, foggy area. The German official history recorded about 35,000 casualties (soldiers killed, wounded, or missing) for the period of 1–10 October. The British captured about 4,759 German prisoners on 4 October alone.
The British Second Army had about 12,256 casualties in the week ending 4 October. The New Zealanders lost 1,853 soldiers. The 21st Division had the highest losses in the Second Army, with 2,616 casualties.
What Happened Next
After the battle, the British continued to secure their gains. They raided German positions in the following days. British commanders were worried about the wet weather returning. They felt the Germans were close to collapsing.
The British had increased the speed of their attacks. This meant less time for artillery to prepare for new assaults. When the autumn rains began after 4 October, it made artillery support much harder. This affected later battles like the Battle of Poelcappelle and the First Battle of Passchendaele.
Brave Soldiers Honored
Nine Victoria Crosses, the highest military award for bravery, were given out for actions during the Battle of Broodseinde on 4 October:
- Acting Lieutenant-Colonel Philip Bent of the 7th Division (awarded for action on 1 October).
- Acting Sergeant-Major James Ockendon of the 29th Division.
- Acting Captain Clement Robertson of the Royal Tank Regiment.
- Sergeant Charles Coverdale, from the 11th (Northern) Division.
- Acting Corporal Fred Greaves of the 11th (Northern) Division.
- Private Arthur Hutt from the 48th (South Midland) Division.
- Sergeant Lewis McGee of the 3rd Australian Division.
- Lance-Corporal Walter Peeler, from the 3rd Australian Division.
- Acting Lieutenant Colonel Lewis Evans, of the 21st Division.
- Private Thomas Sage from the 37th Division.
Images for kids
-
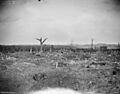
No man's land after the attack, looking towards the German front line.

