
Military history of Australia during World War I facts for kids

When World War I began in 1914, many people in Australia were very excited. Even before Britain declared war on Germany on 4 August 1914, Australia promised to help. It quickly started getting ready to send soldiers overseas.
The first place Australians fought was in German New Guinea. A group called the Australian Naval and Military Expeditionary Force (AN&MEF) was sent there in September 1914. They took control of German areas in the Pacific. At the same time, another group of 20,000 men, called the First Australian Imperial Force (AIF), was formed to fight overseas.
The AIF left Australia in November 1914 and went to Egypt. They first helped protect the Suez Canal. In early 1915, a plan was made to land troops on the Gallipoli peninsula. The goal was to open a new battlefront and control the Dardanelles waterway. Australian and New Zealand soldiers, known as the Australian and New Zealand Army Corps (ANZAC), landed on 25 April 1915. For eight months, the Anzacs and their allies fought a difficult and unsuccessful campaign against the Turks.
The soldiers left Gallipoli in December 1915 and returned to Egypt. The AIF then grew bigger. In early 1916, the infantry (foot soldiers) were sent to France. There, they fought in many big battles on the Western Front. Most of the light horse units stayed in the Middle East. They continued fighting the Turks in Egypt and Palestine. Some Australians also served in other parts of the war. While the main effort was on land, Australian air and naval forces also helped. Squadrons of the Australian Flying Corps flew in the Middle East and on the Western Front. Parts of the Royal Australian Navy operated in the Atlantic, North Sea, Adriatic, Black Sea, Pacific, and Indian Oceans.
By the end of the war, Australians felt very different. More than 60,000 Australian lives were lost, and many more soldiers were injured. The war also cost a lot of money. It greatly affected Australian society and politics. Conscription, which means forcing people to join the army, was a very big argument. Australia was one of only three countries fighting that did not force people to join the army for overseas fighting. For many Australians, the war and the Gallipoli campaign showed that Australia was becoming its own nation. Many ideas about Australian character and nationhood today come from this war. Anzac Day is now a national holiday.
Contents
- How the War Started
- Fighting in German New Guinea
- The First Australian Imperial Force (AIF)
- Gallipoli Campaign
- Egypt and Palestine Campaigns
- Western Front (France and Belgium)
- Other Places Australians Fought
- Australian Flying Corps (AFC)
- Royal Australian Navy (RAN) Operations
- Home Front (Australia)
- After the War
- Facts and Figures
- See also
- Images for kids
How the War Started


On 30 July 1914, the British government told Australia that war was likely. This was during the 1914 federal election, so politicians were busy campaigning. Prime Minister Joseph Cook said that if the British Empire was at war, Australia was at war too. Opposition Leader Andrew Fisher promised that Australians would stand by Britain "to our last man and our last shilling."
On 3 August, the Australian government decided to offer 20,000 men for an army. The United Kingdom declared war on 4 August. Australia and other Dominions (countries in the British Empire) were automatically at war. On 5 August, Prime Minister Cook announced the war. Most Australians had British backgrounds, so there was a lot of support. Many young men quickly joined the army.
Plans for the Australian army were made by Brigadier General William Throsby Bridges and Major Cyril Brudenell Bingham White. They suggested a force of 18,000 men. Prime Minister Cook increased this to 20,000. London accepted the offer on 6 August 1914. Recruiting offices opened on 10 August. By the end of 1914, 52,561 volunteers had joined. However, soldiers had to be very fit.
Fighting in German New Guinea

In 1884, Germany had taken control of the north-eastern part of New Guinea and some nearby islands. When the war started, Germany was using this colony as a wireless radio base. This base helped German warships that were attacking merchant ships in the area. Britain wanted these wireless stations destroyed.
On 6 August 1914, Britain asked Australia for help. The Australian Naval and Military Expeditionary Force (AN&MEF) was formed. Its goals were to capture German stations at Yap, Nauru, and Rabaul, New Britain. The AN&MEF included 1,023 infantry soldiers, 500 naval reservists, and 500 militia men from Queensland. Colonel William Holmes led these forces.
The force left Sydney on 19 August 1914. They reached Rabaul on 11 September 1914 and found no German forces in the port. Australian ships landed small groups of naval reservists at Kabakaul and Herbertshöhe. These groups were joined by more sailors and infantry.
A small group of 25 naval reservists went inland to capture the radio station at Bita Paka. German reservists and local police fought them. The Australians had to fight their way to the station. By nightfall, they reached the radio station, but it was empty. The Germans had left, but the equipment was still there. In the Battle of Bita Paka, six Australians were killed and five wounded. The defenders lost about 30 local police and one German soldier. Able Seaman W.G.V. Williams was the first Australian to die in the war.
On 12 September, the AN&MEF infantry landed at Rabaul. The next day, a ceremony was held to show that Britain now controlled New Britain. The German leaders had moved inland to Toma. An Australian ship fired shells near Toma, and soldiers advanced. This show of force led to talks, and the Germans surrendered on 17 September 1914.
The operation was successful, but it had some problems. The Australians were delayed by a small, less-trained force. However, the Australians fought well in the difficult jungle. The AN&MEF had light losses compared to later battles, but they were still significant. The Australian submarine HMAS AE1 also disappeared on 14 September with 35 men.
After capturing the German areas, the AN&MEF stayed to keep control. On 9 January 1915, Colonel Holmes handed over command to Brigadier General Sir Samuel Pethebridge. Holmes returned to Australia and joined the AIF. Most of his men did too. They were replaced by the 3rd Battalion, called the "Tropical Force."
The First Australian Imperial Force (AIF)

When the war started, Australia's army was mainly for local defense. Australian law said that conscripted soldiers (those forced to join) could not be sent overseas. So, a new army of volunteers was needed. This army was called the Australian Imperial Force (AIF).
The AIF started forming soon after the war began. It was the idea of Bridges and White. At first, the AIF had one infantry division (a large group of soldiers) and one light horse brigade (mounted soldiers). The 1st Division had three infantry brigades, led by Colonel Henry MacLaurin, Colonel James Whiteside McCay, and Colonel Ewen Sinclair-Maclagan. The 1st Light Horse Brigade was led by Colonel Harry Chauvel.
In the beginning, AIF soldiers were chosen very carefully. About 30 percent of men who applied were rejected for health reasons. They had to be between 18 and 35 years old, at least five feet six inches tall (168 cm), and have a chest of at least 34 inches (86 cm). Later in the war, these rules became less strict as more soldiers were needed. Many of the first volunteers died. Out of 32,000 original soldiers, only 7,000 survived the entire war.
More soldiers volunteered quickly. In September 1914, it was decided to create more brigades. The AIF continued to grow during the war. It eventually had five infantry divisions, two mounted divisions, and other units. A sixth infantry division was partly formed in the United Kingdom in February 1917. But it was later broken up to send soldiers to other divisions that had lost many men.
Gallipoli Campaign
Getting Ready

The 1st Division left Australia from Albany, Western Australia on 1 November 1914. They traveled in a group of 10 ships, protected by British, Australian, and Japanese warships. They were heading for British-controlled Egypt. The trip was delayed because of fears of German warships. These fears were right when the German cruiser Emden was seen near Cocos Island. The Australian cruiser HMAS Sydney fought the Emden and won in just 25 minutes.
With the German threat gone, the ships continued safely. They arrived in Egypt in November. The 1st Division went to Camp Mena, near Cairo. They helped defend the Suez Canal against Turkey, which had joined the war. The Australians also trained for fighting on the Western Front. It was still expected that they would go to England and then to Europe. While waiting, Australian and New Zealand forces in Egypt formed the Australian and New Zealand Army Corps (ANZAC). British Lieutenant General William Birdwood commanded them.
There were too many soldiers and not enough equipment in England. So, the Anzacs stayed in Egypt during the European winter. They trained more, but this training was very basic. It did not fully prepare them for the tough fighting ahead.

Meanwhile, plans were made to send the Australians and New Zealanders elsewhere. In November, Winston Churchill suggested a naval attack on the Dardanelles. In January 1915, the British government approved a plan to attack and invade the Gallipoli peninsula. Australian and New Zealand troops would be part of this. They were fewer in number than the British, Indian, and French soldiers. The goal was to open a new front against the Central Powers and allow ships to reach Russia through the Black Sea.
After the naval attacks failed, ground forces were needed. They would destroy Turkish artillery and clear mines for bigger ships. Lord Kitchener appointed Sir Ian Hamilton to lead the forces. These included Birdwood's ANZAC, British, and French troops.
Landing at Anzac Cove

The plan was for British troops to land at Cape Helles and attack forts. The Anzacs were to land north of Gaba Tepe. From there, they would cross the peninsula and stop Turkish reinforcements. The Anzac attack force landed just before dawn on 25 April 1915. They were supposed to land about a mile north of Gaba Tepe. But because of a navigation mistake or currents, they landed about a mile and a half further north. This was a small, unnamed cove between Ari Burnu and Hell Spit. Since 1985, it has been called Anzac Koyu (Anzac Cove).
The Anzacs faced a difficult landscape of steep hills and valleys. The landing was lightly opposed at first. But Mustafa Kemal, a Turkish commander, quickly sent reinforcements. It became a race for the high ground. The fight for the hills happened on the second ridge line, at a spot called Baby 700. This position changed hands several times on the first day. But the Turks, having higher ground, finally took it. Once the Anzac advance stopped, the Turks counter-attacked. They tried to push the invaders back to the sea but failed. A trench line quickly formed, leading to a bloody stalemate until August.
Battles in May and Turkish Counter-Attack
In May 1915, the British commander decided to focus his forces at Cape Helles. The Australian 2nd Infantry Brigade and the New Zealand Infantry Brigade moved there. During the Second Battle of Krithia, these two brigades lost 1,827 soldiers. This happened during a risky daylight attack over open ground. In May, Turkish snipers were very active. On 15 May, Major General Bridges was fatally wounded by a sniper. His body was sent back to Australia. Major General James Gordon Legge replaced him.
On 19 May 1915, the Turks launched a big attack against the Anzac lines. Naval planes had warned the Anzacs, so they were ready. The 2nd and New Zealand Infantry Brigades had returned, and more light horse units arrived. Along most of the line, the Turkish attack failed badly. Anzac rifle and machine gun fire stopped them. At Courtney's Post, a very exposed part of the line, Turks entered the trenches. But Lance Corporal Albert Jacka and others drove them out. For his bravery, Jacka became the first Australian to win the Victoria Cross in the war.
August Offensive

The Allies kept failing to capture Krithia. So, Hamilton planned a new attack. On the night of 6 August, fresh troops would land at Suvla, about 5 miles (8 km) north of Anzac. At Anzac, a strong attack would be made on the Sari Bair range. This would break through a weakly defended area. Diversionary attacks happened on 6 August. At Helles, the attack became another costly battle with no gains. At Anzac, an attack on the Turkish trenches at Lone Pine by Australian infantry was a rare victory. It cost over 2,000 Australian lives but caused 7,000 Turkish casualties. This attack successfully drew in Turkish reserve troops.
The main attack aimed at the peaks of Chunuk Bair and Hill 971 was less successful. New Zealand infantry attacked Chunuk Bair. They got within 500 meters of the peak by dawn on 7 August but couldn't take it until the next morning. This delay had bad results for another attack on 7 August. The 3rd Light Horse Brigade attacked the Nek. This attack was supposed to happen when the New Zealanders attacked the Turkish defenses from behind. The New Zealanders held Chunuk Bair for two days. Then, two British battalions took over. But a huge Turkish counter-attack, led by Mustafa Kemal, pushed these battalions off the heights.
Meanwhile, the landing at Suvla Bay faced little resistance. But the British commander, Lieutenant General Sir Frederick Stopford, was too cautious. Only the beach was captured. Again, the Turks won the race for the high ground, making Suvla another static trench warfare front.
More British troops arrived at Suvla. The final British attempt to restart the attack came on 21 August. Attacks were made at Scimitar Hill and Hill 60. Controlling these hills would have connected the Anzac and Suvla fronts, but both battles failed. When fighting at Hill 60 stopped on 29 August, the battle for the Sari Bair heights, and for the peninsula, was effectively over.
Leaving Gallipoli
After eight months of bloody fighting, it was decided to evacuate all troops from the Gallipoli peninsula. Soldier numbers were slowly reduced from 7 December. Clever tricks were used to fool the Turks and stop them from knowing the Allies were leaving. At Anzac, troops would stay completely silent for an hour. Curious Turks would then come out to check the trenches, and the Anzacs would open fire. As fewer soldiers were left, rifles were set up to fire automatically using water dripping into a pan. This evacuation was the best-planned operation of the campaign. It was finished by dawn on 20 December 1915, with no soldiers lost.
The Gallipoli campaign was a huge failure. It did not achieve its goals. Due to inexperienced commanders and poor management, many soldiers died, not just from fighting. Many also died from widespread disease due to bad sanitation and hygiene. Over the campaign, 26,111 Australians were casualties, with 8,141 killed.
After the war, many Australians believed that the high casualties were due to British officers being incompetent or not caring about Australian lives. Whether this was true or not, the whole campaign was poorly managed. Many military lessons were learned from it. Despite this, for Australians and New Zealanders, the Gallipoli campaign became a symbol of their nations becoming independent. Anzac Day, 25 April, is now a public holiday in Australia and New Zealand. Every year, thousands gather to honor the bravery and sacrifice of the Anzacs and all who died in war.
Egypt and Palestine Campaigns
New Plans in Egypt

After the Gallipoli campaign, Australian troops went back to Egypt. The AIF grew much bigger. Three more infantry divisions were created: the 3rd, 4th, and 5th. The Anzac Mounted Division was also formed. In March 1916, the infantry moved to France. But the cavalry (mounted) units stayed in the Middle East. They fought Turkish troops and Senussi Arab tribes who were threatening British control of Egypt.
Mounted troops were very important for defending Egypt. Australian soldiers from the Anzac Mounted Division fought in all the major battles there. They first saw combat in the Battle of Romani. Besides horsemen, there was also the 1st Imperial Camel Corps Brigade. This was a mounted infantry brigade. Two of its four battalions were Australian. The cameliers fought in most of the battles in Egypt and Palestine.
Fighting the Senussi Arabs
A pro-Turkish Islamic Arab group called the Senussi was a growing threat. A British force, including Australian light horsemen, was sent into the Libyan Desert in late 1915. They fought several battles against the Arabs in December and January. British casualties were light, but many Australians were killed or wounded. Arab losses were much higher. Meanwhile, some Australian Light Horse units returning from Gallipoli guarded the Nile Valley against the Senussi.
Battle of Romani
The Battle of Romani happened near Romani, Egypt, on 3–5 August 1916. The Turkish and German goal was to control the Suez Canal. This would stop the Allies from using it. Both the Anzac Mounted Division, led by Major General Harry Chauvel, and the British 52nd (Lowland) Infantry Division fought the German and Turkish forces.
Australian light horse brigades had been harassing the enemy since 20 July. On the night of 3–4 August, both brigades fought hard. By midday on 4 August, the Turks and Germans had pushed the Australians back. The British 52nd Division then attacked the Turkish right side. New Zealand and British mounted brigades arrived to extend the Australian line. The Turkish and German advance was stopped by combined British and Anzac fire. Deep sand, midday heat, and thirst also played a role.
In these tough conditions, the British infantry could not effectively chase the retreating enemy. The Anzac Mounted Division alone could not stop them from retreating to Katia and then to their base at Bir el Abd. This base was abandoned on 12 August 1916, ending the threat to the Suez Canal for the rest of the war. The battle cost the Allies 1,202 casualties, with half of them Australians.
Battle of Magdhaba

After Romani, the Anzac Mounted Division pushed the German and Turkish Army back across the Sinai Peninsula. The Turks retreated from Bir el Abd on 12 August 1916. They fought a rearguard action at Bir el Mazar before going to El Arish in September. In October, an Allied force attacked a strong Turkish position in the Maghara Hills. Both Bir el Mazar and Maghara Hills were later abandoned. By December, the railway reached Bir el Mazar, allowing for an advance to El Arish.
On 21 December, after a 30-mile (48 km) night march, the Anzac Mounted Division, led by Chauvel, entered El Arish. The Turks had left and retreated to Madghaba. There, the mounted force won a fierce day-long battle against strong defenses. Magdhaba was about 23 miles (37 km) south-east of El Arish. It was one of the last main obstacles for the Egyptian Expeditionary Force to advance into Palestine. Chauvel decided to attack the Turks at Magdhaba with the Anzac Mounted Division.
Leaving around midnight on 22 December, the Anzac Mounted Division reached a position by 3:50 am on 23 December. Chauvel sent the New Zealand Mounted Rifles Brigade and the 3rd Light Horse Brigade to cut off the Turks' retreat. The Imperial Camel Corps Brigade followed the telegraph line to Magdhaba. The 1st Light Horse Brigade advanced, but heavy fire forced them into a dry riverbed. By midday, all three brigades and the Camel Brigade were fighting hard. Australian and British aircraft helped by scouting Turkish positions.
The fighting was tough. By 1:00 pm, Chauvel decided to call off the attack because the Turks still had most of the water. But the message was "misplaced" until the attack had started. Both the 1st Light Horse and New Zealand Mounted Rifle Brigades made progress. By 3:30 pm, the Turkish defenders began to surrender. By 4:30 pm, the entire Turkish garrison had surrendered. The victory cost the Australians 22 dead and 121 wounded.
Battle of Rafa
Two and a half weeks later, on the evening of 8 January 1917, mounted units rode from El Arish towards Rafa. A 2,000-strong Turkish force was there. The attacking force included Australian and New Zealand mounted brigades, a British mounted brigade, and camel battalions. After a long night march, they attacked the strong Turkish position at El Magruntein. A fierce day-long battle resulted in the mounted troops capturing the town around nightfall. They lost 71 killed and 415 wounded. The Turkish garrison lost 200 killed and 1,600 captured.
Fighting Around Gaza, 1917

In early 1917, the Imperial Mounted Division was formed. It included Australian and British mounted brigades. This division first fought in the First Battle of Gaza on 26 March 1917. Around noon, two mounted brigades attacked Gaza. By 6:00 pm, the Turkish position was in danger. But the British commanders decided to call off the attack and retreat, giving victory to the Turks.
A second attempt to capture Gaza was made on 19 April. By then, the Turkish defenses were even stronger. The Anzac Mounted Division played a small role, suffering only 105 casualties. The Second Battle of Gaza was a big defeat for the Allies.
In June 1917, the Imperial Mounted Division was renamed the Australian Mounted Division. In August 1917, Chauvel took command of the Desert Mounted Corps. This included the two Australian mounted divisions. Chauvel became the first Australian to command a corps and reach the rank of lieutenant general.
After the Second Battle of Gaza failed, a third attack was launched on Gaza between 31 October and 7 November 1917. Australian mounted units took part. The battle was a complete success for the Allies. The Gaza–Beersheba line was taken, and 12,000 Turkish soldiers were captured. The most important moment was the capture of Beersheba on the first day. The Australian 4th Light Horse Brigade, led by Brigadier General William Grant, charged over 4 miles (6 km) at the Turkish trenches. They captured the wells at Beersheba. The Australians lost 31 men killed and 32 wounded. The Turks lost over 500 killed and 1,500 captured.

Final Push
From 1 to 7 November, strong Turkish rearguards fought hard. The Turkish Army was able to retreat in good order. On 7 and 8 November, the remaining Turkish armies delayed the Allied advance.
The Desert Mounted Corps and two infantry divisions fought a series of battles. On 10 November, Australian mounted troops successfully crossed the Nahr Sukereir. On 11 November, the Australian Mounted Division occupied the village of Summeil but faced strong Turkish artillery fire.
On 12 November, Allenby planned for battle. He ordered attacks to extend positions. The Australian Mounted Division faced a strong Turkish counterattack. This forced them to give up ground before stopping the Turks in front of Summeil. On 14 November, the New Zealand Mounted Rifles Brigade fought a determined Turkish rearguard near Ayun Kara. The New Zealanders won and occupied Jaffa two days later.
The Battle of Mughar Ridge was fought on 13 November. After a successful charge, two important fortified villages were captured. This led to the capture of Junction Station, a vital railway station connecting Jaffa and Jerusalem.
Jerusalem
Australian mounted troops helped capture Jerusalem in late 1917. These operations included battles in the Judean Hills and on the coastal plain. After strong Turkish counterattacks failed, they left Jerusalem. Australian mounted troops were among the first to enter Jerusalem in December 1917. By the end of December, British forces had pushed the Turkish armies north. A strong British defensive line was set up. This line stretched from north of the Nahr el Auja to north and east of Jerusalem. It was extended in February 1918 when Jericho was captured.
Across the Jordan River

In March and April 1918, Australian and New Zealand mounted troops and British infantry made two raids east across the Jordan River. They went to Amman and Es Salt. These raids were not successful, but they made Turkish commanders believe the main British attack would come across the Jordan. Before these operations, it was necessary to capture the area east of Jerusalem and into the Jordan Valley to Jericho. The attack on Turkish divisions was made on 19 February. Talat ed Dumm was captured the next day. On 21 February, Jericho was occupied.
Final Attack
During the final attack in September 1918, Australian mounted troops and air force units took part in the Battle of Megiddo. This was a big British victory where 70,000 Turkish soldiers were captured. The Desert Mounted Corps attacked across the Golan Heights, cutting off routes to Damascus. On 30 September, a column of 20,000 Turkish and German troops was destroyed by Australian light horsemen as they tried to retreat. Australian troops were the first to enter Damascus on 1 October. After advancing 300 km (186 mi), Aleppo was captured on 25 October. The Turkish government signed an armistice (peace agreement) on 28 October 1918 and surrendered two days later.
After the armistice, the Australian Mounted Division camped at Tripoli. The Anzac Mounted Division suffered from malaria and influenza in the Jordan Valley. Australia's role in the Sinai and Palestine campaign was very important. Total Australian battle casualties were 4,851, including 1,374 dead.
Western Front (France and Belgium)
Moving to Europe
.jpg)
In March 1916, the AIF infantry units moved from Egypt to Europe to fight on the Western Front. They were first organized into I Anzac Corps and II Anzac Corps with New Zealand troops. The 2nd Division arrived first in France, then the 1st Division. The 4th and 5th Divisions left Egypt later in June 1916. The 3rd Division was the last to arrive. It formed in Australia in March 1916, trained in England, and arrived in France in December 1916. For the next two and a half years, Australians fought in many major battles and gained a strong reputation. On 1 November 1917, all Australian divisions were grouped into the Australian Corps.
Australian mechanical transport units also arrived. These were the first such units in the Australian Army. They had nearly 200 vehicles. An Australian Voluntary Hospital was formed in England in August 1914 by Australians living there. It went to France in August 1914. In June 1915, the 1st Siege Artillery Brigade was formed for the Western Front. It had heavy howitzers.
With most of the AIF in France, their support bases moved to the United Kingdom. Training units set up depots in Salisbury Plain. Command Depots for wounded men were also established. AIF Headquarters was in London.
Battle of the Somme, 1916
.jpg)
On 7 April 1916, I Anzac Corps took positions in a quiet area south of Armentières. Australians did not fight on the first day of the Somme offensive. But within three weeks, four AIF divisions were sent to the battle. Only the 3rd Division, which had just arrived, did not take part. The 5th Division was the first to fight in the Battle of Fromelles on 19 July 1916. They suffered a huge 5,533 casualties in one day.
The 1st Division entered the fight on 23 July 1916, attacking Pozières. They captured German positions with few losses at first. But then the Germans fired intense artillery, causing heavy losses. By 27 July, the 1st Division had 5,286 casualties. The 2nd Division took over and attacked on 29 July, suffering more casualties. Another attack on 4 August was successful but cost almost 7,000 casualties.
After Pozières, Australians attacked Mouquet Farm in August. All three divisions of I Anzac Corps tried to break through German lines. The 4th Division attacked on 10 August. They had already lost 1,000 men. In this battle, they lost three times more. The Germans concentrated their defense against the Australians. Three more attacks were made over three weeks. Australians fought their way to the farm but were forced out by German artillery. Australian casualties at Mouquet Farm totaled 6,300 men.
The battle on the Somme continued. The AIF was pulled out to reorganize. They had suffered almost 23,000 casualties in 45 days. The 5th Division was so badly damaged from Fromelles that it did not return to the front until October.
Battle of Bullecourt

In March 1917, two Australian groups chased the Germans back to the Hindenburg Line, capturing Bapaume. On 11 April, the 4th Division attacked the Hindenburg Line in the First Battle of Bullecourt. This battle was a disaster, with over 3,000 casualties and 1,170 taken prisoner. On 15 April, the 1st and 2nd Divisions were hit by a German counterattack near Lagnicourt. Australians were forced to leave the town but recaptured it later. On 3 May, two brigades of the 2nd Division fought in the Second Battle of Bullecourt. They captured parts of the Hindenburg Line and held them. The battle ended in mid-May. It was a victory for the Allies but cost the AIF 7,482 casualties. This ended plans to create a sixth AIF division.
Battle of Messines

On 7 June 1917, II Anzac Corps, including Australian, British, and New Zealand divisions, attacked near Messines in Belgium. The goal was to remove a bulge in the German line that gave them good views. The attack started with 1,000,000 pounds (453,592 kg) of explosives detonated under the Messines ridge. This completely destroyed the German trenches.
After the explosions, the Allied advance faced little resistance. The Germans were too shocked. The Australian 3rd Division suffered heavy casualties from gas and shrapnel shells while moving. But they still got into position. Strong German counterattacks happened the next day, but the Allies continued to advance. Australian casualties were nearly 6,800 men. On 2 July 1917, Major General Holmes was fatally wounded by a German shell.
Third Battle of Ypres
.jpg)
Between September and November 1917, I Anzac Corps fought around Ypres in Belgium. This was part of the Third Battle of Ypres. Australians know these actions by names like Menin Road, Polygon Wood, Broodseinde, Poelcappelle, and Passchendaele.
I Anzac Corps joined the battle six weeks after it started. On 16 September, the 1st and 2nd Divisions took positions at Glencorse Wood. The first attack was on 20 September at Menin Road. Australians gained a lot of ground but lost about 5,000 men. On 26 September, the 4th and 5th Divisions captured Polygon Wood. On 4 October, another successful attack was made at Broodseinde. The four Australian divisions fought side by side. They clashed with a German counterattack that started at the same time. The Australians won, breaking the German line.
The first two attacks were successful. Allied commanders thought a breakthrough was possible. More attacks were made at Poelcappelle on 9 October and Passchendaele on 12 October. But heavy rain turned the ground into thick mud. Both attacks failed with heavy casualties. The Australians were withdrawn by 14 November 1917. In eight weeks, they had suffered 38,000 casualties.
German Spring Offensive, 1918
On 21 March 1918, the German Army launched their Spring Offensive. They used 63 divisions over a 70-mile (112 km) front. The Allies began to fall back. On 25 March, the Australian 3rd and 4th Divisions were rushed to Amiens. The German offensive lasted five months. All five AIF divisions in France fought to stop the German advance. The Germans gained a lot of land and came within 50 miles (80 km) of Paris. During this time, Australians fought at Dernancourt, Morlancourt, Villers-Bretonneux, Hangard Wood, Hazebrouck, and Hamel.
Of these, the battle at Hamel on 4 July 1918 is very important. It was a smaller battle, but it was the first planned and carried out by the new Australian Corps commander, Lieutenant General John Monash. It is now seen as a model of a successful combined arms attack. Using aircraft, artillery, and tanks with infantry, the attack was over in 93 minutes. It achieved its goals of straightening the Allied line and taking Hamel. Australians advanced almost 2 km (1.2 mi) and captured about 1,600 German prisoners. The Australians suffered 1,062 casualties.
Hundred Days Offensive

The German attack stopped in mid-July. Then there was a short quiet period. Australians carried out small attacks to capture parts of the German line. These were called Peaceful Penetrations. They relied on junior commanders and soldiers using fire and movement. This quiet time did not last long. The Allies launched their own offensive, called the Hundred Days Offensive, which ended the war.
The offensive began on 8 August 1918. Twenty Allied divisions, including four Australian, attacked at Amiens. Using combined arms tactics from Hamel, the Allies gained more land than ever before in the war. In the Australian area, the 4th and 5th Divisions led the attack. Then the 2nd and 3rd Divisions advanced another three kilometers. The attack was so successful that German General Erich Ludendorff called it a "black day" for the German Army.
The Allied offensive continued for four months until the end of the war. During the Second Battle of the Somme, the Australian Corps fought at Lihons, Etinehem, Proyart, Chuignes, and Mont St Quentin. Their last battle was on 5 October 1918 at Montbrehain. Australian casualties were very high. With fewer new soldiers from Australia and the rejection of conscription, the AIF was stretched thin. Some battalions had to be broken up to reinforce others.
The battle at Montbrehain was the Australian Corps' last contribution to the war. They were training when the Armistice (peace agreement) was declared on 11 November 1918. Total Australian casualties on the Western Front were 181,000. This included 46,000 dead, 114,000 wounded, and 16,000 gassed. About 3,850 were taken prisoner.
Other Places Australians Fought
When the war ended, many Australian soldiers were in France, England, Egypt, Palestine, and Syria. Small numbers served in other places. Australian troops from the 1st Australian Wireless Signal Squadron helped British forces in the Mesopotamian campaign. They fought in battles like the Battle of Baghdad in March 1917. After the Russian Revolution in 1917, the Caucasus Front collapsed. A special force called Dunsterforce was formed. About 20 Australian officers served with Dunsterforce. One group helped protect thousands of Assyrian refugees. Australian nurses also worked in British hospitals in Salonika and India.
Australian Flying Corps (AFC)
How it Started

The Australian Flying Corps (AFC) was formed in March 1914. It was sent to German New Guinea with one plane, but the Germans surrendered before it was even unpacked. The first flights happened on 27 May 1915. The Mesopotamian Half Flight helped the Indian Army protect British oil interests in what is now Iraq. The AFC later fought in Egypt, Palestine, and on the Western Front. It had four fighting squadrons and four training squadrons. The AFC was part of the AIF.
Mesopotamian Half-Flight
The Mesopotamian Half-Flight was the first AFC unit to see action. On 8 February 1915, Australia was asked for air help against the Turks. The AFC could only provide half a flight, so it was called the Mesopotamian Half-Flight. Captain Henry Petre was its commander. The AFC group sailed to Basra, arriving in May. They flew weak and unreliable planes. They lost two pilots killed and six captured out of just nine pilots. Reinforcements arrived, forming a squadron. But by November 1915, only one original pilot remained. The squadron mainly did unarmed reconnaissance. Later, they dropped small bombs. During the siege of Kut, Captain Petre dropped supplies to the trapped soldiers. When Kut surrendered, AFC ground crew were captured. Seven of them later died.
Fighting in the Middle East
By late 1915, the AFC began forming full squadrons. At Britain's request, No. 1 Squadron went to Egypt. They got British planes. The squadron operated from Heliopolis, Palestine, and Syria for two years. They supported ground forces in all major battles against the Turks. Their missions included scouting, bombing, and helping artillery. They also fought German planes. Lieutenant Frank McNamara won the Victoria Cross for rescuing another Australian pilot on 20 March 1917. No. 1 Squadron also helped destroy the Turkish Seventh Army by airpower on 21 September 1918.
Fighting on the Western Front

Other AFC squadrons formed in Australia for the Western Front. Nos. 2, 3, and 4 Squadrons arrived in France between August and December 1917. No. 2 Squadron was involved in the Battle of Cambrai in November 1917, doing patrols, ground attacks, and bombing. Casualties were high. No. 3 Squadron supported the Battle of Passchendaele, mainly spotting for artillery. No. 4 Squadron was assigned to the First Army. In March 1918, No. 4 Squadron fought planes led by Manfred von Richthofen (the 'Red Baron'). They shot down two German planes.
Australian squadrons played a small role in the Allied advance from Amiens on 8 August 1918. No. 3 Squadron did reconnaissance and contact patrols. Nos. 2 and 4 Squadrons were involved in patrols and raids. As the Germans retreated in September 1918, the squadrons worked hard to keep up. No. 4 Squadron had a big battle on 29 October. Fifteen Australian planes fought over 60 German planes. The Australians won, shooting down 10 German planes.
On the Western Front, No. 2 and No. 4 Squadrons were mainly fighter squadrons. No. 3 Squadron was for reconnaissance. No. 4 Squadron became the most successful fighter squadron, destroying 199 enemy aircraft. No. 2 Squadron destroyed 185. Total AFC casualties on the Western Front included 78 killed. After the war, No. 4 Squadron was the only Australian unit in the British Army of Occupation in Germany. The three AFC squadrons returned to Australia in February 1919 and disbanded.
What the AFC Left Behind

Even though Australian military aviation was new, the AFC being a separate national force was important and unusual. Thousands of aircrew from other British Empire countries flew with British flying services. But the AFC had its own command and experience. By the end of the war, four squadrons had fought. 460 officers and 2,234 other ranks served in the AFC. Casualties included 175 dead. The AFC was disbanded after the war. It was replaced by the Australian Air Corps in 1920, which became the Royal Australian Air Force (RAAF) in 1921.

When the war started, the Royal Australian Navy had a battlecruiser (HMAS Australia), light cruisers (Sydney, Melbourne), destroyers, and submarines. Rear Admiral Sir George Edwin Patey commanded the Squadron.
The first naval operation was supporting the Australian Naval and Military Expeditionary Force in German New Guinea. The submarine AE1 disappeared on 14 September 1914, with 35 men.
The first major RAN victory was when HMAS Sydney sank the German light cruiser, SMS Emden, off the Cocos Islands on 9 November 1914. Four Australians were killed. RAN ships also helped protect the landings at Gallipoli. The submarine AE2 broke through the Dardanelles blockade but was later sunk.

In 1915, the light cruisers Melbourne and Sydney went to the Atlantic. They worked with the Royal Navy, watching German ships in neutral American ports. In September 1916, both cruisers moved to the North Sea. They joined Australia, which was helping the Royal Navy blockade the German fleet.
The RAN also operated in the Pacific and Indian Oceans. By 1915, many German ships were hiding in ports in the Netherlands East Indies. This worried Australia. So, in mid-1915, HMAS Psyche and Fantome patrolled the Bay of Bengal. Later, a force of destroyers and the cruiser Encounter searched for a German munitions base. Nothing was found, but the patrol stopped German secret activities.
In May 1917, Britain asked Australia for help against German U-boats (submarines). Six destroyers were sent. They fought submarines in the Adriatic Sea as part of the Otranto Barrage.
The most decorated RAN unit was the Royal Australian Navy Bridging Train. This reserve unit helped the British at Suvla Bay during Gallipoli by building piers. It later served in Egypt and Palestine. The RAN lost 171 men killed during the war.
Home Front (Australia)
Australian Military Forces at Home
While most Australian soldiers fought overseas, troops were still needed in Australia for important tasks. These duties fell to the militia (part-time soldiers) and a few regular soldiers. At first, militia infantry guarded important places like factories, communication centers, and transport hubs. 500 men from the Kennedy Regiment garrisoned Thursday Island due to a possible threat from German forces. Militia troops also guarded internment camps and coastal defenses.

By late 1914, the naval situation in the Pacific was calmer. Guards were no longer needed at less important places. Home defense focused on coastal defenses and guarding ships in port. In larger ports, this needed hundreds of men. A special corps was formed from men rejected by the AIF to help with these duties.
Militia artillery and engineers manned coastal defenses throughout the war. They were largely prevented from joining the AIF for overseas service. In February 1916, many militia artillerymen tried to join the 3rd Division. But they were called to man coastal defenses because of a German commerce raider threat. This lasted until April 1916.
In April 1918, the militia artillery was mobilized again for a month. This was because German commerce raiders had been in Australian waters. In June 1918, 9,215 troops were on home service. The Navy took over guarding ships and communications. This allowed more militia troops to train.
Conscription Debate

All Australian soldiers sent overseas were volunteers. But in Australia, there was a big debate about conscription (forcing people to join the army). Australian law said conscripts could not be sent overseas. As the war continued, many soldiers died, and fewer new recruits joined. So, the idea of conscription came up again in 1916.
Australians had mixed opinions. Many were against it for moral reasons. Others felt it was needed to win the war. The Hughes Labor government held a vote on 28 October 1916. The "no" vote won by a small margin (51% to 49%). This split the Labor Party. Prime Minister Billy Hughes, who supported conscription, left the party. He formed a new party, the Nationalist Party, with others who supported conscription.
As soldier shortages grew on the Western Front, a second vote was held on 20 December 1917. This time, it was defeated by an even larger margin. This stopped plans to expand the AIF in France. It led to severe soldier shortages for the AIF in 1917 and 1918. Plans for a 6th Division were dropped. The five divisions were combined into the Australian Corps.
Soldier shortages continued. Wounded men were sent back to fight. Some battalions were broken up to reinforce others. This was hard for soldiers, as their battalion was a source of pride. Monash ordered this, but some men resisted. The war ended shortly after, making the change unnecessary.
Wartime Rules and Internment
The war meant the Australian government needed more power. The War Precautions Act 1914 was introduced in October 1914. It gave the government wide powers for six months after the war ended.
This Act allowed the government to make laws for the war effort. Key areas included: stopping trade with enemy nations, raising money for the war, introducing national taxes, setting prices for goods, interning (imprisoning) people seen as a danger, buying strategic goods, and censoring media.
When the war started, about 35,000 people born in Germany or Austria-Hungary lived in Australia. Many people of German origin lived in Australia, some still feeling connected to their homeland. Some were naturalized Australians, and many men of German origin joined the AIF. But because of worries about loyalty, internment camps were set up. About 4,500 people were interned, including 700 naturalized Australians. After the war, 6,150 were deported.
There was public anger about how the War Precautions Act was used. Especially against trade unions and groups less sympathetic to Britain. In 1917, a trade union was suppressed, and 12 members were jailed. This almost caused Australia's war effort to break down.
After the war, the Act continued to cause social and political unrest in 1918 and 1919. There were violent incidents, like the Red Flag Riots in Brisbane in 1919.
Economy During the War

At the start of the war, Australia's economy was small. It relied on farming and resources for exports. Most manufactured goods were imported. Uncertainty about trade quickly led to unemployment.
These worries did not last long. Britain promised to help with war risk insurance for shipping. This allowed trade to continue. Britain also asked Australia to restrict trade to secure resources for the war. This sometimes made it harder for Australian producers to sell goods. But often, Britain bought these goods, helping Australia's economy. This was good for the wool and wheat industries. Britain even agreed to buy Australian products they might never receive due to shipping shortages.
Overall, Australian trade grew because of the war. But the war was very costly. The Australian government had to borrow a lot of money from overseas. Australian exports increased by almost 45 percent. The number of Australians working in manufacturing grew by over 11 percent. This was because traditional suppliers could not send manufactured goods to Australia. This encouraged Australian manufacturing to grow.
About 400 new items were made in Australian factories because of the war. This was significant, but the economic change was not as big as during World War II. The growth of the steel industry during this time laid the groundwork for future industry.
Despite growth in manufacturing, there were still shortages. This was partly because military needs came first. Also, there was a lack of raw materials and parts. This was due to limited shipping from the UK and Britain's own increased needs. This led to inflation. Prices went up in Australia. But export prices were kept low to prevent more inflation worldwide. This increased the cost of living for many Australians.
Trade unions grew during the war. Union membership increased significantly. Wages went up by 8–12 percent, but not enough to keep up with inflation. This caused discontent among workers, leading to strikes. Some disputes were also due to opposition to conscription. Between 1914 and 1918, there were 1,945 industrial disputes, losing many working days and wages.
Overall, the war had a negative impact on Australia's economy. Gross Domestic Product (GDP) fell by 9.5 percent from 1914 to 1920. Civilian employment dropped by 6 percent. Population growth slowed. Incomes per person also fell sharply by 16 percent.
After the War
Bringing Soldiers Home

After the fighting ended in Europe, Australia decided not to send troops to occupy Germany. Instead, they wanted to bring the AIF home early. Lieutenant General Sir John Monash managed this process in Britain. Lieutenant General Henry Chauvel managed it in the Middle East.
Instead of sending men home by units, they used a fair system. Men who had been away the longest came home first. There were about 167,000 soldiers in France, Britain, and Egypt. Bringing them home took a long time. So, it was important to keep the troops busy while they waited. A vocational education program was set up to prepare men for civilian jobs. Several thousand soldiers took part.
Some Australians chose to stay longer. They joined the British Army and served in Northern Russia during the Russian Civil War. HMAS Yarra, Torrens, Swan, and Parramatta served in the Black Sea during the same conflict. In Egypt in early 1919, Australian light horse units helped stop a nationalist uprising while waiting to go home. Despite shipping shortages, soldiers returned faster than expected. By September 1919, 10,000 men were still in Britain. The last main ships left England on 23 December 1919. On 1 April 1921, the AIF was officially disbanded.
The process of helping soldiers did not end there. When they returned, the focus shifted to finding them jobs, education, and housing. The Repatriation Department was created for this. It also managed war pensions and hospitals. This cost a lot of money, more than the total spent on defense during the war.
Many groups for ex-servicemen and women were formed. The most important was the Returned Sailors and Soldiers Imperial League of Australia. It was formed in 1916. After the war, it became very influential. It helped veterans get financial support and job concessions. By 1919, it had 150,000 members.
What the War Left Behind
The war affected Australia in many ways. But perhaps not as much as it affected European nations. Economically, the war had big impacts, but the Great Depression later was more significant. Australian industry did not change as much as it would after World War II. Politics also changed due to the arguments over conscription. The role of women in society also evolved, with more women entering the workforce. Between 1914 and 1918, women's employment increased by 13 percent. About 2,000 women served as nurses in the AIF.
Another legacy was a brief period of independence in Australian foreign affairs. Australia sent its own group to the Paris Peace Conference in 1919. It also started to play a more active role in the Pacific. At the conference, Prime Minister Hughes pushed for payments from Germany and Australian control over German New Guinea. However, there was little real change in relations with Britain. Australia's foreign policy only became truly independent after the Japanese crisis of 1942. This led to an alliance with the United States.
Perhaps the biggest effect was psychological. The heavy losses deeply affected many people. War memorials were built across the country to remember those killed. Charles Bean, who wrote the official history of Australia's war involvement, pushed for a national memorial. He helped establish the Australian War Memorial in Canberra. The war also strengthened ideas about Australian character and national identity. Many Australians felt that their soldiers' performance, especially at Gallipoli, showed Australia becoming its own nation. It also created a belief in Australians' natural ability as soldiers.
Many Australians felt a strong dislike for the large-scale destruction and loss of life. They hoped it would never happen again. This led to a general lack of focus on defense after the war. This might have contributed to Australia not being ready for the next major conflict.
Facts and Figures
During World War I, over 421,809 Australians served in the military. 331,781 served overseas. Over 60,000 Australians died, and 137,000 were wounded. This was a casualty rate of almost 65 percent, one of the highest among British Empire forces. The war cost the Australian government £188,480,000.
See also
- Australian Army battle honours of World War I
- List of Australian diarists of World War I
Images for kids
-
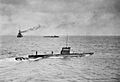
The submarine AE1 with other Australian ships off Rossel Island on 9 September 1914. On 14 September it inexplicably disappeared during a patrol off Rabaul.
-

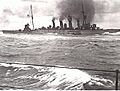
The light cruiser HMAS Sydney (1912) in 1915. In November 1914, it engaged and defeated the German cruiser Emden off the Cocos Islands.
-
HMAS Melbourne operating with the Grand Fleet in 1918. She is carrying a Sopwith Camel on her forward six-inch gun turret.
-
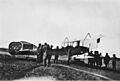
Members of the Half Flight gather around a Short 827 seaplane.
-

No. 1 Squadron, Australian Flying Corps next to their Bristol fighters, at Mejdel in February 1918. The officer in the foreground (with stick) is Lieutenant Colonel Richard Williams, DSO, commanding.
-

Members of the 7th Squadron in Tetbury England
-
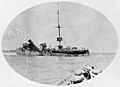
A broadside view of the wrecked German raider Emden

