
Battle of Flers–Courcelette facts for kids
Quick facts for kids Battle of Flers–Courcelette |
|||||||||
|---|---|---|---|---|---|---|---|---|---|
| Part of the Battle of the Somme of the First World War | |||||||||
 Battle of the Somme 1 July – 18 November 1916 |
|||||||||
|
|||||||||
| Belligerents | |||||||||
|
|||||||||
| Commanders and leaders | |||||||||
| Douglas Haig Ferdinand Foch Émile Fayolle Henry Rawlinson Hubert Gough |
Crown Prince Rupprecht Fritz von Below |
||||||||
| Strength | |||||||||
| Sixth Army Fourth Army (11 divisions, 49 tanks) Reserve Army |
1st Army | ||||||||
| Casualties and losses | |||||||||
| 29,376 | (part of 130,000 casualties in September) | ||||||||
The Battle of Flers–Courcelette was a major fight during the Battle of the Somme in France. It took place from September 15 to 22, 1916, during the First World War. French and British armies fought against the German army.
This battle was important because it was the first time Tanks were used in combat. The Canadian Corps and the New Zealand Division also fought their first battles on the Somme during this time. Even though the Allies didn't win a huge, decisive victory, they did capture important villages like Courcelette, Martinpuich, and Flers. They also caused many losses for the German forces.
Contents
- What Led to the Battle?
- The Battle Begins
- What Happened After the Battle?
- Heroes of the Battle
- Remembering the Battle
- Images for kids
What Led to the Battle?
Plans for a Big Attack
Allied Strategy: France and Britain
By August 1916, General Sir Douglas Haig, who led the British forces in France, wanted to keep fighting the German armies. He believed that Germany was struggling on other fronts, like the Eastern Front against Russia. Haig also hoped that new weapons, called tanks, would be ready for battle in September.
Even though only a few tanks were ready, Haig decided to use them. He felt it was important to keep up the pressure on Germany. The Allies, including France, Italy, and Russia, were all attacking at the same time. Haig thought the German defenses on the Somme might even collapse.
Ferdinand Foch, the French commander, wanted to attack German defenses in stages. He aimed to weaken the Germans and cause a general collapse. The main effort was by the British north of the Somme River. The British Fourth Army and Reserve Army were to capture key German positions. The French Sixth Army would also attack to help the British.
German Strategy: New Leaders and Defenses
On August 28, 1916, Germany got new military leaders: Paul von Hindenburg and Erich Ludendorff. They immediately stopped attacks at Verdun, another major battle. Instead, they sent more troops to the Somme front and to fight in Romania.
The new German leaders also changed their defense strategy. They stopped trying to hold every piece of ground at all costs. Instead, they focused on letting the attackers wear themselves out. They wanted to use more machine guns and artillery to save their own soldiers. This new approach was the start of modern defense tactics.
They also ordered a new defensive line, the Siegfriedstellung (later known as the Hindenburg Line). This was a strong new defense built far behind the front lines. It would allow German troops to retreat if needed, without the Allies being able to chase them easily.
New Challenges in Warfare
Air Power and Artillery

Since July, German soldiers had been constantly watched by Allied planes and balloons. These aircraft helped direct huge amounts of artillery fire onto German positions. They also attacked German soldiers with machine guns from low altitudes. This made German troops very anxious.
The German air force, Die Fliegertruppen, struggled to compete. Their planes were often older and outnumbered. This led to many losses for German pilots. However, in August, new German fighter squadrons like Jagdstaffel 2 arrived. They had better planes, like the Albatros D.I, which started to challenge Allied air power in September.
The First Tanks

Before 1914, people had thought about armored fighting vehicles. But it wasn't until the First World War that they became a reality. Ernest Dunlop Swinton, a British engineer, heard about the caterpillar-tracked Holt tractor in 1914. He imagined a "machine-gun destroyer" that could cross barbed wire and trenches.

Winston Churchill, then in the British navy, also pushed for armored vehicles. He set up a committee to create a vehicle that could crush wire and cross trenches. By February 1916, a test vehicle was so successful that 100 more were ordered. These were the first Mark I tanks.

The new "Heavy Section, Machine-Gun Corps" was formed to operate these tanks. Training began in secret in June. There were two types of Mark I tanks:
- Male tanks: Had two 6-pounder guns and three machine guns.
- Female tanks: Had four machine guns and were meant to protect the male tanks.
Both types had a crew of eight and could move at about 3.7 miles per hour. They also had two wheels at the back to help with steering.
British Attack Plan

The British planned to break through German defenses on a 3.5-mile front. They would attack in stages, moving northeast. The goal was to clear the way for cavalry to advance and exploit a possible German collapse.
The Fourth Army aimed to capture the German Switch Line first. Then, the XV Corps would take the German third position near Flers. The XIV Corps would capture Morval and Lesbœufs.

The Reserve Army would also attack. The Canadian Corps would capture areas near Courcelette and Martinpuich. The attack was set for 6:20 a.m. on September 15. The British hoped to reach their final objectives by noon.
The Battle Begins
French Attacks (September 15)
The French Sixth Army had been fighting hard and needed a break. But their artillery still supported the British attack. Their infantry attacked later in the day, gaining some ground near Bois Douage. However, they couldn't advance much further.
British Fourth Army Attacks (September 15)
XIV Corps: Tough Fighting on the Right

On the right side of the British attack, the 56th (1/1st London) Division faced strong German defenses. A tank helped them capture Loop Trench, surprising the Germans. However, heavy machine-gun fire stopped further advances. The tank was eventually destroyed, but its crew fought bravely.
The 6th Division attacked the Quadrilateral, a strong German position. Despite heavy bombing, the German wire was still intact. Machine-gun fire stopped the British advance. One tank tried to help but was hit and returned.
The Guards Division also faced intense machine-gun fire. Their tanks either broke down or got lost. Despite many losses, the Guards pushed forward, capturing parts of the first objective. German soldiers reported that British planes were also attacking them from above.
XV Corps: Tanks Lead the Way to Flers
In the center, 14 of the 18 tanks were ready for the attack on Flers. The 14th (Light) Division attacked a German strongpoint with tanks. One tank, D1, helped clear the way before being knocked out. The infantry then captured the first objective, the Switch Line.
The 41st Division attacked Flers itself. Tanks like D16 entered the village, destroying strong points and machine-gun nests. By 10:00 a.m., the 41st Division had captured Flers, forcing the remaining German soldiers to retreat.
The New Zealand Division attacked with two battalions. They ran into their own creeping artillery barrage but still managed to capture the Switch Line. German machine guns in High Wood caused problems. Tanks D11 and D12 arrived later, helping the infantry break through uncut wire and reach their final objective.
III Corps: High Wood and Martinpuich
The 47th Division attacked High Wood. Four tanks tried to help, but most got stuck or were knocked out. German machine guns in the wood stopped the attack. However, after a heavy bombardment, hundreds of Germans in High Wood surrendered. The wood was captured by 1:00 p.m.
The 50th Division attacked Hook Trench and Martinpuich. One tank was destroyed, but another helped clear machine-gun nests. The infantry captured their first objective and parts of the third. However, German shelling later forced some troops to retreat.
The 15th (Scottish) Division attacked Martinpuich. The artillery barrage was very effective. They met little resistance and captured Factory Lane. A tank helped silence machine guns in Martinpuich. By 3:00 p.m., the village was occupied, and outposts were set up facing Courcelette.
Reserve Army Attacks (September 15)
.jpg)
The Canadian Corps made its first appearance on the Somme. The 2nd Canadian Division attacked with tanks. German soldiers heard the tanks moving up and fired artillery. Despite this, the Canadians pushed through German lines. They captured Factory Lane and the sugar factory, taking many prisoners.
The 6th Canadian Brigade faced strong resistance but reached its objective. They captured a strong point and set up machine guns. The tanks were too slow to keep up, but they still helped by laying telephone cables or destroying machine-gun nests before getting stuck.
The 3rd Canadian Division secured its left flank. They captured their objective and shot down fleeing German troops. Later, the Canadians attacked Courcelette itself. Two battalions, the 22nd Battalion and the 25th Battalion, captured the village. They then fought off German counter-attacks for three days and nights.
German Response (September 15)
The British bombardment was intense. German front-line troops were reduced to a few men per yard. When the British attacked, many German units were quickly overrun. The tanks had a "shattering effect" on the German soldiers, who were shocked to see them driving along trenches and firing.
Many German telephone lines were cut, so they couldn't call for artillery support. Soldiers reported that British planes were flying low, strafing their trenches. Some German units fought bravely, but many were forced to retreat. The German diary of one regiment noted that British supplies seemed endless, making them feel they had no chance.
German counter-attacks were poorly organized because so many units had just arrived. They tried to recapture lost ground, but British artillery and machine-gun fire stopped them. Despite some small gains, the Germans could not take back Flers or the main trench lines.
Air Battles During the Attack
September 15–16: Eyes in the Sky

British planes played a huge role. They flew many hours, observing the battle and attacking German aircraft. Special "contact patrol" planes flew low to report on the infantry's progress. They could see which trenches were occupied and direct artillery fire.
Observers in these planes helped guide artillery onto German positions. They also reported on tank movements. For example, they saw tanks closing in on Flers and later one catching fire near Gueudecourt. These reports helped commanders understand the battle in real-time.
British bombers also attacked German headquarters and railway stations. They hit trains, causing explosions and chaos behind German lines. Despite some losses, British air patrols continued to dominate the skies.
September 17–22: German Fighters Appear

On September 17, German fighter squadrons, like Jasta 2, began to challenge the British. Led by Oswald Boelcke, they used new Albatros D.I fighters. They shot down several British planes, showing that German air power was improving.
However, bad weather often grounded planes for the rest of the week. Despite the new German fighters, the British still had more planes and used aggressive tactics. This prevented the Germans from gaining full control of the air.
What Happened After the Battle?
The Impact of Tanks

The first use of tanks was a mix of success and disappointment. Only 27 of the 49 tanks that reached the front line actually crossed "no man's land." Only six reached their final objectives. Many broke down or were knocked out by shells.
Some people thought using tanks so early was a mistake, wasting their surprise. However, others argued that it was important to use every new weapon available. The British public was excited by the news of tanks, even with exaggerated reports. Germany was puzzled by the new weapon, trying to figure out how it worked.
German soldiers were often terrified when they first saw tanks. They called it "butchery." But they soon learned that tanks could be stopped by artillery or special armor-piercing bullets. They also learned to lie still and let tanks pass, then attack them from behind. Despite the early problems, the British ordered 1,000 more tanks.
Air Power's Growing Importance
German historians later said that controlling the air over the battlefield became "imperative for success." British soldiers reported that contact patrol planes were the only way to know where their most advanced troops were. German soldiers complained that British planes were constantly overhead, watching every move.
The arrival of new German fighter planes like the Albatros D.I helped them fight back. However, the British still had more planes and continued to be aggressive. This meant the British kept their advantage in the air.
Next Steps in the Somme Battle
After the Battle of Flers–Courcelette, the Germans were in a difficult position. Their new leaders ordered more counter-attacks, but these were easily stopped. Germany was running out of soldiers and morale was low.
The British Fourth Army attacked again in the Battle of Morval from September 25 to 28. They captured Morval, Gueudecourt, and Lesbœufs, which had been the goals of the Flers–Courcelette battle. The Reserve Army also began the Battle of Thiepval Ridge on September 26.
Heroes of the Battle
Several soldiers earned the Victoria Cross, Britain's highest award for bravery, during this battle:
- Serjeant Donald Forrester Brown of the Otago Infantry Regiment.
- Lieutenant Colonel John Vaughan Campbell of the 3rd Battalion Coldstream Guards.
- Lance-Sergeant Frederick McNess of the 1st Battalion Scots Guards.
- John Chipman Kerr of the 49th (Edmonton) Battalion.
Remembering the Battle

Many memorials stand today to remember the soldiers who fought at Flers–Courcelette:
- The Courcelette Memorial honors Canadian actions on the Somme.
- The New Zealand Memorial is on the site of the old Switch Line.
- The 41st Division has a memorial in Flers, celebrating the village's capture. It features a bronze soldier statue.
- A memorial cross for the Guards Division is between Ginchy and Lesbœufs.
- Another memorial cross for the 47th London Division is inside High Wood.
Images for kids
-
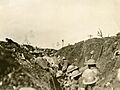
Canadian soldiers prepared to go over the top.
-
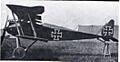
Halberstadt D.II
-
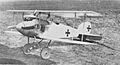
Albatros D.I
-

B.E.2f (A1325, Masterton, New Zealand, 2009), similar to the type flown by 34 Squadron
-
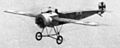
Fokker EIII fighter
-
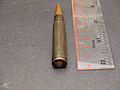
Second World War 7.92x57IS Spitzer with core, equivalent to the S.m.K. round


