Battle of Kehl (1796) facts for kids
Quick facts for kids Battle of Kehl |
|||||||
|---|---|---|---|---|---|---|---|
| Part of the War of the First Coalition | |||||||
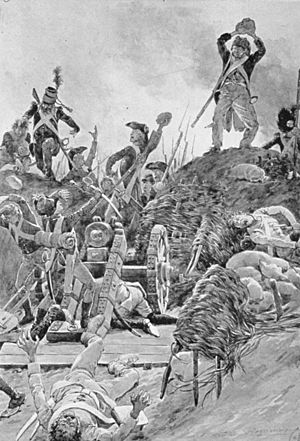 Taking one of the redoubts of Kehl by throwing rocks, 24 June 1796, Frédéric Regamey |
|||||||
|
|||||||
| Belligerents | |||||||
| Commanders and leaders | |||||||
| Strength | |||||||
| 10,065 | 7,000 | ||||||
| Casualties and losses | |||||||
| 150 killed, wounded and missing | 700 killed, wounded and missing | ||||||
The Battle of Kehl happened on June 23–24, 1796. During this battle, French soldiers from the French Republic crossed the Rhine River. They were led by Jean Charles Abbatucci. Their goal was to fight against soldiers from the Swabian Circle.
This battle was part of a bigger conflict called the War of the First Coalition. The French successfully pushed the Swabian soldiers out of their positions in Kehl. After this victory, the French controlled the important river crossing on both sides of the Rhine.
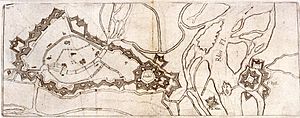
Kehl was a village on the eastern side of the Rhine River in a place called Baden-Durlach. On the western side was the city of Strasbourg in Alsace. Even though they were in different places, their futures were connected. This was because of bridges and special forts that allowed people to cross the river.
In the 1790s, the Rhine River was very wild and hard to cross. It was much wider than it is today, sometimes four times as wide. The river had many channels and small islands. These areas would sometimes be underwater when it flooded or exposed when it was dry.
The forts at Kehl and Strasbourg were built a long time ago in the 1600s. A famous architect named Sébastien le Préstre de Vauban designed them. These crossings had been fought over before in other wars. For the French plan to work, their army needed to be able to cross the Rhine whenever they wanted. Controlling the crossings at Kehl and Hüningen (near Basel) would give them easy access to southwestern Germany. From there, the French armies could move in different directions to reach their goals.
Contents
Understanding the Battle's Background
The Rhine Campaign of 1795
The Rhine Campaign of 1795 was a series of battles that lasted from April 1795 to January 1796. It started when two armies from Austria fought against two French armies. The Austrian armies were led by François Sébastien Charles Joseph de Croix, Count of Clerfayt. They stopped the French from crossing the Rhine River and capturing the Fortress of Mainz.
At the beginning, the French Army of the Sambre and Meuse, led by Jean-Baptiste Jourdan, faced Clerfayt's army in the north. In the south, the French Army of Rhine and Moselle, led by Pichegru, was opposite Dagobert Sigmund von Wurmser's army. In August, Jourdan crossed the river and quickly took Düsseldorf. His army moved south, surrounding Mainz. Pichegru's army also surprised everyone by capturing Mannheim. This meant both French armies had strong positions on the east side of the Rhine.
However, the French didn't keep their strong start. Pichegru missed chances to capture Clerfayt's supply base. Because Pichegru was not active, Clerfayt focused on Jourdan. He defeated Jourdan at Höchst in October, forcing most of the French army to retreat. Around the same time, Wurmser blocked the French crossing at Mannheim.
With Jourdan out of the way for a bit, the Austrians defeated part of the French army at the Battle of Mainz. They then moved down the west side of the river. In November, Clerfayt beat Pichegru badly at Pfeddersheim and successfully ended the siege of Mannheim. In January 1796, Clerfayt and the French agreed to a ceasefire. This allowed the Austrians to keep control of large parts of the west bank. The ceasefire ended on May 31, 1796, setting the stage for more fighting.
The Lay of the Land: Rhine River
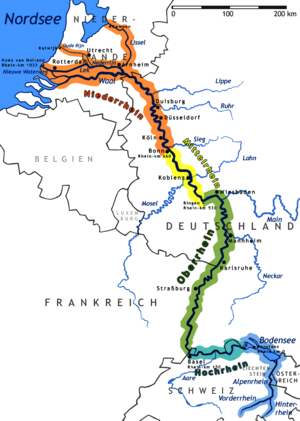
The Rhine River flows west along the border between Germany and Switzerland. For about 80 miles (129 km) between Rheinfall and Basel, the river cuts through steep hills. It used to flow very fast in places like Laufenburg. A few miles north of Basel, the land becomes flat. The Rhine then turns north in a wide bend and enters a flat area called the Rhine ditch. This area is bordered by the Black Forest to the east and the Vosges Mountains to the west.
In 1796, the flat land on both sides of the river was about 19 miles (31 km) wide. It had many villages and farms. At the edges of this flat area, especially on the eastern side, the old mountains cast long shadows. Small rivers flowed from the Black Forest through deep valleys. These rivers then wound their way through the flat land to the main Rhine River.
The Rhine River looked different in the 1790s compared to today. The river was straightened between 1817 and 1875. A canal was also built between 1927 and 1975 to control the water level. In the 1790s, the river was wild and unpredictable. It was much wider in some places, even during normal conditions. Its channels twisted through marshes and meadows, creating islands that were sometimes underwater during floods. The river could be crossed reliably at Kehl (near Strasbourg) and Hüningen (near Basel). These crossings had special bridges and paths.
Political Challenges in the Holy Roman Empire
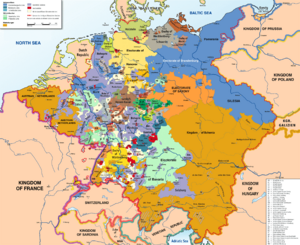
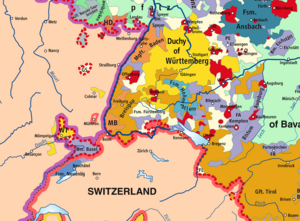
The German-speaking states on the east side of the Rhine were part of a large group of lands called the Holy Roman Empire. This empire had over 1,000 different areas. These areas varied greatly in size and power. Some were tiny, just a few square miles, while others were large kingdoms like Bavaria and Prussia.
The way these states were governed also differed. There were independent free imperial cities, church-controlled lands, and states ruled by powerful families. On a map, the Empire looked like a "patchwork carpet" because of all the different pieces. Even the powerful Habsburg and Hohenzollern families owned lands outside the Empire. Some areas belonging to German states were even completely surrounded by France.
The Holy Roman Empire had rules and systems to help solve problems. These systems helped settle arguments between farmers and landlords, or between different areas. Groups of states, called Reichskreise (imperial circles), worked together. They shared resources and protected their interests, including trade and military defense.
How the Armies Were Set Up
The armies of the First Coalition had about 125,000 soldiers. This was a large force for the 1700s. Archduke Charles, the brother of the Holy Roman Emperor, was their main commander. His troops stretched from Switzerland all the way to the North Sea. Most of the soldiers were from the Habsburg lands. However, they couldn't cover such a large area well enough to stop a strong attack.
Compared to the French, Charles had half the number of soldiers covering a 211-mile (340 km) front. This front went from Renchen to Bingen. He had placed most of his army, led by Count Baillet Latour, between Karlsruhe and Darmstadt. This area was important because the Rhine and Main rivers met there, making it a likely place for an attack. It was a good entry point into eastern Germany and towards Vienna.
To the north, Wilhelm von Wartensleben's smaller army stretched thinly between Mainz and Giessen. In the spring of 1796, about 20,000 more soldiers joined the Habsburg forces. These new soldiers came from the free imperial cities and other areas in the Swabian and Franconian Circles. Most of these new soldiers were farmers and day laborers. They had been called to serve that spring and were not well trained or experienced.
As Charles gathered his army, he wasn't sure where to place them. He didn't like using the new militias in important locations. So, in May and early June, when the French started gathering troops near Mainz, Charles thought the main French attack would happen there. The French even fought the imperial forces at Altenkirchen (June 4) and Wetzler and Uckerath (June 15). Because of this, Charles felt it was okay to place the 7,000-man Swabian militia at the Kehl crossing.
French Battle Plans
French commanders believed attacking the German states was very important. Not only for winning the war, but also for practical reasons. The French Directory, which ruled France, thought that war should pay for itself. They didn't set aside money to feed their soldiers. The French army, made up of young men drafted into service, often had to rely on the areas they occupied for food and pay.
Before 1796, soldiers were paid with worthless paper money called assignat. After April 1796, they were paid with metal money, but their pay was often late. Because of this, the French army was often close to mutiny (rebellion) during that spring and early summer. For example, in May 1796, a group of soldiers revolted in Zweibrücken. In June, other groups of soldiers also showed disobedience.
The French faced a big challenge besides the Rhine River. The Coalition's Army of the Lower Rhine had 90,000 soldiers. Its right side, with 20,000 troops led by Duke Ferdinand Frederick Augustus of Württemberg, was on the east bank of the Rhine. They were watching the French position at Düsseldorf. The forts of Mainz Fortress and Ehrenbreitstein Fortress had 10,000 more soldiers. The rest of the army was on the west bank behind the Nahe River.
Dagobert Sigmund von Wurmser first commanded the 80,000-strong Army of the Upper Rhine. Its right side was at Kaiserslautern on the west bank. The left side, led by Anton Sztáray, Michael von Fröhlich, and Louis Joseph, Prince of Condé, guarded the Rhine from Mannheim to Switzerland. The original Austrian plan was to capture Trier and use their position on the Rhine's west bank to attack each French army. However, when news of Napoleon Bonaparte's victories in Italy reached Vienna, Wurmser was sent to Italy with 25,000 extra soldiers. The Aulic Council (Austrian war council) then gave Archduke Charles command of both Austrian armies and told him to hold his ground.
On the French side, the 80,000-man Army of Sambre-et-Meuse held the west bank of the Rhine down to the Nahe River. On this army's left side, Jean Baptiste Kléber had 22,000 troops dug in at Düsseldorf. The right side of the Army of the Rhine and Moselle, led by Jean Victor Moreau, was positioned east of the Rhine from Hüningen northward. Its center was near Landau, and its left side stretched west toward Saarbrücken.
The French plan was for their two armies to attack the sides of the Coalition's northern armies in Germany. At the same time, a third army would move towards Vienna through Italy. Specifically, Jean-Baptiste Jourdan's army would push south from Düsseldorf. This was meant to draw the enemy's attention and troops towards them. This would make it easier for Moreau’s army to cross the Rhine at Hüningen and Kehl.
If everything worked, Jourdan’s army would pretend to attack Mannheim. This would force Charles to move his troops. Once Charles moved his main army north, Moreau’s army, which had been near Speyer, would quickly move south to Strasbourg. From there, they could cross the river at Kehl. Kehl was only guarded by 7,000 inexperienced and lightly trained militia soldiers. These soldiers had been recruited that spring from the Swabian areas.
In the south, near Basel, Ferino’s group was to quickly cross the river. They would then move up the Rhine along the Swiss and German border, towards Lake Constance. They would also spread into the southern part of the Black Forest. The idea was to surround Charles and his army. Moreau's army would swing behind Charles, and Jourdan's force would cut off his side.
The French Plan in Action: A Tricky Attack
For the first six weeks, everything went according to the French plan. On June 4, 1796, 11,000 soldiers from the Army of the Sambre-et-Meuse, led by François Lefebvre, pushed back 6,500 Austrian soldiers at Altenkirchen. On June 6, the French began to surround Ehrenbreitstein fortress.
At Wetzlar, Lefebvre met Charles's large force of 36,000 Austrians on June 15. Not many soldiers were lost on either side. Jourdan then pulled back to Niewied, and Kléber retreated towards Düsseldorf. Pál Kray, commanding 30,000 Austrian troops, attacked Kléber's 24,000 soldiers at Uckerath on June 19. This made the French continue their retreat north, which encouraged Kray to follow them. These actions convinced Charles that Jourdan planned to cross the Rhine in the middle. So, Charles quickly moved most of his army to deal with this threat.
Because of the French trick, Charles moved most of his forces to the middle and northern Rhine. This left only the Swabian militia at the Kehl-Strasbourg crossing. A smaller force, led by Karl Aloys zu Fürstenberg, was at Rastatt. There was also a small group of about 5,000 French royalists, led by Louis Joseph, Prince of Condé. They were supposedly guarding the Rhine from Switzerland to Freiburg im Breisgau.
Once Charles moved his main army north, Moreau quickly turned around. He made a fast march with most of his army and arrived at Strasbourg. Charles didn't even realize the French had left Speyer. To move so quickly, Moreau left his heavy cannons behind. Foot soldiers and cavalry move much faster. On June 20, Moreau's leading troops attacked the forward posts between Strasbourg and the river. They overwhelmed the guards there. The militia retreated to Kehl, leaving their cannons behind. This helped Moreau with his artillery problem.
Early on June 24, Moreau and 3,000 men got into small boats. They landed on the islands in the river between Strasbourg and the fort at Kehl. They forced the imperial guards off the islands. These guards didn't have time to destroy the bridges connecting to the other side of the Rhine. So, the French kept moving. They crossed the river and suddenly attacked the forts at Kehl.
Once the French controlled the forts of Strasbourg and the river islands, Moreau’s leading group attacked. As many as 10,000 French skirmishers, some from the 3rd and 16th Demi-brigades led by 24-year-old General Abbatucci, swarmed across the Kehl bridge. They attacked the few hundred Swabian guards. After the skirmishers did their job, Charles Mathieu Isidore Decaen's and Joseph de Montrichard's infantry (27,000 foot soldiers and 3,000 cavalry) followed. They secured the bridge.
The Swabians were greatly outnumbered and couldn't get help. Most of Charles's army was further north, near Mannheim. The river was easier to cross there, but it was too far to support the smaller force at Kehl. The only troops somewhat close were Prince Condé’s royalist army at Freiburg and Karl Aloys zu Fürstenberg's force in Rastatt. Neither could reach Kehl in time.
A second attack happened at the same time as the Kehl crossing. This was at Hüningen, near Basel. After crossing without resistance, Ferino moved east along the German side of the Rhine. He had the 16th and 50th demi-brigades, the 68th and 50th and 68th line infantry, and six groups of cavalry. These included the 3rd and 7th Hussars and the 10th Dragoons.
Within a day, Moreau had four divisions (large groups of soldiers) across the river at Kehl. Another three divisions were at Hüningen. The Swabian soldiers, who had been forced out of Kehl, regrouped at Renchen on June 28. There, Count Sztáray and Prince von Lotheringen managed to gather the scattered Swabians and combine them with their own 2,000 troops.
On July 5, the two armies met again at Rastatt. There, under Fürstenberg's command, the Swabians managed to hold the city. But then 19,000 French troops attacked both sides of their army. Fürstenberg decided to make a planned retreat. Ferino quickly moved eastward along the Rhine. He aimed to approach Charles's force from behind and cut him off from Bavaria. Bourcier's division swung north, along the east side of the mountains. They hoped to separate Condé’s royalist soldiers from the main force. Either of these French divisions could have attacked the side of the entire Coalition force. Condé's troops marched north and joined with Fürstenberg and the Swabians at Rastatt.
What Happened Next
The immediate losses of soldiers seemed small. At Kehl, the French lost about 150 soldiers killed, missing, or wounded. The Swabian militia lost 700 soldiers, plus 14 cannons and 22 ammunition wagons. Right away, the French started to make their position safe. They built a floating bridge between Kehl and Strasbourg. This allowed Moreau to send his cavalry (horse soldiers) and captured cannons across the river.
The bigger losses were strategic. The French army's ability to cross the Rhine whenever they wanted gave them a huge advantage. Charles couldn't move much of his army away from Mannheim or Karlsruhe, where the French had also crossed the river. Losing the crossings at Hüningen (near Basel) and Kehl (near Strasbourg) meant the French had easy access to most of southwestern Germany. From there, Moreau's troops could spread out around Kehl. This would stop any enemy approach from Rastadt or Offenburg.
To avoid Ferino's flanking move, Charles made an organized retreat. He moved his army in four groups through the Black Forest, across the Upper Danube valley, and towards Bavaria. He tried to keep his army connected as each group retreated. By mid-July, the group that included the Swabians camped near Stuttgart. The third group, which had Condé’s soldiers, retreated through Waldsee to Stockach, and then to Ravensburg. The fourth Austrian group, the smallest, retreated along the northern shore of Lake Constance.
The situation changed when Charles and Wartensleben's forces joined together. They defeated Jourdan's army at the battles of Amberg, Würzburg, and 2nd Altenkirchen. On September 18, an Austrian group attacked the Rhine crossing at Kehl. But a French counterattack drove them out. Even though the French still held the crossing between Kehl and Strasbourg, the Austrians controlled the land leading to it.
After battles at Emmendingen (October 19) and Schliengen (October 24), Moreau moved his troops south to Hüningen. Once they were safe on French land, the French refused to give up Kehl or Hüningen. This led to long sieges (surroundings) of over 100 days at both places.
Who Fought: Armies and Their Leaders
French Forces
Adjutant General Abbatucci was in command.
- Generals of Brigade: Decaen, Montrichard
- 3rd Demi-brigade (light infantry) (2nd battalion)
- 11th Demi-brigade (light infantry) (1st battalion)
- 31st, 56th, and 89th Demi-brigade (line infantry) (three battalions each)
Habsburg/Coalition Forces
The Swabian Circle Contingent:
- Infantry Regiments: Württemberg, Baden-Durlach, Fugger, Wolfegg (two battalions each)
- Hohenzollern Royal and Imperial (KürK) Cavalry (four squadrons)
- Württemberg Dragoons (four squadrons)
- Two field artillery battalions


