
Second Ostend Raid facts for kids
Quick facts for kids Second Ostend Raid |
|||||||
|---|---|---|---|---|---|---|---|
| Part of North Sea Operations, First World War | |||||||
 Postwar wreck of HMS Vindictive at Ostend |
|||||||
|
|||||||
| Belligerents | |||||||
| Commanders and leaders | |||||||
| Strength | |||||||
| 1 blockship 4 monitors 8 destroyers 5 motor launches Aerial support |
Shore defences | ||||||
| Casualties and losses | |||||||
| 1 motor launch sunk 8 dead 10 missing 29 wounded |
3 killed 8 wounded |
||||||
The Second Ostend Raid was a brave but unsuccessful attempt by the British Royal Navy during World War I. In May 1918, British ships tried to block the port of Ostend in Belgium. This was part of a bigger plan to stop German U-boats (submarines) from using Belgian ports.
Germany had been using Ostend and Zeebrugge as bases for their U-boats since 1915. These ports were very important for their submarine attacks in the Atlantic Ocean. If the British could block these ports, German submarines would have to travel much further from bases in Germany. This would make their journeys longer and give the Allies more chances to find and attack them.
Three weeks before, the British had tried to block Zeebrugge in the Zeebrugge Raid. The First Ostend Raid on April 23, 1918, had largely failed. The ships meant to block the channel got stuck too far away. The second attempt at Ostend also failed. Bad weather made it hard for the British to find the narrow entrance to the harbor. German defenses were also very strong. The old British cruiser HMS Vindictive was sunk, but it only partly blocked the channel.
Even though the raid failed, people in Britain saw it as a very brave effort. Many medals were given to the sailors who took part. The British had some losses, but German losses were very small.
Contents
Why Bruges Was Important
After the German Army took over much of Belgium in 1914, the Allies held only a small part of the coastline. The rest of the Belgian coast, including important ports like Antwerp and Bruges, was controlled by Germany.
Bruges was connected to the coast at Ostend and Zeebrugge by a network of canals. Small warships like destroyers, light cruisers, and submarines could use these canals. They could find a safe place in Bruges to launch attacks into the English Channel and along the British coast. U-boats could also leave Bruges at night. This saved them a day of travel to the main battle areas in the Atlantic. It also helped them avoid British minefields more easily.
From 1915 to 1916, the German navy turned Bruges into a major naval center. They built large concrete bunkers to protect U-boats. They also created training areas for U-boat crews and other warships. Bruges was a key asset for the German navy. They needed it to try and stop Britain from getting food and supplies from other countries.
The British knew how important Bruges was. They had tried twice before to close the exit at Ostend, which was the smaller canal. Both attempts had failed. In 1915, British ships fired at the dockyard, but only caused a small fire. In 1917, they hit the lock gates, which caused the basin to drain at low tide.
Two years later, the First Ostend Raid happened on April 23, 1918. It was planned with the Zeebrugge Raid. Both attacks mostly failed. At Zeebrugge, the British thought they had succeeded, but they hadn't. At Ostend, the attack was a disaster. The two ships meant to block the canal got stuck far from their target. They were sunk by their crews under heavy German fire, causing many casualties. So, while Zeebrugge seemed blocked, Ostend was still wide open. This meant any success at Zeebrugge was pointless.
Planning the Attack

After the first failed raid, British forces regrouped. Vice-Admiral Roger Keyes planned another attack on Ostend. The goal was to block the canal and cut off Bruges from the sea. This would trap the 18 U-boats and 25 destroyers inside for months.
Sailors who had been part of the first failed raid volunteered to help plan the new one. They shared their experiences and ideas. Among them were Lieutenant-Commander Henry Hardy and Commander Alfred Godsal. These officers worked with Commodore Hubert Lynes and Admiral Roger Keyes to create a new plan. Many other officers also volunteered to take part.
Two old cruisers, HMS Sappho and the damaged HMS Vindictive (which had been at Zeebrugge), were prepared. Unnecessary equipment was removed, and important parts were made stronger. Volunteer crews were chosen. The front of the ships was filled with concrete. This would protect them during the attack and help them become a lasting barrier once sunk. Commander Godsal commanded Vindictive. All 54 of her crew were volunteers who had been in the previous failed raid.
The two blockships were joined by four large monitors (ships with big guns) led by Keyes. There were also eight destroyers led by Lynes in HMS Faulknor, and five motor launches. Like the blockships, the motor launches had volunteer crews, many of whom had been in earlier operations against Belgian ports.
The plan was similar to the first failed attempt. If the weather was good, the blockships would sail into the channel. They would be hidden by a smoke screen and supported by bombs from planes and artillery fire from offshore. Once in the channel, they would turn sideways and sink themselves. Heavy monitors would fire at German shore positions from far away. Destroyers would fire at closer range. This cover was very important because Ostend was protected by a strong 11-inch gun battery called the Tirpitz battery. After the ships were sunk, the motor launches would pick up the surviving crews. They would take them to the monitors to return to Britain. The goal was to completely block the channel. This, along with the blockage at Zeebrugge (which the British thought was fully closed), would stop German raiding ships from using Bruges for months.
Attack on Ostend
All preparations were finished by the first week of May. On May 9, the weather was almost perfect for the attack. The British fleet gathered at Dunkirk in France and left port shortly after dark.
Just after midnight, there was a problem. Sappho had a small boiler explosion and had to go back to Dunkirk. This meant the British had only half the blocking power they planned. But Lynes decided to continue the mission. At 1:30 AM, the force got close to Ostend.
The attack began when torpedoes from motor launches destroyed machine gun posts on the ends of the piers. Then, ten heavy bombers from the new Royal Air Force dropped bombs on German positions. They didn't cause much damage. Even with fog, air operations continued under Brigadier-General Charles Lambe. At the same time, long-range artillery from the Royal Marine Artillery began firing on Ostend from Allied positions near Ypres.
| "The star-shells paled and were lost as they sank in it; the beams of the searchlights seemed to break off short upon its front. It blinded the observers of the great batteries when suddenly, upon the warning of the explosions, the guns roared into action. It was then that those on the destroyers became aware that what had seemed to be merely smoke was wet and cold, that the rigging was beginning to drip, that there were no longer any stars—a sea-fog had come on." |
| British Admiralty statement on the Ostend Raid, 11 May 1918 |
Godsal and Lynes had carefully studied maps of Ostend. They knew the Germans had moved navigation buoys after the first raid. But a sudden fog made all their studies useless. They couldn't see the shore at all.
Vindictive steamed back and forth in the fog, looking for the piers that marked the canal entrance. The monitors and German shore batteries were firing at each other. Two German torpedo boats left Ostend to stop the cruiser. But in the thick fog, they crashed into each other and had to limp back to shore. During this time, Godsal's motor launches lost sight of Vindictive in the fog. It took three tries for Vindictive to find the entrance, with only one motor launch guiding it with a flare.
As Vindictive entered the canal mouth, German batteries immediately opened fire. The ship was badly damaged. The shellfire made the damage from the Zeebrugge Raid even worse. Vindictive's left propeller was also badly hit.
Alfred Godsal planned to turn Vindictive sideways to block the channel. But as he gave the order, the right propeller completely broke down. This stopped the cruiser from turning fully. Before anyone on the bridge realized this, a shell hit Commander Godsal directly. He was killed instantly, and the bridge was shattered. Most of the bridge crew were killed or wounded. First Lieutenant Victor Crutchley, though wounded, tried to force the ship to turn. But the damaged propeller made it impossible. The drifting cruiser floated out of the channel and got stuck on a sandbank outside. It only partly blocked the entrance.
Evacuating HMS Vindictive
| "The engineer, who was the last to leave the engine-room, blew the main charges by the switch installed aft. Those on board felt the old ship shrug as the explosive tore the bottom plates and the bulkheads from her; she sank about six feet and lay upon the bottom of the channel. Her work was done." |
| British Admiralty statement |
Realizing they couldn't move the ship further, Crutchley ordered the scuttling charges to be set off. He also ordered everyone to leave the ship on the side facing the sea. Engineer-Lieutenant William Bury prepared to detonate the charges. Crutchley searched the ship with a flashlight, looking for wounded men among the dead. When he was sure no one alive was left, he jumped onto a motor launch below.
The rescue mission was not going well. Of the five motor launches, only one, ML254 commanded by Lieutenant Geoffrey Drummond, had stayed with the cruiser in the fog. This launch was full of bullet holes. Its commander was wounded, and its second officer was dead. Even though it was hidden behind the cruiser, machine gun fire from shore kept hitting the launch. Many people, including Lieutenant Bury, broke their ankles jumping onto the moving deck.
ML254 slowly left the harbor mouth. It carried 38 survivors from Vindictives 55 crewmen. They were crowded on deck, still exposed to machine gun fire. As Drummond turned his boat towards the sea, another missing launch, ML276, passed by. It had finally caught up. Drummond called to ML276s commander, Lieutenant Rowley Bourke, saying he thought there were still men in the water. Bourke immediately went back into the harbor to search. Drummond's launch continued to the destroyer HMS Warwick. It was overloaded and sinking because of the severe damage it had taken.
Bourke heard cries and entered the harbor, but he couldn't find the lost men. Despite heavy machine gun and artillery fire, Bourke returned to the wreck four times. Finally, they found two sailors and Vindictive's badly wounded navigation officer, Sir John Alleyne, clinging to an overturned boat. Bourke pulled them aboard and turned for the open sea. But as he did, two 6-inch shells hit the launch. They smashed the lifeboat and destroyed the compressed air tanks. This stopped the engines and caused a wave of acid to wash over the deck. It badly damaged the launch's hull and almost suffocated the unconscious Alleyne. Under heavy fire, the boat struggled out of the harbor. Another late-arriving motor launch towed it away. After the operation, Bourke's launch was found to have 55 bullet and shrapnel holes.
Offshore, officers from Warwick, Keyes' staff, and Vindictive survivors gathered on the destroyer's deck. They were discussing the operation when a huge explosion rocked the ship. Warwick had hit a defensive sea mine off Ostend and was now in danger of sinking. The destroyer HMS Velox pulled alongside. Survivors from Warwick, Vindictive, and ML254 transferred to the undamaged ship. This group finally reached Dover early the next morning, with Warwick still afloat. British casualties were reported as eight dead, ten missing (presumed killed), and 29 wounded. German losses were three killed and eight wounded.
What Happened Next
.jpg)
Even though Germany said the blockage didn't stop their operations, Britain presented the Ostend raid as partly successful. The channel was mostly blocked, so Bruges seemed cut off from the sea. However, smaller ships could still get through.
In reality, the whole operation was pointless even before it began. British reports about the Zeebrugge raid had been too hopeful. The channel there had not been fully closed. Small German submarines could pass through the Zeebrugge channel the morning after that raid. German engineers were also able to dig channels around the blockages at both ports in the following weeks.
At Ostend, Vindictive did stop larger warships from passing through the channel. But smaller ships could still come and go. The larger warships in Bruges were trapped there for the rest of the war. The Allies captured Bruges in October 1918.
The British Admiralty presented the raid as an example of careful planning by the Royal Navy. They said it boosted morale during a very difficult time in the war. Three Victoria Crosses, Britain's highest military award, were given to men involved. However, the raids at Ostend and Zeebrugge had very little effect on the overall Battle of the Atlantic. It took several years to completely clear the blockages at Ostend and Zeebrugge, not until 1921.
Images for kids
-

Postwar wreck of HMS Vindictive at Ostend
-
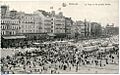
The beachside of the city of Ostende in 1915.
-
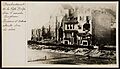
Houses in Ostend destroyed by Royal Navy gunfire
