Battle of Port Royal facts for kids
Quick facts for kids Battle of Port Royal |
|||||||
|---|---|---|---|---|---|---|---|
| Part of the American Civil War | |||||||
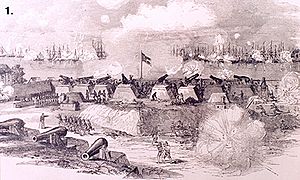
 View of the battle from the Confederate heights by Rossiter Johnson |
|||||||
|
|||||||
| Belligerents | |||||||
| Commanders and leaders | |||||||
| Strength | |||||||
| 77 vessels 12,653 troops |
44 cannons 3,077 troops 4 gunboats |
||||||
| Casualties and losses | |||||||
| 31 (8 killed, 23 wounded) | 63 (11 killed, 48 wounded, 4 missing) | ||||||
The Battle of Port Royal was an early important battle of the American Civil War. It took place in South Carolina between November 3 and 7, 1861. The United States Navy (Union) and United States Army worked together. They captured Port Royal Sound, a key waterway between Savannah, Georgia and Charleston, South Carolina.
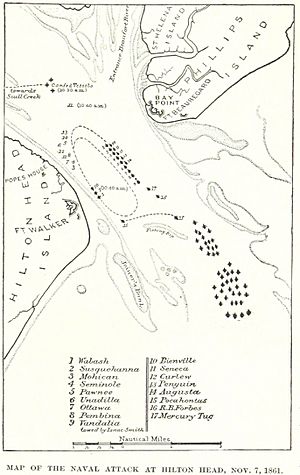
The entrance to the sound was protected by two forts. Fort Walker was on Hilton Head Island to the south. Fort Beauregard was on Phillip's Island to the north. A small group of four Confederate gunboats also tried to help defend the forts.
The Union attacking force gathered outside the sound starting on November 3. Their journey was rough, as a big storm hit their ships. Because of the storm, the army could not land their troops. This meant the battle became a fight between the Union ships' cannons and the forts' cannons on shore.
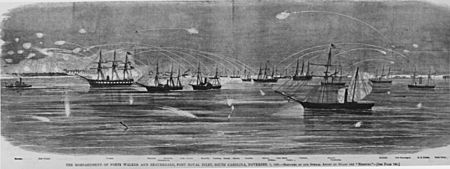
The Union fleet attacked on November 7. There were more delays because of bad weather. Union Flag Officer Samuel F. Du Pont led the attack. He ordered his ships to move in a circle. They would fire at Fort Walker on one side and Fort Beauregard on the other. This plan soon changed. Many ships found a way to fire at Fort Walker from its weak side. This is called enfilading.
The Confederate gunboats showed up briefly but quickly left. By early afternoon, most of Fort Walker's guns were broken. The soldiers inside ran away. A small group from the Union flagship took over the fort.
When Fort Walker fell, the commander of Fort Beauregard got worried. He feared his soldiers would be trapped. So, he ordered them to leave their fort too. Another Union group took over Fort Beauregard the next day. They raised the Union flag.
Even though a lot of shooting happened, not many people died. This was unusual for the Civil War. Only eight Union soldiers were killed, and eleven Confederate soldiers died. Less than 100 people were hurt or missing in total.
Contents
Why Port Royal Was Important
Union Needs for the Blockade
Early in the war, the U.S. Navy had to blockade the Southern coastline. This meant stopping ships from bringing supplies in or out. It was very hard because their steamships needed coal. They had to go all the way back to Northern ports for fuel and supplies.
A special group called the Blockade Strategy Board looked at this problem. They thought about taking a port near Charleston, South Carolina. They looked at Bull's Bay, St. Helena Sound, and Port Royal Sound. Port Royal was the best harbor. But it was also expected to be strongly defended.
Confederate Fort Building
After the war started at Fort Sumter, Confederate General P. G. T. Beauregard thought Port Royal Sound would be hard to defend. The forts on each side would be too far apart to help each other. But South Carolina's Governor Francis Wilkinson Pickens disagreed. So, Beauregard planned two forts at the entrance.
Work on the forts started in July 1861. But it went very slowly. They used enslaved people from local farms to build them. But the owners did not want to send their workers. So, the forts were not finished when the Union attacked.
The forts also did not get the heavy guns Beauregard wanted. To make up for this, they put more smaller guns in Fort Walker. This made the fort weak to enfilade fire, which means being shot at from the side. Fort Walker had 13 guns facing the water and 10 more for land attacks. Fort Beauregard was also strong, with 13 guns facing the channel.
The number of soldiers in the forts grew. On November 6, more troops arrived at Fort Walker. But Fort Beauregard was harder to reach. So, its soldiers could not get as much help.
Georgia also had a small navy. It was made of tugboats and other small ships turned into gunboats. They were led by Flag Officer Josiah Tattnall III. These boats were small but could move easily in shallow waters. Tattnall had four gunboats near Port Royal Sound. Each had only two guns.
Who Was in Charge
Union Leaders
In mid-September 1861, the U.S. Navy split its Atlantic Blockading Squadron. The new South Atlantic Blockading Squadron was formed. It was in charge of the coast south of North Carolina. Samuel F. Du Pont became its Flag Officer. He was in charge of the naval attack.
To hold the land, the Union needed army troops. The War Department sent 13,000 soldiers. Brigadier General Thomas W. Sherman led these troops. Du Pont and Sherman worked together to plan the attack.
Confederate Leaders
The Confederate army in South Carolina had several leaders before the battle. On October 17, 1861, Brigadier General Thomas F. Drayton took command of the area that included the forts. Drayton was from a well-known Charleston family. He had gone to the United States Military Academy. He was in charge of the forts during the battle.
General Robert E. Lee was put in charge of the coasts of South Carolina, Georgia, and East Florida on November 5, 1861. This was just before the battle. But he was too late to make a difference.
The Journey to Battle
The Union forces prepared all summer and fall of 1861. But they were often delayed. President Lincoln wanted them to start by October 1. Du Pont felt rushed. The soldiers and their ships gathered in different places. They met at Hampton Roads, Virginia. Bad weather delayed them for another week.
On October 28, 25 supply ships left Hampton Roads. The rest of the fleet, including 17 warships and army transports, left the next day. This huge fleet of 77 ships was the largest ever under the American flag at that time. To keep the mission secret, Du Pont did not tell anyone the destination. Each captain had a sealed envelope to open at sea.
But the secret was not kept very well. Two days before the main fleet left, the New York Times printed a front-page story. It was called "The Great Naval Expedition." It listed all the ships and army units. This story was even printed in Charleston newspapers. People figured out the information by talking to soldiers and sailors. The Confederate Secretary of War also knew the target was Port Royal.
The fleet sailed south. But on November 1, a strong storm hit them near Cape Hatteras. Du Pont ordered the ships to break formation. Most ships survived, but some had to go back for repairs. Some were lost. The gunboat Isaac Smith had to throw most of her guns overboard to stay afloat. Three supply ships sank or were driven ashore. The transport Governor, carrying 300 Marines, sank. Most Marines were saved, but seven were lost.
The scattered ships started arriving at Port Royal Sound on November 3. They kept coming in for four more days. On November 4, Union ships explored the harbor. They checked the water depth. Confederate Flag Officer Josiah Tattnall III brought his small gunboat fleet out to stop them. But the Union ships had more firepower and forced Tattnall to retreat.
On November 5, Union gunboats went into the harbor again. They wanted to draw enemy fire to see how strong the forts were. Again, Tattnall's fleet came out and was driven back.
General Sherman told Du Pont that his army could not join the attack. The storm had damaged his landing boats and lost much of his ammunition. His ships were not ready for a quick landing. Sherman's main supply ship would not arrive until after the battle.
Du Pont decided to attack anyway. He ordered his fleet to focus fire on Fort Walker. But his flagship, Wabash, got stuck on a sandbar. By the time it was free, it was too late to attack that day.
The next day, November 6, was stormy. Du Pont waited one more day. During this delay, Du Pont's chief of staff, Commander Charles Henry Davis, had an idea. He suggested keeping the ships moving while they fired at the forts. This tactic had worked well in another battle. Du Pont agreed. His plan was for the fleet to enter the harbor. They would fire at both forts. Then, the biggest ships would turn and go back to attack Fort Walker again. They would repeat this until the fort was defeated. Five smaller Union gunboats would go to the back of the harbor. They would protect the main fleet from Tattnall's gunboats.
The Battle Begins
On November 7, the weather was calm. The Union fleet formed two lines and moved to attack. The main line had nine warships and one ship being towed. The second line had five gunboats. Three other gunboats stayed behind to protect the transport ships.
The battle started at 9:26 AM. A gun in Fort Walker fired at the Union fleet. Other shots followed, and the Union ships fired back at both forts. The battle was on. Union shells hit the forts hard. Many Confederate shots missed, flying over the ships.
The Union ships followed Du Pont's plan at first. But then the plan changed. The third ship, Mohican, found a spot where it could fire at Fort Walker's weak side (enfilade) without getting hit back. Other ships followed this idea. Only Wabash and Susquehanna kept moving in the original line.
The bombardment continued until after noon. Then, Pocahontas, which had been delayed by the storm, arrived. Its captain, Commander Percival Drayton, placed his ship to fire at Fort Walker's weak side. Commander Drayton was the brother of Thomas F. Drayton, the Confederate general in charge of the forts.
On shore, Fort Walker was badly damaged. Most of the damage came from the Union ships that had found the weak spots. The Confederate gunners were tired. Only three guns were still working. Around 12:30 PM, General Drayton left the fort to get more soldiers. He told Colonel William C. Heyward to hold out as long as possible. When Drayton returned at 2:00 PM, he saw his men leaving the fort. They said they were almost out of gunpowder.
Union sailors saw the Confederate soldiers leaving the fort. They quickly signaled to stop firing. A Union boat went ashore under a white flag. They found the fort empty. Commander John Rodgers raised the Union flag. The remaining Confederate soldiers were allowed to escape to the mainland.
Fort Beauregard had not been hit as hard as Fort Walker. But its commander, Colonel Robert Gill Mills Dunovant, worried his soldiers would be cut off. When he heard the cheering from the Union fleet, he knew Fort Walker had fallen. He ordered his troops to leave Philip's Island. They left without destroying their supplies, so the Union fleet would not notice. The Union did not realize the fort was empty until a gunboat fired at it and got no reply. It was late, so the Union flag was raised on Fort Beauregard the next morning.
What Happened Next
After the battle, they counted the losses. Not many people died, even with all the fighting. In the Confederate forts, 11 men were killed, 47 were wounded, and 4 were missing. In the Union fleet, 8 were killed and 23 wounded.
After taking the forts, the Union forces moved to occupy Beaufort, South Carolina. Then they moved north to take St. Helena Sound. This expansion continued until they reached the rivers south of Charleston. The siege of Charleston started here and lasted until the end of the war.
General Lee was put in command too late to help in the battle. He decided not to fight the Union gunboats directly. He moved his forces away from the coast. He focused on defending important places inland, like the railroad link between Savannah and Charleston.
Flag Officer Du Pont was praised for his victory. He was promoted to rear admiral in July 1862. He stayed in command of the South Atlantic Blockading Squadron. He continued naval operations against the coast, including Charleston and Savannah. He built large facilities at Port Royal Sound to support the fleet. But Du Pont became too careful. His reputation suffered after the Union fleet failed to take Charleston in April 1863. He soon retired.
General Sherman continued to serve in the war but did not achieve great fame. He was known for being difficult to work with. He lost his right leg in a later battle.

After the Union victory, Confederate Brigadier-General Thomas F. Drayton led his forces away from Hilton Head Island. They went to the Bluffton mainland. The Union fleet at Port Royal Harbor could then be watched by Confederate lookouts from Bluffton. Bluffton was important because it was the only place on the east coast where Confederates could directly watch the Union fleet. This fleet was crucial for the blockade after the battle.
General Drayton was not very good at leading in battle. So, he was given different office jobs instead.
The poet John Greenleaf Whittier wrote a poem called "At Port Royal." It described what happened after the battle and how the enslaved people were freed.
Images for kids
-
Union troops raise the Stars and Stripes over Fort Walker


