63rd (Royal Naval) Division facts for kids
Quick facts for kids 63rd (Royal Naval) DivisionRoyal Naval Division |
|
|---|---|
Formation badge of the division throughout its history
|
|
| Active | 20 August 1914 – 19 July 1916 (in Navy) 19 July 1916 – April 1919 (in Army) |
| Country | |
| Branch | |
| Type | Infantry |
| Size | Division |
| Part of | VIII Corps |
| Divisional HQ | Westminster, London |
| Engagements |
|
| Insignia | |
| Metal divisional badge | |
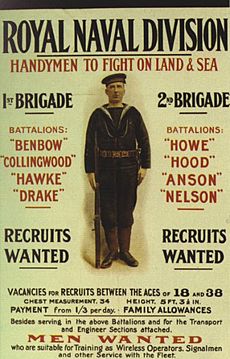
The 63rd (Royal Naval) Division was a special group of soldiers from the United Kingdom during the First World War. It started as the Royal Naval Division when the war began in 1914. This division was made up of sailors and marines who were not needed for ships. They were called "HMS Victory IV" by the Navy.
This division fought in important battles. They were at Antwerp in 1914 and Gallipoli in 1915. In 1916, after many original volunteers were lost, the division joined the British Army. It was then called the 63rd (Royal Naval) Division. They fought on the Western Front for the rest of the war.
Contents
How the Division Started
The Marine Brigade
When World War I began, a special group called the Marine Brigade was formed. It had four battalions (smaller groups of soldiers). These men were from the Royal Marine Light Infantry and Royal Marine Artillery. Their job was to set up or defend naval bases. These bases helped the navy operate or supply the army. Each battalion came from a main naval port: Chatham, Portsmouth, Plymouth, and Deal.
On August 16, 1914, Winston Churchill, who was in charge of the Navy, decided to create two more naval brigades. These would join the Marine Brigade. This formed the larger Royal Naval Division. Many of these new recruits were reservists or volunteers. Some experienced sailors and officers from the army helped train them.
The eight battalions were named after famous naval commanders. These included Drake, Benbow, Hawke, Collingwood, Nelson, Howe, Hood, and Anson. Later, they were simply numbered 1st to 8th. At first, the division only had lightly armed infantry. They did not have medical, artillery, or engineer units. Many trained men were sent back to the fleet. New recruits were taken from other army groups. Training was slow because resources were needed for the fast-growing army. The naval men also did not get army uniforms or field gear right away.
On August 26, the Marine Brigade went to Ostend in Belgium. They were sent to help the Belgian soldiers there. They returned on September 1. On September 3, the Navy decided to train the two Naval Reserve brigades as infantry. They would form an infantry division with the Marine Brigade. They got older rifles from Navy supplies at the end of September. These were not the newer rifles the army used.
Fighting in Belgium
Defending Ostend
In August 1914, Germany invaded Belgium. The Belgian army retreated to the port of Antwerp. Other Belgian troops left ports along the coast. The British Navy wanted to stop Germany from using Belgian ports for submarines. On August 24, German cavalry were seen near Ostend. So, a small naval group was sent to secure the town.
Further south, the French and British armies were retreating. The Germans were pushing them southwest. This left few German units guarding their supply lines. The British Navy planned to use the Channel ports to attack German supply routes. The Royal Marine Brigade was the main part of this landing force.
Only the Chatham, Portsmouth, and Plymouth battalions went to Belgium. Two landed at Ostend on August 27. The third arrived the next day. They were told to hold the town until Belgian troops arrived. About 4,000 Belgian soldiers came on August 30. But the Allied armies were retreating quickly. The British Army decided to get supplies through ports in western France instead. This meant fewer naval ships were available to support the force at Ostend. So, the Marines left Ostend on September 31 and returned to their ports.
The Siege of Antwerp
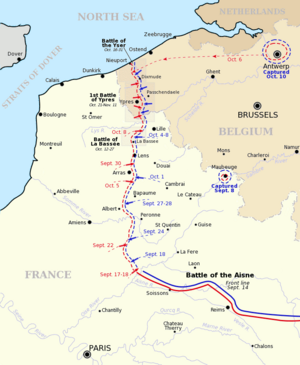
The division also fought in the Siege of Antwerp. The Royal Marine Brigade arrived near Lier on October 4. They used requisitioned London buses to get there. They took up positions around Lier. These were shallow trenches with one wire fence. The two naval brigades arrived on October 6. They were sent to reinforce the Marine Brigade. They found the trenches were shallow and easy for German observers to see.
On the night of October 6–7, the two naval brigades and other Belgian units took over trenches between forts. The British forces were led by Major-General Archibald Paris. Winston Churchill ordered them to defend as long as possible. They were to cross to the west bank of the river rather than surrender.
Belgian commanders decided to continue defending Antwerp with other troops. They moved the 2nd Division and British troops across the Scheldt river. If forts 1 and 2 were lost, the Royal Naval Division would pull back at dusk. News came that the forts had fallen at 5:00 p.m. Orders were sent for a retreat, which began at 7:00 p.m. But not all of the 1st Naval Brigade got the orders. Only one battalion pulled back.
At 9:30 p.m., the mistake was realized. The rest of the division crossed the river from 10:00–11:30 p.m. They moved west, near the Netherlands border. The 1st Naval Brigade reached the Scheldt at midnight. They found the bridges were being destroyed by German shelling. The troops crossed using barges and boats. They headed for a meeting point at Zwijndrecht, arriving at 4:00 a.m. on October 9.
The British moved to Sint-Gillis-Waas. They learned that the Germans had cut the railway at Moerbeke. Their commander, Commodore Henderson, decided to head for the Dutch border. At 10:00 p.m., about 1,500 men were interned (held) in the Netherlands. About forty others managed to escape along the border. The interned men spent the rest of the war in a camp in Groningen. They called it "HMS Timbertown."
Fighting at Gallipoli
The Landings
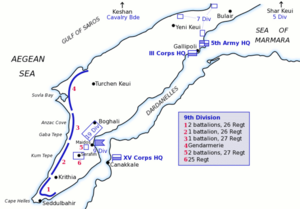
The division was sent by ship to Egypt. They then fought in the Battle of Gallipoli at Anzac Cove and Cape Helles. Before the campaign even started, Rupert Brooke died at sea from an infected mosquito bite. The Royal Naval Division was one of two British divisions at the Gallipoli landings.
Eleven troopships and several warships met off Bulair before dawn. The warships began shelling the area just after daybreak. A destroyer went close to the beach. Later, boats from the troopships were lowered. Lines of eight small boats, pulled by a trawler, pretended to land. In the late afternoon, men got into the boats. They headed for the shore just before dark and returned after night fell.
During the night, Lieutenant-Commander Bernard Freyberg swam ashore. He lit flares along the beach. He then crept inland and watched the Ottoman (Turkish) defenses. Freyberg found that the defenses were fake. He returned safely to report this. Just after dawn, the decoy force sailed south to join the main landings. They came ashore on April 30.
Fighting on the Western Front
The Battle of the Ancre
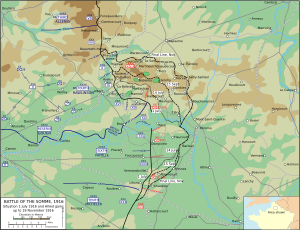
After leaving Gallipoli, the Royal Naval Division moved to France. They took part in the final part of the Battle of the Somme. They advanced along the River Ancre to capture Beaucourt. The division had four main goals during the Battle of Ancre. First, the Dotted Green Line (the German front trench). Second, the Green Line (the road to Beaucourt station). This road was on a fortified ridge. Third, the Yellow Line (a trench beyond the road, around Beaucourt's southwest edge). The final goal, the Red Line, was beyond Beaucourt. Here, the division was to secure their position.
The plan was for battalions to move past each other towards the final goal. The 1st RMLI, Howe, Hawke, and Hood battalions were to take the Dotted Green Line and the Yellow Line. The 2nd RMLI, Anson, Nelson, and Drake battalions were to take the Green and Red lines. The battle started early on November 13. Platoons from the 1st RMLI crawled across "no-man's land" towards the German line. British artillery fired a "creeping barrage" (a moving wall of shells). But many soldiers were hit in no-man's land. About half of all casualties happened before the first German trench was captured. German artillery and machine-gun fire were very strong. All company commanders of 1st RMLI were killed before reaching their first goal.
The German trenches were badly damaged by British shelling. The attackers lost their way, and the plan broke down. The commander and second-in-command of Drake Battalion were killed. Hawke battalion lost its commander and several company commanders. Freyberg, now a temporary lieutenant-colonel, led Hood Battalion to the Green Line. He pushed forward with the remaining men of Drake Battalion. The station road helped the attackers find their way and reorganize. The next creeping barrage started on time at 7:30 a.m. It led the British towards the Yellow Line at Beaucourt Station.
Nelson, Hawke, and Howe battalions had many casualties. Lieutenant-Colonel Burge, commander of Nelson Battalion, was killed attacking a strong part of the Dotted Green Line. Lieutenant-Colonel Wilson, commander of Hawke Battalion, was badly wounded attacking the same spot. Lieutenant-Colonel Saunders, commander of Anson Battalion, was killed early in the battle. But Anson Battalion still captured the Green Line and advanced to the Yellow Line. They made contact with the 51st Highland Division on their left. By 10:30 p.m., Beaucourt had been captured.
On October 17, just before the Battle of the Ancre, Paris was wounded. Major-General Cameron Shute replaced him. Shute was unhappy with the division's "nautical" (sailor-like) traditions. He tried to make them follow army rules more strictly.
Actions of Miraumont
On February 17, the 63rd Division attacked on the north bank of the Ancre. They used the 188th Brigade and two battalions from the 189th Brigade. Their goal was to capture 700 yards of road north from Baillescourt Farm. This would give them a better view of Miraumont. It would also create a defensive side on their left, back to their original front line.
Two battalions attacked, with a third ready on the right side. This third battalion could help them or work with the 18th Division. On the northern side, two infantry companies, engineers, and pioneers were placed. Their job was to set up the defensive side on the left. The division's artillery and other army guns provided covering fire. Three field batteries from the 62nd Division also helped. They created a protective barrage along the northern side.
The darkness, fog, and mud were very bad, just like on the south bank. But the German defense was much weaker. The creeping barrage moved slowly, 100 yards in four minutes. The Germans in a few strong-points were quickly defeated. The goal was reached by 6:40 a.m., and the defensive side was set up. The last German strong-point was captured at 10:50 a.m. A German counter-attack the next day was stopped by artillery fire. The 63rd Division had 549 casualties. The three attacking divisions took 599 prisoners.
Second Battle of Passchendaele
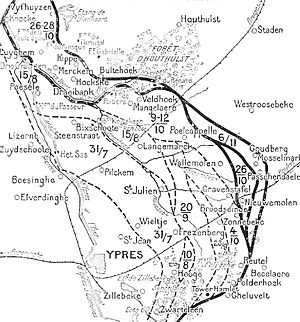
The division arrived at Ypres just before the Second Battle of Passchendaele (October 26 – November 10). On October 26, the 188th Brigade of the 63rd Division quickly captured Varlet Farm and Banff House. The center of the attack was stopped on the road between Bray Farm and Wallemolen village. The troops dug in near Source Trench. As dark fell, Banff House was left, and the line moved back to Berks House. This left Banff House and Source Trench as the only parts of the first objective not taken.
On October 30, the 63rd Division's infantry were hit by German artillery fire at their starting line. They made only small progress in deep mud against German machine-gun fire. The infantry could not reach their meeting point with the Canadians. This left their troops at Source Farm and Vapour Farm in dangerous positions. Two companies later advanced through the Canadian area to capture Source Trench. But they could only reinforce the Canadian outpost at Source Farm. Then they formed a defensive side to Vapour Farm. The 63rd Division had 3,126 casualties from October 26–31. The division was able to move closer to the Paddebeek by attacking at night from November 1–5. This method gained more ground than their attacks in October. It cost them 14 killed and 148 wounded.
Battles Fought
- German invasion of Belgium
- Gallipoli Campaign
- Western Front
- Battle of the Ancre
- Actions of Miraumont
- Battle of Arras
- Second Battle of Passchendaele
- Action of Welsh Ridge
- Battle of St. Quentin
- First Battle of Bapaume
- Hundred Days Offensive
- Battle of Albert (1918)
- Battle of Drocourt-Queant
- Battle of the Canal du Nord
- Battle of Cambrai (1918)
Commanders of the Division
- September 21 – September 29, 1914: Brigadier-General Sir George Aston
- September 29, 1914 – October 12, 1916: Major-General Archibald Paris
- October 12 – October 16, 1916: Brigadier-General Cecil de Rougemont (acting)
- October 16 – October 17, 1916: Brigadier-General Charles Trotman (acting)
- October 17, 1916 – February 19, 1917: Major-General Cameron Shute
- February 19, 1917 – August 30, 1918: Major-General Charles Lawrie
- August 30, 1918 – 1919 (when the division was ended): Major-General Cyril Blacklock
See also
- List of British divisions in WWI
- Naval Brigade


