Battle of Kohima facts for kids
Quick facts for kids Battle of Kohima |
|||||||
|---|---|---|---|---|---|---|---|
| Part of Operation U-Go during the Burma Campaign in the South-East Asian theatre of World War II | |||||||
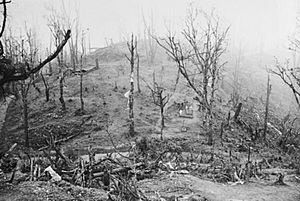 View of the Garrison Hill battlefield, the key to the British defences at Kohima |
|||||||
|
|||||||
| Belligerents | |||||||
| Commanders and leaders | |||||||
| Strength | |||||||
| Start: 1 infantry brigade (1,500) End: 2 infantry divisions 1 Chindit brigade 1 motor brigade |
1 infantry division (15,000–20,000) | ||||||
| Casualties and losses | |||||||
| 4,064 | 5,764–7,000 (mainly from starvation and disease) |
||||||
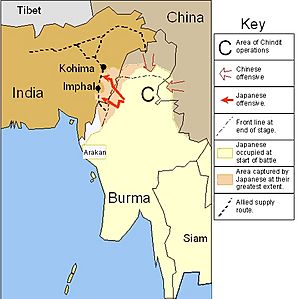
The Battle of Kohima was a major turning point in World War II in Asia. It happened in 1944 when Japanese forces tried to invade India. The battle took place in three main parts from April 4 to June 22, 1944. It was fought around the town of Kohima, which is now the capital of Nagaland in Northeast India.
From April 3 to April 16, the Japanese tried to capture Kohima Ridge. This ridge was very important because it controlled the road used to supply British and Indian troops. These troops were stuck in a place called Imphal. By mid-April, the smaller British and Indian forces defending Kohima got help from more soldiers.
From April 18 to May 13, the British and Indian reinforcements fought back. They pushed the Japanese out of the areas they had captured. The Japanese left the ridge but still blocked the road between Kohima and Imphal.
From May 16 to June 22, British and Indian troops chased the Japanese away. They finally reopened the road. The battle ended on June 22 when soldiers from Kohima and Imphal met. This meeting ended the long Siege of Imphal.
Some historians have called the Battle of Kohima the "Stalingrad of the East". This means it was a very tough and important battle. Military historian Robert Lyman said that the battles of Kohima and Imphal "changed the course of the Second World War in Asia". He noted that it was the first time the Japanese were truly defeated in a big battle.
In 2013, a poll by the British National Army Museum named the Battles of Kohima and Imphal as "Britain's Greatest Battle".
Contents
Why the Battle Happened
The Japanese plan to invade India was called Operation U-Go. At first, it was meant to be a quick attack. This attack would stop the Allied forces from planning their own attacks later that year.
However, the commander of the Japanese Fifteenth Army, Lieutenant General Renya Mutaguchi, made the plan bigger. He wanted to invade India itself. He even hoped to overthrow the British Raj, which was British rule in India.
If Japan could get a strong hold in India, it would show that the British Empire was weak. This might encourage Indian people who wanted independence. Also, controlling the area around Imphal would make it hard for the United States to supply Chiang Kai-shek's army in China. The Japanese leaders finally approved the invasion plan on January 7, 1944.
Part of this plan was for the Japanese 31st Division to capture Kohima. This would cut off the supply road to Imphal. Mutaguchi also wanted the 31st Division to push on to Dimapur. Dimapur was a very important railway hub and supply base.
The commander of the 31st Division, Lieutenant General Kotoku Sato, was not happy with his role. He thought the plan was risky and that his soldiers might starve.
Getting Ready for Battle
On March 15, 1944, the Japanese 31st Division began its march. They crossed the Chindwin River and moved through thick jungle. They had very little transport. So, they left half their heavy weapons behind. They only carried three weeks' worth of food and ammunition.
Even though the march was hard, they made good progress. One part of the division, led by Major General Shigesaburō Miyazaki, met Indian troops on March 20. These Indian troops were from the 50th Indian Parachute Brigade at Sangshak.
A battle started at Sangshak. It lasted for six days. The Indian soldiers ran out of drinking water. Miyazaki's troops were also delayed by a week. They had the shortest way to Kohima, but this fight slowed them down.
Meanwhile, the commander of the British Fourteenth Army, Lieutenant General William Slim, realized something important. He learned that a whole Japanese division was heading for Kohima. He had thought only a small Japanese force would go there.
Slim knew there were few fighting troops in Kohima. There were none at all at Dimapur, a vital base 30 miles (48 km) north. Dimapur held huge supply dumps. If Dimapur fell, it would be a disaster for the Allies. So, Slim asked for more troops to protect Dimapur and help Imphal.
The Allies quickly sent more soldiers to the Imphal Front. The 5th Indian Infantry Division was flown in. Its 161st Indian Infantry Brigade was sent to Dimapur. Also, the 23rd Long Range Penetration Brigade was moved to threaten the Japanese attack.
General Claude Auchinleck, who led the British Indian Army, also prepared to send the British 2nd Division to Dimapur. This division was led by Lieutenant General Montagu Stopford.
The Battle Begins
Kohima's Importance
Kohima was very important because it was on a pass. This pass offered the Japanese the best way from Burma into India. The main supply road between Dimapur and Imphal ran through Kohima. This road was crucial for the British and Indian troops fighting in Imphal.
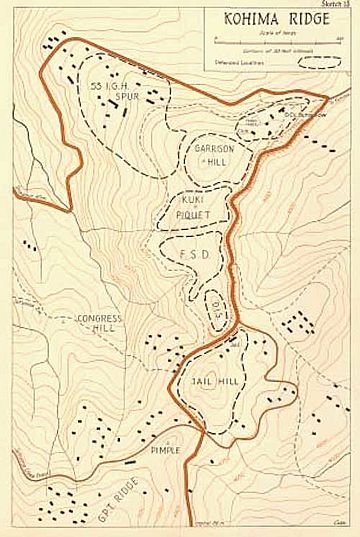
Kohima Ridge runs roughly north and south. The road from Dimapur to Imphal climbs to its northern end. It then runs along the eastern side of the ridge. In 1944, Kohima was the main administrative center of Nagaland. The local British official's bungalow was on the hillside.
The area around Kohima had many hills and features. These included Naga Village, Treasury Hill, Church Knoll, GPT Ridge, and Aradura Spur. Many places were named after the British and Indian army camps there, like "Field Supply Depot" which became FSD Hill.
The Siege of Kohima
Before the 161st Indian Brigade arrived, Kohima had only a few soldiers. These included the 1st Battalion, the Assam Regiment, and some local police. In late March, the 161st Brigade came to Kohima. But they were ordered back to Dimapur because Dimapur was seen as more important.
Luckily for the Allies, the Japanese commander Sato focused on capturing Kohima. His superior, Mutaguchi, wanted him to send troops to Dimapur. But Mutaguchi's own superior stopped that plan.
On April 1, Japanese troops began fighting the Assam Regiment east of Kohima. By April 3, Miyazaki's troops reached the edge of Naga village. They started attacking Kohima from the south.
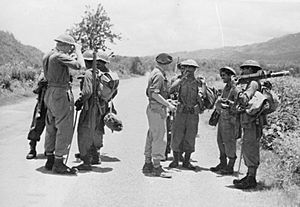
On April 4, the 161st Indian Brigade was ordered back to Kohima. But only one battalion, the 4th Battalion Queen's Own Royal West Kent Regiment, made it. The Japanese cut the road west of the ridge. The Kohima defenders were about 2,500 strong, but many were not combat soldiers. Colonel Hugh Richards commanded them.
The siege started on April 6. The Japanese constantly shelled the defenders. The British and Indian soldiers were slowly pushed into a small area on Garrison Hill. They had some artillery support from the 161st Brigade, who were cut off nearby. But they had very little drinking water. The main water point was captured by the Japanese.
Some of the fiercest fighting happened around the Deputy Commissioner's bungalow and tennis court. This became known as the Battle of the Tennis Court. The tennis court was a dangerous "no man's land." Japanese and Allied soldiers were so close they threw grenades at each other.
On the night of April 17/18, the Japanese finally captured the DC's bungalow area. They also captured Kuki Picquet, splitting the defenders. The situation was desperate. But the Japanese were tired and hungry. The next morning, troops from the 161st Indian Brigade arrived to help.
Help Arrives
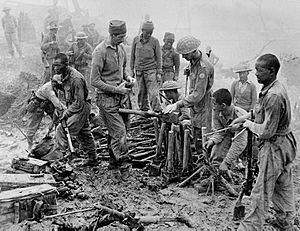
The British 2nd Division began arriving at Dimapur in early April. By April 11, the Allies had about the same number of troops as the Japanese. The British 5th Brigade broke through Japanese roadblocks. They reached the 161st Brigade on April 15.
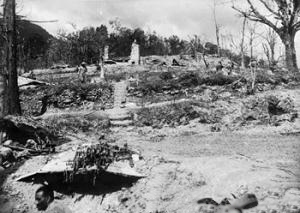
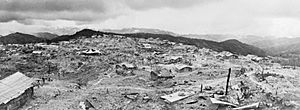
The British 6th Brigade took over the defensive position. This allowed the 161st Brigade to attack Kohima on April 18. After a day of heavy fighting, the 1st Battalion, 1st Punjab Regiment, broke through. They started to relieve the Kohima garrison. By this time, Kohima looked like a battlefield from World War I. It had ruined buildings and craters everywhere.
Under the cover of darkness, 300 wounded soldiers were brought out. It took another 24 hours to fully secure the road. On April 19 and 20, the British 6th Brigade replaced the original defenders. Observers were shocked by how tired and worn out the garrison looked.
Miyazaki still tried to capture Garrison Hill. There was heavy fighting for several more nights. Casualties were high on both sides. Japanese positions were very close to Garrison Hill, leading to hand-to-hand combat. On April 26/27, a British attack recaptured the clubhouse. This position overlooked many Japanese areas.
Fighting Back
The Japanese prepared their defenses. Miyazaki's force held Kohima Ridge. Sato's headquarters and another force held Naga Village. A smaller force held villages to the north and east.
To attack the Japanese, the British brought in many guns. They had 38 mountain howitzers, 48 field guns, and two medium guns. The Royal Air Force (RAF) also bombed and attacked Japanese positions. The Japanese had only 17 light mountain guns with little ammunition.
Still, the British counter-attack was slow. Tanks were hard to use. The Japanese had very strong, hidden bunkers. The monsoon rains had started, making the ground muddy. This made moving and supplying troops very difficult.
On May 4, the British 5th Brigade got into Naga Village but lost it to a counter-attack. On the same day, the British 4th Brigade attacked GPT Ridge. They captured part of it by surprise. But they could not secure the whole ridge. Two commanders of the British 4th Brigade were killed in the fighting there.
Since flanking moves failed, the British 2nd Division focused on attacking Kohima Ridge directly. Japanese posts on GPT Ridge kept firing at British troops attacking Jail Hill. This caused many casualties. But slowly, the British took different positions. Jail Hill, Kuki Picquet, FSD, and DIS were finally captured on May 11.
The last Japanese positions on the ridge were the tennis court and gardens. On May 13, a British tank was dragged up to the summit. The tank crashed onto the tennis court. It destroyed the Japanese trenches and bunkers. British soldiers followed and captured the area where the bungalow stood. Kohima Ridge was finally clear. The area was a mess of destroyed trees and human remains.
More Allied help arrived. The 7th Indian Infantry Division came by road and rail. Its 33rd Indian Brigade joined the fighting on Kohima Ridge on May 4. The 114th Indian Infantry Brigade arrived on May 12. This division focused on taking back Naga Village.
However, the Japanese continued to fight fiercely. They defended Naga Village and Aradura Spur very strongly. Attacks on these areas in late May failed. The British 2nd Division became very tired.
Japanese Retreat
The main reason the Japanese lost was a lack of supplies. The Japanese 31st Division started with only three weeks of food. After that, they had to rely on small amounts of captured supplies. They also tried to find food in local villages, but the villagers were becoming hostile.
The British 23rd LRP Brigade cut the Japanese supply lines. This stopped them from getting food from the east of Kohima. The Japanese tried to bring supplies forward, but they mostly brought ammunition, not food.
By mid-May, Sato's troops were starving. He felt that his superiors were not paying attention to his situation. They gave him confusing orders. Sato decided to pull his troops back to get supplies.
On May 25, Sato told his headquarters he would retreat on June 1. He would do this unless his division received supplies. On May 31, he left Naga Village and other positions. This was against orders from Mutaguchi. It was very unusual for a Japanese commander to retreat without permission. This allowed Allied troops to push south.
Miyazaki's group continued to fight delaying actions. They destroyed bridges along the road to Imphal. But they were eventually forced to retreat east. The rest of the Japanese division retreated south. They found very little food. Many soldiers were too weak to go further.
The Indian XXXIII Corps followed the retreating Japanese. The British 2nd Division advanced down the main road. The 7th Indian Division moved through the rough terrain east of the road. On June 22, the leading British troops met soldiers from Imphal. They met at Milestone 109, 30 miles (48 km) south of Kohima. The siege of Imphal was over. Trucks quickly brought vital supplies to Imphal.
During the Battle of Kohima, the British and Indian forces lost 4,064 men. This included dead, missing, and wounded. The Japanese lost 5,764 soldiers in battle in the Kohima area. Many more Japanese soldiers died later from disease or starvation.
What Happened Next
Sato was removed from command of the Japanese 31st Division in early July. The entire Japanese invasion was called off. Slim, the British commander, thought Sato was not a good opponent. He even told the RAF not to bomb Sato's headquarters. He wanted Sato to stay alive because it helped the Allied cause.
Japanese sources, however, blamed Mutaguchi, Sato's superior. They said Mutaguchi's plan was weak. They also blamed the bad relationship between Mutaguchi and Sato. This led Sato to focus on saving his division instead of attacking distant targets.
After Sato was removed, he refused to commit seppuku (a ritual suicide). He demanded a court martial to clear his name. He wanted to make his complaints about the army public. Sato was declared to have had a mental breakdown. He was replaced by Lieutenant General Tsuchitaro Kawada.
The huge losses the Japanese suffered at Imphal and Kohima greatly weakened their army. They could not defend Burma well against Allied attacks the next year.
On the Allied side, Major General Grover was removed from command of the British 2nd Division on July 5. This was because he was seen as too slow. He was replaced by Major General Cameron Nicholson.
Supplies from the Air
Getting supplies by air was very important at Kohima. At its peak, about 500 tons of supplies were delivered each day. At both Kohima and Imphal, the Allies depended completely on air supply. British and American planes flew from India.
At Kohima, it was hard to drop supplies accurately. The fighting was intense, and the safe area for drops got smaller. Pilots had to fly very low, which was dangerous.
Allied airpower became very strong during this time. This helped the Allies win the war in this area. Air supply allowed British and Indian troops to hold positions. They might have had to give up otherwise due to lack of ammunition, food, and water. Reinforcements and supplies could reach them even when they were surrounded. The Japanese, however, struggled with their supplies. This was a major reason they lost the battle.
Brave Actions: Victoria Crosses
Two Victoria Crosses were given for brave actions during the Battle of Kohima. The Victoria Cross is the highest military award for bravery.
- Lance Corporal John Pennington Harman: He was from the 4th Battalion, Queen's Own Royal West Kent Regiment. During heavy fighting, he single-handedly destroyed two Japanese machine gun posts. He was killed while retreating from the second attack. He was given the award after his death.
- Captain John Niel Randle: He was from the 2nd Battalion, Royal Norfolk Regiment.
Remembering the Fallen
The War Cemetery in Kohima holds the graves of 1,420 Allied soldiers. The Commonwealth War Graves Commission takes care of it. The cemetery is on the slopes of Garrison Hill, where the Deputy Commissioner's tennis court once was.
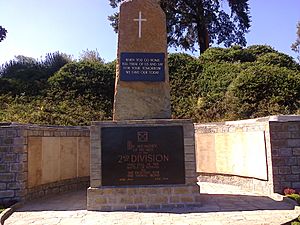
The famous epitaph on the memorial of the 2nd British Division is known as the Kohima Epitaph. It reads:
When you go home, tell them of us and say,
For your tomorrow, we gave our today
This verse is believed to be by John Maxwell Edmonds. It was inspired by an epitaph for the Spartans who died at the Battle of Thermopylae long ago.
See also
- India in World War II


