Burma campaign (1944) facts for kids
Quick facts for kids Burma Campaign 1944 |
|||||||
|---|---|---|---|---|---|---|---|
| Part of the Pacific War during World War II | |||||||
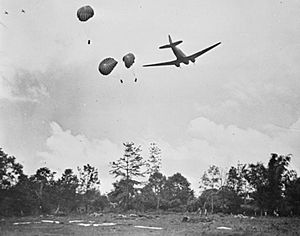 A C-47 transport aircraft drops supplies by parachute to Allied troops in action against Japanese forces; a common event during the fighting in Burma and India during 1944. |
|||||||
|
|||||||
| Belligerents | |||||||
|
|
|||||||
| Commanders and leaders | |||||||
|
|
||||||
| Casualties and losses | |||||||
| 29,324 (British Commonwealth) | 71,289 (Japanese) | ||||||
The Burma Campaign in 1944 was a very tough part of World War II in Southeast Asia. It happened along the borders of Burma with India and China. The main groups fighting were the British Commonwealth, China, and the United States. They fought against Japan and the Indian National Army. Most of the British Commonwealth soldiers came from the United Kingdom, British India, and Africa.
Before 1944, the Allies had struggled with supplies and organization. But they got much better and were ready to attack Japanese-held Burma. However, Japan launched its own attack into India first. By the end of 1944, the Allies had only gained a lot of land in one area: northern Burma. But the Japanese attack on India failed badly. This made it much harder for Japan to defend Burma in the next year's fighting.
Contents
Allied and Japanese Plans
Allied Goals for Burma
After Japan took over Burma in 1942, the Allies tried to fight back in 1942 and 1943. These early attempts didn't go well.
In August 1943, the Allies created a new command called South East Asia Command (SEAC). Admiral Louis Mountbatten was in charge. This brought new energy to the fight. By November, the British Fourteenth Army was ready to attack. Its commander, Lieutenant General William Slim, made his troops much better. He made sure soldiers took medicine to prevent malaria. He also trained them for jungle fighting and helped them win small battles to build their confidence.
Allied supply lines also got much better. By October 1944, railways in northeast India could carry much more. The Allies also had control of the sky. This meant they could fly in supplies and support troops from the air.
The Allies had several plans:
- Admiral Mountbatten wanted to land troops from the sea. One plan was to land on the Andaman Islands. But the landing ships were needed for the Normandy Landings in Europe.
- XV Corps planned to attack the coastal area of Arakan again. They wanted to capture Akyab Island because it had an important port and airfield.
- The United States wanted to keep sending supplies to China. They had an air route over the Himalaya mountains called the Hump. General Joseph Stilwell trained Chinese soldiers in India. He also wanted to build a new road, the Ledo Road, to connect India and China by land.
- China also agreed to attack eastern Burma from the Salween River.
- British Major-General Orde Wingate led a special force called the Chindits. They were long-range jungle fighters. Their job was to go deep behind Japanese lines and cut their supply routes.
After many discussions, the Allied plans for 1944 focused on:
- Stilwell's Chinese troops advancing from Ledo.
- The Chindits supporting Stilwell.
- A new attack in Arakan.
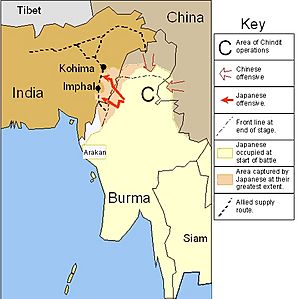
- An attack across the Chindwin River from Imphal to support other operations.
Japanese Plans for India
Around the same time, Japan created a new command called Burma Area Army. Its commander was Lieutenant General Masakazu Kawabe.
Lieutenant General Renya Mutaguchi, who was in charge of the Japanese Fifteenth Army, wanted to attack India. At first, his superiors said no. But Mutaguchi kept pushing his idea. Eventually, the main Japanese headquarters in Tokyo approved his plan. This plan was called Operation U-Go. Mutaguchi believed this attack would win the war for Japan.
Subhas Chandra Bose, the leader of the Indian National Army (INA), also encouraged the attack. The INA was made up of Indian soldiers captured by Japan and some Indian workers. Bose wanted to march into India and start a rebellion. Both Bose and Mutaguchi thought attacking India would bring great benefits.
Fighting in the North
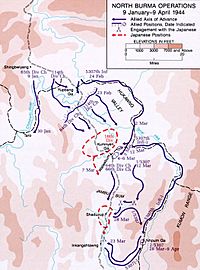
General Stilwell's forces were called the Northern Combat Area Command. They included two Chinese divisions trained by Americans. They also had an American long-range fighting group called "Merrill's Marauders". Later, three more Chinese divisions joined them.
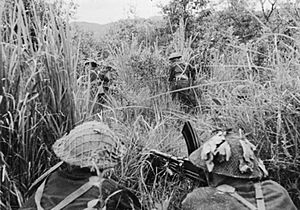
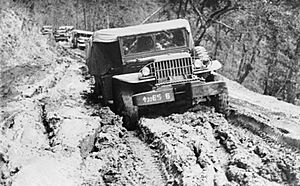
In October 1943, the Chinese 38th Division began moving from Ledo. American engineers built the Ledo Road behind them. The Japanese 18th Division tried to stop them but was outmatched. When the Chinese met strong Japanese defenses, Merrill's Marauders would go through the jungle to attack the Japanese from the sides. This was a tactic the Japanese had used successfully earlier in the war.
The Allies pushed the Japanese back. They even used the Japanese's own supply trails to help build the Ledo Road faster.
Chindits in Action
The Chindits' job was to cut Japanese supply lines near Indaw. On February 5, 1944, one Chindit brigade marched deep into Japanese territory. In early March, three more brigades were flown behind Japanese lines by American planes. They set up strongholds on Japanese roads and railways. For the next two and a half months, the Chindits fought many fierce battles.
One Chindit brigade successfully defended a landing zone called "Broadway." They also blocked a road and railway at Mawlu, which they called the "White City." This position was held for several weeks.
On March 24, the Chindit commander, Wingate, died in a plane crash. Brigadier Joe Lentaigne took over. Later, the Chindits were moved to support Stilwell's main forces. They were given new, difficult tasks. The Japanese also sent more troops to fight the Chindits.
One Chindit brigade tried to block another road and rail line near Hopin. But they had to retreat after 17 days of fighting. Heavy monsoon rains made it hard for other Chindit groups to help them.
Chinese Attack from Yunnan
Chinese forces on the Yunnan front attacked in April. Nearly 40,000 troops crossed the Salween River. About 72,000 Chinese soldiers attacked the Japanese 56th Division. The Japanese in the North were now fighting on two sides.
The Chinese attack was slowed by monsoon rains and lack of air support. But they managed to surround the Japanese at Tengchung by the end of May. The Japanese fought hard but were defeated in September. Further south, the Chinese captured Lungling in August. The Japanese sent more troops to Yunnan and counter-attacked, stopping the Chinese for a while.
Myitkyina and Mogaung Battles
While the Japanese were attacking in the center, Stilwell's forces kept advancing. On May 19, Chinese divisions surrounded Kamaing. Two days earlier, on May 17, Merrill's Marauders captured the airfield at Myitkyina. This was after a very tough march through the Kumon Bum Mountains. If Chinese troops had attacked the town right away, they might have captured it easily. But support units arrived first, giving the Japanese time to send reinforcements.
The long siege of Myitkyina was difficult and costly for the Allies. Merrill's Marauders and the Chindits had to keep fighting much longer than planned. However, the Japanese never got the upper hand in the North.
In late May, Stilwell ordered the Chindits to capture Mogaung. This would cut the Japanese supply line to Myitkyina. The Chindits fought hard and captured Mogaung on June 27. But they suffered many casualties. By July, the Chindits were exhausted and pulled out of the fighting. The British 36th Division replaced them.
The siege of Myitkyina continued. The Japanese were ordered to "Defend Myitkyina to the death." They fought bravely, but by late July, their situation was hopeless. The Japanese commander evacuated the survivors and then took his own life. Myitkyina was finally captured on August 3. Taking Mogaung and Myitkyina was a big victory. The Myitkyina airfield became a vital part of the air supply route over the Hump.
Fighting in the South
In Arakan, XV Corps attacked again. They captured the port of Maungdaw on January 9, 1944. The Japanese then launched a surprise attack. A strong Japanese force went behind Allied lines and attacked the 7th Indian Division's headquarters.
But this time, the Allied troops did not panic. They held their ground. Supplies were dropped to them by parachute. In the Battle of the Admin Box from February 5 to 23, the Japanese attacked the Allied supply area. But they couldn't defeat the defenders, who had tanks. Allied troops broke through to relieve the defenders. This was a big defeat for the Japanese. Their usual tactics of sneaking behind enemy lines and surrounding them had failed. The Japanese also ran out of food.
Two new Allied divisions took over and continued the attack. But the Allies then focused their resources, especially transport planes, on the Central Front. XV Corps stopped its attack during the monsoon season.
Fighting in the Center
At Imphal, the Allies had two divisions near the Chindwin River. One division was held back at Imphal. The Allies knew a big Japanese attack was coming. They planned to pull back and make the Japanese fight far from their supplies. But they misjudged when and how strong the Japanese attack would be.
The main Japanese plan was to cut off and destroy Allied divisions near Imphal. Then they would capture Imphal itself. Another Japanese division would capture Kohima to cut off Imphal. Mutaguchi hoped to then capture Dimapur, a key city. If he succeeded, all of Northeast India would be open to attack. Units of the Indian National Army also joined the attack. Capturing Dimapur would also cut off supplies to China and Stilwell's forces in the North.
Early Battles
The Japanese started crossing the Chindwin River on March 8. The Allies began to pull back to Imphal on March 13. One Indian division pulled back easily. But another, the 17th Indian Division, was cut off at Tiddim by the Japanese. From March 18 to 25, the 17th Division fought its way through four Japanese roadblocks. They got supplies from the air and help from other Allied divisions. They reached Imphal on April 4.
Meanwhile, Imphal was vulnerable to the Japanese 15th Division. A small Allied force was badly beaten at the Battle of Sangshak. However, the Japanese attack in Arakan had already failed. So, in late March, the Allies were able to fly the experienced 5th Indian Division from Arakan to the Central Front. This move took only eleven days.
Battle of Kohima
While Imphal was under siege, the Japanese 31st Division, with 20,000 men, advanced towards Dimapur. Instead of just cutting off the small Kohima garrison and moving on, the Japanese commander decided to focus on capturing the hill station of Kohima. He and other Japanese commanders had doubts about Mutaguchi's risky supply plans.
The Battle of Kohima began on April 6. The Japanese surrounded the garrison and tried to take their positions on the hill. Fighting was very fierce around the Deputy Commissioner's bungalow and tennis court. This part of the battle is famous as the "high-water mark" of the Japanese attack. On April 18, Allied reinforcements arrived. But the battle continued as the Japanese dug in.
A new Allied command, XXXIII Corps, took over. The British 2nd Division began a counter-attack. By May 15, they had pushed the Japanese off Kohima Ridge. More Allied troops arrived. XXXIII Corps attacked again in mid-May.
Battle of Imphal
The Battle of Imphal went badly for the Japanese in April. Their attacks from different directions failed to break the Allied defenses around Imphal. Fighting was intense. In the north, the Japanese attacks were stopped when Allied infantry and tanks recaptured a key hill overlooking the main airfield.
By early May, the Allies began a counter-attack north of Imphal. Progress was slow because the monsoon rains had started, making movement very difficult. Also, the Allies were running low on artillery ammunition. However, the Japanese were at their breaking point. Their divisions had not received enough supplies since the attack began. During the rains, disease spread quickly among the starving Japanese troops.
The Japanese commander at Kohima told Mutaguchi he would retreat if he didn't get supplies. He did retreat, even though he was ordered to hold on. Other Japanese units also started leaving their positions to find food. The Allied troops from Imphal and Kohima met on June 22. This ended the siege of Imphal.
Mutaguchi still ordered more attacks. But the Japanese had suffered so many losses from fighting and disease that they couldn't advance. The Japanese Imphal operation finally ended in early July. They painfully retreated back to the Chindwin River.
After the Battles
The Japanese attempt to invade India was their biggest defeat up to that point. They lost 55,000 soldiers. Most of these losses were due to disease, lack of food, and exhaustion. The Allies lost 17,500 soldiers. Mutaguchi was removed from his command.
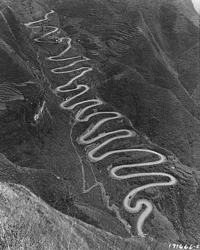
From August to November, the Fourteenth Army chased the Japanese back to the Chindwin River, even during heavy monsoon rains. One Allied division advanced down the Kabaw Valley and improved the road. Another division advanced along the mountainous Tiddim road. This road was so difficult that it was supplied entirely by air drops. By the end of November, the Allies had recaptured Kalewa, an important river port, and set up positions on the east bank of the Chindwin.
In December, the Allied commanders were honored in a ceremony at Imphal.
|


