
Battle of Sio facts for kids
Quick facts for kids Battle of Sio |
|||||||
|---|---|---|---|---|---|---|---|
| Part of World War II, Pacific War | |||||||
 Australian troops of B Company, 30th Infantry Battalion crossing a shallow creek between Weber Point and Malalamai. They have been advancing from Roinji over muddy swamps, Kunai grass and innumerable rivers to link up with American troops at Yagomai. |
|||||||
|
|||||||
| Belligerents | |||||||
|
|
|||||||
| Commanders and leaders | |||||||
| Strength | |||||||
| ~15,000 | ~8,000 | ||||||
| Casualties and losses | |||||||
| 83 killed 186 wounded |
1,421 killed 2,198 found dead 76 captured |
||||||
The Battle of Sio was a key part of World War II in New Guinea. It happened from December 1943 to March 1944. This battle was when Allied forces, led by Douglas MacArthur, chased the Japanese army. It was part of the larger Huon Peninsula campaign.
After the Battle of Sattelberg, Australian soldiers pushed through Japanese defenses. Constant attacks from US Navy PT boats, Australian ground troops, and Allied planes weakened the Japanese. Their supply system almost collapsed. This led to disease, hunger, and hardship for the Japanese soldiers.
Meanwhile, the Allies also faced challenges. The tough land and bad weather made it hard to deliver supplies. Heavy monsoon seas often stopped ships from bringing what was needed.
Australian and Papuan troops moved along the coast. They used infantry, tanks, and air strikes against Japanese positions. These were usually set up at creek crossings in the jungle. The advancing soldiers stayed close to their artillery support. They used powerful artillery and tanks to cause heavy losses for the Japanese. Eventually, they met up with American forces at Saidor.
During this advance, Australian troops found secret Japanese code materials. This was a huge win for the Allies. It allowed codebreakers in Australia and the United States to read many Japanese army messages. This amazing intelligence helped General MacArthur speed up his plans by over three months. This led to important attacks like the Admiralty Islands campaign and landings at Hollandia and Aitape.
Contents
Why the Battle Happened

General Douglas MacArthur started a big plan called Operation Cartwheel. It began well with landings at landing at Lae and landing at Nadzab. But then, bad weather, tough land, and strong Japanese resistance slowed things down.
The Japanese, led by Major General Hatazō Adachi, fought back hard. They launched many counter-attacks against the Australian 9th Division. At the Battle of Sattelberg, the Australians finally defeated Adachi's forces.
Even after this defeat, the Japanese did not leave the area. Their commander, Lieutenant General Shigeru Katagiri, ordered some troops to hold the Wareo area. This was to protect other units as they pulled back. Another group was to guard the coast.
Lieutenant General Frank Berryman, an Australian commander, wanted to push along the coast. He hoped to cut off Japanese supplies and force them to retreat from the Huon Peninsula. But the Australians took a careful approach. The Battle of Wareo showed that the Japanese planned to defend their ground.
After tough fighting, the Australians drove the Japanese from high ground. This included areas around Sattelberg and Gusika. In early December, Adachi ordered all his troops to retreat to Sio. The Australians captured Wareo on December 8. The last Japanese rearguards left on December 15. Meanwhile, the coastal advance began on December 5.
Getting Ready for Battle
Attacking Japanese Supplies

In October 1943, a special team studied how the Japanese got their supplies. They soon realized the Japanese relied on a coastal supply line. During the Battle of Sattelberg, the Allies aimed to cut this line. They used three main methods:
- Air Attacks: US Fifth Air Force planes bombed places where the Japanese gathered food. They also bombed tracks leading from the coast. This reduced Japanese food and scared away local carriers they depended on.
- Naval Attacks: PT boats tried to stop Japanese barges moving along the coast at night. Fifth Air Force fighters searched for barges during the day.
- Ground Attacks: Land forces tried to physically cut the Japanese supply lines. The 9th Division captured Pabu, cutting an important inland track. Also, a landing on Long Island took over a key barge stop.
By December, the poor state of Japanese prisoners confirmed the Allies' success. The Japanese supply system was almost completely broken. Between December 9 and 13, PT boats sank 23 barges. Most were south of Sio. On January 7, PT boats even attacked a submarine.
On January 8, twelve barges were destroyed. One carried ammunition, another about 70 troops. The next day, PT boats attacked six barges, sinking one. Another patrol found eight barges and destroyed two. A third patrol found and destroyed six barges on a beach. On January 10, three PT boats sank three barges carrying troops. They even captured one Japanese soldier. Two more barges were sunk north of Sio Island that night.
How They Fought and Got Supplies

The main Australian advance used teams of infantry, tanks, and engineers. They moved along coastal tracks. Japanese positions were usually at creek crossings in the jungle. The advancing soldiers stayed close to their artillery support. They only moved ahead without it when Japanese resistance was very weak.
A secondary group moved inland over higher ground. This area had coral cliffs covered by kunai grass, rising up to 4,000 feet (1,200 meters). The Japanese wanted to delay, not fight to the death. So, if their escape route was threatened, they usually pulled back. If they didn't, the Australians used tanks, mortars, and artillery to defeat them.
Early in the advance, 4,700 artillery rounds were fired in one day. But later, during the entire 5th Division advance from Sio to Saidor, only 30 rounds were fired. The advance happened in stages. Each goal was usually to secure safe beach areas.

Allied supplies came entirely by sea. Special scouts from the US 532nd Engineer Boat and Shore Regiment (EBSR) went with the infantry. They checked beaches from the land side as they were secured. If a beach looked good, they checked it from the sea. Once a beach was chosen, a team arrived by landing craft. They set up an area to manage supplies.
Engineers improved the coastal track for jeeps to bring supplies. But supplies for inland units had to be carried by local people. Artillery guns were moved along tracks or by Landing Craft Mechanised (LCMs). Tanks usually moved on tracks but used LCMs to go around obstacles. As the advance continued, new beachheads were opened, and older ones were closed. The advance sometimes stopped to bring up guns or gather enough supplies.
The biggest problem was the weather. The monsoon caused rough seas. This made it impossible to use small Landing Craft, Vehicle, Personnel (LCVPs). It also limited the operations of larger LCMs. Because of the very rough seas, most supply missions happened at night. This was when tidal conditions were best. The commander insisted on having at least seven days' worth of supplies ready. This was in case bad weather stopped the LCMs. The Australian Army also used DUKWs (amphibious trucks) to move supplies.
The Battle Unfolds
Pushing to Fortification Point

The initial coastal advance was led by the Australian 4th Infantry Brigade. This brigade was made up of reserve soldiers. The more experienced Australian Imperial Force brigades were saved for the Battle of Wareo. The 4th Brigade had three infantry battalions. They also had tanks, Papuan infantry, and support units. These included engineers and medical teams. They were supported by 24 artillery guns.
To help the advance, a supply area was set up at the Kalueng River mouth. A log bridge was built over the river. The operation started on December 5. The 29th/46th Infantry Battalion led the way. They soon faced scattered enemy fire. One tank was disabled by a land mine. The advance stopped near a lagoon due to growing resistance.
It started again the next day. The Japanese withdrew after an artillery bombardment. Their orders were to delay the enemy without fighting a decisive battle. This became the pattern. The Japanese preferred to retreat rather than suffer heavy losses. By December 14, the Australians were closing in on Lakona. This was a key point on the Japanese retreat route.
The tanks had trouble keeping up. Mines were a big obstacle. On the first day, engineers removed fourteen mines. But a tractor hit a mine and broke a track. On December 7, two more tanks were damaged by mines. Engineers then cut a new track. To attack Lakona, tanks had to cross a creek with steep banks. The creek was swollen by heavy rain. On December 16, infantry and five Matilda tanks overran Japanese positions. They counted 47 Japanese dead. On December 20, the 4th Infantry Brigade took the Fortification Point area. They had help from four Matilda tanks and 750 artillery rounds. Between December 5 and 20, the 4th Infantry Brigade had 65 killed and 136 wounded. Only six Japanese prisoners were taken.
Taking Sio
On December 21, 1943, the 20th Infantry Brigade took over the pursuit. Generals Blamey, Berryman, and Wootten visited the acting brigade commander. They stressed that the brigade should keep casualties low. They should use artillery and tanks whenever possible. That afternoon, the lead company reached Hubika.

A halt was called for Christmas to bring up supplies. Units had a rest day. Most soldiers enjoyed turkey, ham, roast potatoes, and Christmas pudding. Christmas services were held. General Blamey made sure Christmas food reached all units. In one case, a small plane dropped Christmas food to a Papuan Company on patrol.
The advance started again on December 27. It was preceded by air strikes from 18 B-25 Mitchell and 12 Boston bombers. The 2/15th Infantry Battalion and tanks took the lead on December 31. They reached Sialum on January 2, 1944. Sialum had a sheltered beach for supplies. That day, American troops landed at Saidor. This placed a large force across the Japanese escape route.
Before moving over the mountains, the Japanese 20th Division headquarters decided to destroy its secret code materials. The wet weather made burning them page by page slow. A fire might also attract Allied planes. So, someone decided to bury them in a steel trunk in a stream bed. An Australian engineer found it with a metal detector. He thought it was a mine. An intelligence officer realized it contained code books. It was quickly sent to the Central Bureau in Brisbane. There, the pages were carefully dried and photographed.
On February 4, 1944, Central Bureau codebreakers read a secret message. It revealed decisions from a meeting of high-ranking Japanese officers. Copies were sent to Arlington Hall in the US. In January 1944, Arlington Hall had decoded 1,846 Japanese army messages. In March 1944, with the Sio codebooks, they decoded 36,000 messages!
On January 11, a platoon reached an area atop a cliff. It had once been a Japanese headquarters. It would have been a strong position if defended, but it was empty. The main part of the battalion followed the next day. The Goaling River was crossed on January 13 using small boats left by the Japanese. They entered Nambariwa, where one prisoner was taken. Six Japanese were shot, and nine were found dead.
On January 15, Sio was captured. The Sio-Nambariwa area was the main Japanese supply point. Many fuel, supply, and storage dumps were found. During the advance from Fortification Point to Sio, 303 Japanese were killed or found dead. 22 were captured. The 20th Infantry Brigade lost 3 killed and 13 wounded. But 958 soldiers were sent away sick, mostly with malaria. A dengue epidemic also caused many illnesses. Large amounts of Japanese equipment were captured. This included six 75 mm guns, three 37 mm guns, and three 20 mm anti-aircraft guns.
Meeting at Saidor

On January 20, 1944, the Australian 5th Division took over command. The 8th Infantry Brigade replaced the 20th. This brigade had been on guard duty in Western Australia. It arrived in Finschhafen. The brigade had three infantry battalions. They were still supported by artillery, engineers, and the Papuan Infantry Battalion. The brigade had its first casualties on January 21/22. Two Australians were killed and two wounded by their own comrades. This was common for units new to jungle warfare.
On January 22, a local reported seeing seven Japanese in the hills. A patrol led by Corporal Bengari was sent to investigate. On January 24, another 22 Japanese arrived. The next morning, Bengari and his five companions ambushed the Japanese. They killed them all before they could fire a shot.
Wirraway and Boomerang planes scouted ahead of the advance. Their aerial reconnaissance helped the Australians and Papuans know where to expect resistance. This sped up the advance. The pilots saw Japanese parachutes. This meant the Japanese were getting supplies by air. On February 4, the Australians also had to rely on air supply. Swollen rivers had washed out many bridges.
Each day, the Papuans killed 12 to 15 Japanese. But it wasn't until February 8 that the Japanese rearguard was met at Weber Point. A formal attack was made. Five Japanese were killed. In total, 53 Japanese were killed and four captured that day. Two Australians were wounded. The next day, another 61 Japanese were killed and 9 captured. This time, there were no Australian casualties. On February 10, the 30th Infantry Battalion met two American soldiers at Yagomai. This linked them up with the American force at Saidor.
The 8th Infantry Brigade then began to clear the area. On February 18, the 35th Infantry Battalion attacked a Japanese force near Gabutamon, killing 40. They found about 100 Japanese at nearby Tapen. They attacked, killing another 52 Japanese. Only one Australian was wounded. The Papuans on their sides killed another 51. Corporal Bengari and two other Papuans accounted for 43 of them. The next day, the Papuans found and killed another 39 Japanese nearby. From January 20 to March 1, 1944, 734 Japanese were killed. 1,775 were found dead, and 48 were captured. Australian casualties were four killed and six wounded.
What Happened Next
Both sides achieved their main goals. The Japanese retreated, and the Australians caused huge losses. The Japanese suffered far more in terms of men and equipment. Only about 4,300 of the 7,000 Japanese troops who were originally ahead of Sio survived the retreat. Many of them were too sick, wounded, or exhausted to fight.
The chance to completely destroy the Japanese 51st Division was missed. These troops later fought the Americans at the Battle of Driniumor River. They also fought the Australians in the Aitape–Wewak campaign in 1945.
On the other hand, the new base at Finschhafen was no longer threatened by the Japanese. It became an important starting point for the Western New Guinea campaign. The capture of the Japanese codes at Sio was very important. It allowed General MacArthur to plan future operations with excellent intelligence. This was much better than just relying on his own guesses.
Images for kids
-
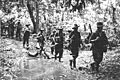
Australian troops crossing a creek.
-

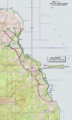
Map of the Huon Peninsula.
-
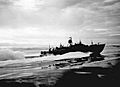
A PT boat patrols off New Guinea.
-
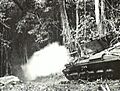
A Matilda tank firing at a Japanese foxhole.
-
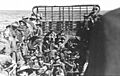
An LCM ferrying Australian troops.
-
Map of the 4th Infantry Brigade advance.
-
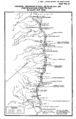
Map of the Coastal Advance.
-
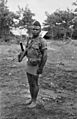
Sergeant Bengari, MM of A Company, Papuan Infantry Battalion.
