
Battle of Walker's Ford facts for kids
Quick facts for kids Battle of Walker's Ford |
|||||||
|---|---|---|---|---|---|---|---|
| Part of the American Civil War | |||||||
 Battle of Walker's Ford in the Knoxville Campaign |
|||||||
|
|||||||
| Belligerents | |||||||
| Commanders and leaders | |||||||
| Units involved | |||||||
| Left Wing, Army of the Ohio | Armstrong's Division Jones' Brigade |
||||||
| Strength | |||||||
| 1,500 | 3,000 | ||||||
| Casualties and losses | |||||||
| 64 | 100 | ||||||
The Battle of Walker's Ford happened on December 2, 1863, during the American Civil War. It was part of the Knoxville campaign. In this battle, three Confederate cavalry groups, led by General William T. Martin, attacked a Union cavalry group. The Union soldiers were led by Colonel Felix W. Graham.
The fight took place at Walker's Ford on the Clinch River. General Martin's cavalry had tried to trap Graham's soldiers earlier but failed. They then chased Graham's group towards Tazewell. The Confederates first pushed the Union soldiers back. But then, Union General Orlando B. Willcox arrived with his infantry (foot soldiers). His arrival helped push back the Confederate cavalry.
General Martin sent another cavalry group to try and surround the Union forces. However, one of Graham's regiments stopped them at a nearby river crossing. Soon after, Martin's Confederates pulled back towards Knoxville. Willcox's attack did not directly help the Union defenders in the Siege of Knoxville. But a much larger Union force, led by General William Tecumseh Sherman, soon arrived and ended the siege.
Contents
Why the Battle Happened
Union Moves into East Tennessee
General Ambrose Burnside led Union forces into East Tennessee in August 1863. His army had two infantry divisions and cavalry. They faced little resistance. On September 1, Union cavalry took control of Knoxville. Burnside then secured the area by capturing a Confederate fort at Cumberland Gap. About 2,000 Confederate soldiers surrendered there on September 9.
But the war situation changed quickly. Confederate General Braxton Bragg's army defeated the Union Army of the Cumberland at the Battle of Chickamauga. This happened on September 19–20, 1863. After this, Bragg's army surrounded the Union forces in Chattanooga. This left Burnside's army in East Tennessee mostly on its own. The Union government quickly sent more soldiers to Chattanooga.
General John G. Parke arrived in East Tennessee with more Union troops on September 20. General Orlando B. Willcox also arrived with 3,000 Indiana soldiers on October 3. Burnside ordered Willcox to go east to Bull's Gap. His job was to protect against Confederate attacks from Virginia. Willcox had about 4,200 soldiers, including two infantry brigades and artillery.
In early October, Confederate General Samuel Jones sent a force to threaten the eastern Union areas. Burnside quickly moved his troops and defeated this force at the Battle of Blue Springs. He chased the Confederates back to Virginia. Later, on October 20, two Confederate cavalry groups badly defeated a Union cavalry group at the Battle of Philadelphia. Because of this, Burnside left Loudon and moved his troops north of the Tennessee River. He still held Kingston. On November 6, a Confederate cavalry force surprised and defeated a Union cavalry group at the Battle of Rogersville. The Union lost 655 soldiers, mostly captured.
The Siege of Knoxville

By the end of October 1863, Confederate General Braxton Bragg decided to send General James Longstreet to recapture Knoxville. Longstreet took two divisions, about 10,000 infantry, 5,000 cavalry, and 35 cannons. On November 14, Longstreet's soldiers crossed the Tennessee River near Loudon. In the Battle of Campbell's Station on November 16, Longstreet tried to stop Burnside's army from retreating to Knoxville, but he failed. At the same time, Confederate cavalry tried to take Knoxville's defenses on the south side of the river, but they also failed.
Longstreet then began a partial siege of Knoxville. It wasn't a full siege because Burnside's men could still get supplies into the city from the south side of the river.

On November 14, Burnside sent a message to Willcox. He told Willcox to keep holding Bull's Gap and Greeneville. But if needed, Willcox should retreat to Cumberland Gap. Burnside also ordered Willcox to send one of his brigades to Knoxville. This left Willcox with four Indiana infantry regiments, three artillery batteries, and some other smaller units. He also had a Union cavalry division.
Burnside sent one last order to Willcox before the telegraph line was cut. Willcox was to retreat to Cumberland Gap. This would protect the Union supply route between Cumberland Gap and Camp Nelson in Kentucky. By November 19, Willcox had moved his units back to Bean's Station. The next day, he reached Cumberland Gap. There, he found there wasn't enough food for his 6,000 soldiers. Heavy fall rains made it very hard for supply wagons to reach Cumberland Gap from Camp Nelson.
Willcox spread out his infantry so they could find food. He placed most of his cavalry near Tazewell to watch Longstreet's forces. Willcox's cavalry even found a herd of hogs and searched for food in Lee County, Virginia. Meanwhile, hundreds of people who supported the Union fled the Knoxville area. They headed for Kentucky through Cumberland Gap.
At this time, General Ulysses S. Grant was planning to attack the Confederate army near Chattanooga. But his plans were delayed. Grant criticized Willcox for retreating to Cumberland Gap. He didn't know that Willcox was just following Burnside's direct orders. Grant wanted Willcox to march to help Knoxville. But no one gave Willcox clear orders to do so. Burnside managed to send a message through the siege lines. He asked for cavalry to be sent south of the Clinch River.
Willcox learned by telegraph from Grant that the Battle of Missionary Ridge had begun. He sent this news to Burnside in Knoxville using a secret messenger. Knowing that Grant's forces were finally moving, Willcox decided to follow Burnside's instructions. Around this time, 250 Union soldiers surprised a Confederate regiment near Jonesville, Virginia. The Union soldiers claimed the Confederates lost many men and were defeated.
The Battle of Walker's Ford
.jpg)
Burnside had asked to be replaced as commander. But his replacement, General John G. Foster, didn't arrive at Cumberland Gap until November 30. Meanwhile, Willcox sent one cavalry brigade to hold Bean's Station. He sent another, Graham's brigade, to Tazewell on November 27. Graham's soldiers crossed the Clinch River at Walker's Ford and reached Maynardville on November 29. The next day, Graham advanced further south but then pulled back to Maynardville. That day, Confederate General "Grumble" Jones's brigade fought with Graham's soldiers near Maynardville. When General Foster arrived, he approved Willcox's plan.
Longstreet responded to Graham's movement. He ordered General Frank Crawford Armstrong's division to stop them. Armstrong moved his two brigades from Knoxville on November 30 and crossed to the north bank of the river. By the evening of December 1, Armstrong's troops joined General Jones near Maynardville. General Martin was in charge of all three Confederate cavalry brigades.
Graham's brigade had about 1,088 soldiers and 6 cannons. Leaving a small group at Cumberland Gap, Willcox started south towards Tazewell with his infantry on December 1. Graham felt that the Confederate forces against him had grown stronger. So, he left Maynardville at midnight. He left a small group of soldiers behind as a lookout. Graham's brigade marched northeast and stopped at 5 AM on December 2. This was about 4 miles (6.4 km) south of Walker's Ford. Willcox arrived at Tazewell with his infantry late on December 1. He received Graham's latest report there.

General Martin tried to cut off Graham's brigade at Maynardville. But he found that most of the Union cavalry had already left. Jones's brigade charged into the town, capturing some Union soldiers and scattering others. Another Confederate regiment quickly chased them. While riding over an icy road, the Confederates were ambushed by a Union lookout. They fought their way through and then surprised Graham's brigade at 7:30 AM.
Graham's cavalrymen pulled back a short distance. They dismounted and formed a line along a fence. They used a log house as a small fort. The Confederates tried to charge them with cavalry, but they were driven back. A Confederate general, Dibrell, was wounded. After more fighting, another Confederate regiment dismounted and attacked the Union's right side. This made Graham order a retreat closer to Walker's Ford. He also asked for help.
Meanwhile, Willcox had left Tazewell at dawn on December 2. He reached the north bank of Walker's Ford with Colonel George W. Jackson's brigade. When he got Graham's message for help, Jackson led two Indiana regiments and an artillery battery across the river. These Indiana soldiers were new recruits, but they bravely formed a line about 1 mile (1.6 km) south of Walker's Ford. They let the cavalry, who were almost out of ammunition, retreat through them. When Armstrong's cavalry attacked with cannon support, the Indiana soldiers and their cannons easily pushed them back.
Before the main fight, Graham noticed that some Confederate cavalry were leaving the field. He thought they might be trying to go around his position. So, Graham ordered Colonel Horace Capron to take his regiment and cover the next river crossing. Capron's regiment crossed to the north bank at Walker's Ford. They then rode east to another crossing. Crossing to the south bank, Capron's 324-man regiment rode about 2 miles (3.2 km) south.
At 10 AM, Jones's Confederate brigade attacked Capron's regiment and pushed them back. Capron placed some of his soldiers and four small cannons on the north bank of the Clinch River for a final stand. But this wasn't needed. His other two groups of soldiers stopped Jones's brigade on the south side of the river by 3 PM. Capron's regiment was almost out of ammunition. He left two companies with the remaining ammunition to defend the crossing. Then he rejoined his brigade at Walker's Ford. An infantry regiment soon relieved the two companies.
Willcox's infantry division was led by Colonel John I. Curtin. While Jackson's brigade went to Walker's Ford, another brigade was sent on a road further east. Willcox sent Curtin and two infantry regiments to Walker's Ford. He kept one infantry regiment as a reserve. The unit that arrived at the crossing at Black Fox Creek was the 129th Ohio Infantry Regiment.
What Happened After
The Union forces had 64 soldiers killed or wounded. Historians believe the Confederates lost about 100 soldiers out of 3,000. The Confederates did not officially report their losses. But Graham thought they lost 25 killed, 50 wounded, and 28 captured. Martin's cavalry pulled back a short distance and camped for the night. The next morning, they headed for Knoxville.
This battle was a Union victory in terms of tactics. But it didn't change the overall war situation much. Martin successfully blocked Willcox's cautious attempt to help Knoxville. However, Longstreet could not ignore General Sherman's large army. Sherman had 30,000 Union infantry and 3,000 cavalry. This huge force started moving north from Chattanooga on November 28. By December 3, Sherman's troops were in Loudon. That day, Longstreet sent his supply wagons moving northeast towards Virginia. On the night of December 4, the Confederates ended the siege of Knoxville. They withdrew northeast towards Rutledge.
Images for kids
-
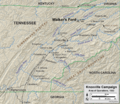
Battle of Walker's Ford in the Knoxville Campaign
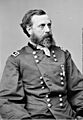
-
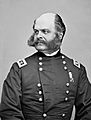
Ambrose Burnside
-
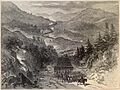
Union troops marched through Cumberland Gap in September 1863.
-
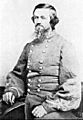
George G. Dibrell
-
Horace Capron
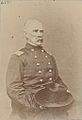
-
Orlando B. Willcox
-
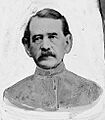
William T. Martin
-
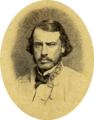
Frank C. Armstrong


