
First Battle of the Jordan facts for kids
Quick facts for kids First Transjordan attack/First Battle of the Jordan |
|||||||
|---|---|---|---|---|---|---|---|
| Part of the Middle Eastern theatre of World War I | |||||||
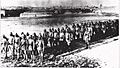
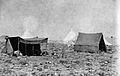
 Ottoman prisoners on their way to Jericho from Es Salt |
|||||||
|
|||||||
| Belligerents | |||||||
|
|
|||||||
| Commanders and leaders | |||||||
| Units involved | |||||||
|
Shea Group
|
Fourth Army 3rd and 46th Assault Companies 48th Infantry Division 145th and part 150th Regiments German 703rd Infantry Battalion |
||||||
| Strength | |||||||
| 6,000 troops with 15 guns | |||||||
| Casualties and losses | |||||||
| 215 dead 1,010 wounded 123 missing |
1,000 prisoners of war 1,700 dead and wounded (estimate) |
||||||
The First Transjordan attack on Amman (also called the First Attack on Amman by the British, and the First Battle of the Jordan by their enemies) happened between March 21 and April 2, 1918. This event was part of the Sinai and Palestine Campaign during World War I. It followed the successful Battle of Tell 'Asur and the Capture of Jericho in February.
During this attack, British Empire forces made big pushes into Ottoman territory. First, they successfully crossed the Jordan River between March 21 and 23. Then, they occupied Es Salt in the hills of Moab from March 24 to 25. The main fight, known as the First Battle of Amman, took place between March 27 and 31. Here, the Anzac Mounted Division and the Imperial Camel Corps Brigade (who fought like foot soldiers) were joined by more British troops and artillery.
The Ottoman Fourth Army had its headquarters in Amman and was very well defended. They received many extra soldiers by train using the Hejaz railway. These strong Ottoman forces eventually made the attacking British Empire troops retreat back to the Jordan Valley between March 31 and April 2. The Jordan Valley stayed under the control of the Egyptian Expeditionary Force (EEF) until September 1918, when the Battle of Megiddo began.
In the winter of 1917-1918, the EEF had gained a lot of land by winning battles like the Battle of Mughar Ridge and the Battle of Jerusalem. They had moved their front line from Gaza to Jerusalem. In February 1918, they secured their right side by capturing land east of Jerusalem, down into the Jordan Valley to Jericho and the Dead Sea. Capturing Jericho and the action of Tell 'Asur were important steps before General Allenby's forces could cross the Jordan River and advance towards Es Salt and Amman.
In March, after several tries, British Empire swimmers from Australia, Britain, and New Zealand managed to get ropes across the fast-flowing Jordan River. They were under fire from Ottoman soldiers on the other side. Once the ropes were across, pontoon bridges were quickly built. This allowed infantry and New Zealand mounted troops to cross and attack the Ottoman defenders, creating a secure area called a bridgehead. After this, General John Shea's force of foot soldiers and mounted troops crossed the river. They moved east across the high ground. The main group of foot soldiers quickly captured the Ottoman position at Shunet Nimrin, which was on higher ground from the Jordan Valley. They then took the town of Es Salt, high in the hills.
Meanwhile, the mounted troops rode north and south of the foot soldiers towards Amman, which was about 30 miles (48 km) east of Jericho on a high plateau. Their goal was to cut the main supply line to Amman by destroying parts of the Hejaz Railway. This included tunnels and a viaduct (a long bridge) that the railway crossed near the town. Amman was strongly defended by the Ottoman Army. The Ottomans quickly repaired the blown-up railway sections, allowing more soldiers to arrive and strengthen their defenses. British Empire foot soldiers and artillery were also sent from Es Salt, but it took a long time for them to travel over the difficult land. Even though the combined British Empire forces attacked Amman bravely, Shea had to pull his troops back to the Jordan Valley from both Amman and Es Salt. It was clear the Ottoman defenders were too strong, making it impossible to achieve their main goal. The only land they kept after the attack were the bridgeheads on the eastern side of the river.
Contents
Why the Attack Happened

The British War Office had promised General Edmund Allenby, the leader of the Egyptian Expeditionary Force (EEF), more soldiers after he captured Jerusalem. The British leaders wanted Allenby to keep attacking the Ottomans as strongly as possible. They especially wanted to cut the Hejaz Railway. This railway was a very important supply line for the Ottoman army.
However, the French leaders said that no British soldiers from France could be sent to the EEF. So, it was decided to send one or two Indian cavalry divisions from France and three divisions from the Mesopotamian campaign. These would also get more artillery and aircraft. By March 1918, these promised reinforcements were reduced to just one Indian division and some heavy guns. This was because British soldiers who had fought in Palestine were being sent to the Western Front in France.

General Jan Christiaan Smuts, a British leader, visited Allenby in February. He encouraged Allenby to destroy about 10 to 15 miles (16 to 24 km) of the Hejaz Railway near Amman. If this happened, the Ottoman army groups along the railway south of Amman to Medina would be cut off and weakened. This could cause more Arab uprisings. Allenby had already told his superiors that he wanted to cut the railway at Amman. He believed this would greatly weaken the Ottoman positions to the south. Without steady supplies and new soldiers, local Bedouin and Arab forces might be encouraged to attack the weakened Ottoman forces. Allenby wrote, "If I could destroy 10 or 15 miles of rail and some bridges and get touch with the Arabs under Feisal – even temporarily – the effect would be great."
Before the first attack across the Jordan, the EEF needed to expand its controlled area. This would help support the planned attack on the Hejaz Railway at Amman. During the Battle of Tell 'Asur (March 8-12, 1918), the front line in the Judean Hills was pushed further north. This gave the British a much stronger base for attacks to the east. The British forces advanced between 14 and 26 miles (23 and 42 km) wide and up to 5 to 7 miles (8 to 11 km) deep. They pushed Ottoman forces north from the River Auja on the coast, and from Jerusalem towards Nablus, capturing key areas.
Working with Arab Forces
The British needed the support of the local Arab people. They were told to be "carefully friendly to the Arab tribes" east of the Jordan River. These tribes were fighting with the Sharif of Mecca against the Ottomans. The British treated these Arabs with great respect, paid them in cash, and tried to avoid any problems. Politically, Britain needed Feisal's support, and Feisal needed British military help. The British encouraged the local people to see Feisal and the Hashemites as their new leaders.
Military cooperation between the Arabs and the British Empire forces was expected, but it was somewhat limited. T. E. Lawrence and the forces of the Arab Revolt, based in Aqaba, had already blown up railway tracks, bridges, and Ottoman supply trains. In early March, Arab forces led by Emir Feisal and Lawrence were attacking Ottoman units south of El Kutrani. They were strong around Tafilah on March 11 but pulled back a week later. In response, the Ottoman Army sent a strong force, including a German infantry battalion, south from Amman to defend the railway and the important town of Ma'an. The Bedouin people near Madaba were not friendly towards the Ottoman Army. It was hoped that the planned attack on Amman might encourage them to join the British.

Getting Ready for Battle
On March 1, planes from No. 1 Squadron AFC flew over El Kutrani. They reported seeing a camp with 150 tents, 14 large supply piles, 150 railway cars, three trains, and seven gun positions. Nearby, a new airfield had six hangars and two large planes. On March 4, Australian and British planes bombed this airfield. During this time, the entire area around the Jordan front and Amman was scouted and mapped. A larger Ottoman presence was noticed at Shunet Nimrin on March 3 and successfully bombed on March 6.
The plan was for diversionary attacks (attacks meant to distract the enemy) along the entire front. These would happen before the main British force crossed the Jordan River and advanced to Es Salt and Amman. An Arab raid led by T. E. Lawrence on the Deraa Hejaz railway station was also planned.
General Allenby ordered Major General John Shea, who commanded the 60th (London) Division, to cross the Jordan River and attack Es Salt and Amman. The main goal was to destroy or damage a long viaduct and tunnel near Amman. These were on the Hejaz Railway, a very important supply line for the Ottoman Empire. This railway ran from Damascus southwards, about 60 miles (97 km) east of Jerusalem, all the way to Medina. By destroying the tunnel and viaduct, which would be hard to repair, the railway could be cut for a long time. This would isolate the Ottoman forces to the south. It would also reduce Ottoman pressure on the Arab forces fighting in the Ma'an area. Allenby hoped Shea's attack would make the Ottomans recall a large force that had taken Tafila in March. Even though Shea's force would be far from reinforcements, they expected the enemy resistance to be light.
Ottoman Forces
The headquarters of the Ottoman Fourth, Seventh, and Eighth Armies were in Amman (east of the Jordan River), and in Nablus and Tulkarm (in the Judean Hills). Their main commander was in Nazareth.
About 4,000 to 5,000 German and Ottoman soldiers, with many machine guns and 15 artillery guns, defended the railway viaduct and tunnel in Amman. Another 2,000 Ottoman soldiers defended the area towards Es Salt. The force defending Shunet Nimrin, Es Salt, and Amman was led by Lieutenant Colonel Asim. It included special "assault companies" and a German infantry battalion. These assault battalions were well-equipped and trained for quick attacks.
On March 27, Amman was defended by about 2,150 soldiers, 70 machine guns, and ten artillery guns. Jemal Kuchuk, commander of the Fourth Army, arrived on March 28 to take charge of Amman's defense. By March 30, about 2,000 more soldiers arrived, with more on the way. The German 703rd Battalion, strong in machine guns, also arrived back from Tafilah. These units meant about 1,500 soldiers were spread between Amman and the Jordan River when the British forces crossed.
German and Ottoman aircraft in the area included single-seater fighter planes and two-seater planes, similar in speed to the British Bristol F.2 Fighters.
Shea's Force
_Infantry_Division_Jerusalem.jpeg)
Shea's force included the 60th (London) Division, the Anzac Mounted Division (Australian and New Zealand Mounted Division), and the Imperial Camel Corps Brigade. They also had artillery, armored cars, and bridge-building units. Before the attack, German and Ottoman planes sometimes bombed their camps.
While these operations were happening, the rest of the Egyptian Expeditionary Force held the front line, guarded captured areas, and supplied the troops.
Supplies
Supplies for the attacking forces started at the Jerusalem railway station. From there, they were loaded onto trucks and driven to Jericho, and then to the Jordan River, about 30 miles (48 km) away. Horse-drawn or mule-drawn wagons carried supplies to Shunet Nimrin and Es Salt. Camels from the Egyptian Camel Transport Corps were used to supply the Anzac Mounted Division and the 60th (London) Division. They carried one day's supplies to Amman and Es Salt. A large supply dump was set up east of Talaat ed Dumm, with extra camels ready.
Crossing the Jordan River (March 21–23)

Two possible crossing points were found: Ghoraniyeh and Makhadet Hajlah (also known as Joshua's Crossing). These were thought to be the only places where bridges could be built at that time of year. However, on March 6 and 7, a company from the 60th (London) Division tried to cross the river at El Mandesi, but failed. The old stone bridge at Ghoraniyeh had been blown up by the retreating Ottoman Army.
Several days of heavy rain made the river rise and flow very fast. Lieutenant General Philip Chetwode worried that the high river might stop the Transjordan operations. The unusual March rains did cause the Jordan River to flood, delaying operations for two days.
March 21
The Anzac Mounted Division gathered in the Talaat ed Dumm area. The Imperial Camel Corps Brigade arrived from Bethlehem. The 60th (London) Division was near Ghoraniyeh. Shea planned to build three bridges at Ghoraniyeh and one at Makhadet Hijla.
The Ottomans had about 1,000 soldiers, some cavalry, and six guns opposing them.
At 3:00 PM, hundreds of Ottoman foot soldiers approached Ghoraniyeh, and two groups of Ottoman cavalry approached Makhadet Hijla. At midnight on March 21, the same day the German spring offensive began in France, another attempt to cross the Jordan started. Two infantry battalions from the 60th (London) Division tried to swim the river. Nine swimmers and Australian engineers crossed with a line at Makhadet Hijla without resistance. Meanwhile, other soldiers tried to launch boats at Ghoraniyeh under enemy fire.
Two swimmers were lost at Ghoraniyeh, and many soldiers were injured trying to get a line across. Later, repeated attempts to cross in rafts failed. Many drowned when Asim's German and Ottoman defenders fired on their rafts, which became waterlogged. All attempts to cross at Ghoraniyeh failed. Brigadier General Watson decided to focus all efforts at Makhadet Hijla. Steel chains were eventually attached to trees, and a temporary bridge was built by Australian and New Zealand engineers. By 1:30 AM, a second pontoon bridge at Makhadet Hajlah was finished by the Anzac Bridging Train.
Bridgehead Established

By 7:45 AM, the entire 2/19th Battalion London Regiment was across the Jordan River. By 10:00 AM, the 2/18th Battalion London Regiment had also crossed using the cavalry pontoon bridge. The remaining battalions of the 180th Brigade reached the east bank at Makhadet Hijla by 1:30 PM.
By nightfall on March 22, an infantry battalion had crossed the Jordan River and set up a bridgehead about 1,000 yards (910 m) wide on the eastern bank. Despite thick jungle and Ottoman machine gun fire, an infantry brigade crossed the river. During the night, the bridgehead was pushed further out.
Another attempt to cross the Jordan River at Ghoraniyeh during the night of March 22/23 failed.
At 4:00 AM on March 23, the Auckland Mounted Rifles Regiment began to cross the river at Makhadet Hajlah. Two groups pushed Ottoman units back north towards Ghoraniyeh. One group rode east and bravely charged into Ottoman cavalry, capturing seven prisoners. One New Zealander was killed in a fight with an Ottoman cavalry officer.
Meanwhile, the two groups that rode north towards Ghoraniyeh were not stopped by any Ottoman posts they attacked. They reached the main road, where they met a strong Ottoman position. Here, the Ottoman infantry held their ground, but a troop of New Zealanders galloped into them, capturing a machine gun and turning it on the escaping Ottomans. By noon, they had reached the eastern side of Ghoraniyeh. This bold attack on Ghoraniyeh happened at the same time as a successful attempt by the 60th (London) Division to cross the river. They soon had their pontoon bridge across and were crossing in large numbers by nightfall. During these fights, the Auckland Mounted Rifles Regiment captured 68 prisoners and four machine guns.
Shea's Force Crosses the Jordan
At Makhadet Hajlah, mounted riflemen, light horsemen, and camels crossed by a pontoon bridge. A second bridge was also built. At Ghoraniyeh, a footbridge was built by 4:30 PM on March 23. By then, the 2/21st Battalion London Regiment had crossed by rafts. A pontoon bridge and a heavy barrel-pier bridge were built by 9:30 PM, making a total of five bridges across the Jordan River.
At midnight, the Anzac Mounted Division gathered near Kasr Hajlah. At 1:00 AM on March 24, the 1st Light Horse Brigade began to cross the Jordan River. The New Zealand Mounted Rifles Brigade followed. By 5:00 AM, the leading brigade of Shea's force was 2 miles (3.2 km) along the Es Salt road, moving east of Hajlah. The three infantry brigades of the 60th (London) Division were between Ghoraniyeh and Shunet Nimrin.
In a telegram on March 25, 1918, Allenby reported, "Three bridges were thrown across Jordan during the night of 23rd–24th March, and by 8 a.m, LXth Division [60th Division], Anzac Division and Imperial Camel Corps Brigade were east of the river."
Light Horse Defend the Northern Side
The Anzac Mounted Division split into three groups. The main headquarters with the 2nd Light Horse Brigade and the Imperial Camel Corps Brigade went straight towards Amman. The New Zealand Mounted Rifles Brigade went along another track. The 1st and 2nd Light Horse Regiments took a position near the Jordan River to protect the northern side of the advance. The 3rd Light Horse Regiment advanced towards Es Salt.
Moving up the eastern bank of the river, the 1st Light Horse Brigade got about 1 mile (1.6 km) north of the El Mandesi ford. The 1st and 3rd Light Horse Regiments protected the left (northern) side of the 60th (London) Division and helped with the attack on Es Salt. The 2nd Light Horse Regiment stayed behind to guard the Es Salt road.
Taking Es Salt (March 24–25)
Es Salt was 15 miles (24 km) northeast of the Ghoraniyeh crossing and 4,000 feet (1,200 m) above the Jordan River. Before the war, it was a city of 10,000 to 15,000 people, including Arabs, Christians, Ottomans, and Circassians, living in stone buildings.

The infantry division followed the main road from the Ghoraniyeh crossing for 6 miles (9.7 km) across the Jordan Valley. Then they reached the Shunet Nimrin pass at the foot of the Moab hills. The advance began at 8:30 AM on March 24. The 181st Brigade was on the right, and the 179th on the left. The 2/14th Battalion London Regiment captured three officers and 33 men from the German 703rd Battalion near Shunet Nimrin.
At Tell el Mistah, the 2/22nd Battalion London Regiment captured three guns. The 181st Brigade captured the bridge across the Wadi Shu'eib, but had to stop when darkness fell. This action opened up a fourth road to the plateau, which led directly to Amman.
By nightfall on March 24, infantry from the 60th (London) Division was 4 miles (6.4 km) beyond Shunet Nimrin. They were marching up the road from Ghoraniyeh bridge to Es Salt. From Shunet Nimrin, the road winds along the hills for an 11-mile (18 km) climb towards Es Salt, which is 2,050 feet (620 m) above sea level.

On March 25, the 181st Brigade covered only 8 to 9 miles (13 to 14 km) on the main road, mainly because of the road's poor condition. Aircraft reported no enemy opposition. The brigade pushed ahead in the late afternoon and reached a crossroads 4 miles (6.4 km) from Es Salt, where they met the 3rd Light Horse Regiment. Aircraft, including an Australian plane, had bombed Shunet Nimrin before the infantry attack.
The 3rd Light Horse Regiment took Es Salt at 6:00 PM on March 25. The advanced guard of the 179th Brigade entered the town two hours later. The 6th Squadron of the Wellington Mounted Rifles Regiment stayed with the infantry to guard the town. Meanwhile, the New Zealand Mounted Rifles and the 2nd Light Horse Brigades, along with the Imperial Camel Corps Brigade, moved directly from the Jordan Valley to Amman. They followed tracks further south and climbed up to the plateau.
Journey to Amman

Amman was another 18 miles (29 km) to the east-southeast across the plateau from Es Salt. It was 3,000 feet (910 m) above sea level, 950 feet (290 m) higher than Es Salt. The Anzac Mounted Division moved to the right of the infantry advance to Es Salt. They went from Makhadet Hajlah across the Jordan Valley on the road to Naaur. Near the Wadi el Kefrein, a group of Arabs joined the light horse units.

The Anzac Mounted Division's headquarters, with the 2nd Light Horse Brigade and the Imperial Camel Corps Brigade, marched towards Amman on a track south of the main road. This track went through the village of Naaur. From the Jordan River (1,200 feet (370 m) below sea level), the road to Naaur (16 miles (26 km) away) rises 4,300 feet (1,300 m). The area was full of rocky hills and deep valleys. The mounted force reached the top around 2:00 AM on March 25.
This southern route through Naaur was the hardest. It had a steep slope, and the track was narrow, rocky, and slippery. It was only wide enough for horses to move in single file. Many camels, whose hooves are better for sand, often slipped and fell. They marched through the night on roads that were often just dry riverbeds (wadis), which became muddy streams after heavy rain. After trekking 10 miles (16 km) in 24 hours, they reached Ain el Hekr on the edge of the plateau.
As the road to Naaur became just a track, all wheeled vehicles had to be left behind. Only four small pack mountain guns, a little extra ammunition, and explosives for destroying the viaduct and tunnels were carried on camels and pack-horses.
Meanwhile, the New Zealand Mounted Rifles Brigade took a path through the Wadi es Sir directly to Amman. This track was between the main column and the road to Es Salt. The New Zealanders reached Ain es Sir at noon, capturing two Ottoman officers and 48 other soldiers. They stayed near the village for 24 hours while the rest of the column caught up.
Anzac Mounted Division at Ain es Sir
After a second night of marching in cold, wet conditions over mud and rock, the Anzac Mounted Division gathered at Ain es Sir on the morning of March 26, about 6 miles (9.7 km) west of Amman. The weather was terrible, with sleet and heavy rain for almost the entire operation. Roads and tracks became soft and muddy. All food and animal feed had to be sent to the troops on camels and pack-horses.
By this point, the troops had been marching for three days and nights. Because the men and horses were exhausted, Chaytor, the commander of the mounted division, delayed the attack on Amman until the next morning. During the day, a patrol captured six German soldiers. The 2nd Light Horse Brigade advanced north of the Es Salt to Amman road, capturing prisoners and finding 30 German trucks stuck in the mud. As soon as it was dark, a special patrol from the Wellington Mounted Rifles Regiment set out to cut the railway line south of Amman. They rode 10 miles (16 km) there and back in darkness and pouring rain, successfully blowing up a section of the railway. Another group tried to damage the line north of Amman but failed, though they destroyed a two-arched bridge.
Battle for Amman (March 27–30)
The delay in Shea's force's advance on March 26, caused by the terrible weather, gave the Ottoman forces plenty of time to strengthen their defenses. Still, during the battle, the British made small gains against the strongly dug-in German and Ottoman forces.
The attack on Amman began on March 27 and lasted until March 30. German and Ottoman reinforcements kept arriving steadily along the undamaged Hejaz Railway from the north. About 4,000 to 5,000 German and Ottoman soldiers, with rifles and 15 guns, were in position covering the railway viaduct and tunnel. Another 2,000 Ottoman soldiers moved towards Es Salt from the north. An additional 15,000 German and Ottoman troops with 15 guns reinforced Amman. At dawn on March 27, two British infantry battalions left Es Salt to reinforce the Anzac Mounted Division and the Imperial Camel Corps Brigade in their attack on Amman. The British infantry reinforcements were delayed near Suweileh by local fighting. A Royal Horse Artillery (RHA) Battery also moved from Es Salt towards Amman with great difficulty, arriving on the last day of battle.
Casualties
The total number of soldiers killed, wounded, or missing from both sides was between 1,200 and 1,348. The 60th (London) Division had 476 infantry casualties, including 347 wounded. The Anzac Mounted Division had 724 casualties, including 551 wounded.
Ottoman Counterattack in the Jordan Valley
On the afternoon of March 29, 1,800 Ottoman soldiers crossed the Jordan River at Jisr ed Damieh. They attacked the left (northern) side of the British line, which was defended by the 1st and 2nd Light Horse Regiments. This counterattack was a serious threat to the British supply lines to Es Salt and Amman. An infantry battalion was sent to help the light horsemen. The Ottoman regiment eventually advanced towards Es Salt, capturing the high ground at Kufr Huda north of Es Salt.
The counterattack by German and Ottoman forces from the north continued to threaten Shea's and Chaytor's northern side. This side, held by the 1st and 2nd Light Horse Regiments, was reinforced by taking troops away from the Amman attack.
Ottoman Counterattack on Es Salt
By March 30, the 1,800 Ottoman soldiers who had crossed the Jordan River the day before were arriving near Es Salt. They threatened the British control of the town. During the night of March 30/31, these Ottoman reinforcements continued to push towards Es Salt.
Air Support
Planes bombed camps on the Jerusalem to Nablus road. The Jisr ed Damieh bridge was bombed and machine-gunned several times, but the bridge itself was not damaged. Between March 19 and 24, seven more attempts were made to damage the bridge without success.
During this operation, aircraft constantly flew over and reported on the progress. On March 22 and 24, Ottoman units were seen moving. On March 24, a large troop-train at Lubin station on the Hejaz Railway south of Amman was attacked by aircraft with machine guns.
Medical Support
It took about 24 hours to move wounded soldiers from the front line to Jericho, a distance of about 45 miles (72 km). Then it was another three hours to Jerusalem. Wounded were carried on stretchers or blankets from the front line to aid posts about 1.5 miles (2.4 km) behind. Dressing stations were set up about 3 miles (4.8 km) behind these aid posts. Between some dressing stations and the nearest clearing station on the Es Salt to Amman road, wounded had to be carried 10 miles (16 km) on camels or strapped to horses. A larger collecting station was set up 6 miles (9.7 km) further back, where wounded were carried by camels. Horse-drawn ambulances then took wounded back to the Jordan Valley. Motor ambulances took wounded from Es Salt to Jericho. From Jericho, wounded were sent to hospitals in Jerusalem or by train to Cairo.
Mobile medical units, with their equipment on pack-horses and camels, followed the attacking force to Es Salt and Amman. Their motor ambulances stayed near Jericho to transport wounded from the receiving station to the main dressing station west of Jericho.
Supplies

Motor trucks supplied Jericho from Jerusalem. But from Jericho to Amman, the Anzac Mounted Divisional Train and Egyptian Camel Transport Corps used camels, pack horses, mules, or donkeys to transport supplies. They covered 24 miles (39 km) a day from the foot of the mountains to the troops at Amman. The bad weather and slippery mountain tracks caused many casualties among camels and drivers. The total distance covered by trucks, horses, and camels, from the railway end to Jerusalem and then to the soldiers fighting, was 86 miles (138 km).
Of the 2,000 camels used for transport, 100 were killed in action, and 92 had to be put down because of injuries. Many camels were overloaded during the retreat from Amman.
After the Battle
Retreat (March 31 – April 2)
By March 30, Chaytor's force had pushed Ottoman soldiers back into Amman. After fierce fighting, the New Zealand Mounted Rifles Brigade had entered the town, about 2 miles (3.2 km) west of the station. But German and Ottoman machine guns on the hills beyond were too strong. All efforts to remove enemy forces from the Hejaz Railway's Amman station failed.
It was decided that trying to capture the Amman Railway Station further would cause too many losses. So, the decision was made to pull back. Allenby reported on March 31 that 5 miles (8.0 km) of railway track and culverts had been destroyed south of Amman Station, and a bridge blown up. He said the goal of the raid had been achieved by cutting the Hejaz Railway. He made this decision even though the main goal of destroying the large viaduct at Amman had not been met. It was becoming less likely that it could be, as Chaytor's force was having trouble defending itself from strong German and Ottoman counter-attacks. Chaytor's force was then ordered to retreat to Es Salt.
When darkness fell on March 30, the soldiers on the front line received the order to retreat. One soldier said, "none of us sorry to leave behind forever, we hope, a nightmare of a most terrible nature."
Evacuating the Wounded

The retreat from Amman began on March 30, with the wounded being sent back to the Jordan Valley. The wounded moved along the main road through Es Salt. However, Es Salt was under attack from German and Ottoman units from the northwest. The only bridge across the Jordan River not destroyed by a 9-foot (2.7 m) flood was at Ghoraniyeh.
By March 31, there were over 240 wounded soldiers at collecting stations. All available transport, including sand carts, were used. About 50 of the wounded were able to walk. The last group of wounded left Amman at 11:00 PM. They found 20 camels carrying wounded that had started their journey six hours earlier. These camels were stuck and exhausted at Suweileh. Nine of them could not move. Ambulance staff stayed with the wounded all night. By daylight, light horse soldiers warned them that Ottoman cavalry were close. Five camels managed to continue, but the remaining four were too exhausted. Of the eight wounded, six were placed on horses. But two who seemed to be dying were left behind when Ottoman cavalry got between the covering party and the ambulance men and started firing. Everyone escaped except the two seriously wounded and three men who were taken prisoner. Only one of these men survived the war.
Refugees

From Es Salt, thousands of Armenian and Bedouin refugees, and others, joined the retreating columns. They carried their belongings or pushed them in carts. Some elderly and tired people were given rides in horse-drawn wagons.
Withdrawal
The fighting was still going on when the withdrawal began. First, the New Zealand Mounted Rifles Brigade had to move back from Hill 3039, across the Wadi Amman. They received their orders at 6:00 PM to withdraw to the crossroads at the western end of the plateau, just above Ain es Sir village. By 11:00 PM, all wounded had started their journey back to the Jordan Valley. The New Zealand Mounted Rifles Brigade began to recross the Wadi Amman at midnight, reaching the crossroads at 4:00 AM on March 31.
An outpost line was set up between Ain es Sir and Amman. The whole day was spent gathering Chaytor's and Shea's forces – mounted troops, infantry, camels, and camel transport. They also worked to get all camels down the mountains. The 2nd Light Horse Brigade and the Somerset Battery took the Es Salt road. The rest of the force, including the infantry, withdrew by the Wadi Es Sir track.
All day and all the next night, a long line of tired camels, horses, and men slowly stumbled, slipped, and fell down the mountain track. This track went down about 4,000 feet (1,200 m) in 8 miles (13 km). It was well after daylight on April 1 before the New Zealand Mounted Rifles Brigade, which was the rearguard (the group protecting the rear of the retreating army), could start retreating again. They were busy holding off advancing German and Ottoman troops.
The Wellington Mounted Rifles Regiment had rejoined its 6th Squadron, which had been with the infantry division. It was ordered to cover the rear of the New Zealand Mounted Rifles Brigade. German and Ottoman attacks on this rearguard were held off until the regiment moved through the village of Ain es Sir.
At 7:45 AM on April 1, as the rearguard passed through the village, the 2nd (Wellington West Coast) Squadron was attacked by Circassians. They suddenly opened fire from a mill, caves, houses, and rocks on nearby hills. They fired at very close range, wounding men and horses. Horses reared up, bolted, and galloped across the hillsides without riders. The remaining soldiers of the 2nd Squadron galloped out of the village, got off their horses, and counter-attacked with the other two squadrons from the ridges above the village. They rushed the mill, and its occupants were killed. No prisoners were taken. The 2nd Squadron had 18 casualties.
About 13:00 the Jordan Valley came into sight and a halt was made to distribute rations and forage which had been brought forward to meet the New Zealanders. The sun came out and the wind died away and an hour later they were riding down through flowers up to the horses' knees. All was peace and warmth and quiet, making it difficult to think that a few short hours before, the winds were raging, rain falling, and a bitter battle in progress.
—C. Guy Powles, Assistant Adjutant and Quartermaster General, Anzac Mounted Division
Return to the Jordan
The withdrawal across the Jordan River was finished by the evening of April 2. The British kept their bridgeheads at Ghoraniye and Makhadet Hajlah. The infantry and mounted forces had marched and fought almost constantly in the mud and rain for ten days. They suffered almost as much during the advance as during the retreat. Shea's force used 587,338 rounds of small-arms ammunition. They brought back four field guns, 700 prisoners (including 20 officers), 10 machine guns, two automatic rifles, 207 rifles, and 248,000 rounds of ammunition. The German and Ottoman forces left behind two field cookers, 26 motor trucks, five cars, and many horse-drawn wagons on the Amman road. An Ottoman aircraft was captured near the Hejaz railway.

Asim's forces pursued the British. On April 4, German and Ottoman counterattacks began. After another failed counterattack on April 11, the Ottomans strengthened their positions. Around this time, the Ottoman Seventh Army formed a temporary cavalry regiment by combining cavalry groups that had been with different infantry divisions.
This attack was meant to be a surprise raid by mounted troops. However, Shea's force moved too slowly and was limited by the difficult land and weather, so the element of surprise was lost. The attack did, however, force the Ottomans to recall a German and Ottoman group from Tafileh. They gave up trying to keep soldiers there permanently.
The strong push by Shea's and Chaytor's forces greatly helped Feisal's Arab forces. The Ottoman 4th Army pulled some of its soldiers from Maan to help defend Amman just as Feisal began his attack there. These major troop movements – recalling the Tafileh group and partly withdrawing from Maan – helped strengthen Feisal's Arab operations. They also forced the Ottoman army to permanently increase their forces in the area east of the Jordan.
Large new Ottoman camps were set up to support their growing defenses in the lower Jordan area. This included a large group of soldiers at Shunet Nimrin. These troops moved from Nablus by railway and then by road to Jisr ed Damieh, where the ford was replaced by a pontoon bridge. This remained an important supply line between the 7th Army in the west and the 4th Army in the east.
For the first time since the Second Battle of Gaza in April 1917, the Egyptian Expeditionary Force had been defeated. Both Shea and Chetwode had been against the attack on Amman at that time of year, believing the attacking force was too small. Nevertheless, a second unsuccessful attack into the hills of Moab to Es Salt followed just a few weeks later at the end of April. It has been suggested that these two failed operations made the Ottoman Army expect more attacks in the same area by the same troops. This might have helped the British when their big breakthrough attack, the Battle of Megiddo, happened on the Mediterranean coast in September 1918.
Images for kids
-
Ottoman prisoners on their way to Jericho from Es Salt
-

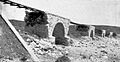
The Hejaz Railway and country east of the Dead Sea
-
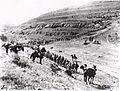
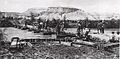
Part of 15 km (9 mi) of railway line blown up in May 1917 by the Anzac and Imperial Mounted Divisions' and the Imperial Camel Corps Brigade's engineers assisted by troopers
-
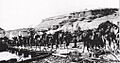
Ottoman infantry column c 1917. Many are wearing Keffiyehs
-
Infantry in the 60th (London) Division marching from Jerusalem to the Jordan Valley March 1918
-
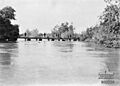
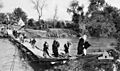
Pontoon bridge at Makhadet Hajlah
-
IWM Q12602:Pontoon bridge across the Jordan River at Ghoraniyeh near Jericho
-
Transjordan theatre of operations 21 March to 2 April; 30 April to 4 May and 20 to 29 September 1918
-
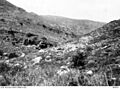
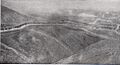
Trees mark a steep portion of the road to Es Salt as it passed through the Wadi Es Salt
-
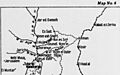
Map of Transjordan
-
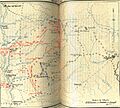
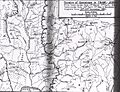
Although Gullett's Map 35 shows positions on 2 May during the Second Transjordan attack on Shunet Nimrin and Es Salt (1918) it clearly shows the Naaur and Ain es Sir tracks to Amman
-
Egyptian Camel Transport Corps crossing pontoon bridge at Ghoraniyeh March 1918
-

2nd Light Horse Field Ambulance crossing the Jordan River at Ghoraniyeh on their return
-
Bedouin refugees from Es Salt crossing a pontoon bridge over the Jordan River
-
Officers' bivouacs, headquarters Anzac Mounted Division at Talat ed Dumm
