Operation Battleaxe facts for kids
Quick facts for kids Operation Battleaxe |
|||||||
|---|---|---|---|---|---|---|---|
| Part of the Western Desert Campaign of the Second World War | |||||||
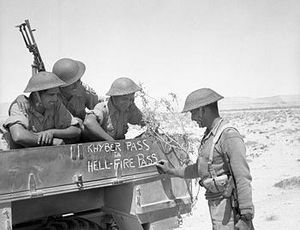 Soldiers of the 4th Indian Division decorate the side of their lorry "Khyber Pass to Hell-Fire Pass". |
|||||||
|
|||||||
| Belligerents | |||||||
|
|||||||
| Commanders and leaders | |||||||
| Strength | |||||||
| 25,000 men 90 cruisers and c. 100 'I' tanks 98 fighters 105 bombers |
8th Panzer Regiment began with c. 100 tanks, about 50 being gun tanks; 5th Panzer Regiment had 96 tanks (57 gun tanks). 130 fighters 84 bombers |
||||||
| Casualties and losses | |||||||
| 969 men 91 98 tanks 36 aircraft |
1,270 men 12 tanks 10 aircraft |
||||||
Operation Battleaxe was a major attack by the British Army during World War II. It took place from June 15 to 17, 1941. The goal was to free the city of Tobruk and take back eastern Cyrenaica (a region in Libya). This area was held by German and Italian forces.
This battle was special because it was the first time a large German force fought defensively. The British lost more than half of their tanks on the first day. Only one of their three attacks succeeded. On the second day, the British had mixed results. They were pushed back on one side but stopped a big German counter-attack in the middle. On the third day, the British barely avoided a huge defeat. They pulled back just before the Germans could surround them. Because Battleaxe failed, Archibald Wavell, the British General in charge, was replaced by Claude Auchinleck.
Contents
Why the Battle Happened
Axis Forces Arrive in North Africa
In early 1941, German forces, known as the Afrika Korps, arrived in Tripoli, Libya. They came to help the Italian army. These Axis forces quickly captured the British front line at El Agheila. By mid-April, they had reached Sallum, Egypt. The British still held the strong port of Tobruk. But the Axis forces surrounded it, starting the Siege of Tobruk.
General Wavell told British Prime Minister Winston Churchill that his forces in Africa were much weaker than the Axis. Churchill then ordered a special convoy of tanks and Hawker Hurricanes to sail through the Mediterranean Sea. This trip, called Operation Tiger, saved 40 days compared to sailing around Africa.
The Siege of Tobruk
The German military leaders sent General Friedrich Paulus to Africa. He was to check on the situation. On May 12, Paulus saw one of Rommel's failed attempts to attack Tobruk. He then reported that Rommel's forces were weak. They were very low on fuel and ammunition.
Because Operation Barbarossa (the invasion of the Soviet Union) was coming soon, Walther von Brauchitsch, the head of the German Army, told Rommel not to advance further or attack Tobruk again.
Operation Brevity: A Small Attack
The British learned about Paulus's report through secret messages (called Ultra intercepts). Churchill believed that one strong attack could push the Germans out. He put more pressure on Wavell to attack.
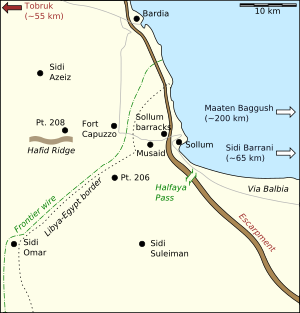
Operation Brevity was quickly planned. It was a small attack to capture Sollum, Halfaya Pass, and Fort Capuzzo. Then, the British would move towards Sidi Aziz and Tobruk. The goal was to destroy as much Axis equipment as possible. It also aimed to gain a foothold for the bigger Operation Battleaxe.
Brevity started on May 15. Fort Capuzzo and Halfaya Pass were captured. But the next day, General William Gott worried that his troops would be destroyed by German tanks. He pulled almost all his forces back to Halfaya Pass. The operation ended on May 17. Only Halfaya Pass was captured. A small German force took the pass back on May 27 in Operation Skorpion.
Impact of Greece and Crete Battles
By the end of May, the Greek island of Crete was captured by Germany in the Battle of Crete. This gave the Luftwaffe (German air force) more airfields. From these fields, they could attack Allied ships and protect their own supplies in Cyrenaica. Delaying Battleaxe meant the Axis could get even stronger. The British military leaders said it was very important to gain control of the area between Sollum and Derna. They also needed to re-establish British air power there.
Getting Ready for Battleaxe
The Tiger Convoy Arrives
On May 12, the Tiger convoy arrived in Alexandria. It brought 238 tanks and 43 Hurricanes. These included 21 Light Tank Mk VI, 82 Cruiser tanks (50 of them new Crusader tanks), and 135 Matilda II Infantry tanks.
There were delays in unloading the tanks. They also needed to be changed for desert use. So, Battleaxe was put off until June 10. The tanks were meant for the 7th Armoured Division. This division had been out of action since February. Most of its tanks had worn out during Operation Compass.
The British Plan of Attack
On May 28, Wavell gave his orders for Operation Battleaxe. It had three stages. First, the British would defeat Axis forces on the frontier. They would secure the areas of Halfaya, Sollum, Capuzzo, and Sidi Aziez. In the second stage, XIII Corps would secure Tobruk and El Adem. Then, Derna and Mechili would be captured.
The plan was based on intelligence that was wrong. It said that two-thirds of German tanks were at Tobruk. This would have given the British a big advantage at the frontier. The attack was first set for June 7. But it was delayed because General O'Moore Creagh's tank units did not get their tanks until June 9. The new date was June 15, giving Creagh five more days for training.
In the first stage, the British would attack in three main groups to clear the frontier. Along the coast was the Coast Force. Inland was the Escarpment Force. The Coast Force was to capture Halfaya Pass. The Escarpment Force was to capture Fort Capuzzo, Musaid, and Sollum. The 7th Armoured Brigade Group and its artillery were to fight and destroy German tanks thought to be at Hafid Ridge. This would also trap Axis units on the frontier. After taking the frontier, the British forces would regroup. Then they would move north to relieve Tobruk. Once joined by the Tobruk defenders, they would push west, driving the Germans back.
Three days before Battleaxe, the Royal Air Force (RAF) bombed Benghazi. All ground attack planes bombed Axis movements on the frontier. Once the battle started, fighters would protect Allied ground forces. Medium bombers would be ready to attack Axis columns. The RAF leader, Arthur Tedder, was told to take big risks in other areas to give all possible air support to Battleaxe.
Axis Gets Ready
Even though Brevity failed, it showed Rommel that his front line was easy to break. Expecting more British attacks, the Axis forces built a line of strong positions. These stretched from Halfaya to Sidi Aziz. They placed many anti-tank guns and anti-tank mines at Halfaya Pass, Point 206 (south of Fort Capuzzo), and Point 208 (west of Fort Capuzzo on Hafid Ridge).
The main defense of the frontier was given to the 15th Panzer Division. This division got a new commander, General Walter Neumann-Silkow, on June 8. Poor radio security by the British 7th Armoured Division gave Rommel nine hours' notice of the operation. Rommel sent the 5th Light Division south of Tobruk. It was ready to counter-attack either the Sollum area or Tobruk. He also ordered a big artillery attack on Tobruk the night before the operation. This was to stop the Allied defenders from breaking out.
Unfortunately, our petrol stocks were badly depleted, and it was with some anxiety that we contemplated the coming British attack, for we knew that our moves would be decided more by the petrol gauge than by tactical requirements.
—Rommel
The Battle Begins
June 15: First Day of Fighting
For the RAF, the first day went as planned. Axis supply lines and airfields were bombed before the attack. Once the operation began, British columns moved safely. RAF fighters protected them. Axis planes only managed six attacks that day.
On the eastern side, at 5:15 AM, the Coast Force began to move. Their goal was to capture Halfaya Pass. The Halfaya Group was on the escarpment (a steep slope). It had the 2nd Battalion Queen's Own Cameron Highlanders, 13 tanks (12 Matildas and one light tank), and an artillery battery. East of them, below the escarpment, were the 1st Battalion 6th Rajputana Rifles and 2nd Battalion 5th Mahratta Light Infantry. They also had two troops of tanks and some 25-pounder guns.
At 5:40 AM, British artillery was supposed to fire on German and Italian forces at Halfaya. But the artillery got stuck in soft sand. After waiting, the tank commander ordered his tanks to attack at 6:00 AM. Soon, the defenders' anti-tank guns opened fire. Within hours, all but two tanks were destroyed. The Cameron Highlanders were soon pushed back by German armored cars and motorized infantry. Below the escarpment, four Matildas were disabled by anti-tank mines. This blocked the path of the others. The Rajputana Rifles and Mahrattas tried several times to reach the pass but were stopped each time.
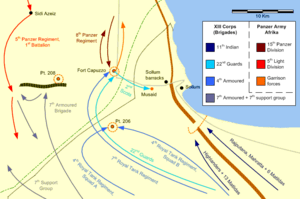
In the center, the 7th Royal Tank Regiment reached Fort Capuzzo by noon. They scattered the defenders, who retreated north. Soon after, they faced several counter-attacks from the 15th Panzer Division. They stopped the final, biggest attack at 6:30 PM. These were not serious attacks. Rommel did not want to fully commit the 15th Panzer Division without more information. The 8th Panzer Regiment fought briefly. Then they pretended to retreat to lure Matilda tanks into range of hidden anti-tank guns. Neither side took much damage. Rommel ordered the 5th Light Division to Sidi Azeiz for a possible counter-attack. This was in response to the British taking Capuzzo.
The rest of the 4th Royal Tank Regiment protected the flank of the 7th Royal Tank Regiment. A Squadron had early success against Battle Position (B.P.) 38. They captured 200 Axis prisoners and eight guns with almost no losses. But these gains were lost when A Squadron was pushed back at Point 206. German forces then counter-attacked B.P. 38. In the evening, Point 206 was captured. The British also took over 500 German and Italian prisoners. That night, the 2nd Scots Guards captured an outpost at Musaid.
On the western side, the 7th Armoured Brigade used older cruiser tanks in front. They kept their new Crusader tanks as a surprise. The force reached Hafid Ridge by 9:00 AM. After crossing the first ridge, they were attacked by hidden anti-tank guns. Two tanks were destroyed before the rest could retreat. This was a problem because the cruiser tanks had 2-pounder anti-tank guns. These guns lacked the special High Explosive (HE) rounds needed to fight infantry and artillery. Artillery support was not available.
A small force of tanks was sent to the western part of Hafid Ridge. They were ordered to turn into the first valley. The attack started well. The tanks surprised the Axis forces and fired their machine guns. They lost only one tank. As they moved towards Point 208, the commander saw its defenses. He ordered his units to pull back. But due to a radio shortage, five tanks did not get the order. They continued towards Point 208 and were destroyed by its 88 mm guns.
Soon, reports came from Allied planes that German tanks were coming. The order was given to clear the ridges. This would give the British an advantage for the tank battle. At 5:30 PM, reports said the defenders were leaving Hafid Ridge. After clearing the first ridge, it seemed true. German trucks and guns were seen moving away. The British pursued them. But when they cleared the second ridge, the Axis forces sprung their trap. They fired on the Crusader tanks at close range. Within minutes, 11 Crusaders were destroyed and six more were badly damaged. The Axis infantry and anti-tank guns also suffered many losses. Over thirty German tanks from the 5th Panzer Regiment arrived from the west.
By the end of the first day, Fort Capuzzo was captured. But Halfaya Pass and Hafid Ridge were not. The British had lost many tanks. The 7th Armoured Brigade had only 28 cruiser tanks left. The 6th Royal Tank Regiment had only 20 of its 50 Crusaders. Many damaged tanks were left behind. German tank losses were small. But many soldiers were lost at Hafid Ridge, Point 206, and Fort Capuzzo.
Rommel had a clear picture of the British situation from intercepted radio messages. He knew their losses and problems. Rommel was worried about his forces at Halfaya Pass. They were trapped and running low on supplies. His plan was for the 5th Light Division to drive south towards Sidi Omar. Then they would go east towards Sidi Suleiman and northeast to Halfaya Pass. This would attack the British from behind. To stop the British from moving their Matilda tanks, Neumann-Silkow was ordered to attack Capuzzo. He ordered attacks to start before dawn.
June 16: Second Day of Fighting
The 11th Infantry Brigade attacked Halfaya Pass again. But they failed just like the day before. Bach's forces, though outnumbered and low on supplies, were completely surrounded. They could not retreat. The British commander saw this lack of progress. He decided to keep his few remaining Matildas.
Neumann-Silkow began his attack on British-held Fort Capuzzo at 6:00 AM. He organized his 80 tanks into two columns. They attacked Capuzzo from both sides. The attack went badly from the start. The 15th Panzer Division ran into heavy fire from 25-pounder guns. These guns had been brought up during the night. They also faced Matilda tanks in strong positions. By 10:00 AM, the 15th Panzer Division had lost 50 tanks. By noon, they had to pull back. Soon after, the Scots Guards advanced further west. They captured the Sollum barracks. This stopped Axis forces from flanking them or linking up with the Halfaya defenders.
Starting at dawn, the 5th Light Division moved south. They went past the western edge of Hafid Ridge. The 7th Armoured Brigade kept pace with them to the east. The two forces approached Sidi Omar. During the fighting, British tanks had some success against German transport vehicles. But they were at a big disadvantage against the panzers. The Germans used a very effective tactic.
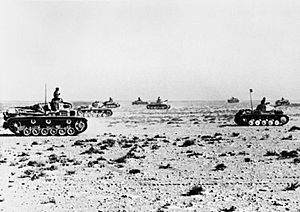
The Panzer IVs had 75 mm (2.95 in) guns with a range of about 2750 meters. They would open fire while still far out of range of the 2-pounder guns on British tanks (about 460 m (500 yd)). This did little damage to British tanks. But it destroyed their towed 25-pounder artillery, which had to retreat. Without British artillery, the Panzer IV and 50 mm (1.97 in) gun armed Panzer IIIs could get closer. They could then pick off the lightly armed British cruiser tanks. If British tanks tried to move forward, the panzers would quickly retreat behind anti-tank guns. Lighter armored units would move around the British sides. To make things worse, many British tanks broke down. By evening, both regiments of the 7th Armoured Brigade had retreated east.
Rommel had seen several fights between the 7th Armoured Brigade and 5th Light Division. He decided to try a full attack against the 7th Armoured Brigade. At 4:00 PM, he ordered the 15th Panzer Division to leave only a few units at Fort Capuzzo. They were to hurry to the northern side of the 5th Light Division. This division was pushing east to Sidi Suleiman. Rommel hoped to cut off most of the British forces, surround them, and destroy them.
That afternoon, Wavell flew to meet Beresford-Peirse. He wanted to simplify decision-making. When he arrived, Beresford-Peirse was meeting with other commanders. He confirmed his orders for the infantry to keep attacking Halfaya and hold Capuzzo. The 4th Armoured Brigade was to join the 7th Armoured Brigade. They would fight the 5th Light Division to the west. That night, learning of the 5th Light Division's advance, the British commander Messervy took action. He ordered his forces to retreat. He also ordered the remaining Matildas of the 4th Armoured Brigade to form a protective line. This would protect the retreating infantry from the advancing panzers. The 7th Armoured Brigade had lost more than half of its tanks. The 4th Armoured Brigade was down to 17 Matildas.
June 17: The Final Day
At 4:30 AM, Rommel's panzers began their advance. The 5th Light Division met the 7th Armoured Brigade at 6:00 AM. They began pushing them back. By 8:00 AM, they had reached Sidi Suleiman. At Capuzzo, the early movements of the 15th Panzer Division made Messervy think another attack was coming. He canceled the order for the 4th Armoured Brigade to reinforce the 7th. He wanted to keep them at Capuzzo.
These events worried the British commander Creagh. He sent a message to Beresford-Peirse, asking him to come for instructions. Wavell, who was with Beresford-Peirse, took command of the operation. He flew to Creagh's command post. The Germans intercepted this message. Rommel later wrote,
It sounded suspiciously as though the British commander no longer felt himself capable of handling the situation. It being now obvious that in their present bewildered state the British would not start anything for the time being, I decided to pull the net tight by going on to Halfaya.
—Rommel
The 5th Light Division and the 15th Panzer Division were attacking. They were only 9 mi (14 km) from Halfaya. At 10:00 AM, as the Panzer divisions pushed eastward, they ran into the remaining Matildas of the 4th Armoured Brigade. The remaining cruisers and artillery of the 7th Armoured Brigade and 7th Support Group joined them. The tanks formed a line to protect the retreating British infantry. At 10:45 AM, Messervy told Creagh over the radio that he had ordered his infantry to retreat from Capuzzo and Halfaya. This retreat would begin at 11:00 AM. At noon, Wavell and Beresford-Peirse arrived and approved the retreat. The British tanks held off the German advance until 4:00 PM. By then, the British infantry had escaped.
What Happened After the Battle
Losses and Casualties
The Allied forces had 969 casualties. This included 122 killed, 588 wounded, and 259 missing. The Germans had 678 casualties, with 93 killed, 350 wounded, and 235 missing. The Italians had 592 casualties.
The British lost 98 tanks (3 light, 30 cruisers, and 65 Matildas). The Axis had about 50 tanks disabled. But they held the battlefield and recovered most of their damaged vehicles. Only 12 Axis tanks were completely destroyed. The British also lost 33 fighter planes and three bombers. The Germans lost 10 aircraft. RAF fighter losses were due to a lack of pilot training and the need for constant air cover.
Military Forces in Battleaxe
Allied Forces (British and Commonwealth)
- XIII Corps (led by Lieutenant-General Noel Beresford-Peirse)
- 4th Indian Infantry Division (led by Major-General Frank Messervy)
- 22nd Guards Brigade
- 7th Armoured Division (led by Major-General Sir Michael O'Moore Creagh)
- 4th Indian Infantry Division (led by Major-General Frank Messervy)
Coast Force
- 7th Armoured Brigade Group
- 7th Armoured Brigade (with 4 A10 Cruiser tanks at HQ)
- 2nd Royal Tank Regiment (10 A9, 11 A10, 21 A13 Mk II Cruiser tanks)
- 6th Royal Tank Regiment (53 Crusader I tanks)
- 3rd Hussars (16 Mk VIb light tanks)
- 7th Support Group
- 1st The King's Royal Rifle Corps
- 2nd The Rifle Brigade
- 3rd Regiment Royal Horse Artillery
- 4th Regiment Royal Horse Artillery
- 1st Light Anti-Aircraft Regiment, Royal Artillery
- 7th Armoured Brigade (with 4 A10 Cruiser tanks at HQ)
Escarpment Force
- 22nd Guards Brigade
- 2nd Scots Guards
- 3rd Coldstream Guards
- 1st The Buffs
- 4th Armoured Brigade (with 2 A10 Cruiser tanks at HQ)
- 4th Royal Tank Regiment (44 Matilda II Infantry tanks, 6 Mk VIb light tanks)
- 7th Royal Tank Regiment (48 Matilda II Infantry tanks, 6 Mk VIb light tanks)
Halfaya Group (part of Coast Force)
- 2nd Queen's Own Cameron Highlanders
- C Squadron, 4th RTR (12 Matilda II Infantry tanks)
- 11th Indian Infantry Brigade Group
- 1st/6th Rajputana Rifles
- 2nd/5th Mahratta Light Infantry
- Two troops from A Squadron, 4RTR (6 Matilda II Infantry tanks)
Air Support (RAF)
In total, the British had 25,000 men and about 220 tanks. These tanks included 28 light tanks, 100 cruiser tanks, and 92 infantry tanks. Of the cruiser tanks, 38 were older models and 53 were the new Crusader tanks. The Crusader and Matilda tanks had special trailers. These trailers carried water, food, ammunition, oil, and extra fuel.
Axis Forces (German and Italian)
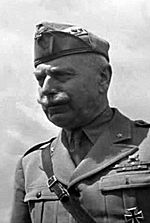
- Commander: Generale d'Armata Italo Gariboldi
- Deutsches Afrika Korps (DAK) under Generalleutnant Erwin Rommel
- 5th Light Division (Generalmajor Johann von Ravenstein) was in reserve. It had 57 Panzer III and Panzer IV tanks, and 39 Panzer I and Pz II tanks. The 5th Panzer Regiment of this division had 96 tanks, with 57 being medium tanks.
- 15th Panzer Division (Generalmajor Walter Neumann-Silkow) was on the frontier. The 8th Panzer Regiment of this division had 36 Panzer II tanks and about 62 Panzer III and IV tanks. Most other units of this division were spread out along Rommel's defensive line.
- The Italian 102nd Motorised Division "Trento"; most of this division was at Bardia. But three infantry battalions and an artillery regiment were in the Sollum–Musaid–Capuzzo area.
In total, the Axis forces had 13,200 men (5,700 German, 7,500 Italian). They had about 194 tanks (75 Panzer II, 119 Panzer III and IV). They also had 130 fighters (60 German, 70 Italian) and 84 bombers (59 German, 25 Italian).
See also
- List of World War II Battles
- North African campaign timeline
- List of British military equipment of World War II
- List of German military equipment of World War II
- List of Italian military equipment in World War II


