
Battle of Marion facts for kids
Quick facts for kids Battle of Marion |
|||||||||
|---|---|---|---|---|---|---|---|---|---|
| Part of Stoneman’s Raid into Southwest Virginia | |||||||||
 Location of the battle |
|||||||||
|
|||||||||
| Belligerents | |||||||||
| Union | Confederacy | ||||||||
| Commanders and leaders | |||||||||
| George Stoneman | John C. Breckinridge | ||||||||
| Casualties and losses | |||||||||
| 154 | 120 | ||||||||
The Battle of Marion happened during the American Civil War on December 17-18, 1864. It was a fight in Southwest Virginia. Major General George Stoneman, a Union commander, led his troops on a mission. His goal was to destroy anything that helped the Southern war effort. His leaders approved this plan on December 6, 1864.
During the battle, the Confederate soldiers held their ground well. They fought off many Union attacks. But they eventually ran out of ammunition. This forced them to pull back. The battle had 274 total casualties. This was a relatively low number for a Civil War battle. After the fight, the Union soldiers destroyed salt mines and lead works. They also ruined anything else that could help the Confederates.
Contents
Where the Battle Happened
The town of Marion is in southwest Virginia. It sits on the Middle Fork of the Holston River in Smyth County, Virginia. Marion was about halfway between the important salt works at Saltville and the lead mines near Wytheville.
Because it was near the Mason–Dixon line, many families in Marion were divided. Some family members fought for the Union, and others for the Confederacy. Until the winter of 1864, the mountains had kept Marion safe from fighting.
Why the Battle Happened
Union Army's Plan
Major General George Stoneman led the Union Army in Kentucky and Tennessee. He suggested another trip into southwest Virginia. His idea was to destroy all factories and supplies that helped the Confederate war effort. Major General John Schofield agreed to this plan on December 6, 1864.
Getting Ready for the Union Attack
Stoneman used troops led by General Alvan Cullem Gillem and General Stephen G. Burbridge. This included the 5th and 6th U.S. Colored Cavalry. These units had tried before to destroy the salt works at the first Battle of Saltville.
Stoneman told Burbridge to bring his 4,200 men through the Cumberland Gap. They were to meet Stoneman and General Gillem in Knoxville, Tennessee. Gillem was getting his 1,500 chosen men ready there. Stoneman did not tell his officers the mission's goals until December 13. This was three days after they left Knoxville on December 10.
On December 12, Stoneman's force pushed back Confederate General Basil W. Duke's cavalry at Rogersville, Tennessee. The Union soldiers defeated the Confederates the next day at Kingsport, Tennessee. There, General Gillem captured 84 prisoners. He also took their supply train.
On December 14, the Union army started pushing Duke's cavalry toward Abingdon, Virginia. The next day, Stoneman and his cavalry camped at Glade Spring, Virginia. This was about 13 miles (21 km) west of Marion. On December 16, Stoneman's cavalry rode toward Marion. They destroyed buildings and roads along the way.
Confederate Army's Defense
The Confederate force fighting General Stoneman was led by Major General John C. Breckinridge. He was in charge of the Department of Southwest Virginia. Breckinridge had about 1,000 regular soldiers and 500 militia reserves. Most of his army had been sent to help defend Richmond.
Confederate Preparations
Breckinridge's army included Colonel Henry Giltner's brigade. This group had soldiers from the 4th and 10th Kentucky Cavalry. It also had the 10th Kentucky Mounted Rifles and the 64th Virginia Mounted Infantry. General Breckinridge's army also included General Basil Duke's cavalry, General George Cosby's cavalry, and Colonel Vincent Witcher's 34th Battalion of Virginia Cavalry.

On the night of December 16, General Breckinridge and his troops left Saltville, Virginia. They wanted to stop Stoneman. Breckinridge took his regular troops with him. He left Colonel Robert Preston in charge of 500 militia men to defend the salt works. General Breckinridge sent Witcher and his men ahead. He told them to bother the Union army.
Around 3 AM, Breckinridge and his small army began to cross Walkers Mountain. In the days before, 4 inches (10 cm) of rain had fallen. This made travel hard on the muddy roads. At 4 AM, they reached the main road near Seven Mile Ford, Virginia. Breckinridge waited there for daylight before moving on.
The Battle
The Advance
Around noon on December 17, 1864, Breckinridge's men rode toward Marion. Meanwhile, General Stoneman sent some of his Tennessee regiments to Wytheville, Virginia. They were to destroy anything valuable. Stoneman also sent two cavalry regiments to destroy the lead mines. These mines were about ten miles (16 km) from Wytheville.
Stoneman and Burbridge continued toward Marion. They met Witcher and his men. Burbridge's lead regiment easily pushed back Witcher's small group. Witcher's men stopped only to fire a volley into the Union cavalry. Then they continued to retreat toward Marion. Witcher sent a messenger to tell Breckinridge they were coming to join them at Marion.
First Day of Fighting
General Breckinridge's lead regiment was the 10th Kentucky Mounted Rifles. Colonel Benjamin Caudill led them. Caudill's men got off their horses and fired at the Union cavalry. This caused several injuries. As the rest of Breckinridge's troops arrived, General Stoneman's men took control of a high hill. This hill overlooked the river.
Breckinridge saw that these hills were the best places to defend. He ordered the 10th Kentucky Mounted Rifles to charge up the hill. They were to drive out the Union army. The rest of Giltner's Brigade also joined the charge. They pushed back the Union soldiers. The Confederates won this charge and gained control of the hill.
Burbridge then lined up his men in columns. He planned to attack the Confederate defenses. Once his men were ready, he ordered all columns to charge together. The Union Army rushed forward. The first Confederate volley of shots greatly reduced the Union forces. Even after this, the Confederate forces were still greatly outnumbered.
Confederate Artillery commander Major Richard Page and his four 10-pounder Parrott rifles began to fire. They tried to slow the charge. The strong fire forced the Union soldiers to fall back. Many were injured.
The Union officers then regrouped their men. With a yell, they charged again. Like the first charge, this one was also pushed back. One more charge happened that day. The men bravely got ready to face the strong fire they knew would come from the temporary walls in front of them. For the last time that day, the Union army charged into Confederate fire. The results were the same as before. The Confederates had held their position during the first day of battle.
Breckinridge ordered his men to move forward. They built new breastworks (temporary walls). These new defenses put the two armies less than 150 yards (137 meters) apart. During the night, a Union officer was told to take positions at the covered bridge near the river. He and 75 men took positions in and around the covered bridge. This was the only Union advance that night.
Second Day of Fighting
The Union army at the covered bridge fired the first shots. They wanted to bother the Confederate front lines. General Burbridge attacked just as the fog lifted. Soldiers from both armies started yelling insults at each other across the fields. Around midmorning, Burbridge decided the light rain would not stop soon. He had his officers prepare to start the battle.
Both armies again shouted their battle cries. Columns of Union men charged across the fields. They faced the same strong fire as the day before. A mix of Black and white Union troops managed to push back the 4th Kentucky Infantry and General Cosby's positions. Cosby rallied his men and attacked back. They retook their temporary walls.
The Union soldiers who had taken positions at the covered bridge felt pressure from the 4th Kentucky in front of them. They realized their spot was not safe. Some tried to run back to the Union lines. As these men tried to retreat from the bridge, the Confederates shot most of them. The remaining Union soldiers at the bridge decided to wait out the battle. Later that day, General Burbridge ordered one of his regiments to charge across the bridge on horseback. This was to help the trapped men. The regiment suffered a few injuries and then retreated.
On the far right, General Duke was being pushed hard by many attacking soldiers. Seeing this, Colonel Giltner sent his regiment to help Duke. Before they arrived, Duke and his men attacked the Union line and pushed them back. Duke and Witcher then joined forces. They charged the Union's far left side. This Union regiment, made of Black soldiers, was also completely pushed back.
Burbridge and his men then began a messy retreat. The Confederate temporary walls had held. But holding the line used a huge amount of ammunition. Each Confederate soldier had fired at least 75 rounds. Some had fired as many as 100 shots. The Union army then ordered another charge with a large cavalry regiment. This group reinforced the Union infantry. The small Confederate army's unexpected fighting ability had temporarily saved the salt works.
After the Battle
Breckinridge told his officers to check on the troops. They were to report back about the army's condition. The number of injured and killed men had made his army too small. He felt he could no longer stop the Union army at the front lines. Ammunition in the camp was also running low. Each man had no more than ten bullets left. Their supplies had been destroyed by Stoneman's army in Wytheville and Abingdon. There was little hope of getting more supplies or help in time.
Breckinridge then ordered his men to leave the battlefield. Even though the men faced terrible conditions, they felt confident they could have held the field the next day. Angrily, they obeyed orders. They quietly began to move out, with Colonel Ben Caudill and his Mounted Rifles leading the way.
What Happened Next
The battle at Marion was a Union victory. The Confederates were greatly outnumbered. They caused some injuries and slowed the Union advance on Saltville. But they could not stop it. Breckinridge and his men found their own path to Saltville's defenses blocked. They retreated further south, while the Union raiders moved forward.
Saltville fell to a night attack on December 20-21. The Union army destroyed the salt works. The damage to the lead mines near Wytheville stopped their production for three months. Even then, they could only produce a little. Salt production did not start again for over a month. All railroad engines, cars, stations, and bridges nearby were destroyed by the raid. General Stoneman said he captured 34 officers and 845 enlisted men during the raid.
Images for kids
-
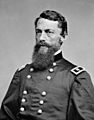
George Stoneman
-
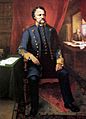
John C. Breckinridge as a brigadier general
-
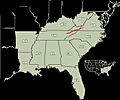
Stoneman's advance toward Marion, Virginia.
-
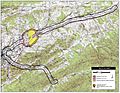
Map of Marion Battlefield core and study areas by the American Battlefield Protection Program.
-
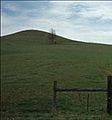
The hill where General Stoneman positioned his army
-
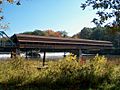
A covered bridge like the one where Union Forces were positioned


_Covered_Bridge_1.jpg)
