
Battle of Marston Moor facts for kids
Quick facts for kids Battle of Marston Moor |
|||||||
|---|---|---|---|---|---|---|---|
| Part of the First English Civil War | |||||||
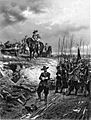
 The Battle of Marston Moor, John Barker |
|||||||
|
|||||||
| Belligerents | |||||||
| Commanders and leaders | |||||||
| Strength | |||||||
| 24,500 | 17,500 | ||||||
| Casualties and losses | |||||||
| 300 killed | 4,000 killed 1,500 captured |
||||||
The Battle of Marston Moor was a huge fight during the First English Civil War (1642–1646). It happened on July 2, 1644. In this battle, the combined armies of the English Parliamentarians and Scottish Covenanters won a big victory.
The Parliamentarians were led by Lord Fairfax and the Earl of Manchester. The Scottish Covenanters were led by the Earl of Leven. They fought against the Royalists, who were loyal to King Charles I. The Royalists were commanded by Prince Rupert of the Rhine and the Marquess of Newcastle.
In the summer of 1644, the Covenanters and Parliamentarians were attacking the city of York. The Marquess of Newcastle was defending York. Prince Rupert gathered an army and marched across England to help the city. When these armies met, it became the biggest battle of the English Civil War.
On July 1, Rupert cleverly moved his army to relieve York. The next day, he wanted to fight, even though his army was smaller. He was convinced to wait, and both sides gathered their full strength on Marston Moor. This was a large, open field west of York. In the evening, the Covenanters and Parliamentarians launched a surprise attack.
After a two-hour battle, Parliamentarian cavalry led by Oliver Cromwell defeated the Royalist cavalry. Then, with the Covenanter foot soldiers, they completely destroyed the remaining Royalist infantry.
After this defeat, the Royalists lost control of Northern England. They lost many soldiers from the northern parts of England, which had supported them strongly. They also lost access to Europe through ports on the North Sea coast. This loss in the north was a major problem for them later in the war.
Contents
Why They Fought: The Background
War in Northern England
In Northern England, the Royalists usually had more soldiers and local support. However, in parts of Lancashire and West Riding of Yorkshire, the Parliamentarians had strong support. These areas had many towns that made clothing, and their people often disagreed with the wealthy landowners.
On June 30, 1643, the Royalists, led by the Marquess of Newcastle, beat the Parliamentarian army. This army was led by Lord Fairfax at the Battle of Adwalton Moor. Lord Fairfax and his son, Sir Thomas Fairfax, escaped to Hull, a port controlled by Parliament.
Newcastle sent some of his army south towards London. But he had to lay siege to Hull with most of his forces. The siege failed because the Parliamentarian navy could bring supplies and more soldiers to Hull. Also, the city's defenders flooded large areas around the city. Meanwhile, Royalist groups sent into Lincolnshire were defeated in other battles.
A Wider War and New Allies
In late 1643, the English Civil War grew bigger. King Charles I made a deal in Ireland. This allowed him to bring English soldiers from Ireland to help his armies. But Parliament took an even bigger step. They signed the Solemn League and Covenant, making an alliance with the Scottish Covenanters.
In early 1644, a Covenanter army from Scotland entered northern England. This army was led by the Earl of Leven. The Marquess of Newcastle had to split his army. He left some soldiers to watch Lord Fairfax's Parliamentarians in Hull. He took his main army north to fight Leven.
The Siege of York Begins
In March and April, the Marquess of Newcastle tried to stop the Scots. He wanted to prevent them from crossing the River Tyne and surrounding Newcastle upon Tyne. At the same time, a Parliamentarian cavalry force, led by Sir Thomas Fairfax, crossed the Pennine mountains. They entered the West Riding of Yorkshire.
To stop Sir Thomas from rejoining Lord Fairfax in Hull, the Royalists took over Selby. On April 11, Sir Thomas Fairfax's force, with more soldiers, stormed Selby. They captured many Royalist soldiers.
When Newcastle heard this, he knew York was in danger. York was the most important city for the Royalists in northern England. Losing it would be a huge blow. He quickly went back to York to protect it. Leven followed Newcastle's army with his main force. On April 22, Leven and the Fairfaxes joined their armies near Wetherby. Together, they began the Siege of York.
At first, the siege was a loose blockade. The Covenanters and Parliamentarians focused on capturing smaller Royalist forts. These forts threatened their supply lines to Hull. On June 3, they got more help. The Parliamentarian army from the Eastern Association, led by the Earl of Manchester, joined them. York was now completely surrounded.
Leven became the commander in chief of the three allied armies. This was a smart move because the Scottish Covenanters were the largest part of the army. Leven was also a very experienced soldier from the Thirty Years' War.
Prince Rupert's Rescue Mission

News of the siege reached Oxford, where King Charles I had his wartime capital. From April 24 to May 5, the King held a meeting with his nephew, Prince Rupert. They decided that Rupert would go to relieve York.
Rupert left Shrewsbury on May 16 with a small force. He planned to gather more soldiers along the way. He took command of a Royalist army near Chester. This increased his force to 2,000 horsemen and 6,000 foot soldiers. He crossed the River Mersey at Stockport. Then, he stormed Bolton, reportedly killing many Parliamentarian defenders.
While resting near Bury, Rupert was joined by the Marquess of Newcastle's cavalry. These horsemen had escaped from York earlier in the siege. He also got more soldiers from Derbyshire and Lancashire. Rupert avoided the Parliamentarian stronghold of Manchester. He then attacked Liverpool on June 6 and captured it after a five-day siege.
Rupert then hesitated. He wasn't sure if he should go to York or stay to secure Lancashire. On June 16, he received an urgent message from the King. The King's advisors had changed Rupert's plans. This left Oxford open to attack. The King had to leave Oxford quickly. The letter also gave Rupert unclear orders about his northern mission.
Rupert understood the letter to mean he must relieve York and defeat the allied army. Then he had to go south to help the King. By this time, Rupert's army had nearly 14,000 soldiers. He left Liverpool for Preston, which surrendered easily. From there, he marched to Skipton. He rested there for three days to get his weapons ready and wait for more soldiers. He arrived at Knaresborough Castle on June 30. This castle was about 14 miles (22 km) northwest of York.
York is Relieved
The allied armies knew Rupert was coming. They had hoped that more soldiers from the Midlands could stop him. But they learned these forces would not arrive in time. The allied armies around York were separated by rivers. If Rupert attacked them, he could destroy one army before the others could help.
So, they stopped the siege on the night of June 30. They gathered their forces near Hessay. Then they moved to Marston Moor. This position blocked Rupert's direct path to York. It also allowed them to move to their left to stop Rupert from going south.
On July 1, some Royalist cavalry appeared on the Moor. The allies got ready for battle. However, Rupert had marched 22 miles (35 km) around their flank. He crossed the River Ure and the River Swale. These rivers join to form the River Ouse. Rupert had successfully put this river between himself and the allied armies.
Later that day, Rupert's forces defeated some Parliamentarian dragoons. These dragoons were guarding a bridge of boats across the Ouse near Nether Poppleton. This was the only crossing available to the allies north of York. Its capture stopped the allies from crossing the Ouse to fight Rupert.
More of Rupert's cavalry arrived at York to connect with the city's defenders. With York now safe, Newcastle sent Rupert a letter of welcome. Rupert replied through one of his officers, demanding that Newcastle bring his forces to Rupert's aid the next morning.
The Battle of Marston Moor
Getting Ready to Fight

When the allied commanders realized they had been outsmarted, they discussed what to do. They decided to march south to Tadcaster and Cawood. From there, they could protect their supply lines from Hull. They could also block Rupert if he tried to move south. Their foot soldiers, cannons, and supplies left early on July 2. The cavalry stayed behind as a rearguard.
Around 9 AM, the allied generals learned that Rupert's army had crossed the captured bridge. They were advancing onto Marston Moor. The Covenanter and Parliamentarian foot soldiers, who had already started marching south, were quickly called back.
However, Newcastle and his general, Lord Eythin, did not want a pitched battle. They might have been annoyed by Rupert's bossy attitude. Instead of joining Rupert right away, they delayed. They claimed it would take time to clear the rubble from York's city gates. Newcastle's soldiers in York also refused to fight unless they were paid. Many were also busy looting the abandoned allied camps outside the city.
Around midday, Newcastle joined Rupert on Marston Moor. He brought only a small group of "gentleman volunteers." Rupert greeted him, saying, "My Lord, I wish you had come sooner with your forces, but I hope we shall yet have a glorious day." Newcastle suggested waiting for more Royalist soldiers to arrive. But Rupert insisted that the King's letter ordered him to fight immediately. Rupert wanted to surprise the enemy before more Parliamentarian soldiers arrived.
However, without Newcastle's foot soldiers, Rupert could not attack. His own infantry was tired from their long march. As the day went on, the Scots and Parliamentarian infantry and artillery returned. They took up positions, making the odds against Rupert even worse.
Around 2:00 PM, the allied artillery, with about thirty cannons, began firing. One Royalist said it was "only a shewing of their teeth." The firing stopped around 5:00 PM. Meanwhile, around 4:00 PM, the Royalist soldiers from York finally arrived. Lord Eythin led them.
Rupert and Eythin already knew each other and didn't like each other. Eythin criticized Rupert's battle plan. He said the Royalist army was too close to the enemy. He worried about a dip in the ground that hid the allied infantry. This would allow them to attack suddenly. When Rupert suggested attacking or moving back, Eythin said it was too late. The Royalist army prepared to settle down for the night.
How the Armies Lined Up
Covenanters and Parliamentarians

The Covenanters and Parliamentarians were on Marston Hill. This was a low hill, but it stood out in the flat Vale of York. They had the advantage of higher ground. But cornfields between the villages of Long Marston and Tockwith made it hard to set up their lines.
On the left side, Oliver Cromwell commanded the cavalry. His first two lines had over 3,000 horsemen. This included Cromwell's famous "ironsides." They had musketeers placed between them to disrupt enemy cavalry. Three regiments of Scottish Covenanter horsemen formed a third line behind Cromwell. Five hundred Scottish dragoons were on the far left.
The center had over 14,000 foot soldiers and 30 to 40 cannons. The Earl of Leven was in charge of the center. Most of Manchester's infantry was on the left of the front line. Lord Fairfax's foot soldiers were in the center. Two Scottish brigades formed the right of the front line. The second line had four more Scottish brigades.
The right side was commanded by Sir Thomas Fairfax. He had at least 2,000 horsemen from Yorkshire and Lancashire. They also had musketeers placed between them. There were also about 500 dragoons. Some Scottish cavalry regiments were also with Fairfax's wing.
Royalists

The Royalists were on the lower ground, behind a drainage ditch. This ditch was a good obstacle against cavalry charges.
The Royalist left side was commanded by Lord Goring. It had 1,700 horsemen from Newcastle's army and 400 from Derbyshire. It also had 500 musketeers.
Their center was commanded by Eythin. It had Rupert's and Byron's foot soldiers. They were placed at the ditch where the right side and center met. This was possibly to protect some cannons. Behind them were the rest of Rupert's foot soldiers, about 5,500 men. Newcastle's 3,000 foot soldiers formed the right side of the second line. There were 14 cannons in the center.
The right side was commanded by Byron. It had 2,600 horsemen and 500 musketeers. The second line included Rupert's own cavalry regiment.
Unlike the allies, Rupert kept a reserve of 600 cavalry. This included his best soldiers, the Lifeguard of Horse. This reserve was behind the center.
The Main Fight
The Royalists were fully ready late in the evening. A sudden rainstorm and the doubts of Newcastle and Eythin made Rupert decide to wait until the next day to attack. From the allied army, he could hear them singing psalms. As the Royalist soldiers broke ranks for supper, Leven noticed they were not ready. He ordered his men to attack around 7:30 PM, just as a thunderstorm began.
On the allied left, Crawford's infantry outflanked the Royalists. Cromwell's cavalry quickly defeated Byron's wing. Byron had been told to hold his ground and use the ditch and muskets to slow the enemy. Instead, he ordered a quick counter-charge. This confused his own troops and stopped his musketeers from firing. In the fighting that followed, Byron's front line was defeated. Cromwell was slightly wounded in the neck and left the field briefly.
Rupert saw the problem on this side. He led his reserve to the right, rallying his own fleeing cavalry. A Parliamentarian officer wrote that Cromwell's men fought hard against Rupert's best soldiers. But Cromwell eventually broke through them.
Leslie's Scottish regiments helped Cromwell win. They outflanked and defeated the Royalist cavalry. Rupert's right wing and reserve were routed. Rupert himself barely escaped capture by hiding in a bean field.
On the allied right center, Fairfax's infantry and Baillie's soldiers crossed the ditch. They captured at least three cannons. But on the allied right, Sir Thomas Fairfax's wing did not do as well. He later wrote that the bushes and ditches made it hard to reach the enemy. This caused great confusion. Royalist musketeers hidden among the horsemen caused a lot of damage.
When Goring counter-charged, the disorganized Parliamentarians were defeated. Some of the Scottish cavalry with Sir Thomas Fairfax fought bravely for a while. Many of Goring's victorious soldiers then chased the fleeing enemy or looted the allied baggage. But some of them, led by Lucas, turned to attack the right side of the allied infantry.
Meanwhile, some of Newcastle's foot soldiers attacked Fairfax's infantry in the center. They threw them into confusion. Blakiston's cavalry brigade, probably with Newcastle himself, charged the allied center. In the confusion and growing darkness, six Scottish infantry regiments and all of Fairfax's infantry fled.
One Scottish brigade of foot soldiers stood their ground. Lucas launched three cavalry charges against them. In the third charge, Lucas's horse was killed, and he was captured. Behind them, the Scottish general Lumsden reformed the allied center. He pushed four regiments forward into the gap. Manchester's own regiment then pushed back Blakiston's brigade.
It was almost completely dark, but the full moon was rising. The countryside was filled with soldiers fleeing from both sides. Cromwell's disciplined horsemen had regrouped. Sir Thomas Fairfax, finding himself alone among Goring's men, removed his identifying white handkerchief from his hat. He made his way to Cromwell's wing to explain what had happened. Some of Fairfax's cavalry and a Scottish regiment also joined Cromwell.
Cromwell then led his cavalry, with Sir David Leslie and Crawford's foot soldiers, across the battlefield. They attacked Goring's cavalry. By this time, Goring's troops were tired and disorganized. When Cromwell attacked, Goring's outnumbered troops were pushed back. Many of them retreated but refused to fight further. Eventually, they were ordered to retreat to York late at night.
The victorious allies then turned against the remaining Royalist center. They defeated unit after unit, killing many who tried to flee. Finally, some of Newcastle's foot soldiers, called the "whitecoats," made a last stand in a ditched area. They refused to surrender and fought off constant cavalry charges. Infantry and dragoons were brought up to break their formation with musket fire. The last 30 survivors finally gave up.
Who Won and Who Lost
About 4,000 Royalist soldiers were killed, many in the last stand of the whitecoats. Another 1,500 were captured. The Royalists lost all their cannons, hundreds of weapons, and several flags.
The allied generals reported that 300 of their soldiers were killed. Among those who died was Sir Thomas Fairfax's brother, Charles. Cromwell's nephew, Valentine Walton, was also hit by a cannonball early in the day. Cromwell was with him when he died and wrote a famous letter to his father.
What Happened Next
For the Royalists
Late at night, the Royalist generals reached York with many defeated soldiers. The Governor of York, Sir Thomas Glemham, only let in those who were part of the city's defense. He was worried Parliamentarian cavalry might enter the city. Many fleeing soldiers, including the wounded, crowded the streets outside the city gates.
Newcastle, seeing his forces destroyed and having spent all his money for the King, decided to leave. He went to Scarborough the day after the battle (July 3) and then went into exile in Hamburg. Eythin and many of his senior officers went with him. Two days after the battle, Rupert gathered 5,000 cavalry and a few hundred foot soldiers. He decided he needed to return south to rejoin the King. He left York and marched back over the Pennines.
Marston Moor was the first time Rupert had been clearly defeated in the war. He was deeply affected by the loss. He kept the King's unclear message with him for the rest of his life. He also lost his dog, "Boye", who had been with him in all his campaigns. Parliamentarian propaganda made a lot of fun of this, saying Boye was like a "Devil's familiar."
With Newcastle and Rupert gone, the Royalists mostly gave up the north. Their remaining forts were captured one by one. The Royalist cavalry from the northern counties continued to fight for the King. They helped a Royalist fort at Pontefract Castle in February 1645. But their bad behavior turned many former supporters away from the Royalist cause. After being defeated in other battles, they made a final attempt to reach Scotland but were routed in October 1645.
For the Allies

The victorious allies regrouped. They were too slow to catch Rupert as he left York. Once the allied army was ready again, they continued the siege of York. With no hope of help, the city's defenders surrendered on good terms on July 16.
After York surrendered, the allied army soon split up. Leven took his troops north to attack Newcastle upon Tyne and Carlisle. He ordered that all soldiers who ran away from the Scottish regiments at Marston Moor be returned. However, every tenth deserter was to be hanged. Once reunited, the remaining soldiers from the broken regiments were given unpleasant duties until they could prove themselves in the storming of Newcastle. Manchester's army went back to Lincolnshire and then moved south to fight in the Second Battle of Newbury.
The Earl of Leven had shown how important disciplined foot soldiers were. Even when some of the new allied regiments fled, he had enough experienced soldiers in reserve to turn the tide of the battle. Oliver Cromwell's reputation as a cavalry commander also became very strong after this battle. Despite attempts by his political rivals to downplay his role, everyone knew that his leadership and the discipline of his troops were key to the victory. Cromwell later said that Marston Moor was "an absolute victory obtained by God's blessing." From this moment, he gained more and more power in Parliament and in the army.
However, reports published after the battle made the disagreements between different groups worse. The Scottish theologian Robert Baillie wrote that he was upset that Cromwell's supporters were taking all the credit. He said they made it seem like Cromwell alone won the battle, and that most of the Scots fled. He argued that David Leslie was Cromwell's leader that day.
How the Allied Generals Acted
Many arguments among the Parliamentarians and Covenanters started because of early reports. These reports claimed that all three allied generals had fled the battlefield. The Earl of Manchester did leave the field, but he later gathered some foot soldiers and returned. However, he could not control much of what was happening.
Some accounts say Lord Fairfax and Leven also fled with their defeated troops. But this has been questioned recently, especially for Leven. The most detailed story of Leven's flight was written much later. However, newer eyewitness accounts show that most of the Scottish infantry and cavalry kept fighting until the end. Seven different eyewitnesses said they fought under Leven's command. For example, Simeon Ashe noted that Leven came forward with his foot soldiers and helped turn the tide of the battle.
Images for kids
-
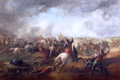
The Battle of Marston Moor, John Barker
-
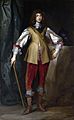
Prince Rupert of the Rhine (1619–1682) – Rupert was ordered to retake the north from Parliament and their Scottish allies
-
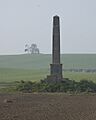
The monument commemorating the battle, alongside the Long Marston – Tockwith road. In the background is Marston Hill, crowned by the clump of trees known as "Cromwell's plump", reputedly the site of the Parliamentarian and Covenanter headquarters.
-
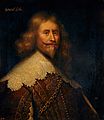
Alexander Leslie, 1st Earl of Leven (1580–1661) – Leven commanded the Covenanter and Parliamentarian armies
-
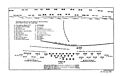
A plan of the Royalist dispositions at Marston Moor, drawn up by Sir Bernard de Gomme
-
Oliver Cromwell at the Battle of Marston Moor (1599–1658). Cromwell's reputation as an effective cavalry commander and leader was cemented by his success at Marston Moor.
See also
 In Spanish: Batalla de Marston Moor para niños
