
Battle of Great Bridge facts for kids
Quick facts for kids Battle of Great Bridge |
|||||||
|---|---|---|---|---|---|---|---|
| Part of the American Revolutionary War | |||||||
 Sketch by Lord Rawdon of the battlefield |
|||||||
|
|||||||
| Belligerents | |||||||
|
|
||||||
| Commanders and leaders | |||||||
| William Woodford | Samuel Leslie Charles Fordyce † |
||||||
| Strength | |||||||
| 861 infantry and militia | 409 infantry, militia, sailors, and grenadiers with 2 artillery pieces |
||||||
| Casualties and losses | |||||||
| 1 wounded |
62 to 102 British regulars killed or wounded, militia casualties apparently unknown. |
||||||
|
Great Bridge Battle Site
|
|||||||
| Lua error in Module:Location_map at line 420: attempt to index field 'wikibase' (a nil value). | |||||||
| Location | Both sides of the Albemarle and Chesapeake Canal between Oak Grove and Great Bridge, Chesapeake, Virginia | ||||||
| Area | 130 acres (53 ha) | ||||||
| Built | 1775 | ||||||
| NRHP reference No. | 73002205 | ||||||
| Significant dates | |||||||
| Added to NRHP | March 28, 1973 | ||||||
The Battle of Great Bridge was a key fight in the early days of the American Revolutionary War. It happened on December 9, 1775, near Great Bridge, Virginia. In this battle, Virginia's colonial militia forces won a big victory. This win forced the British Royal Governor, Lord Dunmore, to leave Virginia. It also ended British control over the Colony of Virginia at the start of the war.
Before the battle, tensions grew between British leaders and American rebels. Both sides gathered troops and tried to get military supplies. The fighting soon focused on Norfolk, where Lord Dunmore had found safety on a British Navy ship. Dunmore's troops built a fort on one side of a key river crossing at Great Bridge. The rebel forces set up camp on the other side. To break up the rebel gathering, Dunmore ordered an attack across the bridge. But the rebels strongly fought back and won. Colonel William Woodford, who led the Virginia militia, called it "a second Bunker's Hill affair".
After the battle, Dunmore and his Loyalist (Tory) supporters left Norfolk. They went to British Navy ships in the harbor. Rebel forces then took over Norfolk. On January 1, 1776, Norfolk was destroyed. This destruction was started by Dunmore and finished by the rebel troops.
Contents
Why the Battle Happened: Rising Tensions
How the War Started in Virginia
Tensions in the Colony of Virginia grew in April 1775. This was around the same time the American Revolutionary War began in Massachusetts. The first battles happened at Lexington and Concord. In Virginia, John Murray, 4th Earl of Dunmore, who was the royal governor, had closed the colonial assembly. This assembly was called the House of Burgesses.
The Burgesses then formed a new, temporary assembly. This new group allowed existing and new militia troops to arm themselves. This led to a fight over who would control the colony's military supplies. Lord Dunmore ordered British forces to remove gunpowder from the storehouse in Williamsburg, the capital. This caused a standoff between royal troops and the militia.
Dunmore's Actions and the Loyalists
Even though no violence happened, Dunmore feared for his safety. He left Williamsburg in June 1775. He put his family on a Royal Navy ship. A small British fleet then gathered at Norfolk. Norfolk was a port town where many merchants supported the British King. These supporters were called Loyalists or Tories. The British fleet's presence may have also kept rebel activity low in the town.
Small fights continued between rebels and Loyalists until October. By then, Dunmore had enough military support to start operations against the colonists. General Thomas Gage, the British commander in North America, sent small groups of soldiers to Virginia. These soldiers were from the 14th Regiment of Foot. They began raiding nearby areas for rebel military supplies on October 12.
Dunmore's Proclamation and New Troops
This raiding continued until the end of October. A small British ship got stuck and was captured by rebels near Hampton. Navy boats sent to punish the townspeople were pushed back by colonial militia. Several sailors were killed or captured in a short gunfight.
Dunmore reacted by issuing a proclamation on November 7. He declared martial law, which meant military rule. He also offered freedom to enslaved people in Virginia who would join the British Army. This proclamation worried both rebel and Loyalist slaveholders. They were concerned about armed former slaves and losing their property.
Despite this, Dunmore recruited enough enslaved people to form the Ethiopian Regiment. He also created a company of Loyalists called the Queen's Own Loyal Virginia Regiment. These local forces joined the two companies of the 14th Foot. These were the only British military forces in Virginia, along with the navy. Dunmore was so successful that he wrote on November 30, 1775, that he would soon be able to "reduce this colony to a proper sense of their duty."
Getting Ready for Battle: The Setup at Great Bridge

Fort Murray: A Strong British Position
When Lord Dunmore arrived in Norfolk, he ordered a fort to be built. This fort was at the bridge over the Elizabeth River. The bridge was about 9 miles (14 km) south of Norfolk, in the village of Great Bridge. The bridge was a natural defense point. It was the only road south from Norfolk toward North Carolina. The Great Dismal Swamp bordered both sides of the road. The bridge could only be reached by narrow causeways.
Dunmore sent 25 soldiers from the 14th Foot to the bridge. They built a small fort called Fort Murray on the Norfolk side of the bridge. They also removed the bridge planks to make it harder to cross. The fort had two cannons and several smaller swivel guns. Soldiers from the Ethiopian Regiment and Queen's Own regiments joined the 14th Foot. This brought the fort's total size to between 40 and 80 men.
The Rebels Arrive and Prepare
Virginia's assembly ordered its militia to march on Norfolk. This was in response to Dunmore's proclamation. William Woodford, a colonel leading the 2nd Virginia Regiment, moved toward the bridge. He had 400 soldiers and about 100 riflemen from the Culpeper Minutemen. On December 2, they reached the bridge and set up camp across from the British fort.
When the rebels arrived, the British destroyed buildings near the fort. This cleared their view for shooting. Woodford did not want to attack the British fort at first. He thought he did not have enough cannons. He also thought the British fort was stronger than it was. So, he began to dig trenches to protect his position. More and more militia companies arrived from nearby counties and North Carolina.
Rumors and Reinforcements
Some cannons eventually arrived with soldiers from North Carolina. But they could not be used because they lacked proper mounts. Woodford also worried when he heard rumors that many Scottish Highlanders had joined Dunmore's forces. The rumors were partly true. There were 120 Highlander families, but few of the men were trained soldiers. By December 8, the rebel camp had nearly 900 men. More than 700 were ready for duty.

Dunmore learned that the colonial militia had cannons. But he did not know they were unusable. He worried about the safety of his fort. So, he decided to attack the rebel position. His plan was to have the Ethiopian companies create a distraction downriver from the bridge. This would draw the militia's attention. Then, the fort's soldiers, joined by more troops from Norfolk, would attack across the bridge at dawn.
The Battle: A Quick and Decisive Fight
The British Attack
Dunmore believed the rebel forces had about 400 men. On the night of December 8 and morning of December 9, Captain Samuel Leslie led more soldiers to Fort Murray. They arrived around 3:00 am. When he arrived, Leslie learned that the Ethiopian soldiers meant for the distraction were not in the fort. They had been sent on a regular patrol to another crossing. Dunmore had forgotten to send orders for them to be available.
Leslie decided to go ahead with the attack anyway. After his troops rested, he sent men to replace the bridge planks just before dawn. Once this was done, Captain Charles Fordyce led a company of 60 grenadiers across the bridge. They had a short fight with rebel sentries, which raised the alarm in the rebel camp. Navy gunners joined Fordyce's men. They were there to operate the cannons for the attack. The Loyalist companies lined up on the Norfolk side of the bridge.
Rebel Defense and British Retreat
At first, the rebel leaders thought the early fighting was just a normal morning salute. They did not pay much attention. But soon, they realized the alarm was serious. As the camp got ready, about sixty militia soldiers prepared for the British attack behind their earthworks (dug-in defenses). They waited carefully until the grenadiers, who were charging with bayonets, were within 50 yards (46 m). Then, they fired a powerful volley of shots at the British column.
Fordyce, leading the column, fell dead just steps from the earthworks. Many soldiers in the front ranks also fell. The British attack broke apart as the militia kept firing. About half of Fordyce's force was killed, and many were wounded. The navy gunners fired to cover their retreat back across the bridge. But their small cannons did not harm the earthworks.
Figure yourself a strong breastwork built across a causeway, on which six men only could advance abreast; a large swamp almost surrounded them, at the back of which were two small breastworks to flank us in our attack on their intrenchments. Under these disadvantages it was impossible to succeed.
Colonel Woodford had by now organized the rebel forces. They marched out to face the British. After a short exchange of musket fire from a distance, Woodford sent the riflemen from the Culpeper Minutemen to the left. From this position, the riflemen could fire on the British side of the bridge. Their weapons had a much longer range than muskets.
The navy gunners were the only British soldiers who could fight the riflemen at that range. But they were now out of position. They were also threatened by the large militia force coming toward the earthworks. They disabled their guns and retreated across the bridge. Captain Leslie ordered his men to retreat into Fort Murray. In about 25 minutes, Dunmore's attempt to stop the rebel forces near Norfolk had failed completely.
What Happened Next: The Aftermath

After the battle, a truce was called. This allowed the British to remove their dead and wounded. That night, the Loyalist forces quietly left the fort and returned to Norfolk. Captain Fordyce was buried with full military honors by the rebels near the battle site.
Reports on casualties varied. Dunmore's official report said 62 British soldiers were killed or wounded. A rebel who escaped reported that British losses totaled 102, not counting Loyalist militia. The rebels claimed only one casualty: a man with a slight wound to his thumb. Colonel William Woodford wrote in a letter published in Virginia Gazette on December 15, 1775: "This was a second Bunker's Hill affair, in miniature; with this difference, that we kept our post, and had only one man wounded in the hand."
Norfolk's Fate and Dunmore's Departure
Virginia's militia forces were then joined by troops from North Carolina. These troops were led by Colonel Robert Howe. Dunmore blamed Leslie for attacking without the planned distraction. However, the battle's outcome might not have changed, given how many more rebel soldiers there were.
In the days that followed, Dunmore and his Loyalist supporters found safety on Royal Navy ships. The victorious rebel forces occupied Norfolk. But the danger Dunmore posed to the rebel cause was not over. General George Washington, who led the Continental Army and knew Dunmore well, wrote a letter in late December. He warned that Dunmore was still a threat. He told General Charles Lee that "if that Man is not crushed before Spring, he will become the most formidable Enemy America has". Washington added that "nothing less than depriving him of life or liberty will secure peace to Virginia."
The rebels refused to allow supplies to be delivered to the crowded British ships. This led to more problems. On January 1, 1776, Norfolk was destroyed. Royal Navy ships and their landing parties started the fire. But rebel troops finished the job, continuing to loot and burn the former Loyalist town.
Lord Dunmore occupied Portsmouth in February 1776. He used it as a base for raiding until late March. Then, General Charles Lee forced him back to the fleet. After more raiding in the Chesapeake Bay, Dunmore and the British fleet left for New York City in August 1776. Dunmore never returned to Virginia.
A highway marker was placed by the state of Virginia in 1934 near the battle site. In 1999, local citizens formed a group to protect the battlefield from construction.
Images for kids
-
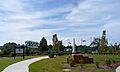
Battlefield
-
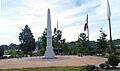
Monument
-
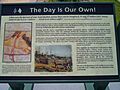
Plaque


