
Battle of Hannut facts for kids
Quick facts for kids Battle of Hannut |
|||||||
|---|---|---|---|---|---|---|---|
| Part of the Battle of Belgium in World War II | |||||||
|
|||||||
| Belligerents | |||||||
| Commanders and leaders | |||||||
| Strength | |||||||
| 2 armoured divisions 20,800 personnel 600 AFVs |
2 Panzer divisions 25,927 personnel 618 tanks (some sources say 674) 108 artillery pieces 1,252 aircraft |
||||||
| Casualties and losses | |||||||
| 121 tanks destroyed/damaged or abandoned | 52 tanks destroyed 111 tanks damaged |
||||||
The Battle of Hannut was a big tank battle during World War II. It happened in Belgium from May 12 to 14, 1940. This battle was part of the larger Battle of Belgium. It was the biggest tank clash in history at that time.
The German army wanted to keep the strong French First Army busy. This would stop the French from interfering with the main German attack. That main attack was planned to go through the Ardennes forest. The Germans hoped the Allies would think the main attack was coming through Belgium. This would draw the Allied armies into Belgium. Once there, the Germans would fight them in eastern Belgium at Hannut and Gembloux. Then, the Germans planned to rush to the English Channel. This move would trap and destroy the Allied forces.
For the French, their plan was to get ready for a long defense at Gembloux. This town was about 34 kilometers (21 miles) west of Hannut. The French sent two armored divisions forward. Their job was to slow down the German advance. This would give the rest of the First Army time to dig in at Gembloux.
The Germans reached Hannut just two days after invading Belgium. But the French fought off several German attacks. They then fell back to Gembloux, just as they had planned. The Germans did succeed in keeping many Allied forces busy. These forces might have helped in the Battle of Sedan. This was the main attack through the Ardennes. The Germans did not completely defeat the French First Army at Hannut.
The French also had tactical successes at the Battle of Gembloux. This happened from May 14 to 15. After that battle, the French First Army was able to retreat to Lille. There, they held up the Germans in the Siege of Lille. This delay was very important. It helped the British Expeditionary Force, French, and Belgian troops escape. They were evacuated from Dunkirk.
Contents
Why the Battle Happened
Allied Plans
General Maurice Gamelin was the top Allied commander. He sent his First Army Group into Belgium. This group included the strong French 1st Army. It also had the Cavalry Corps, led by General René Prioux. Their goal was to help the Belgian Army.
Gamelin thought the Germans would quickly break through Belgian defenses. The Belgians had already said they would retreat after four days. They would move to a planned Allied front called the "Dyle Line." This line was between Antwerp and Namur. Gamelin wanted to quickly set up a strong defense line at Gembloux. He believed the Germans would try to break through the "Gembloux Gap." This gap was between the Dyle and Meuse rivers. He expected them to use many tanks there.
Belgium, the Netherlands, and Luxembourg were neutral countries. They did not take sides until Germany invaded them. Because of this, the French 1st Army could not prepare its positions well. So, the Cavalry Corps was given a special mission. They had to fight a delaying battle. This battle would happen somewhere between Gembloux and Maastricht. Their job was to stop the enemy from reaching Gembloux for eight days. This would give the 1st Army enough time to dig in.
The Cavalry Corps had two armored divisions. These were the 1st and 2nd Mechanised Light Divisions (DLM). Later, the 1st DLM was sent to help the Dutch Army. A new, less trained 3rd DLM took its place. General Prioux still thought his forces were strong enough. He could fight at Maastricht, or have a moving battle, or defend a temporary line. He chose to keep his options open. He would act based on what the situation demanded.
German Plans

The German plan for this area was very clever. First, paratroopers and special troops would capture Fort Eben-Emael. They would also take bridges over the Meuse and Albert Canal. This would open a path through Dutch and Belgian defenses. Then, the 4th Panzer Division would rush through. This would cause the Albert Canal defense line to collapse quickly.
Once the path was open, General Erich Hoepner's XVI Army Corps would take over. This corps included the 4th and 3rd Panzer Divisions. Hoepner's mission was to quickly move his corps from the bridgehead. He needed to capture the area around Gembloux. He wanted to do this before the French infantry divisions could dig in. By doing this, he would draw all the strong Allied forces to the north. This would pull them away from the main German attack. That main attack was coming through the Ardennes.
This action was a feint, or a trick. It was meant to keep the Allies busy in the north. This way, they could not stop the main attack through the Ardennes. This would allow the German Army to quickly advance to the English Channel. This would create a giant pincer movement to trap the Allied forces.
Armies and Their Strengths
Allied Forces
The Battle of Hannut became the biggest tank battle of the campaign. The French DLMs were well-equipped. Each had two "Light Mechanised Brigades."
One brigade was for combat. It had two tank regiments. Each regiment had two squadrons of medium tanks. These were the strong SOMUA S35 tanks. They also had two squadrons of light tanks, the Hotchkiss H35. Each squadron had about 44 S35s and 43 H35s. There were also eight armored command vehicles.
The other brigade had a reconnaissance regiment. This unit used 44 Panhard 178 armored cars. It also had a mechanized infantry regiment. This regiment used 126 trucks to carry soldiers. Each DLM had about 260 tanks and 44 Panhard armored cars.

The entire French Cavalry Corps had 520 tanks in total. This included 176 SOMUA S35s and 172 Hotchkiss H35s. Many Hotchkiss tanks had a small 37mm gun. This gun was not very good against enemy tanks. Some commander's vehicles had a more powerful 37mm gun.
German Forces

The German armored divisions also had tank brigades. Each brigade had two tank regiments. These regiments were split into two tank battalions. Each battalion had light companies with 19 tanks. These were supposed to be Panzer IIIs. They also had a medium company with 15 tanks, using the Panzer IV. But because they didn't have enough of these, they mostly used lighter Panzer IIs and even Panzer Is.
On May 10, the 3rd Panzer Division had 314 tanks. These included 117 Panzer Is, 129 Panzer IIs, 42 Panzer IIIs, and 26 Panzer IVs. The 4th Panzer Division had 304 tanks. These included 135 Panzer Is, 105 Panzer IIs, 40 Panzer IIIs, and 24 Panzer IVs.
So, the German XVI Army Corps had 618 tanks in total. Most of the Panzer IIs were not yet upgraded with thicker armor. This made them weak against the French 37mm guns. The Germans also had more artillery and air support. The Luftwaffe (German air force) had many planes ready to help the tanks. This included about 300 Junkers 87 dive bombers and many fighter planes.
The Battle Begins
Prioux's Decisions
General Billotte suggested that Prioux move his tanks further east. This would help the Belgian Army. But Prioux was not impressed by the Belgian defenses. He also worried about his forces being out in the open. He feared attacks from the powerful Luftwaffe. So, he decided to place his troops and weapons further back. He set up strong points. His tanks would be behind these points. They would counterattack if the enemy broke through.
Billotte agreed to Prioux's plan. He said the First Army Group would advance day and night. This was despite the threat from the Luftwaffe. Their goal was to reach Gembloux quickly. So, Prioux only needed to hold off the German tanks until the morning of May 14.
On May 11, the French air force sent most of its fighter planes to cover the First Army. After more fighters were used for bomber escorts, few were left for the cavalry. Allied bombers tried to slow down Hoepner's German tanks. Prioux's reconnaissance units fell back. They moved towards the main French cavalry. This cavalry was set up in strong points along a 40 km (25 mi) front. The 2nd DLM was from Huy on the Meuse river. The 3rd DLM formed a front from Crehen to Orp. Then it went north along the Petite Gette stream to Tirlemont.
The battlefield Prioux chose had a plateau with some woods. It had many roads, towns, and large farms. The Mehaigne and Petite Gette were small streams. They flowed in deep cuts and had many crossing points. These streams offered good cover for soldiers trying to sneak through. But the most important feature was a ridge. This ridge ran from Hannut through Crehen and Merdorp. This ridge was a natural path for tanks.
The 3rd DLM was spread out over a 17 km (11 mi) front. Only 11 km (7 mi) of this front had anti-tank obstacles. Prioux was stretching the limits of French military rules. French cavalry rules said that if an armored division had to cover a wide front, it should concentrate its forces. But Prioux did not follow these rules.
French Setup
On May 11, the French set up their cavalry front. On the left was the 3rd DLM, led by General Langlois. Its front was split into northern and southern parts. The northern part had the 12th Cuirassiers (reconnaissance regiment). They were in contact with British and Belgian cavalry near Tirlemont. Then came two battalions of the 11th Dragoon Regiment. They held a line along the Petite Gette river. They had Hotchkiss tanks and artillery support.
General de Lafont led the southern part of the division. This area faced Hannut and was dangerously open. Lafont had the 1st Battalion of the 11th Dragoons. They were in strong points at Thisnes, Wansin, and Crehen. They also had Hotchkiss tanks and artillery. SOMUA tank squadrons were kept as reserves behind this sector. South of Crehen, the 2nd DLM was placed. Its front was mostly covered by the Mehaigne creek, down to Huy.
Fighting on May 12
Morning Attacks
On May 12, the 4th Panzer Division quickly moved to capture Hannut. They reached the area that morning. General Hoepner ordered the 3rd and 4th Panzer Divisions to focus on Hannut. This would protect the German 6th Army's side. Major-General Johann Stever of the 4th Panzer Division noticed he was low on fuel. His artillery and infantry had not yet caught up. This made an immediate attack on Hannut risky. He asked for fuel to be dropped from the air. Thinking he faced only one French battalion, he attacked the French defenses. That morning, the 4th Panzer Division met a French armored force of about 25 tanks. The 4th Panzer Division destroyed seven French tanks without losing any of their own.
Allied air units also attacked Stever's division. The British Royal Air Force (RAF) sent 38 bombers and lost 22. The French air force launched two big bombing attacks. One attack included 18 new Breguet 693 bombers. They lost eight planes. German fighter planes and anti-aircraft guns shot down many Allied aircraft. But that afternoon, General Georges ordered air support away from Belgium. He sent it to the threatened Sedan area further south. Prioux's cavalry now had little air cover.
Prioux had given up the first move. With little air reconnaissance, he could only wait to see where the German tanks would attack. He anchored his right side on the Meuse river. He held Huy with two battalions of motorized infantry, some dragoons, and artillery. His left side was in contact with British and Belgian cavalry. They were slowing down the enemy near Tirlemont. German armored cars and infantry probed towards Tirlemont that afternoon. The French Cavalry Corps sent tanks to the area. British reinforcements also arrived. The German effort there was mostly a scouting mission. Both sides were most concerned about the open area around Hannut.
On the ground, Stever's 35th Panzer Regiment advanced towards Hannut. They met strong resistance. The French tanks were hidden. During the battle, they counter-attacked several times. The French forces then left Hannut without a fight. German forces tried to go around the town, not knowing the French had left. About 50 light German tanks ran into the French strong point at Crehen. French defenses had 21 Hotchkiss tanks. They were supported by artillery and fire from the nearby 2nd DLM. The French dragoons suffered heavy losses. But the Hotchkiss tanks carried most of the defense. They fired from prepared positions. German medium tanks tried to pin down the French. Meanwhile, light tanks moved around the French position. The main French force retreated to Merdorp. The surrounded 2nd Cuirassiers were freed by a tank counterattack from the 2nd DLM. SOMUA S35s broke through the German line. The French units escaped, but lost many tanks. The right side of the 4th Panzer Division was now dangerously open.
Evening Attacks
The 3rd Panzer Division rushed from the German staging area at Oreye. This was about 11 km (7 mi) northeast of Hannut. They moved to cover the exposed flank. At 4:30 PM, the German 6th Army asked for air reconnaissance. The Luftwaffe reported French tanks at Orp and motorized units at Gembloux. Reichenau, commander of the German 6th Army, ordered Hoepner to send XVI Corps to Gembloux. He wanted to stop the French from setting up a defense. But Hoepner was still worried about his long supply lines. He was especially worried about his exposed sides. His neighboring IV Corps was probing towards Tirlemont. But the XXVII Corps was still held up north of Liège. This left Hoepner's southern side open.
The Germans decided to create an advance guard. This force had one tank battalion and one infantry battalion. It was supported by two artillery groups. Their goal was to push forward to Perwez. This town was 18 km (11 mi) southwest of Hannut. But Stever ordered his guard to stop if they met strong resistance. The force advanced with heavy air and artillery support. They attacked the French strong point at Thisnes. They ignored the French counterattack at Crehen behind them. The streets of Thisnes were blocked. Heavy French artillery fire stopped the lead tank company. The rest of the German force went around the French position. But poor visibility made it hard to move. The guard finally reached the western edge of the town. There, they met strong artillery fire from the French strong point in Wansin. The German force was ordered to regroup and secure a perimeter. But before they could do this, French SOMUAs counterattacked. They knocked out the Panzer Regiment commander's tank. After hard fighting, both French and German tanks pulled back in the dark. They sometimes ran into each other. The French retreated to Merdorp. The German tanks went back to the Hannut area.
At 8:00 PM, Stever told Hoepner that he was sure two French mechanized divisions were in front of him. One was directly ahead, and one was behind the Mehaigne river. Both agreed to launch a major attack the next day. The plan was for the 4th Panzer Division to focus on Gembloux's right. It would work with the 3rd Panzer Division. The 3rd Panzer would get air support from Fliegerkorps VIII.
The Germans attacked that night. They tested the French defenses. The French strong point at Wansin fought all night against German infantry. It finally pulled back in the early hours of May 13. The front of the 3rd DLM remained. It held positions near Tienen, Jandrenouille, and Merdorp. The 2nd DLM also held its original front. The only break in the line happened at Wansin. Hoepner had failed to take his objective. On the first day, French tanks definitely won, despite German reports.
Fighting on May 13
Morning Actions
To the southeast, German forces began crossing the Meuse River. This was the main German effort. To the north, General Hoepner launched attacks. He wanted to keep the powerful French First Army busy. This would stop it from helping in the main attack.
Hoepner believed the 3rd Panzer Division faced only weak enemy forces. But he thought the 4th Panzer Division faced strong French mechanized forces at Hannut and Thisnes. The French had actually already left these places. He also thought there might be a second French mechanized division south of the Mehaigne.
The Luftwaffe attacked in the late morning. They wanted to weaken the enemy defenses. The 3rd Panzer Division advanced on Thorembais. The 4th Panzer was to move next to it on Perwez. They expected a strong Belgian anti-tank line there. The XVI Army Corps then followed the 6th Army's order. They were told to push immediately towards Gembloux.
The French 12th Cuirassiers and 3rd Battalion of the 11th Dragoons fought off waves of German infantry. These infantry were supported by armored vehicles. The German 18th Infantry Division still broke through their positions. The French command planned to counter-attack with tanks. They wanted to restore their lines. But they dropped those plans because of other events on the 3rd DLM's front. In the afternoon, the French command ordered a retreat. The Allied forces escaped. The German infantry was too slow to follow up their success.
The 2nd DLM was just south of Hoepner's planned attack path. In the early morning, the 2nd DLM sent about 30 SOMUA S-35s. They moved from the Mehaigne to the Merdorp-Crehen line. This was to relieve pressure on the 3rd DLM. The attack was pushed back by heavy German tank and anti-tank fire near Crehen. The French suffered heavy losses. General Bougrain, who commanded the 2nd DLM, reported enemy soldiers sneaking in. He also reported attacks by armored cars over the Mehaigne river. These attacks were at Moha and Wanze, north of Huy. They threatened to cut off the large Belgian garrison in Huy. Bougrain sent his tank reserves to try to fix the situation. At 3:00 PM, a French reconnaissance plane reported many German tanks southeast of Crehen. The 2nd DLM no longer had reserves to help.
Bougrain's Dragoons and motorized infantry were spread out. They were in isolated strong points. This made them easy targets for enemy soldiers sneaking in. Bougrain refused help from the Belgian III Corps. This corps was retreating through his front from the Liège area. Prioux's lack of attention to French defense rules caused problems. It allowed decentralized command to continue. This hurt the French defense.
The German command was worried. They feared the 2nd DLM could interfere with their main attack. So, they moved infantry units between their XVI and XXVII Corps. They also gathered four units from other infantry divisions. These units advanced through Liège. They had air support and some armored cars. These forces sneaked between the French strong points north of Huy. They drew out Bougrain's tanks. This was a critical German success. By keeping French tanks busy with infantry, Hoepner was free to focus on Prioux's front west of Hannut. If Bougrain had gathered his tanks for an attack to the north, he might have caused big problems for the German plan. But Prioux did not give him such a mission.
The main fighting on May 13 was west of Hannut. An order came from the 6th Army to Hoepner. He was told not only to break through to Gembloux. He also had to chase the enemy west of that position. Hoepner gathered all his corps' tank and infantry battalions. This included about 560 working tanks. They were helped on their right by the 18th Infantry Division. They attacked on a front of about 12 kilometers (7.5 miles). The 3rd Panzer Division was in the north, facing Marilles and Orp. The 4th Panzer faced Thisnes and Merdorp.
The 3rd Panzer Brigade of the 3rd Panzer Division moved out around 11:30 AM. Its 5th Panzer Regiment was on the right, and its 6th was on the left. By noon, the tanks were fighting in the blocked and mined towns along the Petite Gette river. After 90 minutes of heavy fighting, both Panzer regiments pushed parts of the French defenders across the stream. The 5th was before Marilles, the 6th at Orp. The German command ordered most of the 6th Regiment to turn south. They went towards Jandrain and Jandrenouille. The land there was better, and they could help the 4th Panzer Division. The 6th Regiment operated on both sides of the Petite Gette. It ran into French tanks in the Orp area. Then, more French tanks attacked it. The German battalions worked together to defeat the attack.
Tank Battle at Orp
The German forces attacked in the afternoon. The 3rd Panzer Division in the north faced Marilles and Orp. The 4th Panzer Division faced Thisnes and Merdorp. The 5th and 6th Panzer Brigades of the 3rd Panzer Division faced an attack by French tanks. Both sides clashed while attacking. The German tanks had more numbers. They could be seen moving in large groups. The French fought in small groups and fired more slowly. From 3:00 PM to 3:48 PM, the 3rd Panzer Brigade repeatedly called for anti-tank units and the Luftwaffe. They needed help dealing with French tanks. The 2nd Battalion, 5th Panzer Regiment, was still opposite Marilles. It was suddenly attacked from the side and rear by more French tanks. The 3rd Panzer Brigade's war diary recorded the 15 minutes when the 2nd Battalion fought alone. The 1st Battalion, 5th Panzer Regiment, saw victory on the left. It sent the 1st Battalion back to its right. This brought the fight before Marilles to a successful end around 4:00 PM. As the infantry secured Orp, the German tanks urgently asked for 37mm and 75mm ammunition.
That morning, the strong points of the 2nd Battalion, 11th Dragoons, suffered heavy losses. This was due to air and artillery bombing. German motorcyclists, followed by armored cars, looked for ways to sneak in and cross. From about 11:30 AM, the 3rd DLM reported about 80 German tanks opposite Marilles. They saw about 100 before Orp. The dragoons defended their strong points. They were supported by their Hotchkiss tank squadron. But their resistance began to break around 1:30 PM. This was because of German numbers and a lack of ammunition.
Colonel Dodart des Loges, who commanded the northern part of the 3rd DLM front, ordered a retreat. As the remaining dragoons pulled back, their Hotchkiss H35 tanks counter-attacked. They were joined by two Hotchkiss squadrons from the 1st Cuirassiers. The French pushed the German tanks back to the stream. Losses were about equal. The French claimed six German tanks for the loss of four of their own. Colonel de Vernejoul, commanding the 1st Cuirassiers, sent 36 SOMUA S-35s. Their mission was to stop German tanks advancing from Orp to Jandrain. German armored forces then surprised the French as they attacked. An equal number of German tanks attacked from cover. They defeated the French attack.
This attack was the main effort of the 3rd DLM. It was meant to stop the 3rd Panzer Division. The 2nd DLM launched raids against the still open sides of the 4th Panzer Division. Some small groups of French tanks broke through. But the German 654th Anti-tank battalion quickly dealt with them. This battalion was attached to the 4th Panzer Division. Besides these small, scattered raids, the 2nd DLM did not try to attack the 4th Panzer Division's side again.
Afternoon Actions
In the afternoon, the 4th Panzer Division began an attack on Merdorp. As the French artillery opened fire, German artillery fired back. The French moved tanks into the abandoned town. They skillfully changed positions. This made it hard for the German tanks to hit their targets. The German tanks decided to go around the town on its left side. But this exposed the German infantry. They were forced to give ground against approaching French tanks. The German tanks quickly turned around. They engaged the French in the open. At first, the French had the advantage. Their tanks had better armor and firepower. But German tactics of schwerpunkt (focusing their tanks on the key point) began to work. Small groups of French infantry sneaked in and attacked from the rear. But German infantry crushed any resistance.
At this point, the 3rd and 4th Panzer Divisions were advancing to Jandrain. A fierce tank battle happened outside the town. The German tanks won because they had more numbers. They reported 22 French SOMUA S-35s completely destroyed. The German forces secured the area and town. German forces reported taking 400 prisoners. They also captured four and five tanks. The French forces, the 2nd and 3rd DLM, began a general retreat westward. The Panzer Divisions no longer feared an attack on their sides. They advanced and fought the remaining enemy forces in the evening. The 3rd Panzer Brigade reported 54 French tanks knocked out that day. Its own losses were listed as "slight." The 6th Panzer Regiment reported losing only two tanks. The Germans had many more tanks disabled. But since they controlled the battlefield, many were repaired. The rest of the 3rd DLM was in line behind the Belgian anti-tank obstacle. This line was from Beauvechain to Perwez. The next morning, the 2nd DLM fell back into line south of Perwez.
Fighting on May 14
Attack on Perwez
The German attack on Perwez happened on the morning of May 14. General Stumpff's 3rd Panzer Division was to fight the new Allied line near Gembloux. General Stever and the 4th Panzer Division were to break through its center at Perwez. Hoepner ordered the attack to start without infantry support. But they could not break through the French positions.
The 4th Panzer Division fought French tanks. The French resisted strongly in wooded areas around Perwez. After hard fighting, the French defenses were destroyed. German infantry helped in this. The French First Army had spread out its tank battalions behind the infantry. Because they were spread out and unsupported, they were defeated. The Germans used many tanks together in a coordinated way.
The 3rd Panzer Division was stopped by strong resistance from the 2nd DLM. Bitter fighting took place. Many French tanks appeared. This made the German Command panic. They thought a major counter-attack was happening. But in fact, these were just French rearguard actions. Both sides lost many tanks. But as night fell, the 2nd DLM stopped its rearguard actions. The German Command calmed down. The Allied forces had gained time. They could reorganize their forces to respond to another big German attack on May 15.
What Happened Next
The German PzKpfw III and IV were the only German tanks that could beat the SOMUA S35 in battle. The SOMUA S35 was thought to be one of the best tanks in the Western campaign. But German tactics were better. They used radio to coordinate their tank movements. This made the Germans smarter than the French. The French were limited to fixed, static positions, like in World War I. French tanks could not communicate as quickly or easily. The French missed chances to attack and were not well coordinated. German tanks also had more crew members. This meant the commander could focus on leading. French commanders had to also act as gunners.
The German plan did not stop the French First Army at Gembloux. This was despite their victory over the 3rd DLM. The German advance into Belgium kept the Cavalry Corps and part of the French First Army busy. Meanwhile, the main German attack crossed the Meuse at Sedan to the southeast. The Germans had hoped that Hoepner's tanks would keep the First Army busy and defeat it. But on May 15, parts of the First Army were in position. They stopped the German tanks. This gave them time and space to move. Part of the First Army sacrificed itself at the Siege of Lille. It held up most of the German tanks. This allowed the British Expeditionary Force and other French units to escape from Dunkirk.
See also
- Battle of Gembloux (1940)
- Battle of Fort Eben-Emael
- Battle of France
- Battle of the Netherlands
- Western Front (World War II)
- List of French military equipment of World War II
- List of German military equipment of World War II
Images for kids
-
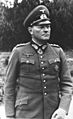
General Hoepner led the German XVI Army Corps at Hannut.
-
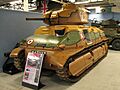
The French SOMUA S35 tank was very strong. It was better than many German tanks in armor and firepower.
-
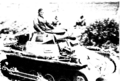
A German Panzer I tank during the invasion of Belgium.
