
Color photography facts for kids

Color photography is a way of taking pictures that can capture and show all the different colors of the world. Unlike black-and-white photos, which only show shades of gray, color photos record how bright and colorful everything is.
When you take a color photo, special electronic parts or chemicals inside the camera record color information. This usually works by splitting the colors into three main groups: red, green, and blue. This is similar to how our own eyes see color. Then, this information is used to recreate the original colors. This can be done by mixing red, green, and blue light (like on a TV screen) or by using special dyes that remove certain colors from white light (like in printed photos).
Sometimes, old black-and-white photos are "colorized" by adding colors later, either by hand or with a computer. These are "colored" photos, but they aren't true "color photographs" because the colors weren't captured when the picture was taken. The colors added might not be exactly what the original scene looked like.
The basic idea for all modern color photography came from a Scottish scientist named James Clerk Maxwell in 1855. The very first color photo was taken in 1861 by Thomas Sutton for one of Maxwell's talks. Since the 1970s, color photography has been the most popular way to take pictures. Black-and-white photography is now mostly used for special art projects.
Contents
History of Color Photography
Early Attempts to Capture Color

People started trying to take color photos way back in the 1840s. At first, they hoped to find a special material that would change color when light hit it. Some early tries seemed promising, especially when they shone a rainbow of light directly onto the material. But taking pictures with a camera was much harder. It needed very long exposures, sometimes hours or even days! The colors were often limited, mostly to primary colors. One example was the "Hillotype" process invented by Levi Hill around 1850. Other scientists, like Edmond Becquerel, got better results, but their colors quickly faded when the pictures were shown. For many years, these experiments kept raising hopes, only to disappoint. Nothing truly useful came from them for a long time.
The Three-Color Idea
The main idea behind almost all color photography, whether old chemical methods or new digital ones, is the "three-color method." This idea was first suggested in 1855 by the Scottish scientist James Clerk Maxwell.
It's based on how our eyes see color. Our eyes have tiny cells called cone cells that are sensitive to different colors of light: red, green, and blue. Maxwell showed that you could create almost any color by mixing just these three pure colors of light in different amounts. He compared it to black-and-white photography: if you took three black-and-white photos of the same scene, each through a red, green, or blue filter, and then projected them back through the same filters, you would see all the original colors.
The very first color photo made using Maxwell's idea was taken by Thomas Sutton in 1861. It was a picture of a colorful ribbon. Maxwell used it in a lecture to show his ideas about color. He even mentioned that the photographic materials weren't very good at capturing red and green light back then. Later, scientists realized that the red in Sutton's photo might have actually been caused by ultraviolet light, not true red light, because of the chemicals used.
How Colors Are Made: Additive and Subtractive
Additive Color
This method creates colors by mixing different amounts of colored lights, usually red, green, and blue. Think of your TV, phone screen, or computer monitor. They all use this method! If you look very closely at a screen with a magnifying glass, you'll see that each tiny dot (called a pixel) is actually made up of even smaller red, green, and blue lights. These tiny lights blend together from a normal viewing distance to create all the different colors you see, including white and shades of gray. This is also known as the RGB color model.
Subtractive Color
This method works differently. Instead of adding light, it subtracts colors from white light using dyes or pigments. This is how color prints on paper or film transparencies are made. The main colors used are cyan (a greenish-blue), magenta (a purplish-pink), and yellow. Cyan absorbs red light, magenta absorbs green light, and yellow absorbs blue light.
Imagine you have three separate images of the same scene, taken through red, green, and blue filters.
- The image taken through the red filter is used to create a cyan dye image.
- The image taken through the green filter is used to create a magenta dye image.
- The image taken through the blue filter is used to create a yellow dye image.
When these three dye images are layered on top of each other, they create a full-color picture. This is also known as the CMYK color model. The "K" stands for black, which is often added in printing to make colors look better and images sharper.

It might seem strange that the red-filtered image makes a cyan print, but it makes sense! A red object, for example, will look very light in the red-filtered image but dark in the other two. When you print this, the cyan dye (which absorbs red) will be light, while the magenta and yellow dyes (which absorb green and blue) will be strong. This combination lets mostly red light reflect from the paper, making the object appear red.
Before the 1930s, making subtractive color prints was very difficult and took a lot of work. It often involved creating three separate pigment images and then carefully combining them. Louis Ducos du Hauron was a pioneer in this area, and his 1868 patent included many ideas for future color photography. His early methods still needed very long exposure times, especially for red and orange light.

Making Film Sensitive to All Colors
For a long time, photographic materials were mostly sensitive only to blue, violet, and ultraviolet light. This made three-color photography very hard. In 1873, a German chemist named Hermann Wilhelm Vogel discovered that adding small amounts of certain dyes to a photographic chemical mixture (called an emulsion) could make it sensitive to other colors. This was a huge step forward! It meant that exposure times for "problem" colors like red and green could be reduced from hours to minutes, and later, to seconds.
Special Color Cameras

Taking three separate pictures by changing filters and plates was slow and could lead to blurry results if the camera moved. So, inventors designed special cameras for color photography.
One type, called a "one-shot" camera, used mirrors to split the light into three parts. Each part went through a different color filter and created a separate image at the same time. This meant all three color pictures were taken in a single moment. These cameras were used for professional photography even into the 1950s.

Another type, called a "multiple back" camera, still took images one at a time but had a sliding holder for filters and plates. This allowed photographers to quickly switch between filters and unexposed film. A famous example is the Miethe-Bermpohl camera, used by Sergey Prokudin-Gorsky to take his amazing color photos of Russia before 1917.

Some cameras tried using multiple lenses with different color filters, but this often caused problems with alignment unless everything in the picture was very far away.
Color Photography for Everyone
Before the late 1890s, color photography was only for a few dedicated scientists and inventors. It was very complicated, and getting a good color photo was rare. Most photographers thought color photography was just a dream.
But by 1898, you could actually buy equipment and supplies for color photography! Two different systems became available to the public.
One was the "Kromskop" system, developed by Frederic Eugene Ives. This system used the additive method. You would take three black-and-white pictures through red, green, and blue filters. To see them in color, you put them into a special viewer called a "Kromskop." This viewer used colored filters and mirrors to combine the three images into one full-color picture. Some Kromskops were even stereoscopic, meaning they showed images in 3D, which was very exciting back then! The Kromskop produced excellent, realistic colors.
The other system was the Joly screen process, invented by John Joly. This was simpler and didn't need a special camera or viewer. It used a glass plate with very fine lines of red, green, and blue colors. When you took a picture, this screen helped record the color information. After developing the negative, you would print a positive transparency and then carefully place a similar colored viewing screen over it. The colors would then appear. This was similar to how modern LCD screens work, with tiny colored stripes. However, the lines were often visible, and the colors could fade over time.
Lippmann photography was another method from the 1890s that created color photos without any dyes or pigments. It used the way light waves interfere with each other to make colors, similar to how soap bubbles show colors. Gabriel Lippmann won a Nobel Prize for this in 1908. The colors were very accurate, but the photos were hard to view and couldn't be easily copied.
The first truly successful color process for the public was the Lumière Autochrome, released in 1907 by the French Lumière brothers. Instead of lines, it used tiny, invisible grains of dyed potato starch in three colors. The light-sensitive film was coated right onto this screen. This made it much easier to use. Autochromes were expensive and needed longer exposure times, so they weren't great for quick snapshots or moving subjects. But when viewed correctly, a well-preserved Autochrome can still look incredibly vibrant. Millions of Autochrome plates were made and used for about 25 years.
- Autochrome Lumière Photographs
-
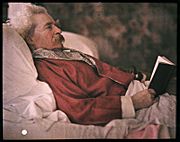
A 1908 Autochrome photo of American author, Mark Twain.
-
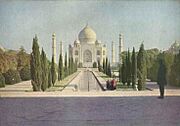
A 1914 color photo of the Taj Mahal.
-
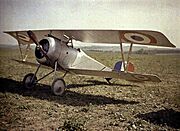
An Autochrome of a World War I Nieuport 23 biplane fighter, around 1917.
-
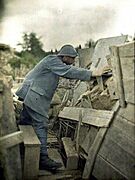
A 1917 Autochrome photo of a French Army lookout during World War I.
-
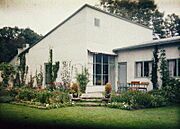
A house in Stockholm, Autochrome, 1930.
-
Autochrome from 1934, showing the Royal Swedish Opera.


Color Film Since the 1930s
A big breakthrough came in 1935 when Eastman Kodak introduced Kodachrome. This was the first "integral tripack" color film. It had three layers of photographic material coated on a single base, each sensitive to red, green, or blue. You just put the film in your camera, took pictures, and then sent it to Kodak for processing. During processing, special chemicals created cyan, magenta, and yellow dye images in each layer. The silver was then removed, leaving only the color dyes.
Kodachrome first came out for home movies, then for 35mm still cameras in 1936. In 1936, the German company Agfa released its own integral tripack film, Agfacolor Neu. Agfa found a way to put the dye-forming chemicals right into the film layers during manufacturing. This made processing much simpler. Most modern color films (except for the now-discontinued Kodachrome) use this method.
In 1941, Kodak started offering prints from Kodachrome slides. The next year, they introduced Kodacolor film. This film created a color negative (where colors and brightness are reversed), which made it easier and cheaper to make prints on paper.
For a long time, color film was more expensive than black-and-white, and it was hard to use indoors without special lighting. In 1950, most photos were still black-and-white. By 1960, color was more common, but often saved for special trips or events. By 1970, prices dropped, film got better, and electronic flashes became common. Color photography then became the normal way to take pictures for most families. Black-and-white film continued to be used by some artists, but by 1980, it was almost gone from regular cameras.
Instant color film was introduced by Polaroid in 1963. These cameras could print a color photo right after you took it!
Today, some color films create positive transparencies (slides) for projectors, while others create color negatives for making prints on paper. Negative film is more forgiving if you don't get the exposure or lighting exactly right, because you can correct it when printing. Most disposable cameras use negative film.
- Color Film Examples
-
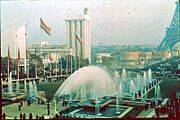
Agfacolor photo from the 1937 World Exposition in Paris, France.
-
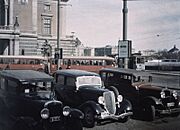
An Agfacolor slide from a café in Oslo, Norway, 1937.
-
An Agfacolor slide from Sweden, 1938.
-
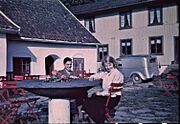
Agfacolor photo from Vaxholm, Sweden, 1938.
-
Kodachrome photo taken at the 1939 New York World's Fair.
-
Kodachrome photo taken during the German invasion of Poland in September 1939.
-
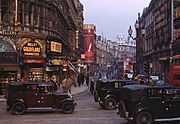
Kodachrome photo of Shaftesbury Avenue from Piccadilly Circus, London, around 1949.
-
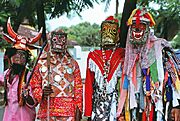
John Canoe Festival celebrants, Kingston, Jamaica, Christmas 1975 (from a Kodachrome original).
-
A sample photo from Polaroid Type 600 color film, 2009.


Digital Photography Today

Between about 1994 and 2006, digital cameras became very popular and affordable. They largely replaced color film. Now, film photography is mostly a special hobby for artists or people who like its unique look.
Most digital cameras capture color using something called a Bayer filter. This filter sits over the camera's sensor. The sensor itself can detect different light wavelengths. The Bayer filter has tiny colored squares (red, green, and blue) arranged in a pattern. Each square lets only one color of light pass through to a specific part of the sensor. The camera then uses this information to figure out the full color of each pixel. There are twice as many green filters because human eyes are more sensitive to green.

Other ways to capture color digitally exist. The Foveon sensor, for example, uses the fact that different colors of light go different depths into silicon. By reading light at different layers, it can figure out the color. Another method uses a prism to split the light into three colors, sending each color to a separate sensor, like in a three-CCD camera.
Artists and Color Photography
When color photography first became available, photographers had different opinions about it. Some quickly started using it, while others weren't sure if it was truly "art."
Supporters of Color Photography
Paul Outerbridge was an American photographer known for his early experiments with color. He wrote articles about color photography starting around 1930. He was famous for his high-quality color pictures, made using a very complex process. In 1940, he published a book called Photographing in Color, explaining his techniques.
Ferenc Berko was another photographer who quickly saw the potential of color film. He thought it was a new way to see and show the world, allowing him to experiment with how he captured feelings in his photos.
John Hedgecoe also preferred color photography. In his book, The Art of Color Photography, he talked about how important it is to understand the "special and often subtle relationships between different colors." He also explained how color can make people feel certain emotions.
William Eggleston is widely recognized for helping color photography be accepted as a serious art form. Jan Groover, a postmodern artist from the 1970s, used color a lot in her work.
Keeping Color Photos Safe
Color photographs don't last forever. The dyes used to make them can fade over time. Even if you store them carefully, some fading is unavoidable. However, proper care can slow down fading and color changes.
Best Environment for Photos
Bad environmental conditions can damage photos. Here are some things to avoid:
- High heat and high humidity (moisture in the air).
- Air pollution and dirt.
- Too much light exposure.
- Things like mold (fungi) and insects.
- Leftover chemicals from processing.
- Damage to the photo's base or top layers.
- Rough handling.
- Using the wrong storage materials.
Three common signs of aging in color photos are:
- Dark fading: This happens even in the dark. It's caused by temperature and humidity. Often, the blue-green (cyan) dyes fade faster, making the photo look too red.
- Light fading: This happens when photos are exposed to light, like when they are on display. Strong light and ultraviolet (UV) rays make them fade faster. The pink-purple (magenta) dyes often fade the quickest.
- Highlight staining: In older color photos, the white borders or very bright areas might turn yellow.
Storing Photos Safely
Generally, the colder you store color photographs, the longer they will last. Storing them below freezing (called cold storage) is one of the best ways to stop damage. However, this is more expensive and needs special handling. Cool storage above freezing is more common and cheaper. It means keeping photos between 10–15°C (50–59°F) with 30–40% humidity, making sure it's not so cold that water condenses on them.
It's best to store individual photos in dark storage, meaning in light-tight envelopes or boxes. When you do look at them or display them, use UV-filtered light and keep the light as dim as possible.
Protective Enclosures
Using protective covers is the easiest way to keep photos safe from handling and light. All protective materials should pass a special test called the Photographic Activity Test (PAT). This test makes sure the storage materials won't harm the photos.
Each photo should have its own protective cover that fits well. These covers can be made of paper or plastic. Both have good and bad points.
- Paper covers should be acid-free and made of special paper. They are usually cheaper than plastic. Paper blocks light, which protects photos. It also lets air circulate, which can protect against humidity and pollution. However, you have to take the photo out to see it, which means you might accidentally damage it.
- Archival quality plastic covers are clear, so you can see the photo without taking it out. They are also stronger and less likely to tear than paper. But plastic can create static electricity, and moisture can get trapped, making the photo stick to the plastic.
After individual photos are covered, they should be placed in housing or storage containers, like folders and boxes made from archival paperboard. It's usually best to store photos flat in boxes because it gives them more stable support, especially for fragile ones. Don't overfill boxes or folders.
More to Explore
- People
- John Bulmer
- George Eastman
- Jules Gervais-Courtellemont
- Luigi Ghirri
- Léon Gimpel
- Gabriel Lippmann
- Luis Marden
- Otto Pfenninger
- Stephen Shore
- Hugo Jaeger
- William Vandivert
- Ivan Dmitri
- Other topics
- Color motion picture film
- Color printing
- Color television
- Film colorization
- Hand-coloring (often confused with early color photography)
- Photochrome
- Photographic processes
- Potassium ferricyanide
- The Shackleton Expedition, which used Paget color photography
- Timeline of historic inventions
Images for kids
-
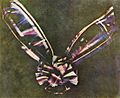
The first color photograph made by the three-color method suggested by James Clerk Maxwell in 1855, taken in 1861 by Thomas Sutton. The subject is a colored ribbon, usually described as a tartan ribbon.
-
A circa 1850 "Hillotype" photograph of a colored engraving. Long believed to be a complete fraud, recent testing found that Levi Hill's process did reproduce some color photographically, but also that many specimens had been "sweetened" by the addition of hand-applied colors.
-
Color print made by Louis Ducos du Hauron from three direct photograms, 1869 or 1870 a presentation copy of this bears an early (February?) 1870 date on the mat in DdH's handwriting, may refer to print only, original photography possibly 1869
-
An 1877 color photographic print on paper by Louis Ducos du Hauron, the foremost early French pioneer of color photography. The overlapping yellow, cyan and red subtractive color elements are apparent.
-
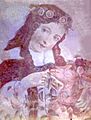
A 1903 Sanger Shepherd process photograph of Col. Willoughby Verner by Sarah Angelina Acland, an English early pioneer color photographer.
-
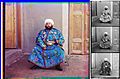
The Emir of Bukhara, Alim Khan, in a 1911 color photograph by Sergey Prokudin-Gorsky. At right is the triple color-filtered black-and-white glass plate negative, shown here as a positive.
-
A 1912 color photograph of Sergey Prokudin-Gorsky, who documented the Russian Empire with a color camera from 1909 to 1915
-
A color photograph made by Lippmann in the 1890s. It contains no pigments or dyes of any kind.
-

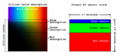
The Bayer arrangement of color filters on the pixel array of an image sensor
-
Wavelength-dependent absorption in silicon and the Foveon X3 sensor. See text for explanation.

