
Battle of Genoa (1795) facts for kids
Quick facts for kids Battle of Genoa |
|||||||
|---|---|---|---|---|---|---|---|
| Part of the naval operations during the War of the First Coalition | |||||||
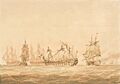
 "The 'Agamemnon' engaging the Ça Ira', 13 March 1795". Nicholas Pocock, 1810. NMM |
|||||||
|
|||||||
| Belligerents | |||||||
| Commanders and leaders | |||||||
| Strength | |||||||
| 14 ships of the line (OOB) | 13 ships of the line (OOB) | ||||||
| Casualties and losses | |||||||
| 74 killed 254 wounded |
400–750 killed and wounded 2 ships of the line captured |
||||||
The Battle of Genoa was a naval battle fought in the Ligurian Sea near Genoa, Italy. It took place on March 14, 1795, during the French Revolutionary Wars. This battle was between the French navy and a combined fleet of British and Neapolitan (from the Kingdom of Naples) ships.
The French fleet was led by Admiral Pierre Martin. He had 14 large warships called ships of the line. The British and Neapolitan fleet was commanded by Vice-Admiral William Hotham, with 13 ships of the line. The battle ended with a victory for the British and Neapolitan forces, who captured two French ships.
This battle was part of a bigger naval campaign in 1795. Admiral Martin wanted to show French power in the waters near Southern France. Before this, the British had taken control of these waters. This happened after they captured the French naval base at Toulon 18 months earlier. Even though Toulon was later taken back by the French, many French ships in the harbor had been burned.
While the French repaired their fleet, the British used their strong navy to invade and capture the island of Corsica in 1794. By early 1795, enough French ships were ready for battle. Admiral Martin then began to sail in the Ligurian Sea. In early March 1795, he sailed towards Genoa. On the way, he captured a British ship. Off Genoa, Martin's fleet was chased by Hotham's fleet. After two days of tricky movements in calm weather, the French admiral decided to turn back towards the French coast.
Hotham chased them. On March 13, his fastest ships caught up with the French ships at the back of their fleet. For two days, the French ships at the rear fought against the British fleet. Several ships on both sides were badly damaged. Martin's main ship, the Sans Culotte, lost touch with the battle overnight. After a short fight the next morning, Martin ordered his fleet to retreat. Two French ships, Ça Ira and Censeur, were left behind. They were surrounded and forced to surrender to the British.
Captain Horatio Nelson urged Hotham to keep chasing the French. But Hotham refused and took his fleet away for repairs. One British ship, HMS Illustrious, later crashed on the Italian coast. Martin sent his damaged ships to Toulon for repairs. The rest of his fleet waited for more operations. Four months later, the two fleets fought again in the Battle of the Hyères Islands. That battle also ended with a British victory.
Contents
Why the Battle Happened
The French Revolutionary Wars began in 1793 when France declared war on Great Britain. To protect its trade in the Mediterranean Sea, the British Royal Navy sent a fleet. Their goal was to block the French fleet in their main port of Toulon. In August 1793, the British arrived and found Toulon in chaos. The British commander, Lord Hood, convinced the people of Toulon to support the French Royalists. This allowed British forces to take control of the town and the French fleet.
French Republican forces then attacked the city. After four months of heavy fighting, the Royalists and their allies had to leave on December 18. During the hurried escape, most of the French Mediterranean fleet was set on fire by British and Spanish teams.
After this, the British launched an invasion of Corsica. Meanwhile, the French began rebuilding their fleet. Many naval supplies in Toulon survived the fire, as did more than half of the fleet. However, many ships were badly damaged. For most of 1794, the French ships stayed in port. The new commander, Admiral Pierre Martin, made a short trip in June with seven ships. But he had to hide to avoid an attack by Lord Hood's fleet. The French fleet had less experience and lower morale compared to the British fleet. This was due to problems from the French Revolution.
By 1795, the French Mediterranean Fleet was mostly repaired. Martin had 15 ships of the line and six smaller ships called frigates for an operation in the Ligurian Sea. The exact goal of this mission is not fully clear. Some reports said the fleet was securing shipping routes. Others suggested it was meant for a land invasion in Corsica. There were also many troopships gathering in Toulon, but they did not leave port during this operation. Some historians think the goal might have been to show force against Rome. This was after a French ambassador was killed there two years earlier.
Martin's Journey
Admiral Martin did not want to leave Toulon until he was sure the British blockade was not active. Lord Hood had been replaced in late 1794 by Vice-Admiral William Hotham. Hotham kept his ships in San Fiorenzo Bay in Corsica during the winter. They tried to make some repairs there. One ship, HMS Berwick, was badly damaged in a storm. In late February, Hotham sailed for bigger repairs at Leghorn in Italy, leaving Berwick behind.
Martin heard about Hotham's departure in early March. He sailed from Toulon on March 3. The French fleet faced several storms. It took four days to reach the Corsican coast. Two ships were partly damaged during the trip. There, Martin's scout ships found the damaged Berwick sailing slowly around Cap Corse. It had temporary masts. Martin knew he had more ships. He sent a group of frigates and ships of the line to chase Berwick. A short battle began. The fleeing Berwick fought the frigate Alceste. Both ships were damaged. Then, a cannonball hit Captain Adam Littlejohn on Berwick, killing him. With other French ships getting closer and their captain dead, the remaining officers on Berwick decided to surrender. Martin ordered the captured Berwick and the damaged Alceste to go to a safe harbor. His fleet continued east into the Gulf of Genoa.
On the same day Berwick was captured, Hotham at Leghorn heard that the French had left Toulon. Reports said the French had passed Île Sainte-Marguerite on March 6, heading east. A scouting ship, Template:Sloop-of-war HMS Moselle, confirmed this. Within a day, Hotham's fleet was ready. They left the harbor early on March 9. Hotham thought the French were going to Corsica. He sent a small ship, Template:Brig HMS Tarleton, to warn Littlejohn and meet Berwick off Cap Corse. On the evening of March 9, Tarleton returned with news of Berwick's capture. This made Hotham change course to the north-west. The next day, British scout frigates found Martin's fleet off Cape Noli in the Gulf of Genoa. They were heading west, back towards Toulon.
The Chase Begins
The weather was calm, so it took until March 11 for the main British fleet to see the French. The French were now south and upwind of the British. The lead ship in Hotham's fleet was HMS Princess Royal. It was about 5 or 6 nautical miles (9 or 11 km) ahead of the main fleet. Contact was lost for a while. But it was re-established on March 12 when Martin turned his fleet around. Martin came within 3 nautical miles (5.6 km) of Princess Royal. Then he turned away. The weather stayed calm with choppy seas. This made it very hard to move ships and prevented either fleet from getting close enough to fight. Martin chose not to attack when he had the chance.
A breeze from the south in the evening allowed Hotham to line up his fleet. The British were to the west, and the French to the southwest. The night had strong winds. The French ship Mercure lost a topmast. This damaged ship left to join Berwick at Gourjean Bay. It was joined by a frigate. Martin kept steering his fleet west, away from the British. At 8:00 AM the next morning, another of Martin's ships, the large 80-gun Ça Ira, crashed into the nearby Victoire. Its front and main topmasts fell overboard.
By the morning of March 13, Hotham realized Martin did not want to fight. The British admiral decided to order a general chase. This meant his captains could break formation and chase the French as fast as their ships could go. The first ship to chase was a frigate, the 36-gun HMS Inconstant. It was commanded by Captain Thomas Fremantle. Within an hour of the collision, it reached the damaged Ça Ira and began firing at close range.
Seeing Ça Ira in danger, the French frigate Vestale attacked Inconstant from a distance. It then pulled past the British ship and attached a tow line to the limping French ship of the line. Fremantle turned his ship and fired at Ça Ira again. But this time, he was hit by the main cannons of the French ship. This caused three deaths and 14 injuries, plus much damage to Inconstant. Fremantle had to pull back for repairs.
Inconstant's attack allowed other British ships to join the fight. At 10:45 AM, the 64-gun HMS Agamemnon, commanded by Captain Horatio Nelson, began firing on the French ship. Agamemnon, briefly helped by HMS Captain, stayed in contact with Ça Ira. It fired at the French ship from a distance for three and a half hours. Nelson was able to position his ship behind Ça Ira. He moved back and forth, firing powerful shots that hit the French ship from end to end. This attack killed or wounded 110 crew members on the French ship. It also shattered its masts and ropes. Nelson's ship had only seven men wounded.
Attempts by the French ships Sans Culotte and Barra to help were stopped. Ça Ira was badly damaged by Agamemnon's fire. Eventually, some French ships from the middle of their fleet came back to help. Hotham ordered Nelson to pull back rather than risk being overwhelmed. While this fight continued, other British ships arrived. HMS Bedford and HMS Egmont fought three French ships, including Timoléon and Martin's main ship, the 120-gun Sans Culotte. Egmont had trouble during the fight when a cannon exploded on its lower deck. This caused nearly 30 injuries among the gun crews. Hotham's fleet could not fully engage the retreating French ships all day. When night fell, both fleets continued west. The French were retreating, with the British chasing them.
The Battle Continues
During the night, Martin and Letourneur moved from Sans Culotte to the frigate Friponne. This allowed them to move around the fleet more easily and direct the battle better. This was a standard French practice during fleet battles. Orders were given for the French fleet, now fully retreating towards Toulon, to sail close to the wind, away from the British. For unknown reasons, Sans Culotte did not follow these orders and left the fleet during the night. Ça Ira fell further and further behind the main French force. To better protect the damaged ship, Vestale was replaced by the ship of the line Censeur, which began towing Ça Ira towards Toulon.
In the morning, the fleets were about 21 nautical miles (39 km) southwest of Genoa. The British were getting closer to the French line to the west. Ça Ira and Censeur had fallen far behind the French fleet. Hotham sent his fastest ships to chase them, helped by a northwesterly breeze. By 6:30 AM, Bedford and Captain had caught up with the slow French ships. Captain was in the lead, fighting both French ships for 15 minutes before Bedford joined. Captain suffered severe damage to its ropes, sails, and masts. By 7:50 AM, it could not be controlled and drifted out of the fight. It was towed to safety. Soon after, Bedford also had to pull back with extensive damage to its sails. Both French ships were also badly damaged. They were left drifting, unable to join Martin's main fleet.
Martin tried to defend his struggling ships at the back. He ordered his line to turn around to cut between the British fleet and the badly damaged Ça Ira and Censeur. These two ships were now threatened by the recently arrived HMS Illustrious and HMS Courageux. Both fleets were then hit by calm weather, which made moving ships difficult. The French turn surprised HMS Lowestoft. The frigate suddenly found itself under the guns of the leading French ship Duquesne. Captain Zacharie Allemand fired on the frigate. Captain Benjamin Hallowell, knowing he could not fight back effectively, sent his entire crew below deck to protect them. Lowestoft was badly damaged in its sails and ropes. But it was saved from more harm by the arrival of the Neapolitan frigate Minerva, which fought Duquesne.
When turning, Allemand did not follow orders correctly. Instead of passing between the British ships and Ça Ira and Censeur, he passed on the other side of the British ships. Hotham had managed to place his ships between the shattered French ships and Martin's main fleet. It seemed a close, full battle was about to happen. At 8:00 AM, Allemand engaged Illustrious and then Courageux. Duquesne was joined by Victoire and Tonnant in the attack. The British ships were also supported from a distance by Agamemnon and Princess Royal. For an hour, the leading French and British ships exchanged heavy fire. Illustrious took the worst of it, drifting out of the battle heavily damaged. Its mainmast had fallen onto the mizzen mast, and both had fallen overboard. The ship's crew had 90 casualties. Courageux was next to suffer, also losing two masts. Its hull was shattered by French cannonballs. Captain Augustus Montgomery's crew lost nearly 50 sailors killed and wounded. The French ships in this exchange were reported to be firing heated shot, but it did not have much effect on the battle. Allemand's group of ships then pulled away from the drifting British ships, which were not supported by the rest of the British fleet because of the calm weather.
The rest of the French fleet did not follow Allemand and turned away. This left the battered Ça Ira and Censeur trapped on the other side of the British fleet. Martin left them to their fate. Isolated, these ships surrendered at 10:05 AM. Without British pursuit, the long-range firing finally stopped at 2:00 PM. Hotham had decided that fixing the severe damage to his leading ships and securing the captured ships was more important than continuing the fight. He turned his fleet away from Martin's quickly disappearing ships. Nelson believed that by leaving the captured ships and damaged ships and closely following the French, Hotham could force a battle that might destroy the entire French fleet. Nelson was so convinced that he took a boat to Hotham's main ship, HMS Britannia, to try to persuade the admiral. Hotham refused, saying, "We must be contented, we have done very well." No amount of appeals by Nelson or Rear-Admiral Samuel Goodall could convince Hotham to continue the action. Soon, the French were out of sight.
After the Battle
Hotham gathered his captured ships and dismasted ships. He turned east towards the anchorage in the Gulf of La Spezia. All of his battle line ships had been in action and suffered casualties. The heaviest losses were on the badly damaged Illustrious and Courageux. Captain, Bedford, Egmont, and HMS Windsor Castle were also damaged. All of them had more than 20 casualties. The total British and Neapolitan losses were 74 killed and 284 wounded. French losses were not fully counted after the battle. However, the total on the shattered Ça Ira and Censeur was about 400 casualties in British reports. For the surviving French ships, casualties are not precisely known. But Duquesne, Victoire, Tonnant, and Timoléon were all reported as being badly damaged.
Hotham's ships anchored in the Gulf of La Spezia after the battle. On March 17, a heavy storm hit them. During the storm, the damaged Illustrious broke its tow rope to the frigate HMS Meleager and began to drift towards the coast. The ship's temporary masts were lost overboard. Many holes in the hull allowed water to pour into the ship. At 1:30 PM, the ship's situation worsened when a loaded cannon fired by accident. It blew off the gunport and made a large hole in the ship from the inside. This made Illustrious impossible to control. By 2:00 PM, the Italian coast was clearly visible to the east. His ship was drifting dangerously close to shore. At 2:30 PM, Captain Thomas Frederick gave control to a sailor on board who claimed to know the area and a safe place to anchor. For five hours, Illustrious struggled to avoid disaster. But at 7:30 PM, the ship ran aground near Avenza. Frederick tried to anchor to save the ship, but this failed due to battle damage and strong winds and waves. The rudder was torn off at 10:30 PM.
The next morning, Tarleton came alongside the hopelessly damaged Illustrious. But it was not until March 20 that the weather calmed enough for the evacuation to begin. Tarleton, Lowestoft, HMS Romulus, and teams of ship's boats successfully removed all of the crew and most of the ship's supplies without any injuries. Once the wreck was empty, it was set on fire and left. The remaining fleet stayed at La Spezia for a week to make basic repairs. Then they sailed for San Fiorenzo on March 25. Repairs lasted until April 18, when Hotham returned to Leghorn.
Both captured French ships were added to the Royal Navy at San Fiorenzo under their original names. However, neither had long careers. Censeur was sent to escort a group of ships to Britain in late summer 1795. It was still damaged. It was attacked, isolated, and recaptured by a French group of ships off Cape St. Vincent in the action of 7 October 1795. Ça Ira survived only a little longer. It accidentally caught fire while anchored off San Fiorenzo on April 11, 1796, and was completely destroyed. Only four of its 600 crew members were killed.
Martin retreated to Hyères after the battle. He was soon joined by the damaged ships from Gourjean Bay and his main ship from Genoa. After getting separated during the night of March 13, Sans Culotte had tried to rejoin the French fleet. But it was seen and chased by a Spanish group of ships. It hid in a neutral port until the way back to France was clear. Martin sent the most damaged ships back to Toulon for repairs. He stayed anchored off Hyères with 11 ships of the line until April. Then he also returned to port, joined by more ships from the French Atlantic Fleet. The captains of Sans Culottes, Mercure, and Duquesne were criticized by Martin for not following his orders. But they were later cleared of wrongdoing by a jury. The jury also highly praised the captains of Ça Ira and Censeur. Martin did not sail again until June. He was caught by Hotham once more in early July. Retreating towards Hyères, the French fleet was chased by the British. The ship at the very back, Alcide, was caught and destroyed at the Battle of the Hyères Islands.
Even though the battle was a British victory, Nelson privately thought Hotham's refusal to keep fighting was bad. He wrote that "I could never have called it well done." Sir William Hamilton, the British ambassador to the Kingdom of Naples, agreed with Nelson. He wrote that Hotham was "not quite awake enough for such a command." Hotham believed his actions were justified because he prevented possible French landings on Corsica. He was also worried about events on land, where a peace treaty between France and Tuscany put access to the harbor at Leghorn at risk. Historians have criticized Hotham's cautiousness. William Laird Clowes wrote in 1900 that "it was an unsatisfactory victory. Hotham took two ships of the line but gained little credit, seeing that he might have, and should have, done much more." More than 50 years after the battle, the Admiralty recognized the action with a special medal clasp. This was given to all British participants still alive in 1847.
Images for kids
-
Agamemnon fighting Ça Ira, 13 March 1795.
