Price's Missouri Expedition facts for kids
Quick facts for kids Price's Missouri Expedition |
|
|---|---|
| Part of the Trans-Mississippi Theater of the American Civil War |
|

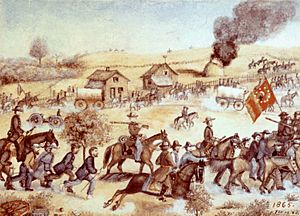
The Price Raid by Samuel J. Reader
|
|
| Operational scope | Strategic offensive |
| Location | Arkansas, Missouri, and Kansas |
| Commanded by | |
| Date | August 29 – December 2, 1864 |
| Executed by | Army of Missouri |
| Outcome | Union victory |
The Price's Missouri Expedition (August 29 – December 2, 1864) was also known as Price's Raid. It was a Confederate cavalry raid during the American Civil War. This raid went through Arkansas, Missouri, and Kansas.
Led by Confederate Major-General Sterling Price, the goal was to take back Missouri for the Confederacy. They also hoped to boost the Confederate side in the war.
Even though Price won some early battles, he was defeated. Union forces led by Major-General Samuel Ryan Curtis beat him at the Battle of Westport in October. Price then lost more battles to Union cavalry under Major-General Alfred Pleasonton at the Battle of Mine Creek in Kansas. This forced him to go back to Arkansas.
Price's Missouri Expedition was the last big Confederate attack west of the Mississippi River. Its failure helped the Union feel more confident about winning the war. It also helped President Abraham Lincoln get re-elected in 1864. Plus, it made sure the Union kept control over Missouri, a state that was hard to win over.
Contents
Why the Raid Happened
After three years of hard fighting, the Confederate leaders were getting desperate. The U.S. presidential election was coming up in the fall of 1864. The Union controlled important rivers and cities in the west. General Sherman was moving through Georgia, and General Lee was stuck defending Richmond.
The Confederacy had hoped other countries would help them, but that was no longer possible. If Abraham Lincoln won the election again, it would be very bad for their cause.
Earlier that summer, the Confederacy told General Edmund Kirby Smith to send troops across the Mississippi River. These troops were meant to help defend Atlanta and Mobile. But Union gunboats on the river made it impossible to cross.
General Smith then came up with a new plan. He decided to try and win Missouri back for the Confederacy. He hoped this would make people in the North turn against Lincoln. He ordered Sterling Price, who was from Missouri, to invade his home state. Price was told to attack St. Louis, a major city with military supplies. If St. Louis was too strong, Price was to go west and capture Jefferson City, Missouri, the state capital. This would be a big win for the Confederates.
After that, Price was supposed to go into Kansas and then south through the Indian Territory. His orders were to gather mules, horses, cattle, and military supplies from those areas.
Who Fought in the Raid
| Main Commanders |
|---|
|
Price put together a force he called the Army of Missouri. It had 12,000 men and fourteen cannons. His army was split into three groups, led by Maj. Gen. James F. Fagan, Maj. Gen. John S. Marmaduke, and Brig. Gen. Joseph O. Shelby. At first, Price was supposed to have more foot soldiers. But these soldiers were sent to another part of the war. This changed his mission from a full invasion to a cavalry raid.
Price's men were a mix of experienced soldiers and new recruits. Many of them were soldiers who had left the army but were forced to return. Hundreds of Price's men had no shoes. Most lacked basic gear like water bottles and ammunition pouches. They often used jugs for water and kept bullets in their pockets. Price hoped the people of Missouri would join him. But most Missourians did not want to get involved in the fighting. Only small groups of pro-Confederate fighters, called guerrillas, joined his army. About 6,000 of them joined in total.
The Union Army in Missouri had thousands of Missouri State Militia cavalry. These cavalry units were very important in stopping Price. The Union also had the XVI Corps led by Maj. Gen. Andrew Jackson Smith. Maj. Gen. Alfred Pleasonton's cavalry division also joined them.
When Price started his campaign, Smith's troops were on boats going to join General William Tecumseh Sherman in Georgia. But the Union commander, William Rosecrans, asked for these troops to be sent to Missouri instead. The Army Chief of Staff, Henry Halleck, quickly agreed. By mid-October, more Union troops arrived from Kansas. These were led by Maj. Gen. Samuel Ryan Curtis, who had fought Price before. Curtis commanded about 35,000 men in total. The Confederates were greatly outnumbered.
Key Battles of the Expedition
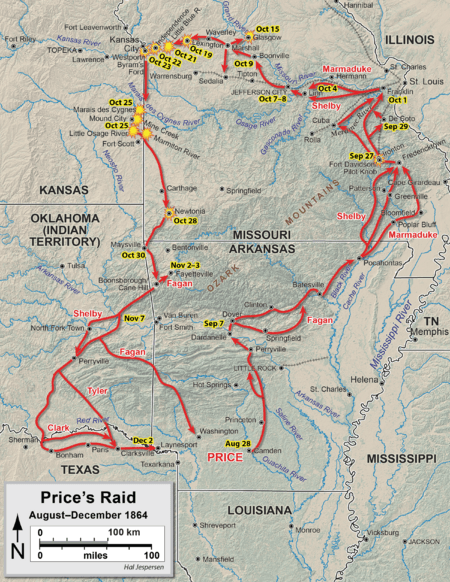
Price left Camden, Arkansas, on August 28, 1864. He met up with his other groups of soldiers in Princeton and Pocahontas. His combined army entered Missouri on September 19. Union militia groups in Missouri fought Price's army almost every day. But Price's first big battle was on September 27 at Pilot Knob, southwest of St. Louis.
Price's Missouri Expedition included these battles:
- Fort Davidson (September 27, 1864)
- Union Brigadier General Thomas Ewing Jr. learned Price was in Missouri. He moved his troops from St. Louis to Ironton to slow Price down. Price attacked Ewing's forces on September 27. He pushed the Union soldiers back into Fort Davidson. This fort was made of earth walls and wooden fences near a hill called Pilot Knob. Price attacked the fort many times in the afternoon. He lost many soldiers and a lot of ammunition. During the night, the Union soldiers quietly left the fort. They then blew up its powder storage with a timed fuse. Price took the fort, but it cost him many lives. This gave the Union time to gather their forces to stop his raid.
- On the same day, about 130 miles northwest, a group of pro-Confederate guerrillas attacked the town of Centralia. This group was led by William T. Anderson, also known as "Bloody Bill." They killed 24 unarmed Union soldiers in what is called the Centralia Massacre. Frank James and Jesse James were with Anderson. Because of these events, Union troops moved to St. Louis. Price saw that St. Louis was too well defended. So, he turned west toward Jefferson City. He later found that the capital was also too strong. He went around it and continued west toward Kansas City.
- Glasgow (October 15, 1864)
- Price sent some of his troops to Glasgow. They were led by Generals Shelby and John Bullock Clark Jr.. Their goal was to capture weapons and supplies. The Confederates attacked Glasgow on October 15. They forced the Union defenders back to their forts. The Union commander, Colonel Chester Harding, surrendered. He managed to destroy some supplies. But Price's men found muskets, coats, and army horses. The Confederates rested in Glasgow for three days. Then they rejoined the main army marching toward Kansas City. This win and the captured supplies made Price's army feel better. But Price's delay in Glasgow gave the Union armies time to join forces and plan how to defeat him.
- Lexington (October 19, 1864)
- Price's army moved slowly west. Union Major General William S. Rosecrans wanted to trap Price. But he could not reach Major General Samuel R. Curtis to make a plan. Curtis was having problems because many of his soldiers were Kansas militia. They refused to fight in Missouri. Finally, a force of 2,000 men under Major General James G. Blunt went to Lexington, Missouri. This was about 30 miles east of Kansas City. On October 19, Price's army reached Lexington. They met Union scouts and guards. The Confederates quickly pushed them back. They then fought the main Union force. The Union troops fought hard, but Price's men pushed them through the town. They chased them until nightfall. Without Curtis's full force, Rosecrans could not stop Price. But he did slow down Price's march. Blunt also learned important information about Price's army.
- Little Blue River (October 21, 1864)
- On October 20, Blunt's retreating troops arrived at the Little Blue River. This was about 8 miles east of Independence. The Union force prepared to fight the Confederates again. They had a strong defensive spot on the west bank. But Curtis ordered Blunt to go back to Independence. He left only one group of soldiers under Colonel Thomas Moonlight at the Little Blue. The next day, Curtis changed his mind. He ordered Blunt to take his soldiers back to the river. As Blunt arrived, he found that Moonlight's group was already fighting Price's lead soldiers. They had burned the bridge as ordered. Price's main army had arrived and was fighting Moonlight's men. Moonlight's soldiers bravely guarded every river crossing. Blunt immediately attacked, trying to push Price back. A five-hour battle took place. The Union troops forced the Confederates back. But the Confederates had more soldiers. The Union soldiers were forced to retreat. The fighting then moved to Independence itself.
- Independence (October 21–22, 1864)
- As Blunt's forces moved west toward Kansas City, they went through Independence. Here, Union soldiers tried to cover their retreat. They fought Price's oncoming troops in the city streets. Fierce fighting happened all afternoon. The Union soldiers were slowly pushed back. On the night of October 21, Price camped just west of Independence. He had taken the city. But he was also being chased by 10,000 Union cavalry. These were led by Maj. Gen. Alfred Pleasonton. Pleasonton caught up with Price in Independence the next morning. Pleasonton crossed the Little Blue River and attacked the city from the northeast. This hit Price from behind as he tried to continue west. Two of Price's groups were badly beaten. They were pushed back through the city. Another Confederate group tried to stop the attack. But they were almost completely destroyed by Pleasonton's force. Still, the Union did not win a full victory in Independence. Marmaduke's group fought Pleasonton about 2 miles west of town. They managed to push the Union soldiers back and hold them until the morning of the 23rd. The fighting then moved west from Independence to Westport.
- Byram's Ford (October 22–23, 1864)
- The Battle of Byram's Ford had two separate fights. One was on October 22, and the other was on October 23.
- As Price got closer to Kansas City, he learned that General Curtis's Union army was gathered around Westport. They were blocking his way west. Also, Pleasonton's cavalry was pushing Price from behind. Price had almost 500 wagons with him. He needed a good place to cross the Big Blue River to get his supplies safely across. Byram's Ford was the best crossing point. So, it became very important during the fighting around Westport. On October 22, Blunt's Union group held a defensive spot on the Big Blue's west bank. Around 10:00 a.m., parts of Shelby's group attacked Blunt's men from the front. The rest of Shelby's men went around Blunt's defenses. This forced the Union soldiers to retreat to Westport. Price's wagons and about 5,000 cattle then crossed the Big Blue River at Byram's Ford. They headed south to temporary safety.
- The second fight at Byram's Ford happened on the 23rd. It was part of the big Battle of Westport happening nearby. Confederates under Marmaduke now held the west bank of the Big Blue. They wanted to stop Pleasonton from attacking Price from behind. Pleasonton started his attack on Byram's Ford around 8 a.m. At first, the Confederates held their ground. Despite some problems, Union troops crossed the river by 11 a.m. and Marmaduke retreated. Price now faced two Union armies. One was in front of him, and one was behind him. Each army had more soldiers than Price's tired force. The outcome of the Battle of Westport was clear, even though the fighting continued until that evening.
- Westport (October 23, 1864)
- Price decided not to retreat south. Instead, he chose to fight Curtis and Pleasonton one at a time. Pleasonton was coming fast after the fighting in Independence. So, Price decided to attack Curtis's army at Westport first. Then he would deal with Pleasonton. But Curtis had strong defensive positions. Price attacked many times during the four-hour battle. But he could not break the Union line. Once Pleasonton crossed the Big Blue River at Byram's Ford, Price's fate was sealed. His army retreated south through Kansas toward Arkansas. Pleasonton's cavalry chased them. Price's army never recovered. This battle, later called "the Gettysburg of the West," ended Price's campaign. It also ended all remaining Confederate hopes west of the Mississippi River.
- Marais des Cygnes (October 25, 1864)
- Three battles happened within a few hours on October 25. The first was the Battle of Marais des Cygnes.
- Price was now in a full retreat. Pleasonton chased him into Kansas. He caught up with the Confederates as they camped by the Marais des Cygnes River. This was near Trading Post. Pleasonton's men attacked fiercely after an artillery bombardment. Price ordered his troops to cross the swollen river. He left Fagan to hold off the Union soldiers until his wagons could cross. The Union captured two cannons and several prisoners. But they could not stop Price's army from escaping. Pleasonton continued to chase Price. He caught up with him again later that morning at Mine Creek.
- Mine Creek (October 25, 1864)
- About 6 miles south of Trading Post, two Union cavalry groups caught up with Price's Confederates. Price's wagons were stuck trying to cross the swollen Mine Creek. So, his soldiers formed a battle line on the north side of the creek. Even though they were outnumbered, the Union cavalry attacked. One soldier said they burst upon the Confederates "like a thunderbolt." Price's line fell apart "like a row of bricks." The Union's stronger firepower and fierce attack made up for their smaller numbers. Pleasonton's cavalry forced Price to retreat again. About 600 of Price's men and two of his generals were captured. Six cannons were also taken.
- Marmiton River (October 25, 1864)
- Price continued his retreat toward Fort Scott, Kansas. In the late afternoon of October 25, his supply wagons had trouble crossing the Marmiton River. Just like at Mine Creek, Price had to stop and fight again. Brig. Gen. John McNeil, leading two Union cavalry groups, fought Price's rallied troops. Many of Price's men were unarmed. McNeil saw the large Confederate force. Not knowing many were unarmed, he did not attack with all his strength. After about two hours of fighting, Price started his retreat again. McNeil could not chase them effectively. Price's army was now completely broken. The only question was if he could escape and how many men he could save.
- Newtonia (October 28, 1864)
- The tired remains of Price's army stopped to rest about 2 miles south of Newtonia, Missouri. Soon after, Blunt's Union cavalry surprised the Confederates and attacked them. Many of Price's troops were running away. But Joseph Shelby's group, including his "Iron Brigade," rode to the front. They got off their horses and fought the Union soldiers. This allowed the remaining Confederates to retreat toward the Indian Territory. Brigadier General John B. Sanborn then arrived with more Union soldiers. This convinced Shelby to pull back. Union troops had again forced the Confederates to retreat. But they failed to destroy or capture them. This was the last battle in Price's Missouri campaign.
What Happened After the Raid
Price wanted to avoid Fort Smith, Arkansas. So, he went west into the Indian Territory and Texas. He finally returned to Arkansas on December 2. He had lost more than half of his original 12,000 men. This included thousands of the guerrillas who had joined him.
Price reported that he "marched 1434 miles, fought 43 battles and skirmishes." He also said he captured and released over 3,000 Union officers and men. He captured 18 cannons and destroyed Missouri property worth $10,000,000.
However, Price's Missouri Expedition was a complete failure. It helped President Lincoln get re-elected. It also showed that the Union was winning the war in other places like Virginia and Georgia.
Another result of Price's raid was that it mostly cleared Missouri of pro-Confederate guerrillas. Almost all of those who joined him were either killed or left the state with him. Price's Missouri Expedition was the last Confederate attack in the Trans-Mississippi region during the war.
Why the Raid Failed
Major Dale E. Davis wrote a paper about Price's Missouri Expedition. He said the raid failed because Price could not properly use "compound warfare." This is when a weaker army uses both regular soldiers and unofficial fighters (like guerrillas) together. This strategy was used by the North Vietnamese against the French and Americans in the Vietnam War.
Major Davis also said Price moved too slowly during his campaign. He also kept the unofficial Confederate fighters too close to his main army.
He noted that Price wasted time, ammunition, and men attacking places like Fort Davidson and Glasgow. This gave Union General Rosecrans time to plan a strong response. Also, Price insisted on guarding a growing train of stolen supplies. This became a burden during his retreat.
Davis believed Price should have used the Confederate guerrillas to bother Union forces. This would have made the Union send many troops to chase them. This would have left fewer Union soldiers to fight Price's main army. Instead, Price kept many guerrillas close to his army. He even put some of them into his regular groups. This made them less useful because they lost their speed and ability to fight in small, independent groups. This allowed the Union generals to gather enough soldiers to trap and defeat Price at Westport. This ended his campaign, forced him to retreat, and crushed one of the Confederacy's last hopes in the Civil War.
Images for kids
See also
 In Spanish: Expedición de Price a Misuri para niños


